Mar 27, 2020

iPhone Recovery Mode Not Working? Fixed!

iPhone recovery mode can be used to resolve some software glitches on your iPhone device. For example, if you can't update or restore your iPhone, you can put your device in recovery mode and then restore it by using your computer. However, the recovery mode itself sometimes is not available. If you come across such an issue, you can read the post and get 4 possible solutions to make it work again.

1. Update iTunes App

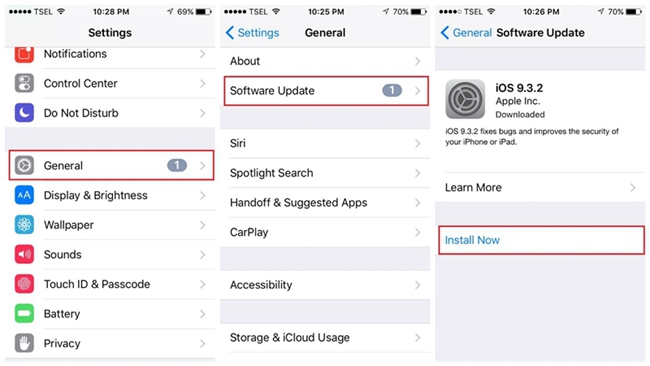
This can be a simple solution to iPhone recovery mode not working problem. Sometimes all iOS issues can be easily fixed by updating the iTunes program version. The following is the quick steps.
update itunes
For Windows, open iTunes and go to the Help on the top menu bar > Check for Updates > Install. If your iTunes program is downloaded from Microsoft Store, it will be automatically updated.
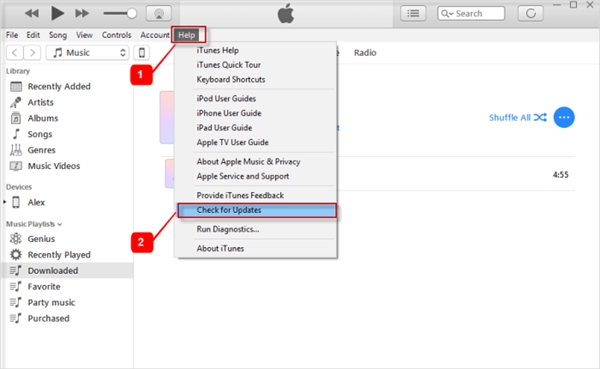
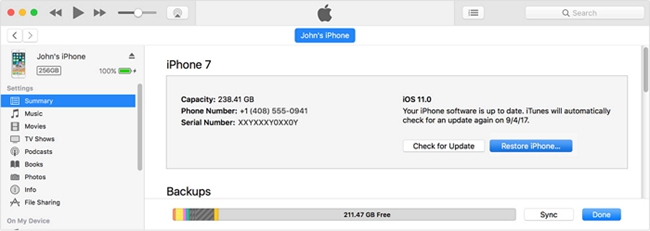
For Mac, launch the iTunes app and navigate to Updates. If there is an iTunes update available, just click on Update.

Tip 2. Force Restart Your iPhone

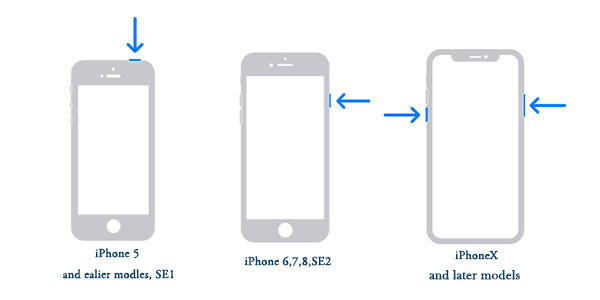
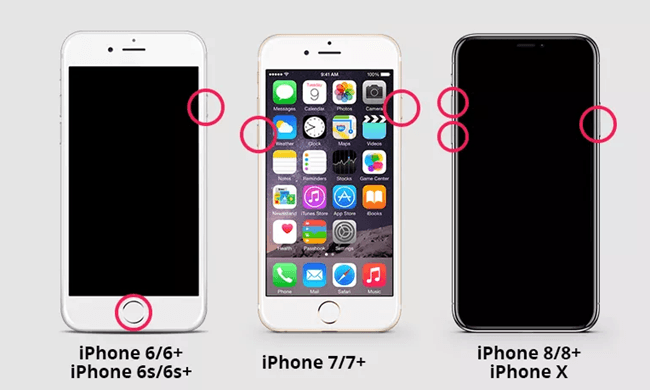
If your iPhone recovery mode not working still exist after updating iTunes, you can then try to force reboot your device. This can resolve most minor problems with iPhone. Different models have different procedures, yet it is still simple to operate. Here it is:
force restart ipad
For iPhone 8, X and newer series, press the Volume Up button and then quickly release it. Do the same for the Volume Down button. Then hold the Power button until the Apple logo is visible.

Tip 3. Use DFU Mode Instead of Recovery Mode

If your iPhone recovery mode does not work when you try to use it to repair your device software problem, you can still use another mode named DFU Mode to fix the iOS problem. DFU is short for Device Firmware Upgrade, which can be used to fix serious software-related problems on your device. So it can be an effective option to recovery mode. However, putting iOS device into DFU mode is much difficult and many users have reported that they failed to do so. Besides, the data on the device might be lost. Anyway, if you don't mind you still have a try.
Step 1. Launch the latest version of iTunes on your Mac or PC computer. Use a USB cable to connect your iPhone to the computer.
Step 2. Manually put your device into DFU mode. When it succeeds, you will see a message on your screen, saying "iTunes has detected an iPhone in recovery mode".
Step 3. Click the OK button and then press the Restore iPhone button to confirm your action. Wait a while until the process completes.

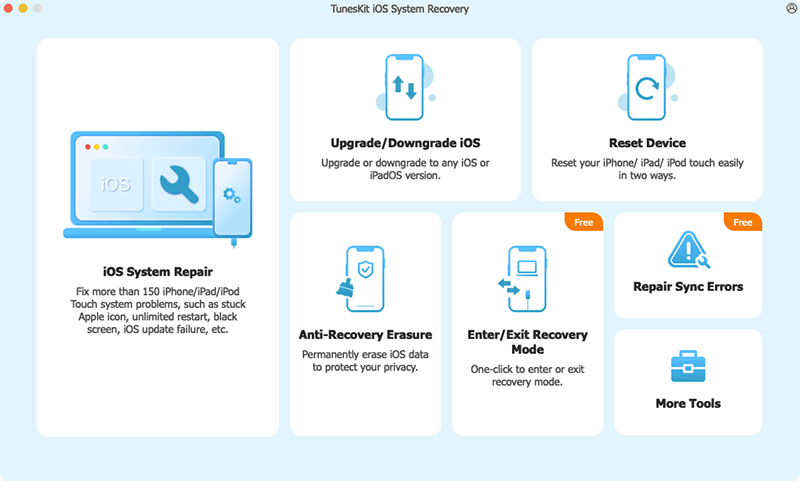
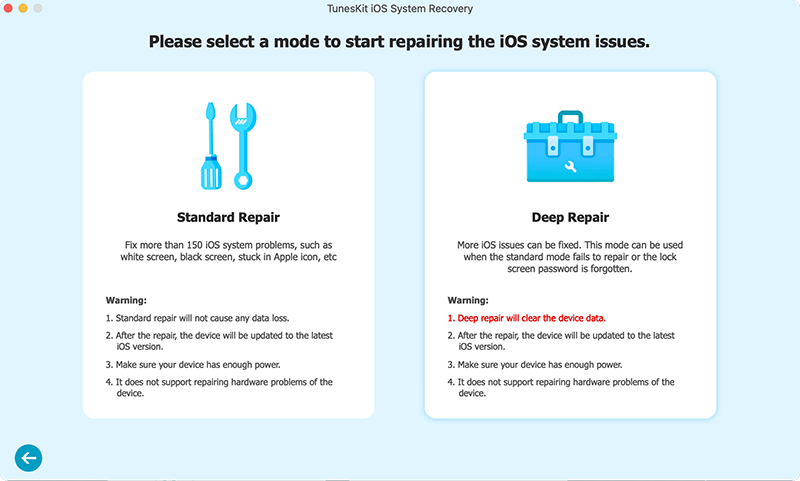
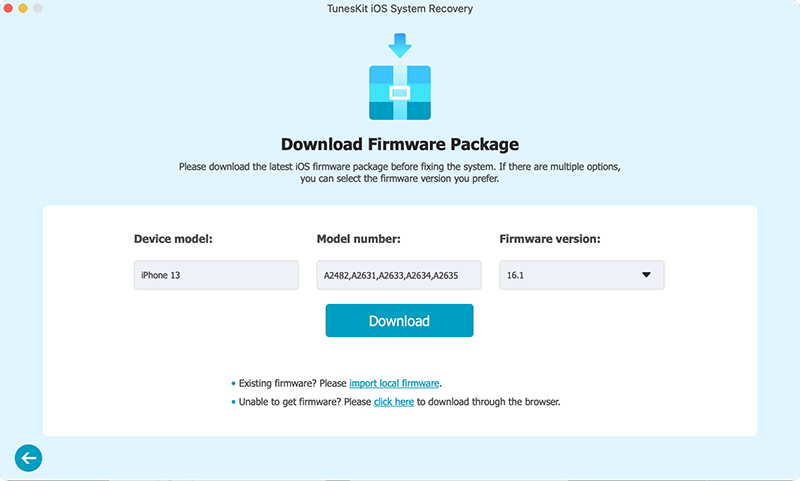
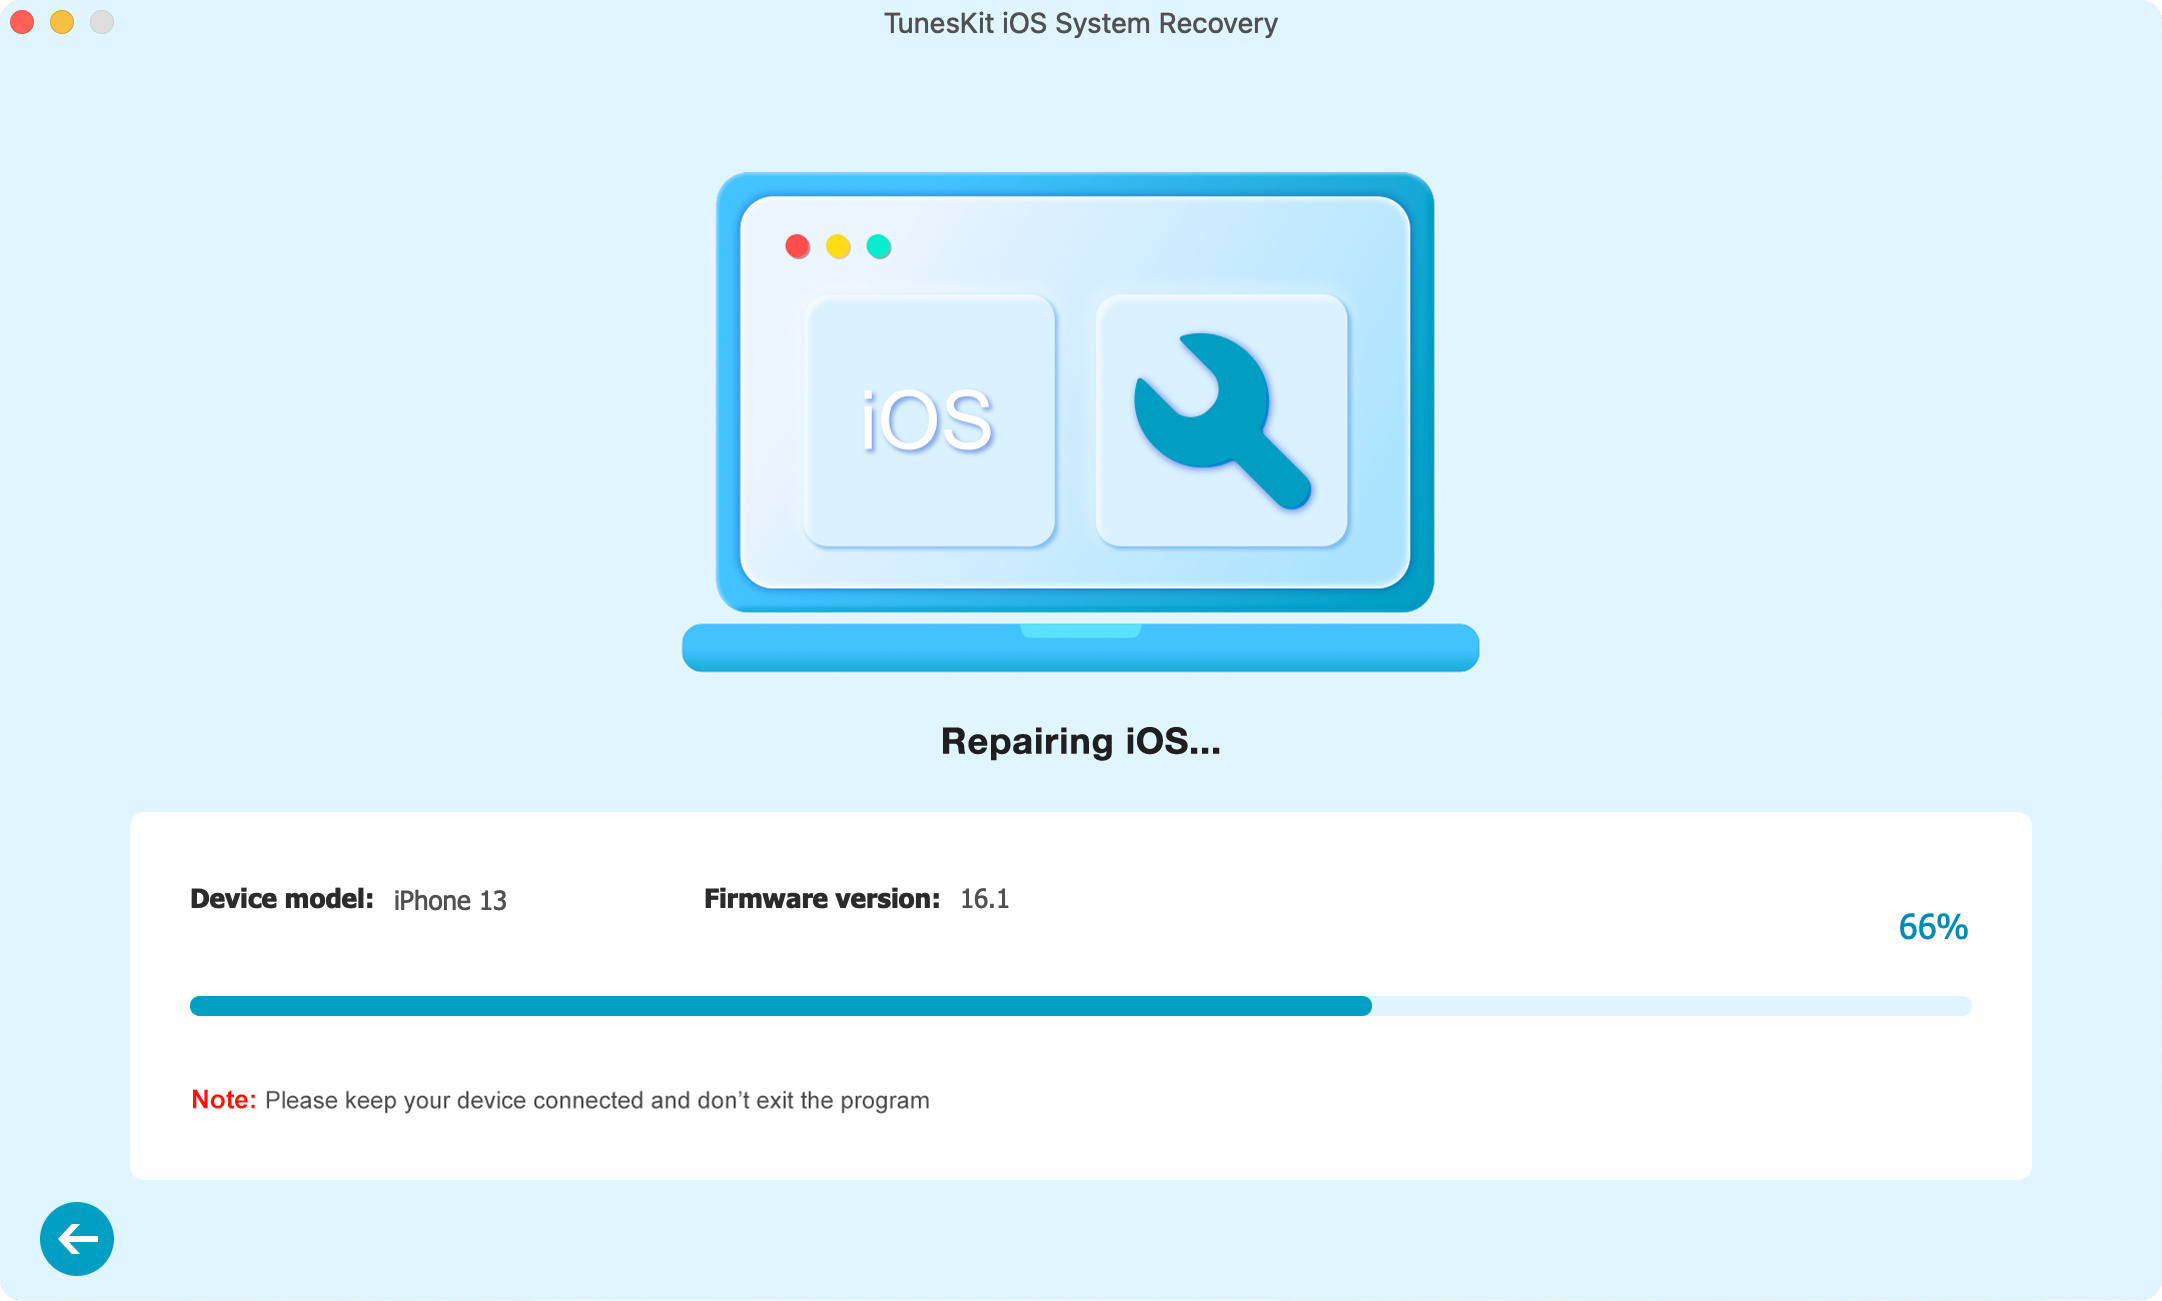
Tip 4. Use TunesKit iOS System Recovery Instead of Recovery Mode

As mentioned above, if you use DFU mode to fix iPhone, iPad recovery mode doesn't work, you're in a big risk of losing the data on your device. So if you don't want any data loss, you can try this iTunes alternative - TunesKit iOS System Recovery.
It is a professional iOS repair tool that is able to fix over 30+ types of iOS problems, which covers almost all issues that recovery mode can resolve, including iPhone recovery mode not working problem. Moreover, you can use this program to put iPhone into recovery mode in one click for free. In addition, this program allows users to repair iOS problems without data loss in a few clicks only.
Now follow the simple steps below to effectively fix iPad/iPhone recovery mode not working issue with TunesKit iOS System Recovery.
connect ios device
Step 1. Open TunesKit iOS System Recovery on your computer after finished installation. Connect your iPhone or iPad to the computer with a USB cable. Click the Start button on the main interface once it's recognized by the software. Choose the Standard Mode and click on the Next button to proceed.
select standard mode to repair without data loss
Step 2. Check the device information and manually correct it if there is wrong info detected. Next press the Download button and ask TunesKit to download the related iOS firmware package and then verify it.
confirm information
Step 3. When the download is done, click on the Repair button and the program will start fixing the iPhone recovery mode not working issue. Wait for the process to complete and you can then use your device as usual.

fix iphone recovery mode not working
If you want to learn more, you can visit the source page: https://www.tuneskit.com/ios-repair/ipad-iphone-recovery-mode-not-working.html

Mar 18, 2020

How to Keep iTunes Rentals Permanently

Only iTunes movies offer you a chance to rent them instead of buying, which saves users a lot of money. No matter you're in the US or other regions, you're only given 30 days to keep your iTunes movie rentals. Moreover, you have to finish it within 48 hours once you start watching it. Do you want to keep iTunes rentals forever? This post will tell you how.

The tool you'll need:

To realize this purpose, you need to remove DRM from iTunes rentals and then convert rented movies to other common formats. TunesKit M4V Converter is the right tool that you're looking for. It's capable of stripping the DRM restrictions from iTunes rental movies permanently, so you can then freely save them on Mac or PC computer, iPhone or iPad, Samsung Galaxy, Surface Pro, Xbox One, and may other devices forever. Besides, TunesKit will preserve 100% original quality including Dolby 5.1 AC3 audio tracks, CC subtitles, etc. while converting iTunes rentals at 30X fast speed.

How to keep iTunes rentals forever

Step 1. Open TunesKit and import the rented movies from iTunes library
add itunes videos to tuneskit
Launch TunesKit M4V Converter application on the desktop and then press the "Library" button on the top menu bar to add the iTunes rental movies you want to keep forever to the program. You can also import your target iTunes video files by drag-and-drop.

Step 2. Set output format, audio tracks and subtitles
adjust output format and settings
When all iTunes movie rentals are loaded, you can select the audio tracks and subtitles for each film. Then click the "Format" button and a new window will pop up. Here you can choose an output format according to your needs. If you don't want any quality loss, MP4 (Lossless) under the HD Video is highly recommended.

Step 3. Start to remove DRM and convert iTunes rentals to MP4
convert itunes movies and keep forever
Once all the settings are done, you can then click the "Convert" button to let TunesKit start the conversion. Wait for a while and all the iTunes movie rentals will have no DRM restriction at all and be converted to MP4 format. You can then locate them on the "Converted" folder and save iTunes rental movies forever on a computer or any other device you like.


To learn more info about iTunes rentals, you can read this source page: https://www.tuneskit.com/reviews/keep-itunes-rentals-forever.html

You may also like:

Mar 6, 2020

Fixed: iOS 13 Camera Not Working

Last night, I found that my iPhone camera not working anymore after I updated to iOS 13.2. To fix the issue, I searched on the Internet and got some tips. Finally, my camera can work normally again. Now I want to share the methods for you if you're also suffering from the issue. 

Method 1. Check iPhone Storage

If your iPhone storage is almost full, there will be no more space for you to take photos. So you can first check your iPhone storage to see whether it's running up. Just go to the Settings app > General > About > Available to see if there is a suggestion showing 'iPhone Storage Almost Full'.
check iphone storage

Method 2. Close Camera App and Reopen

Sometimes, your camera app stops working is just because of the interference with other apps. So you can try to close the Camera app first and then reopen it.
close camera app
Step 1. Tap on the Home button twice (for iPhone models with Home button) or swipe up on the screen for a few seconds (for iPhone models without Home button), and you will see all the apps you've been using.
Step 2. Swipe to the left side and find the Camera app. Then swipe up on it to close the app. Open the Camera app again to see whether it works now.

Method 3. Reboot Your Device

Another simple method you can try to fix camera not working on iOS 13 is to reboot iPhone. It will close all the programs running in your device and give it a fresh restart. Different models have different procedures and the following is how.
restart iphone
For iPhone X and later, keep pressing the Side button and Volume Up (or Volume Down) button and release them until the slider to power off appears on your screen. Then drag the slider to turn it off. Next press the Side buttons for a few seconds and release it when you see the white Apple logo.
For iPhone 8 and former, the procedure is almost the same. The difference is that you only need to press and hold down the Top (or Side) button to command the slider or Apple logo appear.

Method 4. Force Restart iPhone

If the simple restart failed to resolve iOS 13 camera not working problem, you can then try to force restart it. This could be the most straightforward way to solve almost all iOS glitches. Now follow the quick guide below.
hard reboot iphone
For iPhone 8 and above, you can press the Volume Up button and release it quickly. Then do the same for the Volume Down button. Next press and hold the Side button until the white Apple logo is visible.
For iPhone 7 and 7 Plus, keep holding the Volume Down and Power buttons at the same time and release them once you see the Apple logo come out.
For iPhone 6s and earlier, press the Home and Power buttons simultaneously. Release both until the white Apple logo appears on the screen.

Method 5. Update iOS Version

If your iOS 13 is just the debug version for Apple developers, you can then try updating to the latest one, in which some issues may have fixed, such as iOS 13 camera and flashlight not working.
update ios version
Step 1. Open your iPhone and go to Settings > General > Software Update.
Step 2. Tap it and press Download and Install if there is any update available. Keep your device in full power during the process.

Method 6. Reset Your iPhone

At times, your camera not working problem may be caused by the settings on your device. You can try to reset the iPhone settings to get it fixed. It will not cause any data loss on the data loss, but we still recommend you to make a backup for your data in case of any accident.
reset all settings
Step 1. Open you iPhone and go to Settings > General > Reset.
Step 2. Tap the Reset All Settings and confirm the action.

Method 7. Restore iPhone with iTunes

If resetting iPhone settings has not solved the camera not working after iOS 13 update, you can then try to restore iPhone completely. This will cause data loss, so always remember to back up your important data before using this method.
restore iphone with itunes
Step 1. Open the latest version of iTunes app on your computer and connect your iPhone to it with a USB cable.
Step 2. Find your device and then go to Summary > Restore iPhone... Confirm the action and iTunes will start to restore your device and set it up as a new iPhone.

Method 8. Fix iOS 13 Camera Not Working without Data Loss

The last and efficient method recommended here is to use a professional iOS repair tool like TunesKit iOS System Recovery to fix your camera not working problem.
This program is a dedicated to help users solve all kinds of iOS problems on iPhone, iPad and iPod touch, such as iPhone/iPad stuck in recovery mode, Siri not working, won't update software, black screen of death, etc. Most importantly, it will fix the problem of the camera not working on iOS 13 without causing any data loss.

Step 1: At first, open TunesKit iOS System Recovery on your computer after finished the installation. Use an original USB cord to connect your device to the computer. Then click the Start button to begin and choose the Standard Mode on the next window.
connect iphone
Step 2: Next you can check your device info and correct it when you see some errors. Then click the Download button to download the required iOS firmware package for repair.
download firmware
Step 3: Once the download process comes to the end, you can click the Repair button and TunesKit will start the repair. Wait a while and your device will get fixed.
fix ios

All these are very simple methods. You can try them one by one. I hope your camera problem can be solved. Any experience or idea, you can share with me.