Jul 29, 2020

How to Fix 'Find My iPhone' Not Working?


'Find My iPhone' is an important built-in function on the iPhone. When you enable Find My iPhone on your device, Activation Lock will be turned on automatically. Your Apple ID and password will then be required before anyone can erase your device or reactivate it. Activation Lock is designed to prevent anyone else from using or selling your device. And your Apple ID and password is required if you want to turn off 'Find My iPhone' or erase your device. However, many Apple users recently reported that  'Find My iPhone' is not working on their iPhone for unknown reasons.

What's the Common Issues of Find My iPhone Not Working?

The most common issues they have encountered will be listed as followed.

  • Find My iPhone is greyed out
  • The location is not accurate
  • 'Find My iPhone' showing offline
  • Find My iPhone not sharing location
  • Has a server error

Why 'Find My iPhone' Not Working?

After a series of analysis, I come to a conclusion on why will Find My iPhone issues will happen. You can check to see if there are any problems with your phone in any of the following causes.
  • Doesn't have the correct Date & Time
  •  App incompatibility with the browser
  • iOS system hasn't updated or damaged
  • Weak or no network connectivity on your iPhone
  • The restrictions on your iPhone's settings
  • Weak or no GPS signals

How to Fix 'Find My iPhone' Not Working?

Here I will recommend you to use an iOS repair tool named TunesKit iOS System Recovery. Regarded as one of the best iOS repair tools in 2020, TunesKit can help you fix more than 50 iOS issues like Find My iPhone not working, iPhone call failed without data loss. It can also provide you the function like 1-click to enter /exit recovery mode for free, help you downgrade iOS system and fix iTunes error.

Here are the steps on how to use it.

Step 1. Open TunesKit and Connect your iPhone with Computer

First, you need to download TunesKit on your computer and then connect your phone to the computer via a USB cable. After your phone has been detected, press 'Start'.

Step 2. Select a Repairing Mode and Download Firmware Package


To fix 'Find My iPhone' not working, choose the Standard mode first.
Note: Standard Mode can solve the common iOS issues and repair the iOS system without any data loss. Advanced mode can fix more serious issues, but it will erase all data on your phone.


Next, confirm your device information and press 'Download'.

Step 3. Recover the iOS system

After the download process has finished, click the 'Repair' button and wait for your phone being recovered.

Conclusion

If you want to fix Find My iPhone efficiently and without any data loss, TunesKit iOS System Recovery will be your best choice. As a professional and multi-functional software, TunesKit can provide you the highest experience and improve the quality of your life. Why not download it and have a try?

If you want to learn more about all these tools, you can refer to the source page here: https://www.tuneskit.com/ios-repair/fix-find-my-iphone-not-working.html#for-part3


Jul 27, 2020

How to Download Music from Spotify Free

Spotify, one of the most popular music streaming services, has provided millions of songs for music lovers worldwide. If you're a Spotify user, you must know that it has offered two plans - Free and Premium. Free subscribers are allowed to listen to the songs with ads, but cannot download the songs for offline listening, while the Premium users can enjoy this feature. 

Do you want to download music from Spotify without upgrading to the premium plan? Here in this article, I will show you how to do that with ease. 


Tool Required: TunesKit Spotify Music Converter

To download Spotify music with a free account, what you need is a powerful 3rd-party Spotify downloader such as TunesKit Spotify Music Converter.

As a professional and handy tool for Spotify, it's specially developed to directly download any Spotify track, album, and playlist to the computer in lossless quality and super fast speed, with either free or premium account. By downloading the Spotify music as MP3 format, it enables you to listen to Spotify offline even without premium.

Tutorial: How to Download Spotify Music for Free

First of all, you need to download and install the TunesKit Spotify Music Converter on your computer. Then please simply follow these steps to begin free downloading music from Spotify for offline playback without Premium account. 

< Download TunesKit Spotify Music Converter for Windows >

< Download TunesKit Spotify Music Converter for Mac >

Step 1 Drag Spotify playlist to TunesKit

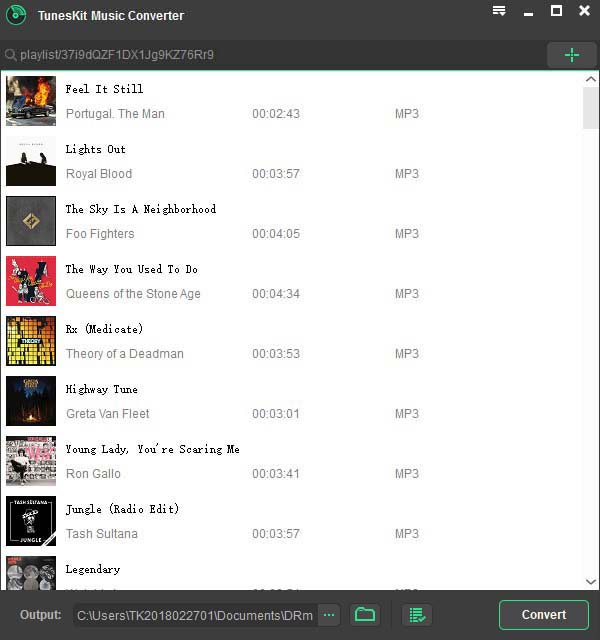
add spotify music

Firstly, launch TunesKit Spotify Music Downloader on your PC or Mac. Upon launching, it will load Spotify desktop app automatically. After that, you can log into your Spotify account and simply drag any track or playlist from Spotify store to TunesKit downloading interface. Or you can paste the track links to the search box to add the songs.

Step 2 Choose output settings

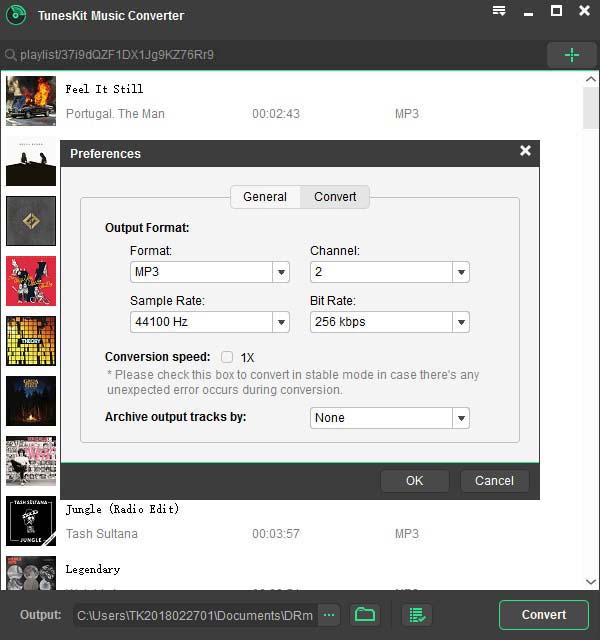
set output profile

Click top right menu > Preferences to set the basic parameters of the output files, including output format, output quality, bit rate, etc. TunesKit Music Converter for Spotify now supports output formats as MP3, AAC, FLAC, M4A, M4B and WAV.

Step 3 Start to download Spotify songs for free

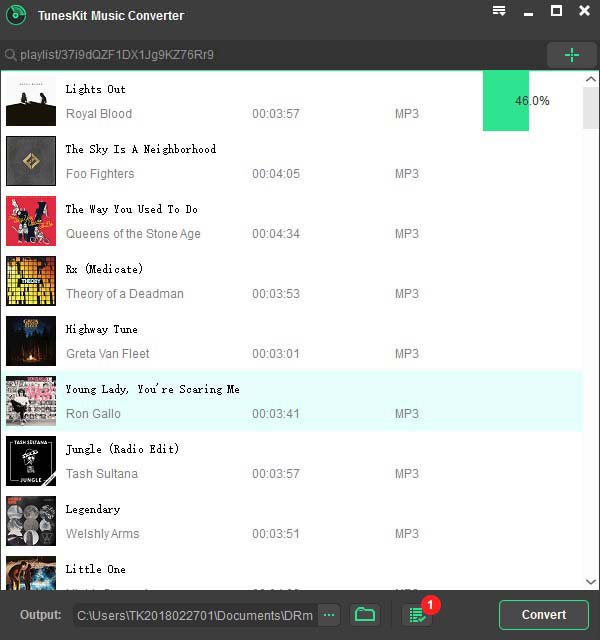
download spotify music free

Now click the "Convert" button and the program will begin to download Spotify music free and convert them to the desired format as you like. Once the conversion completes, you can share or save the songs everywhere without limit.

Conclusion

So, now you know how to download music from Spotify for free. Actually, TunesKit Music Converter for Spotify can help both free and premium users download songs from Spotify and save as MP3 format. Unlike Spotify premium downloading features, now you can listen to the Spotify tracks on any device or player without the internet. 


Jul 22, 2020

Instagram Stories Not Working on Your iPhone? Fixed!


Q: Hi everybody, I'm having trouble with the Instagram stories not giving me all the features people seem to have gotten a lot of time ago(polls, gifs, etc). I have an iPhone and my app and iOS have been updated to the latest version. I mailed the Instagramsupport twice but got no reply.. someone have this problem also? How can I fix it? Thank you all.From Reddit

Some Apple users recently have reported that their Instagram stories not working and they don't know how to fix their problem successfully. If you also encounter the same problem with the question above, don't worry, here we will provide you 8 best solutions to fix your problem.

Solution 1. Uninstall and Reinstall Instagram

There is a chance that the Instagram stories not working is because of the bugs on the Instagram software, so you can try to uninstall and reinstall the software to fix your problem.

Step 1. Tap and hold the Instagram app icon on the home screen until it wobbles

Step 2. Tap the X on the application to delete it. Instagram will save your photos and profile information.

Step 3. Go to the App Store and reinstall Instagram, then log in with your account and password.

Solution 2. Update Instagram to the Latest Version

And you should also make sure that Instagram has been updated to the latest version. Here are the steps on updating this software on the iPhone.

Step 1. Go to the 'App Store' and then tap on the 'Update' at the bottom of the page.

Step 2. You can choose the 'Update All' button or scroll down to find the Instagram below and update it individually.


Solution 3. Reset Your iPhone

You can recover your iPhone back to normal by restarting your iPhone temporarily. Here are the detailed steps on restarting.

Step 1. Press the button to which the blue arrow points according to the picture below until your phone's interface appears a slider.

Step 2. Drag the slider and wait for 30 seconds to turn off your phone.

Step 3. Press the button shown in the picture again to turn on your phone.

Solution 4. Check the Network Connection

If rebooting the device fails to fix the problem, try using Instagram over Wi-Fi and a mobile data connection to check if the problem is caused by a weak signal. If the network connection is very poor on your iPhone. You can go and change another Wi-Fi or try to reboot your data connection when it is not working properly.

Solution 5. Check the Date & Time Settings

It is also necessary for you to make sure that the time and date on your iPhone/ iPad are set correctly. Here are the detailed steps to correcting them.

Step 1. Go to 'Settings' > 'General' > 'Date & Time'

Step 2. Select your time zone

Step 3. Change the correct date and time

Solution 6. Check the Storage Space and Clear the App Cache

If the space of your iPhone is insufficient, there will also cause some problems with the apps. Clearing the Instagram app cache shouldn't make any difference to loading Stories so it is worth trying.

Step 1. Go to 'Settings' > 'General'

Step 2. Click on 'iPhone Storage' to check how much space is left.

Step 3. Once all the storage and data has loaded, scroll down to find "Instagram." You should see the apps' total size.


Solution 7. Update iOS System on Your Phone


You should also update the iOS System in your phone by doing the following steps. Go to 'Settings' > Find 'General' > Tap 'Software Update' > Choose 'Install Now'.


Solution 8. [The Optimal Choice] Use iOS System Repair Tool

If you have gone through all the above steps and still can't fix Instagram stories won't work, here I will recommend you to use the TunesKit iOS System Recovery software which can help you effectively fix more than 50+ iOS issues without any data loss and the complicated operation of backing up. It can fix many iOS issues like iPhone echo problems, iPhone safari not working, stuck on the white Apple logo, 'iPhone is disabled. Connect to iTunes' error, etc.

In the next part, we will show you how to fix Instagram stories with TunesKit iOS System Recovery steps by steps.

Step 1. Open TunesKit and Connect your iPhone with Computer

First, you need to open TunesKit on your computer. Then connect your phone with computer via a USB cable. After your phone has been detected by your computer, press 'Start'.

Step 2. Choose a repairing mode and Download firmware package

Here are two modes you can select. Standard Mode can solve the common iOS issues and repair the iOS system without data loss. And the Advanced Mode can fix more serious issues but it will erase all data on your phone. To fix Instagram stories issues, you should select Standard Mode first.
Then you need to confirm your device info is correct and press "Download" to download the firmware package.

Step 3. Recover the iOS system

When recovering, make sure your iPhone keep connecting with your computer.
TunesKit can fix all the iOS issues without any data loss. It also provides you the function one-click to enter/exit for free. It will also help you downgrade iOS and fix iTunes error like iTunes error 54, iTunes error 39.

Conclusion

Here are all the 8 best solutions to fix iPhone Instagram Stories not working. You can follow the steps above one by one to fix your problem. If you still have any questions on fixing this issue with the tips above, you can leave your comment below, we will try our best to help you.

If you want to learn more about all these tools, you can refer to the source page here: https://www.tuneskit.com/ios-repair/fix-instagram-stories-not-working.html 


Jul 13, 2020

Top 8 Tips to Fix iPhone Won't Restore Issue


Usually, when we have a system problem with our iPhone, the experts advise us to put the phone in recovery mode and reinstall the phone. There are two ways to reinstall your phone. The first one is to restore the iPhone from an iCloud backup, and the second one is to restore from iTunes' backup.
However, some people will find that their iPhone won't restore in recovery mode. When they try to restore with iTunes, they might also see these messages on their computer: 'The iPhone [device name] could not be restored', 'An unknown error 9/ 4005/ 4013/ 4014 occurred'.
So if you also have the same problem, don't worry, this tutorial will help you analyze the reasons why this situation will occur and give you the full guide to fix your problem. Let's get started.

Why My iPhone Won't Restore? 

Have you ever had an iPhone won't charge? This situation mainly appears when your iPhone disconnects with the computer during the update or restore or your computer couldn't tell your device to restore. Here are some of the factors contributing to this problem.
1. You haven't updated the iTunes to the latest version
2. Some bugs on your computer
3. The iOS system hasn't been updated
4. The iOS system issues on your iPhone
5. The USB cable has been damaged
6. The poor network connection
7. The blocking of the third-party security software
These are the common triggers of your iPhone won't restore. In the next steps, we will provide you some effective tips to fix it completely.

How to Fix iPhone Won't Restore Successfully?

We have listed the 6 most effective tips to fix the iPhone cannot restore the issue right here. Read on and learn how to fix iPhone won't the restore by doing the following steps one by one.

Tip 1. Check your USB cable

If you want to restore your iPhone with iTunes, you need to connect your phone via a USB cable. So if the USB cable has been damaged, you will not connect your iPhone to the computer successfully. You have better check your USB cable or replace it with another one to have a try.

Tip 2. Check your network connection

If you restore your iPhone with iCloud, you should make sure that your phone has been connected with Wi-Fi or cellular data. Therefore, you need to go and check the network settings on your iPhone. Or you can try to change another Wi-Fi or use the cellular data. If you find your network doesn't work, you can try to fix this problem by resetting the network settings.
To reset network settings, you should go to 'Settings'> 'General'> 'Reset'> 'Reset Network Settings'.


Tip 3. Update iTunes to the latest version

Make sure that your iTunes has been updated to the latest version by clicking the 'Help' button on the top of the menu. Then click 'Check for Update'.


Tip 4. Reboot your computer

Then you can try to reboot your computer to fix the bugs in your computer after updating iTunes to the latest version. If you are using a Mac, you should click the 'Apple' button at the upper-left-hand corner of the screen, and click the 'Restart' button from the menu. If you are using a PC, you should click the Start Menu, and click Restart.

Tip 5. Update the iOS system to the latest version

If your iOS system has not been updated to the latest version, some system issues on your iPhone will not be recoverable. Here are the steps to update your system.

Step 1. Got to 'Setting'> Find 'General'
Step 2. Tap 'Software Update'
Step 3. Choose 'Install Now'


Tip 6. Reset your iPhone

Before resetting your iPhone to factory settings, you must back up your data first for this action will erase all the data on your phone.
To reset your phone, you should do the following steps.
Step 1. Go to 'Settings'> Find 'General'.
Step 2. Press 'Reset' at the bottom
Step 3. Tap 'Erase All Content and Settings'.


Tip 7. Remove the third-party security software

If you have installed some security software that runs in the background of the computer, you must have a check whether this kind of anti-virus software stops you from syncing.
You'd better quit this software before starting syncing. You can also change your security software's setup and see whether the iPhone could not be restored issue has been fixed.

Tip 8. [The optimal choice] Fix iPhone won't restore with TunesKit

If your problem still can't be fixed after doing the 9 tips above, there is likely something wrong with your iOS system. Here I will recommend you to use a powerful system recovery software named TunesKit to help you fix it. With TunesKit, all the iTunes errors like error 9, 4005, 4013, 4014 you meet can be easily fixed without any data loss. 
Regarded as the best iOS repair tool in 2020, TunesKit iOS System Recovery can fix more than 50 iOS system issues like iPhone won't restore, iPad won't charge, iPhone won't download the app with easy three steps. It is more than an iOS repair tool. It can also help you downgrade the iOS system and provides the function 1-click to enter/exit recovery mode for free. So you don't have to do the complicated process of backing up and can fix your problem easily.

Here are the detailed steps on fixing your problem with TunesKit.

Step 1. Open TunesKit and Connect Your iPhone to PC
Open TunesKit on your computer. Then connect your phone with computer via a USB cable. After the computer has detected your phone, press 'Start'.


Step 2. Select a repairing mode and Download firmware package
To fix iPhone won't restore, you should choose Standard Mode first.


Note: Standard Mode can solve the common iOS issues and repair the iOS system without any data loss. Advanced Mode can fix more serious iOS issues but it will erase all data on your phone.
Then, confirm your device info is correct and press 'Download' to download the firmware package.


Step 3. Recover the iOS system
After your firmware package has been downloaded, click the 'Repair' button and wait for the recovering process finished.


As you can see in the 3 steps above, TunesKit iOS System Recovery is a multi-functional and professional iOS repair tool. It's very easy to operate, so you can fix the problem by yourself without asking help from any technical specialist. More functions are waiting for you to explore, why not download it and have a try?

Conclusion

Here are all the top 8 tips to fix iPhone won't restore issue. We really hope you can make a clearer understanding on how to fix this issue with TunesKit after reading these instructions. If you still have any trouble, please don't hesitate to leave your voice below.

Jul 9, 2020

Quick Guides to Convert or Rip DVD to MKV

As DVDs equipped with high fax sound quality and can meet people's needs for large storage capacity and high-performance storage media, they are still popular among people and have been widely used in the audio/ video field. 
However, we can't directly convert or rip DVD to MKV. Because all the DVDs have the data protection system which will encrypt the DVDs and prevent people from copying it. And there are many also other copyright protection techniques commonly used in DVDs such as  CSS Scrambling System, Anti-analog device ripping, Region Goding. As a result, even we download it from our DVDs, we still can not play it on our computer, let alone converting DVD to MKV format with high quality. 
That's why TunesKit Video Converter comes here. No matter what kind of format you want to convert or rip from a DVD, TunesKit Video Converter can easily meet your needs, thus you are capable of play it the DVD on any portable and mobile device or share it to other platforms. While ensuring the quality of the converted video, TVC can also convert your videos to over 250 formats at 60X faster speed without data loss.  Regarded as the best video converter in 2020, TunesKit can also provide you other functions like merge videos into one, trim, adjust, plus effect, add watermark and subtitle, and so on.

The Detailed Steps on Convert DVD  to MKV

Next, I will teach how to use TunesKit Video Converter to convert DVD to Mkv steps by steps.
Step 1. Launch TunesKit and Press the button to add Target DVDs


Connect your DVD with your computer via a DVD driver. Then add your target DVD into the interface by clicking the button in the red frame.

Step 2. Customize Output Settings and Choose the format


Click "Format" > "Encoding mode"> "General Video" > "WKV"
Note: There are 2 converting modes you can choose. High-Speed mode allows you to convert videos to any format fast and lossless. Encoding mode gives you a chance to choose any format you want like MP4, M4V, MKV, MOV, and device like iPad, iPhone, Samsung.

Step 3. Start to Convert or Rip DVDs to Any Format


Press the "Convert" button


Note: You can find all your converted video in the third button on the top of the interface. And you can have a check there.
 

Key Features of TunesKit DVD Ripper:

  • Rip a DVD to in any format like MKV easily
  • Convert DVD or videos without quality loss
  • Edit DVDs with a built-in video editor
  • Convert over 250+ videos and audios
  • Easy of use with clear navigations
As it is a very professional and multifunctional software which can meet your diverse need easily, so what not download it and have a try?

Conclusion: 


Here are all the instructions on converting DVD to MKV format. If you still have trouble in doing the steps above, you can leave your voice below. Now, go and enjoy your favorite DVD videos or audios on your phone.

If you want to learn more about all these tools, you can refer to the source page here: 

Jul 2, 2020

Quick Guide to Rip a DVD and Upload it to YouTube


YouTube is one of the most famous and popular video-sharing platforms in the world. So If you're a YouTuber who loves to collect DVDs, you may want to upload and share some wonderful fragments of the videos in DVDs to your audiences. 

Sometimes, you will also need to clip some videos on DVDs and then edit or merge them into the effect you want, and upload them to your channel.
So here comes to a problem, how to rip a DVD and upload it to my YouTube channel? Don't worry, we will analyze the restriction on YouTube when uploading a DVD file and provide you the full guide steps by steps.

Something You Should Know

Before introducing how to rip DVDs to YouTube, there are some restrictions on YouTube you should know.
  • Intellectual property: Not matter what kind of forms of commercial videos, they can't be your commercial use. So you can't upload a commercial DVD completely without permission to YouTube for it's illegal to do.
  • YouTube supported formats: MPEG4, MPEG-PS, MP4, AVI, MOV, WMV, FLV, DNxHR, WebM, 3GPP, CineForm, ProRes, HEVC (h265). As a result, you can convert your DVD file into these 13 types of video formats and then upload it to your channels.

The Best Tool to Rip a DVD

What you need most is a professional DVD Ripper that can rip your DVDs into the formats that can be supported by YouTube.

If you are not familiar with the various video formats and don't know which one to choose, TunesKit Video Converter can be your optimal choice. It provides you the option that can automatically convert your video to the YouTube format, thus you don't need to set all the parameters like size and length suitable for YouTube by yourself, which is very convenient and easy to operate.

Regarded as one of the best video converter in 2020, TunesKit supports more than 250 output formats like MP4, MKV, MOV, AVI, etc, and 68+ output devices like iPhone, iPad, Apple TV. Meanwhile, it is more than a DVD to YouTube converter. TunesKit also lets you edit your video files like trimming, cutting, add special effects, and watermark to make your videos more wonderful.

Key Features of TunesKit DVD Ripper:

  • Rip a DVD to in any format supported by YouTube
  • Convert DVD or videos without quality loss
  • Edit DVDs with a built-in video editor
  • Convert over 250+ videos and audios
  • Support more than 68 output devices
  • Easy of use with clear navigations

The Full Steps to Rip and Upload a DVD to YouTube Channel

The following section is the step-by-step guide for converting and uploading DVD to YouTube by using TunesKit.

Step 1. Open TunesKit and Add Your Target DVD files
You should connect your DVD with a computer via a DVD driver. Then after your DVD files have been detected, add your target files by clicking the first button in the red frame or dragging the files into the interface.

Step 2. Customize Output Settings and Choose the format
Click 'Format'> 'Encoding mode'> 'Web video'> 'YouTube'

Note: High-Speed mode can convert videos to any format fast and lossless. Encoding mode gives you a chance to select any format you want like YouTube, Facebook, Vimeo, etc.
Step 3. Start to Convert or Rip DVDs
Press the 'Convert' button to rip your DVDs files to the format you set.

And you can find all your converted video by clicking the third button on the top of the interface. So you can have a check after finishing converting.

Step 4.  Upload DVD Video to YouTube
Then your last job is to upload the converted videos into YouTube sites and let people enjoy them.
  1. Upload your YouTube
  2. Define your video is 'Public' or 'Private'
  3.  Click on the arrow to upload your DVD video and wait for it to finish
 

Video Demo: How to Rip a DVD and Upload it to YouTube Site?


Conclusion

Here are all the steps on how to rip and upload a DVD to your YouTube channel. If you want to be a famous YouTuber, you will need a multi-functional tool to help you. And TunesKit can provide you wonderful experience and improve the quality of your videos. So why not download it and have a try?


If you want to learn more about all these tools, you can refer to the source page here: https://www.tuneskit.com/video-converting-tips/convert-dvd-to-youtube.html