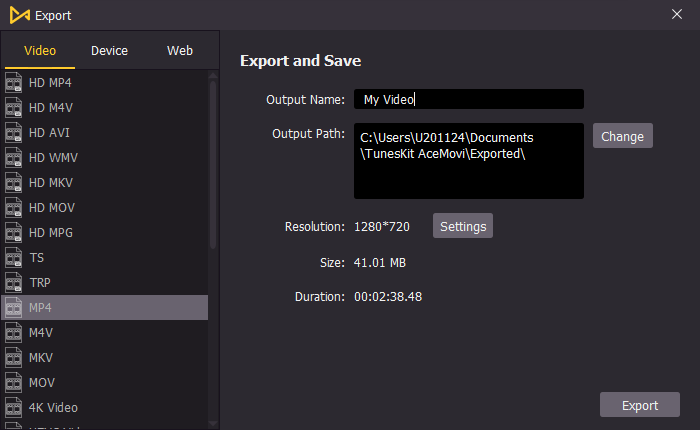
Mar 31, 2021

TunesKit AceMovi V3.0.0 Released to Provide More Editing Features

Hong Kong, March 31, 2021TunesKit AceMovi Video Editor has been upgraded to the V3.0.0 with more powerful features. Meantime, the developer still spare no efforts to keep the program simple and easy to operate.

Videos now have increasingly become an indispensable part of our daily life, instead of images and texts. With the development of mobile technology, everyone can easily shoot a video on a smartphone. Creating and editing a video is not the thing that only professional video editors will do, especially when there are a lot of easy-to-use video editing tools emerging. TunesKit AceMovi is such a wonderful video editing application with an intuitive interface, making everyone edit a video like a pro.

"To make the tool more powerful that experienced editors will love, and meanwhile we still strive to keep it easy-to-operate. It's a little difficult task for us," said Henry Ramon, the Product Manager of TunesKit. "But we made it! By constant test and heard from numerous customer's experience, the upgraded AceMovi now is more accessible to most users, with no technical skill required and no steep learning curve."

What's new in TunesKit AceMovi V3.0.0

1. Freeze Frame: It's now quite easy to freeze a video or audio to emphasize an action or add some captions.

2. Speed Adjustment: Apply this feature to speed up or slow down a video or audio clip in order to create dramatic effects.

3. Enrich Effects: Add some special effects like magnify, mosaic, blur, sharpen, etc., and you can now easily blur a video or sharpen it, etc.

4. Snapshot: Take a snapshot from the video file whenever you find it's useful.

5. Canvas Undo/Redo: Support the undo and redo from the canvas.

6. Quick Guide: Add a quick guide for new users, which will be friendly and save time for learning.

7. Loading Progress Display: Every time when you reopen the program, it will display the loading progress.

8. Preview Optimization: Optimize the preview of the video, image, and audio resources

9. Performance Optimization: Optimize program features and fix some small bugs.

Pricing and Compatibility

TunesKit AceMovi V3.0.0 is available for Windows and Mac and is priced at $19.95 for a one-month license, $39.95 for a one-year license and $59.95 for a lifetime license. It is compatible with Windows 10/ 8.1/8/7/Vista/XP (64-bit/32-bit OS) and macOS v. 10.15 Catalina, v. 10.14 Mojave, v. 10.13 High Sierra, v. 10.12 Sierra, v. 10.11, v. 10.10, v. 10.9, v. 10.8.

About TunesKit

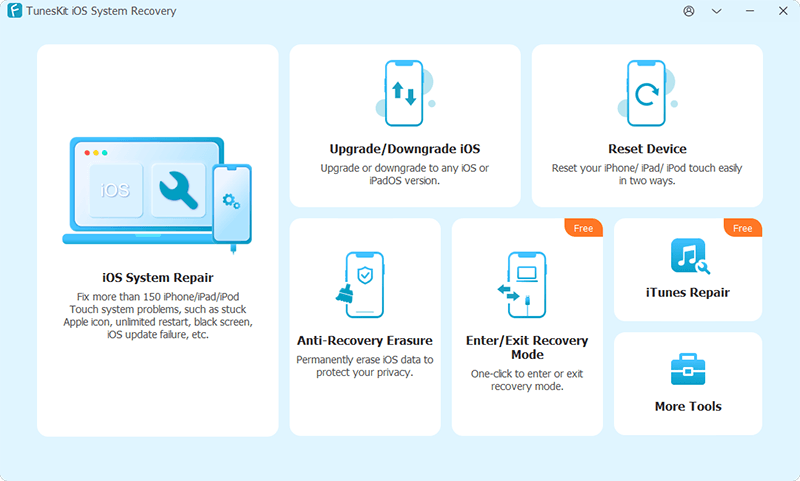
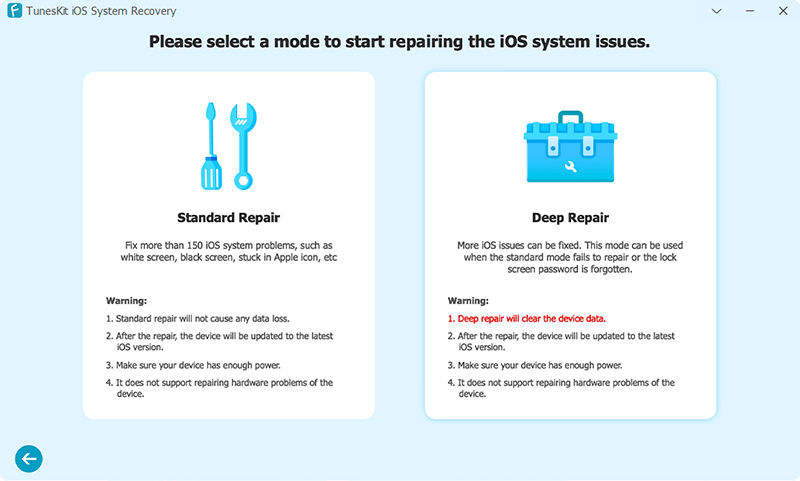
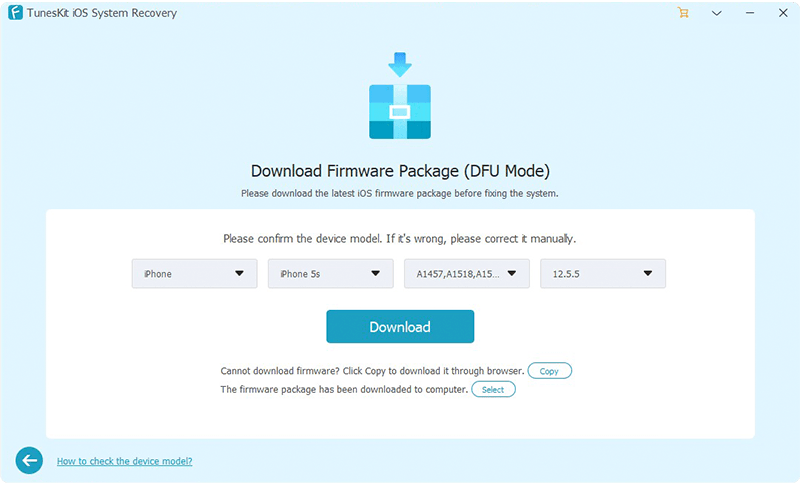
Founded in 2014, TunesKit Studio is a popular multimedia software provider. It offers high-quality multimedia programs and iOS utilities to help users worldwide enjoy digital life better. The products include AceMovi video editor, media converter, video cutter, screen recorder, iOS system recovery, iPhone data recovery, and so on. TunesKit programs have been trusted by millions of customers in 150+ countries all over the world.

This PR was first published on TunesKit official website

Mar 30, 2021

Easy Tutorial to Make a Video Slideshow

A well-made slideshow contains music, text, and transition. Can we make a video slideshow like that? If you are trying to make a video slideshow but don’t know how to, you are here at the right place. In this way, I’m going to show you some easy ways to make a video slideshow.


TunesKit AceMovi Video Editor

TunesKit AceMovi is a comprehensive video editing software. You can not miss it if you are trying to make a video slideshow. As a professional video editing software, making a video slideshow just one of the essential features. TunesKit AceMovi Video Editor can help you add subtitles, add music, add stickers, crop videos, etc. Besides, you can do professional editing without expertise requirements.

Step 1. Install and open TunesKit AceMovi Video Editor

image

This is the main interface of TunesKit AceMovi Video Editor

Step 2. Import your video file to TunesKit AceMovi Video Editor  

You can click the File, Import Media button to import your media file, or you can drag and drop your video file to the media box. TunesKit AceMovi Video Editor supports importing most of the video or photo formats.

image

Step 3. Drag the target videos to the track

image

When you are going to make a video slideshow, what you need to do is drag the target media files to the track in order, or you can press Ctrl+A to select all the videos and drag them to the track, they will play in the order you placed them.

Step 4. Add transitions between videos

image

The standard video slideshow you have finished, but adding some transitions between the videos can make your videos switch smoothly. Click the Transition button, choose the one you like, and drag it to the video. You can adjust the transition on the top-right interface. There are more than 1 transitions you can add to the whole slideshow.

Step 5. Add split-screen to the video

image

Split-screen is a wonderful feature for you to make a video slideshow. Click Split Screen, and there are so many effects for you to choose from. Drag it to the place you want and a new window will pop up. In this window, you can add videos so that they can play simultaneously. You can transform the flip, rotate, position, scale, and so on of each video you add to the split-screen.

Step 6. Add music to the video

image

An excellent video slideshow is always with nice music. You can use the import feature to add music to the slideshow, or you can click the Audio button to drag the music to the track from the TunesKit music library. Also, you can adjust the music on the top-right interface.

Step 7. Export your video

image

Done all the steps, you can click the Export button to export your video slideshow. You can change the output name, location, resolution, and format in this window. When the export process is done, you can enjoy your video slideshow. TunesKit AceMovi Video Editor is a multifunctional software for users to unleash their creativity. If you are a beginner who is trying to create or edit videos, TunesKit AceMovi is the one you can’t miss.

Animaker (online)

image

Animaker is an online tool for you to create video slideshow easily. You can find it the interface is concise. You can add videos to this website by the Uploads button. What you need to do to create a video slideshow in Animaker is just add the videos to it and drag them to the track in order. In addition to this, Animaker offers plenty of useful features for users. You can use the features to make your slideshow pleasing to the eye. As an online tool, Animaker contains fewer features but you can create your video slideshow as soon as you open the website.

TunesKit AceMovi Video Editor is a nice software and you you can download it for free. Though Animaker can make a video slideshow online, the limitations are obvious.

Read More: TunesKit

Mar 25, 2021

Listen to Audible Audiobooks without a Membership

 Audible audiobooks are very popular among audiobook lovers. But it is expensive if listeners subscribe to Audible every month. Can we listen to Audible audiobooks without a membership? This passage will tell you 3 methods.

Audible Free Trial

If you are new to Audible audiobook, then you are qualified to try Audible for free for 30 days and get an audiobook for free. This is really generous considering that each audiobook costs over $10 on average.

1. Go to the Audible website on a computer.

2. Navigate the categories to find the audiobook. Audible includes fiction, fantasy, romance, kids, comedy, history, business, and so on.

3. After finding the book you want, just click the "Free with 30-day trial" button, it will prompt you to login with your Amazon account.

4. The first book is free, so it won't charge you any extra money. But it requires you to input a payment method to confirm your account.

5. After getting the free book, you will own it forever and you can cancel the Audible subscription so that it won't charge you in 30 days. 

Whispersync Deals

Whispersync for Kindle is the service that allows users to switch back and forth between reading a Kindle book and listening to the audiobook version without losing the last place after buying both the eBook and audiobook from Amazon. This offers the best way for us to enjoy books.

Besides, Amazon wants to promote Whispersync, so you can buy the books which support Whispersync to save money. Normally if you buy two books together from the Whispersync page, the total price will be less than buying only 1 version. And it doesn't require a subscription.

There are two ways to buy Whispersync books. The first way is that you can go to the Amazon Matchmaker page, it will automatically check the audio version counterparts of the eBooks. If you haven't bought any books yet, you can also buy the eBook and audiobook together. Else if you have already bought the audiobook, you can try the other way to go back to your Audible library page to find and buy the eBook counterpart.

Normally Whispersync works automatically. After purchasing, you just need to download both eBooks and audiobooks to your devices and start to read or listen to them.

Daily Deals

Audible offers great audiobook daily deals on their official website at the lowest price which is much lower than paying with a credit. You might pay attention to the daily deal section on the page. Also, you can subscribe to it by email so that you won't miss any best offers.

1. Go to the Daily Audible daily deal page, and you will see a book each day on a big promotion.

2. If you are interested in a book, you can click the 'Buy' button to buy it directly.

3. Else if you are simply don't like the books of this day, you can click 'Sign up here' to receive the email of other deals every day.

4. Once you find a book you like, you can buy it from the daily deal page to save big without an Audible membership.

More Tips about Audible Audiobooks

These are the best ways to help you save money when buying Audible audiobooks without a subscription. Also, as for the audiobooks you bought, though you can enjoy them on most devices with the audible app, you have to authorize them due to the protection. There could be a big annoyance if you have multiple devices or you switch devices often. To avoid the trouble of keeping authorizing devices, you can also use the great TunesKit Audible Converter to help you convert Audible audiobooks. This converter can help you convert Audible on Windows phones, LG TV, or any device after converting them to MP3, AAC, WAV, and others.  

1.     Import Audible files

You just need to drag and drop to add the Audible audiobooks. TunesKit software requires no account or membership to convert Audible audiobooks.

2. Set output format as MP3

After adding the Audible books into the TunesKit conversion window, simply click the "Format" icon to select the output format as MP3 which is a universal format. In addition, you can choose the output parameters such as bit rate, codec, pitch, volume, speed, and others.

3. Convert Audible files

Now you can begin to convert the Audible AA, AAX audiobooks to MP3 by clicking the "Convert" button. Once the conversion finishes, you can freely put the converted Audible books on any device without authorizing them.

Summary

These methods can help you save some money for listening to Audible audiobooks. For the last method, you can share the audiobook and also the fee with your friends to save money. Except for these, there are some free audiobooks in Audible.


For more: https://www.tuneskit.com/audiobook-tips/buy-audible-audiobooks-without-a-membership.html

Mar 24, 2021

Five Tips to Fix iPhone Ringer Not Working

"When my friends call me or send me a message, I could not hear ringing. What' s happening? Why and how to fix it?"

Actually, this is A common issue that the marjority of iPhone users have once reported. No one wants to ignore this problem, as people are not willing to miss important messages from others. Sometimes, it is because users turn on Do Not Disturb or Mute that the iPhone ringer fails to work well. But it may be caused by your broken iPhone Speaker. Or the device is stuck in headphone mode or encounters system glitches after software updates. 

Althought we can not find a certain reason, we can provide ultimate solutions for you. Therefore, if you are experiencing this issue, feel free to refer to this turtorial.

Fix 1: Adjust the Ringer Volume

As we know, the ringer volume is different from other sounds on the iPhone. Even if all other sounds are normal, the ringer may do not work when it really has a problem. Therefore, you may need to check if the ringer volume is too low and then make it louder. To adjust the ringer volume, just go to Settings > Sounds & Haptics > Ringer And Alerts. Then, you can drag the slider to the right to increase your ringer volume.

Fix 2: Turn off Do Not Disturb

If you make sure your ringer is not silent, you need to check if you turn on Do Not Disturb. If this button is on, you may discover that the iPhone ringer stops working. To turn off Do Not Disturb, two options are feasible.

• Go to Settings > Do Not Disturb. Then, tap the switch to turn it off.


• Open Control Center and find the moon button. Tap the button to turn it off. If the button is white, this means that Do Not Disturb is off.

Fix 3: Turn off Bluetooth

If your Bluetooth is on and connects to other devices, the iPhone ringer may be abnormal. To disconnect Bluetooth, you need to go to Settings > Bluetooth. Then tap the button to turn it off.

Fix 4: Use iOS System Repair Software

If you have tried all the above-mentioned solutions, you have found that these ways still cannot fix your iPhone ringer not working. This means your iPhone may need to have an update or the device has encountered system glitches. In this case, I recommend you to use effective and powerful iOS system recovery software. Although it is a third-party tool, this tool is designed to fix all of your Apple device issues.

TunesKit iOS System Recovery belongs to a desktop tool that is compatible with both Mac and Windows OS. If your iPhone ringer won' t work, TunesKit will promise a faster processing speed and higher success rate. Gnerally speaking, one of the main functions that TunesKit embraces is to fix your iPhone/iPad/iPod Touch/Apple TV suffering from system issues. For instance, when your iPhone is stuck on black screen, you can ask help from TunesKit. Besides, it can also downgrade your Apple device and let you enter/exit recovery mode with one click.

A step-by-step guide

Step 1: First, you need to launch TunesKit. Then, use a USB cord to connect your iPhone to your computer. Wait for several seconds and the software will quickly detect your iPhone. If detected, just click Start.
Step 2: Now, a pop-up window for you to select a mode will occur. Here, the Standard Mode is recommended, as the mode will not lead to any data loss. Then, click Next.
Step 3: TunesKit will let you download firmware package. Before downloading, you can check if the device mode is correct. If no problem, click Download. Wait for a while, and then click Repair to fix your iPhone ringer not working.

Fix 5: Factory Reset Your iPhone

As this method will erase all your data, you may need to take careful consideration if you choose to factory reset your iPhone. The factory reset is also another effective way to fix your unresponsive iPhone. If necessary, you may need to back up your iPhone data using iCloud or other tools. To factory reset your iPhone, just do this:

Go to Settings > Reset > Erase All Content and Settings. When a warning box appears, tap on Erase iPhone to factory reset your iPhone.

Conclusion

To fix iPhone ringer not working, you can follow the above-mentioned ways one by one. All in all, there is always a way out.

To get more details, please visit this article: https://www.tuneskit.com/ios-repair/fix-iphone-ringer-not-working.html

You may also like:

Mar 17, 2021

How to be a Skilled YouTube Video Creator? It can help!

Sometimes when we watched YouTube videos, we would like to make videos by ourselves. It is a wonderful experience for us that the imagination becomes a video and post it to YouTube to share with others.

But, how to create a video for beginners? As we all know that editing a video requires professional skills. If you had never used video editing software before, it will cost you a lot of time in learning professional skills.

The first step to becoming a YouTube video creator is to find a beginner-friendly video editor. An easy-to-use video editor will help you to become a better YouTuber. A well-made YouTube video not only for your interest but also could earn money for you.

Nowadays internet, users can download video editing software everywhere. Though it is free to use, it should be noted that if the software is abundant in functions and tutorials for users.

TunesKit AceMovi Video Editor is a powerful yet beginner-friendly video editing software. I recommend it for you because of its high-cost-performance, well-designed interface, and powerful features. With a nice video editor, making an imaginative video not a difficulty anymore.

This is the main interface of TunesKit AceMovi Video Editor. With these useful functions, users can unleash their creativity, and free to create a video. Drag the video from the computer folders that you would like to edit, or record your windows screen. Then, you can start to trim or merge your video segments.

Besides cropping videos, there are many features for users to make their video looks better.

Through this menu, users can add a background, edit audio, add subtitles, split-screen, add filter effects, add transitions, and add animations. These various functions can enhance the video you create and your video will look much more skillful than before. The most important is that they are very easy to use, all the operations can be done in some clicks.

TunesKit AceMovi Video Editor offers users numerous stock resources so that if you are going to add some effects, you have choices and you don’t need to be worried about how to find the wanted stock effects, AceMovi can meet all that you want.

The split-screen function allows users to play 2 or more videos on one screen at the same time. You just need to drag the videos toward different areas split. It is very easy to make it, isn’t it?

In this part, you can add transition effects between segments. After adding the transition effects, videos can look more lively. A video without any transition effects would be tedious.

Finish editing your video, you can export your video in any format and resolution you want. It is a convenient feature for those who use different devices.

Conclusion

As a video editing beginner, it must take time to practice how to create an interesting video. When we watching YouTube, we would prefer to subscribe to the YouTubers who make well-made videos. With TunesKit AceMovi Video Editor, you can add many advanced effects without the requirement of professional skill. Not only the software, the TunesKit website offers tutorials for beginners, click to read more about how to use TunesKit AceMovi Video Editor: 

https://www.tuneskit.com/video-editing-tips/

Let’s download TunesKit AceMovi Video Editor and enjoy your editing!


You may also like:


Mar 11, 2021

Listen to Audible Audiobooks on Chromebook

Compared with other laptops, Chromebook is lighter and more portable. Using a Chromebook to listen to audiobooks seems to be a nice try. But how to play Audible audiobooks on Chromebook? You can try my methods in this passage.


Install Audible to Chromebook

Some Chromebooks are compatible with Android apps such as the HP Chromebook 14 CB3, Samsung Series 5 Chromebook. For these Chromebooks, you can install Audible on them. To get started, you can update your Chromebook system first. Then you can follow the steps to sign in to the Google Play Store and install Audible to play Audible books.

1. Click the account photo and click 'Settings' button on your Chromebook.

2. On the Play Store section, find out and turn on the option 'Enable Google Play Store on your Chromebook'. Please note this option will only show on compatible devices.

3. Then follow the screen instruction to choose and accept the agreement and sign in to the Google Play account. After that, you can search for the Audible app and download it to your Chromebook.

4. On the Audible Manager, please sign in and then go to the library to download the Audiobooks and start listening.

Convert Audible AA/AAX to Chromebook

However, as aforementioned, some Chromebooks don't support the Android app, so you may not be able to use the solution above if you, unfortunately, got such an old one. In addition, Audible audiobooks are protected, and some possible server errors or lacking internet connection may cause you to fail to play Audible audiobooks. So, you can try the alternative solution to convert Audible audiobooks to common audio files by an audiobook converter from TunesKit.

TunesKit Audible Converter makes it easiest ever to convert any Audible audiobooks you throw at it. The converting speed could reach up to 100X and no other products come close to it. By using the latest deciphering technology, the audio files won't be touched during conversion so that the quality will be kept 100%. What makes it even better is that TunesKit offers a free trial version and 30 days money-back guarantee if the software doesn't work as advertised.


Tips to convert Audible audiobooks to Chromebook

1 Load Audible files

The best way is to drag and drop the Audible audiobooks from your computer folder to the TunesKit software main screen. If you haven't downloaded the Audible audiobooks yet, you can follow this instruction: How to Download Audible Audiobooks.

2 Set the parameters of the Audible audiobooks

The media files supported by Chromebook are WAV3PG, AVI, MOV, MP4, M4A, MP3, MKV, OGV, OGM, OGG, OGA, WebM, so please pick up one compatible format. MP3 is highly recommended.

3 Convert Audible files

When everything is ready, you can simply click 'Convert', TunesKit will convert your audiobooks. Depending on the number of files you convert, the time it takes may vary. But in general, it should be very fast.

4 Transfer converted audiobooks to Chromebook

After you converted the MP3 files, you can transfer them to your Chromebook via a USB flash drive and then open the media files by clicking the Files app and start playing them with ta media player.

Conclusion

Those are the two solutions to listen to Audible audiobooks on Chromebook. Check them and try them. Install Audible app or convert Audible to LG TV, PS4, Chromebook, or any other devices.

More details: https://www.tuneskit.com/audiobook-tips/listen-to-audible-books-on-chromebook.html

Top 6 Remedies to Fix Apple TV Could not Sign in

Now, Apple TV has grown into a popular device and widely used by people. It can receive digital data for visual and audio content and play it on a connected television.  But in some cases, this smart device will get stuck in some serious issues. Apple TV could not sign in is one of the issues. If your Apple TV fails to sign in, this will prevent you from watching your favorite TV shows or movies.  

To solve users' questions, here we sort out several ways to fix Apple TV could not sign in. If you are facing this issue, do not miss it and just keep reading. In this tutorial, you can always find a way up.

Fix 1: Restart your Apple TV 

To restart your device, just refer to the following steps:

• Press and hold the Menu and Home (for 3rd generation and earlier, tap Down) buttons on the Siri Remote until the Apple TV status light blinks rapidly;

• Disconnect Apple TV from the power outlet, wait five seconds, then reconnect it;

• As for Apple TV 4K or 4th Generation, just Go to Settings, choose System and then click Restart. But for the 3rd generation and earlier, just go to Settings > General > Restart.


Fix 2: Reset your Apple TV 

If restarting can not fix Apple TV stuck on could not sign in, then you may try to reset your Apple TV. To achieve this, you simply need to go to Settings > System > Reset. If you are using Apple TV 3rd generation and earlier, just select Settings > General > Reset.

Fix 3: Disable two-factor authentication

• Open the iCloud;

• Select Apple ID and then Password & Security;

• Turn off the 2-factor verification option and log into iTunes.

Fix 4: Use verification code

The issue may occur on older Apple TV, especially if you are using two-factor authentication. To fix it, you may follow the guide below:

• Get an iPhone/iPad and the Apple ID;

• Go to Settings > iCloud > your iCloud > Password & Security > Get Verification code;

• Next, enter the six-digit code.

Fix 5: Restore Apple TV with iOS system recovery software (No Data Loss)

If all the solutions above fail to help you, we guess your Apple TV may suffer more serious issues. In this situation, users may download a professional iOS system recovery software to fix Apple TV stuck on could not sign in. This kind of tool takes the success rate and effectiveness at its centers. Whenever your devices, it will deliver an impressive result.

Among different software, TunesKit iOS System Recovery can always take a leading place in the market. In general, it is can fix over 30 system issues of iPhone, iPad, iPod Touch and Apple Watch. In terms of the Apple TV problem described in this tutorial, TunesKit can fix it at a faster speed and ensure a higher success rate. Besides, TunesKit can also be an effective tool when your Apple TV is stuck on Apple logo, black screen, airplay screen, etc. 

A step-by-step guide:

Step 1: : When TunesKit is launched on your computer, you need to use a USB cord to connect your Apple TV to the computer. TunesKit will detect your device. Next, you need to tap Start. 

Step 2: Now, it is time to select a mode (Standard Mode is recommended). Next, just click Next. 

Step 3: The final step is to download the firmware package. Before downloading, you can choose to check the device mode to see if it is wrong and then click Download. The download process will not require a long time. When downloaded, you can click Repair to fix your Apple TV. 

Fix 6: Restore Apple TV with iTunes (Data Loss)

Using iTunes is another solution to fix Apple TV system issues. Resorting to iTunes to restore means that your Apple TV will be subject to factory settings and lose all data. To use this method, you need to download the latest version of iTunes on your computer. If necessary, you need to back up all of your data.

• Unplug the power and HDMI cables from Apple TV, and open the latest iTunes on your PC;

• Plug the Apple TV power cable back in (3rd and 4th generation only). If you have a 2nd generation Apple TV, leave it disconnected from the power source;

• Wait for some time to let iTunes recognize Apple TV. If the summary page appears, just select Restore Apple TV;

• After the restore process is completed, you can disconnect the Apple TV from the computer and power it on. This Apple TV is now restored to factory settings, and you can check if your Apple TV becomes normal.

Final Words

With all these thorough fixes, we hope that this article can give you a hint to fix Apple TV could not sign in. You can try these ways one by one. If using TunesKit, you can no longer need to leave your home to fix your Apple TV. The benefit is that this tool can fix your device stuck in any system issues at any time. 

Mar 9, 2021

How to Fix Twitter Not Working on iPhone

 Twitter not working on iPhone could result from various situations including the app itself, software or system glitches and poor internet connectivity. Do you have this problem? Well, in this problem-solving guide, we will introduce you some simple and advanced ways to get it resolved. 

Easy and Quick Fixes for Twitter Not Working on iPhone

1. Close out all of running apps

Apart from the Twitter app, closing out all other running apps is recommended. By doing so, you may fix the Twitter issue more effectively. To close out all of running apps, just follow the guide below:

• Double-press the Home button to open the App Switcher (for iPhone SE, iPhone 8 and earlier), or from the Home Screen, swipe up from the bottom of the screen and pause in the middle of the screen (for iPhone X and later);

• Use your finger to swipe up on the app’ s preview until it disappears from the App Switcher.

2. Clear cache and data on Twitter

To clear the cache and data on Twitter, you need to:

• Open the Twitter app and click the Me button in it;

• Click Settings > Data Usage > Media Storage one by one, then clear the cache;

• Next, choose Web Storage and clear the cache.

3. Update the app

To fix some app issues, software developers would release the updated version. Therefore, you may need to update the app to let it work normally.

To check if you have the latest version of Twitter, open the App Store and tap Updates to see a list of the apps that can be updated. If there’s an update available for the Twitter app, tap the blue Update button.

4. Delete and reinstall the app

If all of the three solutions above are not useful, you can try to delete and install a new Twitter for your iPhone.

To delete the app: From your home screen, press and hold your finger on the Twitter app icon. An x will appear in the top left corner and then tap the x. Next, Tap Delete.


To reinstall the app: Open App Store, tap the search tab at the bottom of your iPhone, and type in Twitter. Next, click Get and then Install.

Advanced and Effective Methods to Solve Twitter Not Working on iPhone

If the app troubleshooting solutions listed above cannot fix Twitter not working on iPhone, you may try the remaining methods below one by one.

5. Use an iOS system recovery software to repair without data loss

In some cases, the Twitter app itself does not have any issue, so there is a possibility that your iPhone system is in trouble. While iOS system recovery software is just used to repair your iOS system.

TunesKit iOS System Recovery is a well-known desktop software that can easily fix your Twitter not working on iPhone due to system glitches. Besides, the main function of this software is to fix your iPhone stuck recovery mode, white and black screen, or boot loop. Of course, if your other Apple devices including iPad/Apple TV/iPod Touch are stuck in similar issues, TunesKit can help you. And users do not need to worry about its reliability, as TunesKit will ensure 100% security.

Characteristics of TunesKit iOS System Recovery:

1. Fix Twitter not working on iPhone without data loss.
2. Repair different tvOS/iOS issues at home.
3. Fix iOS system issues at a fast speed.
4. Easy to use with friendly interface.

Step 1: Open Tuneskit and use a USB cord to connect your iPhone to the computer. If TunesKit detects your device, just click Start.


Step 2: Now, according to the software hint, select a mode (Standard Mode is recommended) and click Next.


Step 3: Lastly, you only need to download the firmware package. Wait for a while and then click Repair to fix your device.


Note: If you do not fix the issue, there is another Advanced Mode offered for you. But this may erase your data, so be careful that you need to back up your data before using this mode.

6. Power off and power on your iPhone

To restart your device, press the Power button (also Sleep/Wake button), and release the button when Slide to power off and the red power icon appear near the top of the screen. Swipe the icon from left to right to turn off your iPhone. Wait for a couple of seconds, and then press and hold the Power button until you see the Apple logo appears.

7. Update to the latest OS

When your iPhone may suffer from specific software issues, your device could be addressed by updating to the latest iOS version.

You need to tap Settings > General > Software Update. If you see an update, tap Download and Install.

8. Check internet connection

• Turn off and turn on WiFi: you can turn it off in the Control Center by tapping the WiFi icon. Or you may tap Settings > WiFi and then toggle on the button to turn it off. Wait for a while and turn it on again.


• Forget WiFi network: Tap Settings and then WiFi besides the WiFi network you want the iPhone to forget, tap more information (look like blue “ i ” icon), and then select Forget This Network. After you’ve forgotten the WiFi network, wait for a while and reconnect WiFi again.


• Connect a different network: Try to connect to a friend’s Wi-Fi network, or visit your local library, Starbucks, or restaurants to connect to free public WiFi.

• Reset network settings: Launch Settings > General > Reset. Then, choose Reset Network Settings and enter your passcode. (Before doing so, make sure your WiFi passwords are noted.)

Conclusion

Whenever the Twitter app won't work on your iPhone, you can check the real solutions from this tutorial. All the fixes are easy, but TunesKit is well-positioned to fix the Twitter app not working on iPhone quicker. So download TunesKit is not a bad thing, and it can help you whenever you have a need.