Dec 31, 2019

How to Listen to Spotify on Apple Watch without iPhone


Spotify, one of the largest music streaming services with over 40 million songs and 87 million paid subscribers, has finally released the first version of the Apple Watch app, which allows users to play Spotify music on their Apple Watch easily.

With this new application, users now can control Spotify tunes with wrists with ease now. You can play or stop any songs and podcasts on your watch. It also gives you a chance to skip any tracks or rewind any podcast by 15 seconds to catch something you just missed.

However, what makes users feel disappointed is that the first version of the Apple Watch app doesn't add support to play Spotify for offline listening. It means that you still cannot go for a run with just Bluetooth headphones, leaving your iPhone at home.

If you want to play Spotify on Apple Watch offline without iPhone, you can keep reading and we will provide you a great solution.

To solve the problem, you'll need TunesKit Spotify Music Downloader, an excellent Spotify music downloader and extractor which can not only download any track and playlist from Spotify but also remove DRM from Spotify music and convert the OGG Vorbis to MP3, AAC, FLAC or WAV, etc. with 100% original quality kept. With this solution, even if you are using the free Spotify account, you can easily download any Spotify track for offline listening on any Apple Watch series without iPhone.

How to Download and Stream Spotify Music to Apple Watch

Now you can install the free trial version of TunesKit Spotify Downloader on your Mac or Windows and follow the complete tutorial as below to learn how to download and transfer Spotify music to play on Apple Watch offline.

Step 1 Drag Spotify songs or playlists to TunesKit

add spotify songs
Open TunesKit Music Converter for Spotify and you'll notice the Spotify app is loaded automatically. Then log in to the Spotify account with your user name and password. Browse the store to find the songs or playlists you want to download to Apple Watch. Simply drag the tracks from Spotify to the TunesKit conversion window. You can also copy and paste the URL of the songs to the search box in TunesKit. Then wait for the songs to load into the software.

Step 2 Customize output songs

set output format
Click the top menu > Preferences. There you will be allowed to set the output audio format, bit rate, sample rate, etc. according to your own needs. In order to make the songs playable by Apple Watch, you are suggested to choose the MP3 as output format. For a stable conversion, you'd better check the 1X conversion speed option.

Step 3 Start downloading Spotify music

convert spotify songs
When finish customizing, simply click the "Convert" button to start extracting and downloading the Spotify songs as MP3. Once converted, you can click the "converted" icon to load the DRM-free Spotify tracks.

Step 4 Sync offline Spotify songs to Apple Watch


Now you can transfer the converted Spotify playlists to your iPhone. Then launch the Apple Watch app on your iPhone. Tap on Music > Synced Playlist, choose the Spotify playlists to sync. Once the sync's over, you can access them on your Apple Watch without carrying iPhone together.

This article is written by Adam Gorden, from TunesKit Software.

Dec 26, 2019

All I want for Xmas: A macOS Catalina Music app that doesn't suck


Is it childish to wish upon a star? To creep downstairs in the dead of night and shout your deepest desires up the chimney in the hope that Santa is out there, watching, waiting… anticipating? To write an article basically begging one of the world’s biggest companies to do something because you’d really like it to happen?
No. No it’s not. In fact, it’s actually a really mature, cool thing to do. Shut up.
So, here I go. All I want for Christmas is for Apple‘s software division to pull its fist out of its own anus and actually give us a macOS Catalina Music app that’s genuinely good.
Is that so hard, Apple? Is it? Is it?

First, some context

I’m not talking about the Apple Music streaming service, but the digital file library. Although you don’t hear about this from Apple very often, there must be millions and millions of people who still buy MP3s and have active digital music libraries.
Now, earlier this year, Apple took iTunes out to look at some rabbits, and then blew its brains out all over the grassy knoll.
I think I was one of the few people to really love and enjoy iTunes, so I found this news quite upsetting. Aside from the predictable nostalgic element of the death of iTunes, I was especially concerned that Apple would turn the macOS Catalina Music app into one long advert for the Apple Music streaming service.
Thankfully, this didn’t pan out as I feared.
But.. not everything was rosy. Why? Because the macOS ‘Music’ app is still basically iTunes, just with less stuff in it.
Now, I know what you’re thinking: “but Callum, you said you loved iTunes, why would you be unhappy that the new macOS ‘Music’ app is basically the same thing?”
Look at you smarty-pants, coming in here and pointing out the inconsistencies in my own article. Aren’t you special? Basically, I liked iTunes a lot, but that doesn’t mean I didn’t think it could be better. And once I’d seen that Apple hadn’t made the macOS ‘Music’ app worse, it seemed pretty ridiculous that it didn’t put ANY effort into making the software a superior music library.
Don’t worry though, Apple. Stop weeping. There there, it’s okay — because I have some ideas that’ll make the macOS Catalina Music app as good as it should be.

FLAC (and other format) support

Currently (and to my understanding), the macOS ‘Music‘ app only supports MP3, AAC, WAV, AIFF, and Apple Lossless files. This is… okay, but there are a raft of other audio formats out there that people prefer listening to. I’m not going to get into all that now, but at the very least there should be FLAC support.
This is the most common lossless (i.e. high quality) format and the fact that the Music app doesn’t support this is… ridiculous. This should be a fundamental characteristic of any music library.

Actually make the macOS Catalina Music app fast


There have been multiple reports of the macOS Catalina Music app being slow as a tar-covered turtle. Whether it’s the search, song selection, or a myriad of other things, the software is as far away from a slick experience as possible.
Honestly, a streaming service like Spotify seems faster than the macOS Catalina Music app. Apple, you need to strip this thing to the bare bones and make it lightning quick.

And sort out all the fucking bugs while you’re at it

Literally, no one wants music software that just randomly pauses. Or doubles tracks up in the library. All of which has happened to me.

Incorporate more flexibility into the software

This might go against the desire for less bugs, but it’d be great to have more flexibility with the macOS Catalina Music app. I know Apple‘s famous for making bits of software and hardware you can’t really tinker with, but it’d be amazing if it bucked the trend with this app.
What I’d really like to see would be a way you can drag-and-drop different elements onto the screen and make a truly customizable view. For example, having a little window that displays lyrics while a song is playing. Or two artist lists, so you can remain on one and still browse your library. Or an always-there equalizer with customizable settings.
There’s so much potential there, so many ways you could make something incredible that still has the feel of an Apple piece of software. Oh, any maybe we could introduce crazy, Winamp-style skins too?

winamp skin
An example from the brilliant Winamp Skins twitter account.
Actually, let’s not.

A smarter way of retrieving metadata

I know you can ask the macOS Catalina Music app to retrieve album artwork, but not only is it pretty poor at this, it should have the ability to pull a lot more metadata. In this day and age, how hard would it be to add lyrics to the track? BPM? The key?
The main desktop music app on Apple machines should be able to find accurate information for every track you drop it in. That shouldn’t be so hard.

Apple actually doing any of the above

It’s never gonna happen. Not even a bit of it. Unfortunately, Apple has completely abandoned the management of digital music as a priority. On one hand, this makes sense because it views the Apple Music streaming service as its main money maker in this space. But on the other, it fucking sucks.
I mean, how much is Apple making from people using its software to manage their own libraries of music? Apart from sales of devices, nothing. I’m glad that Apple hasn’t removed this functionality entirely from the macOS Catalina Music app, but it has been ignored for so long that even a few months of focus from a dev team could make the software thousands of times better than it currently is.

I’m not gonna hold my breath though.

This article is written by Callum Booth on TheNextWeb.
Source: https://thenextweb.com/plugged/2019/12/19/all-i-want-for-xmas-a-macos-catalina-music-app-that-doesnt-suck/

You may also like:
How to Get Free Apple Music Forever

Dec 24, 2019

An Easy Method to Transfer iTunes Movies to Vudu

Just like iTunes, Vudu is another online video streaming service owned by Walmart. It provides a huge library of movies and TV shows that can be purchased or rented by users. Some people may wonder how to move iTunes movies to Vudu for watching on Android device, since iTunes videos are protected by FairPlay DRM protection. Here I'd like to present an easy way to transfer movies from iTunes to Vudu.

As you may know, all iTunes movies and TV shows are DRM-protected by Apple, and you can only enjoy them within Apple's own ecosystem, that's why you can't move iTunes movies to Vudu directly. So, how can I move my movies from iTunes to Vudu? What you need is a third-party iTunes DRM removal tool such as TunesKit M4V Converter.

TunesKit M4V Converter is a professional iTunes media converter that is able to bypass the DRM protection from iTunes movie purchases and rentals, and then convert iTunes M4V video to MP4, AVI or other DRM-free video formats, so that you can easily watch them on Vudu. One highlight of this software is that it works at an amazing 30X faster speed while keeping almost 100% original quality, including AC3 5.1 Dolby audio track, subtitles, etc.

Step 1. First, choose the right version of TunesKit M4V Converter to download and install it on your PC or Mac computer. Simply open it and then click the "Library" button on the top to import the iTunes you want to transfer to Vudu. Make sure all your target iTunes movies have already been downloaded from iTunes store and can play well in iTunes.
add itunes movies
Step 2. Next you can choose the audio track and subtitle for each movie. Then click the "Format" tab to select an output format such as MP4 (Lossless) that has great compatibility for any device.
choose output format and remove drm
Step 3. Now click the "Convert" button and TunesKit will help you convert all added iTunes movies to MP4 format. You can then upload them to your Vudu account or play them on any device as you like.

For more solutions, you can read this post:
Top 3 Ways to Transfer iTunes Movies to Vudu

Dec 19, 2019

TunesKit Rolls out 2019 Big Christmas Sale: Up to 50% Off

Hong Kong, Dec. 19, 2019 - TunesKit, a professional multimedia software developer, has offered the biggest discounts of the year 2019 – an up to 50% off promotion, in order to celebrate the Christmas holiday with all registered or new users . The sale lasts only two weeks and won't end until January 3, 2020. See more details on the promotion page:
https://www.tuneskit.com/special/2019-xmas-sales/

The promotion includes a 50% off special offer, sales of most popular products and bundles for Christmas only. With only half of the original price, you can get the powerful TunesKit Audio Converter, an all-in-1 audio converter that is able to convert Apple Music, Audible audiobooks, iTunes audiobooks, and other common audios to MP3, AAC, FLAC and so on. It is available on the latest Windows and Mac systems.
As for other products, there are discounts ranging from 15% to 30%. To be specific, iTunes M4V Converter, Audio Capture, and Audible Converter will be sold at 20% off and the Spotify Music Converter only takes $25.46. With the help of these DRM removal solutions, watching an iTunes movie at home with family and friends in the cold winter day or playing Spotify music on the Christmas or New Year parties can’t be easier. Besides, users can also get an efficient iOS System Recovery at up to 30% off, which will help you fix iOS device glitches without data loss easily.
It’s a common sense that getting bundles can save you more money than getting the products separately. This is especially true for TunesKit’s “Christmas Only Bundles” because you can enjoy a super 35% - 40% discount during this Christmas season. Bundle of video and audio DRM solutions makes a lot of sense. By purchasing a bundle consisting of M4V Converter and any other audio related program, you can enjoy the best software with lowest price ever. Moreover, all deals on this promotion have no extra restriction, and users don’t have to share the page or do anything in order to get the discounts.
“We are celebrating this happy Christmas and we really appreciate the years-long supports from our users, so we hold this special event,” said the marketing manager, Andres Green. “TunesKit’s Christmas promotion is not limited to returning customers and also available to new users. This is the last chance of this year to get the useful software at such a favorable price,” added he.

About TunesKit

TunesKit Studio is a leading developer dedicated to providing multimedia and iOS solutions. In order to make your digital life easier, TunesKit keeps exploring the possibilities and expanding the field of its products. Besides the well-received DRM removal products, TunesKit also develops tools to help users recover iOS devices or data, record screen and audio, as well as cutting and merging video. You can find all the tools you need in this one-stop shop whether you want to unlock DRM from digital content, fix device glitches, or do video editing. By offering life-long free upgrades for all its products and prompt customer support, TunesKit received high reviews from millions of active users. All DRM products sold on TunesKit are home edition for personal use only.

Contact

Andres Green
Marketing Manager

E-mail: support@tuneskit.com

Dec 12, 2019

Why Is Siri Not Working?

As an intelligent persional assistant, Siri can be a good tool to make our life more convenient. For instance, we can ask her to make a call, send messages, set an alarm, etc. in a few words. However, there are always some times you cannot use Siri on your phone. So why is Siri not working? And how can I fix it? You can find answer in the following article.
Generally, Siri not working on iPhone can be caused by several reasons:

  • Some features are disabled or some restrictions are on.
  • The internet connection is no good.
  • There are some software-related problems on your phone. 

Part 1. Check Your Siri Settings First

If Siri is not working on your iPhone, you can do some checking first to make sure the feature can be normally worked on your device, according to the official Apple Support Team. So far, Siri feature can be used on iPhone 6S or later. If you're using other iPhone model, then Siri will not be available on it. If your device supports Siri, but it doesn't work, just keep reading and find solutions.

1. Is your Siri on?

First of all, please make sure your Siri feature is turned on. Go to the "Settings" > "Siri & Search" to have a check. Trigger the options for "Hey Siri" and "Press Side Button for Siri" ( for iPhone X or later) or "Press Home for Siri" (for iPhone 6s or later) if both are off. If they're on, you can toggle them to Off and turn them on again.

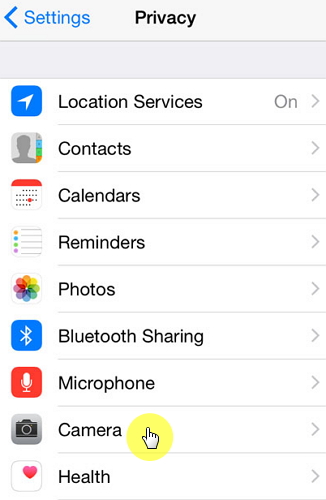
2. Is the restriction on for Siri?

If you cannot turn on Siri on your iPhone, you'd better check whether you have disabed Siri in Restrictions. For iOS 12 or later, go to the "Settings" > "Screen Time" > "Content & Privacy Restrictions" > "Allowed Apps" to make sure the "Siri & Dictation" is turned on. For iOS 11 or former, go to the "Settings" > "General" > "Restrictions" to have a check.

3. Are your microphones working?

When Siri doesn't respond after you ask her a question, she may not hear you successfully. At this time, you can remove your case and clear the microphones with a clean cloth. Then ask Siri a question to see whether she will respond. If not, try to connect an earphone to the microphone, and talk to her to see if Siri works.

4. Is your device muted or Voice Feedback turned off?

If Siri doesn't give your response, she may not hear you at all. Try to increase the volume level on your iPhone and speak clearly while you're talking to her. Next go to the "Settings" > "Siri & Search" > "Voice Feedback" to check and change how Siri should responds.

Part 2. Other Possible Solutions to Fix Siri Not Working on iPhone

After checked all the aforementioned problems and Siri is still not responding, you can then follow these useful tips below to fix it now.

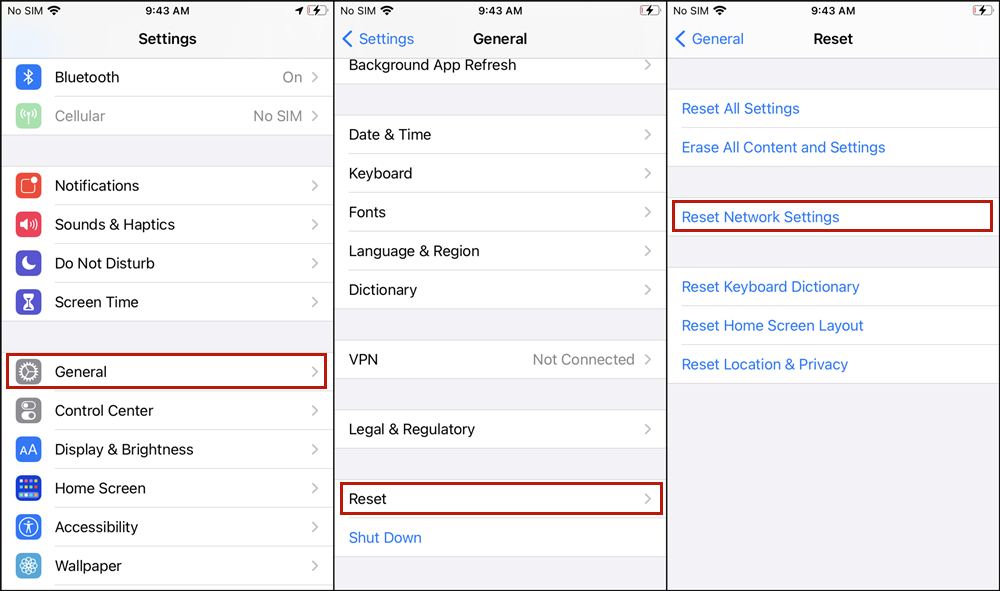
1. Reset the networking

If your device is not connected to the internet such as Wifi or cellular, Siri may not work well and would tell you that she's having trouble connecting to the network, please try again later. Check your internet connection and go to the "Settings" > "General" > "Reset" and tap the "Reset Network Settings" to have a try.
reset network setting

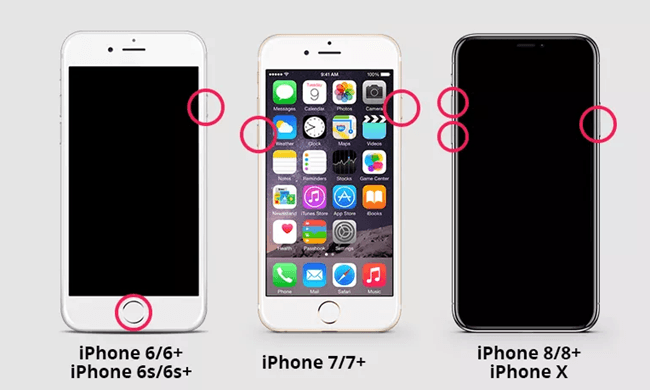
2. Force restart your iPhone

This might be the easiest way to fix most common problems related to iOS device and the method is also simple.
1) For iPhone 6s model, you can press the Home button and the Power button simultaneously until you see the Apple logo appear.
2) For iPhone 7 and 7 Plus devices, please press and hold the Power button and Volume Down button at the same time for at least 10 seconds until the Apple logo comes out on the screen.
3) For iPhone 8 and later models, press the Volume Up button and release it quickly and then do the same operation to the Volume Down button. Then press and hold the Power button until you see the Apple logo (Ignore it when you see Slide to Power Off).
hard reboot iphone guide

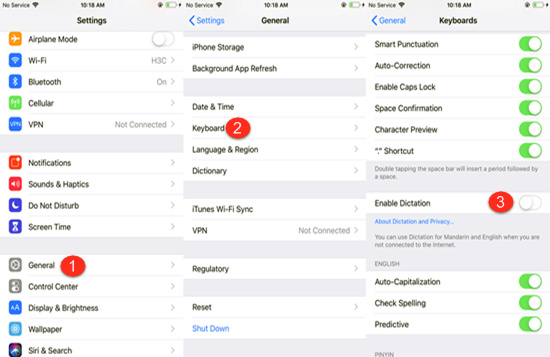
3. Restart iPhone dictaion

Sometimes Siri cannot hear your voice because the dictation function on your iPhone is not working. You can try to restart iPhone dictation to make Siri work normally. Go to the "Settings" > "General" > "Keyboard", and find the "Enable Dictation". Toggle it on or toggle it off and turn it on again.
reset iphone dictation siri

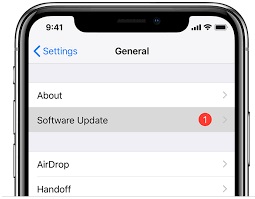
4. Update iOS version

If your Hey Siri not working on iPhone, you can update your iOS to the latest available version, and this may solve some unknown Siri issues. You can go to the "Settings" > "General" > "Software Update". Tab the "Install Now" button if there is an update available.
update ios version

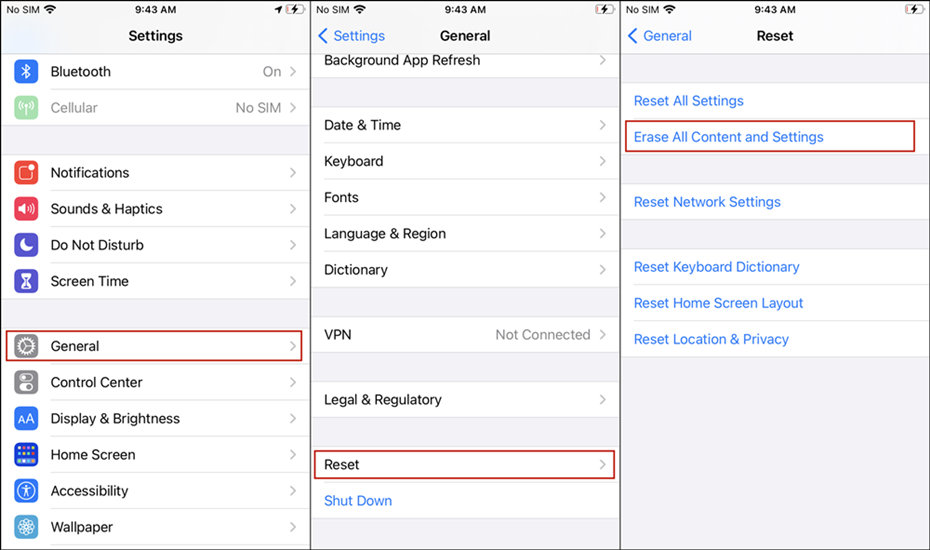
5. Restore iPhone to factory settings

This might be the last resort to fix Siri not working on iPhone X or other models. Trying restoring your device to the factory settings will remove all the settings you've made thus it will also solve the deep system issue that may cause Siri to malfunction. Just go to the "Settings" > "General" > "Reset". Tab the "Erase All Content and Settings" button to do the factory reset.
Note: This operate will erase all the data and settings on your iPhone, please make sure you have backed up all the data before proceeding.
factory reset iphone

Part 3. Ultimate Way to Fix Siri Not Working on iPhone (iOS 13 Supported)

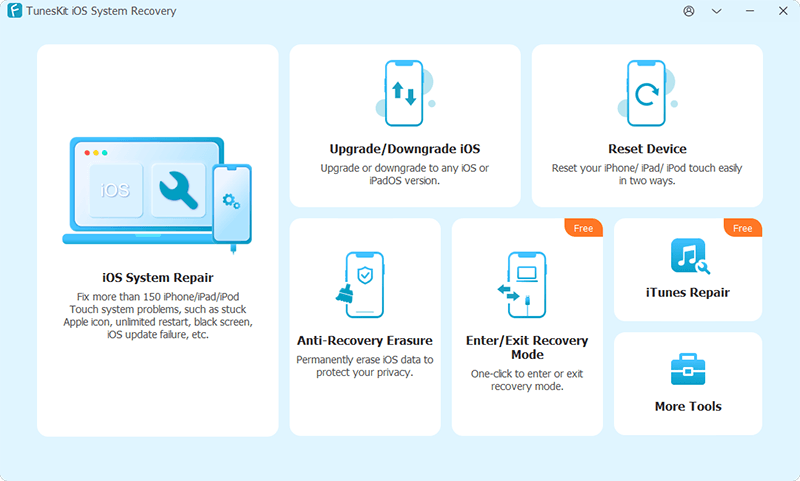
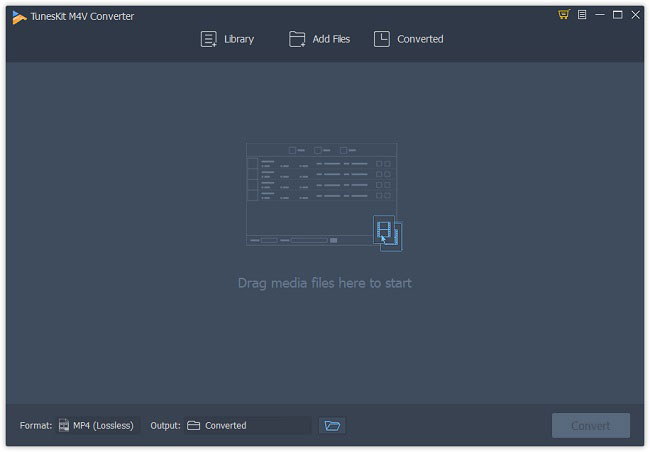
The tool you'll need: TunesKit iOS System Recovery

Before your restore iPhone to factory settings, you can take a look at this method, which is using a professional third-party iOS repair tool to fix Siri not working problem with no risk of losing any data.
Among multiple similar programs in the market, TunesKit iOS System Recovery is highly recommended here because of its fastest speed and highest success rate. It will help users fix more than 30 kinds of iOS or tvOS problems on iPhone, iPad, iPod touch and Apple TV, such as 
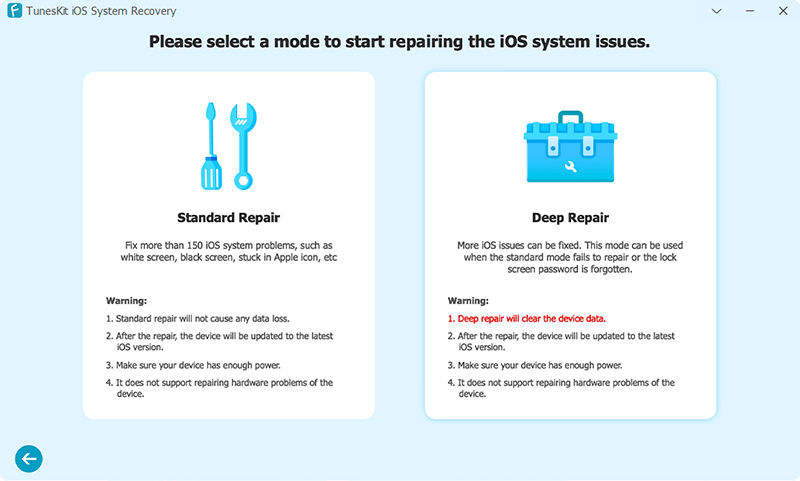
iPhone stuck on boot loop, recovery mode, black screen, won't turn on, etc. It provides two repair modes to either fix iOS problems without data loss or deeply restore iOS system.

TunesKit iOS System Recovery Key Features

  • Resolve Siri not working and many other iOS issues
  • Fix iOS/tvOS problems with no data loss
  • Offer two repair modes - Standard/Advanced Mode
  • One click to enter or exit the recovery mode for free
  • Easy to use with friendly interface
The following is the quick steps to fix Siri not working on iPhone issue without data loss by using TunesKit iOS System Recovery.
connect ios device
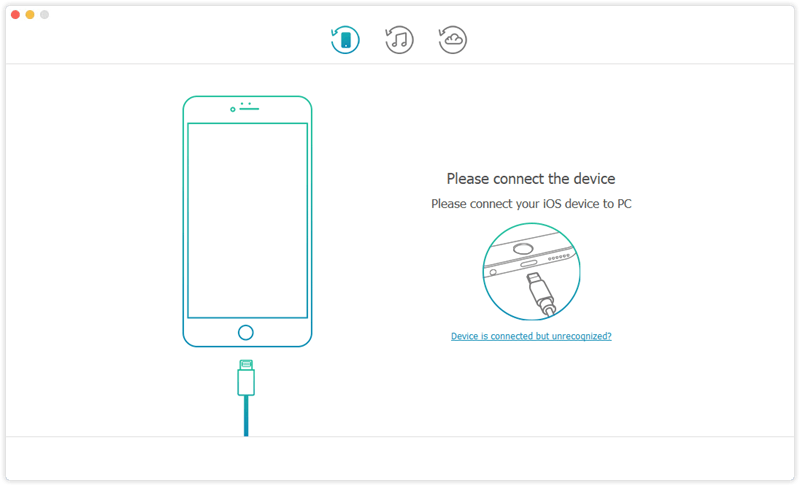
Step 1: First, connect your device to the computer with an original USB cable. Then launch TunesKit iOS System Recovery on the computer and it will detect your iPhone automatically. Click the "Start" button to begin and then choose the Standard Mode to fix Siri not working problem without data loss.
select mode to repair iphone bluetooth not working
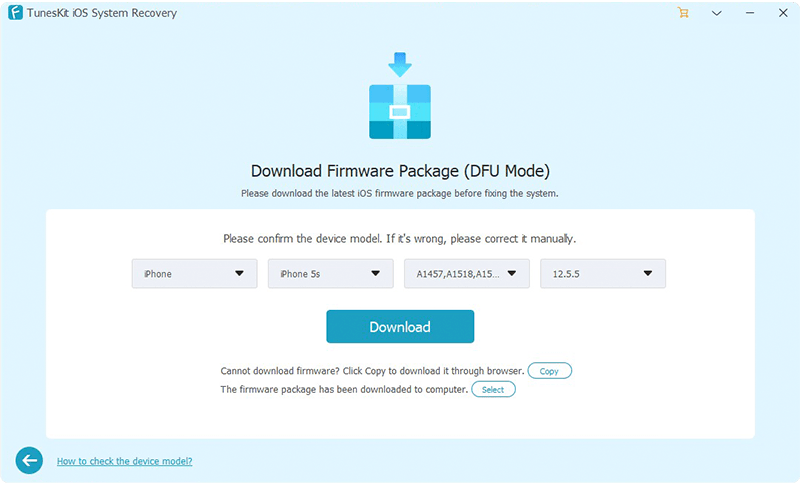
Step 2: Confirm your device info and correct it manually if anything is wrong. Next click the "Download" button to get relevant iOS firmware package downloaded and verified. Wait a while until the process completes.
confirm information

Step 3: Once the download is done, you can click the "Repair" button and start fixing the problem. Do not plug out your device while it's repairing iOS system, or it may cause other problems. After a few minutes, your device may come back to normal.

Dec 10, 2019

'All I Want for Christmas Is You' MP3 Download Free

What's your favorite songs for this Christmas holiday? How about Mariah Carey's 'All I Want for Christmas Is You'? If you're about to download it for offline listening, you must enjoy it very much. But how to download it for free? An easy method is introduced in this post.
Mariah Carey's 'All I Want for Christmas Is You' is now available on YouTube, Spotify and Deezer. And here I'd like to take Spotify as an example and show you how to free download it without premium subscription while keeping the original 320kbps bitrate high quality. 

'All I Want for Christmas Is You' MP3 Free Download: The Tool You'll Need

To download 'All I Want for Christmas Is You' from Spotify, you'll need to remove DRM from the song with the help of Spotify DRM removal software like TunesKit Spotify Music Converter, as DRM is the main reason that prevents free users to download Spotify music offline. With such a Spotify music downloader, you're able to free download any Spotify track and playlist as MP3 losslessly with ID3 tags kept, no matter whether you are using Premium or Free account of Spotify.

'All I Want for Christmas Is You' MP3 Free Download: Simple Guide

Now the following guide will show you how to download the most streamed Christmas song 'All I Want for Christmas Is You' as MP3 from Spotify step by step.
Step 1 Locate 'All I Want for Christmas Is You' on Spotify
Open TunesKit Spotify Music Converter and wait for a while till it launches the Spotify app. Go to your Spotify account and search for 'Maria Carey', or 'All I Want for Christmas Is You'. You can simply find it from the homepage of Spotify under 'Christmas Hit' playlist. And then drag the song to TunesKit main window.
add mariah carey's songs
Step 2 Define output profile as MP3
Go to the top menu of TunesKit Spotify Converter and click on "Preferences" option. Then select the output format as MP3. You can also customize the other parameters like audio channel, bit rate, sample rate based on your requirements. Click "OK" to save the changes.
set output format
Step 3 Begin downloading Mariah's songs
Now you can start the downloading process by simply clicking the "Convert" button. Then it will automatically extract and download the 'All I Want for Christmas Is You' from Spotify at up to 5× speed. Once done, you can find the MP3 file from "converted' folder and share it to any MP3 player for offline playback.
download all i want for christmas is you

'All I Want for Christmas Is You' MP3 Free Download: YouTube Video


Dec 5, 2019

American Music Awards 2019 Winners - Full List

American Music Awards 2019, the first ever Apple Music Awards announced by Apple, has been unveiled recently. It was Taylor Swift for the win, who scored six wins during that night, including artist of the year. BTS and Khalid tied for second with three wins each.
Who else won during the night? See the complete list below.

#1 Artist of the Year

Drake
Ariana Grande
Halsey
Post Malone
Taylor Swift - WINNER

#2 New Artist of the Year
Luke Combs
Billie Eilish - WINNER
Lil Nas X
Lizzo
Ella Mai

#3 Collaboration of the Year
Lady Gaga and Bradley Cooper, "Shallow"
Lil Nas X ft. Billy Ray Cyrus, "Old Town Road"
Marshmello and Bastille, "Happier"
Shawn Mendes and Camila Cabello, "Señorita" - WINNER
Post Malone and Swae Lee, "Sunflower (Spider-Man: Into the Spider-Verse)"

#4 Tour of the Year
BTS - WINNER
Ariana Grande
Elton John
P!nk
Ed Sheeran

#5 Favorite Music Video
Billie Eilish, "Bad Guy"
Ariana Grande, "7 Rings"
Halsey, "Without Me"
Lil Nas X ft. Billy Ray Cyrus, "Old Town Road"
Taylor Swift, "You Need to Calm Down" - WINNER

#5 Favorite Social Artist
BTS - WINNER
Billie Eilish
EXO
Ariana Grande
Shawn Mendes

#7 Favorite Male Artist -- Pop/Rock
Drake
Khalid - WINNER
Post Malone

#8 Favorite Female Artist -- Pop/Rock
Billie Eilish
Ariana Grande
Taylor Swift - WINNER

#9 Favorite Duo or Group -- Pop/Rock
BTS - WINNER
Jonas Brothers
Panic! At The Disco

#10 Favorite Album -- Pop/Rock
Billie Eilish, "When We All Fall Asleep, Where Do We Go?"
Ariana Grande, "Thank U, Next"
Taylor Swift, "Lover" - WINNER

#11 Favorite Song -- Pop/Rock
Halsey, "Without Me" - WINNER
Jonas Brothers, "Sucker"
Lil Nas X ft. Billy Ray Cyrus, "Old Town Road"
Panic! At The Disco, "High Hopes"
Post Malone & Swae Lee, "Sunflower (Spider-Man: Into the Spider-Verse)"

#12 Favorite Male Artist -- Country
Kane Brown - WINNER
Luke Combs
Thomas Rhett

#13 Favorite Female Artist -- Country
Kelsea Ballerini
Maren Morris
Carrie Underwood - WINNER

#14 Favorite Duo or Group -- Country
Dan + Shay - WINNER
Florida Georgia Line
Old Dominion

#15 Favorite Album -- Country
Kane Brown, "Experiment"
Dan + Shay, "Dan + Shay"
Carrie Underwood, "Cry Pretty" - WINNER

#16 Favorite Song - Country
Luke Combs, "Beautiful Crazy"
Dan + Shay, "Speechless" - WINNER
Blake Shelton, "God's Country"

#17 Favorite Artist -- Rap/Hip-Hop
Cardi B - WINNER
Drake
Post Malone

#18 Favorite Album -- Rap/Hip-Hop
Meek Mill, "Championships"
Post Malone, "Hollywood's Bleeding" - WINNER
Travis Scott, "Astroworld"

#19 Favorite Song -- Rap/Hip-Hop
Lil Nas X ft. Billy Ray Cyrus, "Old Town Road" - WINNER
Post Malone, "Wow."
Travis Scott, "Sicko Mode"

#20 Favorite Male Artist -- Soul/R&B
Chris Brown
Khalid
Bruno Mars - WINNER

#21 Favorite Female Artist -- Soul/R&B
Beyoncé - WINNER
Lizzo
Ella Mai

#22 Favorite Album -- Soul/R&B
Chris Brown, "Indigo"
Khalid, Free "Spirit" - WINNER
Ella Mai, "Ella Mai"

#23 Favorite Song -- Soul/R&B
Khalid, "Talk" - WINNER
Lizzo, "Juice"
Ella Mai, "Trip"

#24 Favorite Artist - Alternative Rock
Billie Eilish - WINNER
Imagine Dragons
Panic! at the Disco

#25 Favorite Artist - Adult Contemporary
Maroon 5
P!nk
Taylor Swift - WINNER

#26 Favorite Artist -- Latin
Bad Bunny
J Balvin - WINNER
Ozuna

#27 Favorite Artist - Contemporary Inspirational
Lauren Daigle - WINNER
For King & Country
MercyMe

#28 Favorite Artist - Electronic Dance Music (EDM)
Avicii
Marshmello - WINNER
The Chainsmokers

#29 Favorite Soundtrack
"A Star Is Born" by Lady Gaga & Bradley Cooper
"Bohemian Rhapsody" by Queen - WINNER
"Spider-Man: Into the Spider-Verse"

You may also like: 

Dec 2, 2019

Fixed! iTunes Movies Not Playing?

Have you ever bought a new iTunes movie and only to find that it can't play unexpectedly? If so, you're in the right place. In this article, I will share you some useful tips to help you solve this problem efficiently.

Tip 1. Check Your Internet Connection

Sometimes, if your iTunes movies won't play without WiFi, you can check the internet connection first. You should make sure that your internet connection is stable, so you can play the movies from iTunes. If your internet is not good enough, you can try to turn off WiFi and then turn it on again. Try doing this several times, it may get better.

Tip 2. Update to the Latest Version

The second reason for why won't my iTunes movies play may due to your old iTunes and QuickTime player versions. So you can update both iTunes and QuickTime applications to the latest versions. The following are the simple steps.
For iTunes:
Step 1. Launch iTunes on your computer and click the "Help" option on the top menu bar.
Step 2. Next select the "Check for Update" and then follow the instruction to finish the update if an update is available.
update itunes
For QuickTime Player:
Step 1. Still, open QuickTime player on your computer and choose the "Help" option on the tab.
Step 2. Then click the "Update Existing Software..." option and start to update QuickTime to the latest version if there is an update available.
update quicktime

Tip 3. Re-login Your Apple Account

Next you can try to sign out and sign in again to iTunes with your Apple account to fix iTunes movie won't play problem. This is because there sometimes might be some bugs to your Apple account which may lead to connection failure.
sign in itunes
Step 1. Run the latest version of iTunes app and click the "Account" ("Store" on Mac) > "Sign out".
Step 2. Then go to the "Account" ("Store" on Mac) > "Sign in" to re-log in iTunes with your Apple account and passcode.
Step 3. Click the "Account" ("Store" on Mac) > "Authorization" > "Authorize This Computer" to make sure that you have already authorized the computer.
authorize itunes

Tip 4. Check Your Expiry Date

If your movie is rented from iTunes and it won't play, you can take a look at its expiry date. Generally, customers only have 48 hours to finish watching the movie once you have started to play it. If it is expired, you're not allowed to watch it again. You can re-rent the movie and continue watching it, yet it still gives you only 30 days to watch the rental movie.

Tip 5. Download the Purchased Movies

When your iTunes movies won't play and a black screen appears, it might because your purchased movies are not completely downloaded. You can check if the downloads are available from purchased movie and re-download them again.
Step 1. Open the latest version of iTunes program and click the "Account" ("Store" on Mac) option.
Step 2. Go to choose the "Check for Available Downloads" option.
itunes downloads
Note: We recommend you download iTunes movies in 1080p or 720p, and any higher resolution might not be supported by the display.

Tip 6. Fix iTunes Movie Won't Play Forever

After tried all the tips above but still can't fix iTunes movie won't play problem, you can then try this one. Here I'd like to recommend you to download all iTunes movies for playing on any player and device without internet connection. As all iTunes videos are protected by the digital right management (DRM), so you need a professional third-party tool such as TunesKit M4V Converter to remove the DRM and download iTunes movies quickly.
TunesKit M4V Converter can easily first strip the copyright protection and convert iTunes M4V videos to MP4, MOV, AVI, M4V, WMV, MPG, MKV etc. without damaging the original quality, including the subtitles and audio tracks, etc. Besides, the program is easy to operate and the conversion can be finished in 3 steps only.
add itunes m4v videos
Step 1: After downloaded and installed TunesKit M4V Converter on your computer, simply launch it. Click the "Library" button on the top menu bar to import the iTunes movies you'd like to download. Or, you can just drag your target iTunes videos and drop them to the program.
choose mp4 output format
Step 2: Next press on the "Format" panel and choose an output format such as "MP4 (Lossless)" or "M4V (Lossless)". You can also adjust the video codes, size, quality, bit rate, etc. by clicking the Gear icon on the top right corner of each format profile.
convert itunes m4v to mp4

Step 3: Now just click the "Convert" button and TunesKit will start converting the iTunes movies. After the conversion, all iTunes movies will be downloaded and saved at the "Converted" folder on your computer.

Nov 28, 2019

Howto: Fix iPhone Screen Sensitivity Too High

As a popular smartphone, iPhone is renowned for its high performace, one of which is its high sensitive touch screen. However, many users have complaint that their iPhone screen sensitivity is too high. So how to solve this problem? In this article, you can find some useful tips.

1. Clear iPhone Screen

There are some obstructions that can be ignored easily but still impede the screen from reacting to finger touches normally, for example, small dust, a screen protector. To eliminate these causes, you should:

1) Clean the screen with a cloth. To clean the screen to the finest condition, wipe the screen cloth soaked with ethyl alcohol (not wine, spirit or beer!) and then dry cloth.

2) Remove the screen protector and see whether the screen functions normally without it. If you have to use a screen protector to ensure the safety of the screen, use a well-established brand that will not block normal screen usage.

2. Turn Down iPhone Touch Screen Sensitivity

Up until now, iPhone 3D Touch is installed on models from iPhone 6s to iPhone XS Max. 3D Touch can sense how deeply the user presses the screen, intending to provide a multi-functional touching experience. However, over sensitivity of iPhone 3D Touch will cause screen touch hard to use.
To turn down the sensitivity of 3D Touch, you should first find the 3D Touch menu as shown in the image below, then use the slider under the menu to adjust the sensitivity.
tunr down iphone touch sensitivity

3. Hard Reboot iPhone

Easy as it seems, a hard reboot, also called hard restart, can solve a large number of problems for iPhone users. It is different from the normal reboot in that it is more complete.
hard reboot iphone
1) iPhone 6s Plus and earlier models:
Press and hold the power button and the home at the same time button until the Apple logo appears as illustrated.
2) iPhone 7 and derivative models:
Simultaneously press and hold the volume down and the power button until the Apple logo appears on your screen.
3) iPhone 8 and other latest models:
Press and release the volume up button and then do the same to the volume down button, and finally hold the home button till the Apple logo appears on the screen.
Before using this method always make sure that your iPhone is not running out of power.

4. Fix iPhone Screen Sensitivity Issue with TunesKit iOS System Recovery

If you find your iPhone touch screen too sensitive only occasionally, it may be caused by the iOS system bugs. However, to identify and tackle the bugs is never easy. Finding out what the specific problem costs time energy, while an iTunes restore will have the data erased. But don't worry, we have prepared an effective and safe tool to help you.
TunesKit iOS System Recovery for Windows (or for Mac) is a multifunctional iOS recovery tool that covers more than 30 issues, such as iPhone white screen, iPhone reboot loop, etc. It can eradicate the glitches that cause iPhone screen sensitivity to become too high without any data loss, which is its most significant feature. All in all, convenience and safety are the reasons why we choose it.
ios system recovery

TunesKit iOS System Recovery Key Features

  • Covers 30+ iOS issues, including abnormal iPhone screen sensitivity
  • 3 easy steps to reset iPhone screen sensitivity
  • No data loss in repairing abnormal iPhone screen sensitivity
  • Lowest price among similar products
Here is a brief guide of using TunesKit iOS System Recovery:

Step 1 Connect iPhone to the Computer
Connect your phone with the computer with a Made for Apple Cable. Wait until TunesKit iOS System Recovery has detected your phone.
Step 2 Choose the Standard Mode
In the next window, displayed on the screen are two modes to choose, which are the Standard Mode and the Advanced Mode. Choose the former which can solve common troubles like abnormally high iPhone sensitivity without data loss.
select a mode to fix screen sensitivity
Step 3 Download Firmware Package and Fix
In the window as shown below, TunesKit iOS System Recovery will automatically collect the info of your iPhone, and you need to make sure all of it is correct so that the iOS Recovery tool can download corresponding firmware. Then download the firmware matching your iPhone and tap the Repair button to start repairing. Wait a few minutes, your iPhone should be back to normal.
download normal screen sensitivity firmware

Conclusion

These are 4 simple useful methods that can be used to fix your iPhone screen sensitivity too high problem. You can try them one by one until your problem is solved. In case it's still exist, you can ask Apple Support for help or send it to the professional repair store to have a check. 


Nov 26, 2019

Viber Not Working on iPhone? 6 Tips!

Does your Viber app not work on your iPhone? For instance, you can't use it to send messages or receive any new messages; cannot find contacts; the viber doesn't ring, etc.
If you came across these Viber related problems, you can then read this troubleshooting guide carefully. Here I will offer several tips for your reference.

1. How to Fix Viber Doesn't Ring on iPhone

Effective communication should end up with some feedback. This explains why Viber notifications not working can be an impending thing to wind up a proper communication. When Viber doesn't ring on iPhone, there is no way you will know that some message has arrived or whether a friend is trying to reach you.
Step 1. Solve this by opening the "Settings" app on your iPhone.
Step 2. From the Settings menu, look for Viber and tap on "Notifications".
Step 3. Next, go to the "Alert Style" and enable it. Do this by setting it to "Alerts" or "Banner". This should allow notifications that will let you hear every sound from your Viber app.
viber doesnt ring

2. How to Fix Viber Messages not Sending or Receiving

When you cannot send or receive your messages then this is an indication that your Viber app functionality is deteriorating. You need to do a few fixing from your settings page.
Step 1. Solve this by going to the "Settings" page of your Viber app.
Step 2. Then go to the "Privacy" settings and click on "Disable" the "Collect analytics" button.
Step 3. Next, check your "Messages" setting to ensure it is enabled.
If this solution does not solve the Viber not receiving messages or Viber message not delivered problem, then you can refresh your iPhone by a simple restart.
viber message not sent
Bonus Tip: Lost Viber Messages on your iPhone?
Your important Viber messages are lost after fixed Viber messages not showing problem? No worries. TunesKit iPhone Data Recovery for Windows (or for Mac) can help you get them back instantly. This tool has a high success rate, supporting over 20 data types including Viber messages, imessages, text messages, contacts, photos, videos, reminders, photos and many more. It will also enable you to preview your data before you retrieve them. Furthermore, it is a 100% secure with only three easy steps to the recovery process.
connect ios mac

3. How to Fix Viber Disconnecting Abruptly

Unnecessary disruptions can be so annoying especially when you are in the middle of an important conversation. However, you should be in a position to know whether it is a power disruption or not. Head on to your Wi-Fi connection and confirm that it is rightfully connected and working. In the event that the internet connection is up and running although the Viber app continues to disconnect abruptly, head on to fix the Viber service.
Step 1. The first step is to click on the "Settings" from your Viber app.
Step 2. From the Settings menu, click on "Additional settings".
Step 3. Go to "Battery and performance" and scroll to "Manage apps battery usage". Click on "Choose apps".
Step 4. Then go to "Customs" and look for "Background Networks" From here, select "Stay Connected". This should prevent any further Viber service disconnections.

4. How to Fix Viber Can't Find Contacts

There are those times when you check out for contacts but wonder where probably they might have disappeared to. Well, Viber app usually syncs with your phone's contacts and that is the reason why you can access any number that is on your contacts list via Viber. However, this may not be the case especially when Viber not working iPhone problem is at hand. This then indicates that the sync functionality is facing some disruptions. Don't worry though, just follow these steps to fix it.
Step 1. Open the "Settings" on the app then click on "General" and then on "Sync contacts" to make them viable.
Step 2. Click on "Mail" and then scroll and tap on "Contacts".
Step 3. Select on "Import SIM Contacts" to make them visible on your Viber app.
import sim contacts

5. How to Fix Viber Is Always Online

You should understand that as long as your Viber app is running in the background, it will always portray that it is online. By this, you are able to receive calls, messages and other data from friends as long as both of you are connected via Viber. In this a scenario, you need to change your online status.
Step 1. From your phone's home screen, open your "Viber" app.
Step 2. Tap on "More" menu and scroll to "Privacy".
Step 3. Then disable your status by tapping on "Share Online Status". By this, your phone will show that you are offline. Once you need to go online, simply change your status by enabling it once more.
viber online status

6. When iPhone Camera Refuses to Connect the Camera on Viber

What is the beauty of a Smartphone anyway? I guess it is the capability to do more than our traditional phones, such as video calling. Though sometimes, the problem escalates from Viber free call not working, to iPhone camera not being able to connect to the camera on Viber. Follow these steps for a quick fix.
Step 1. Open the "Settings" on the app and tap on the "Privacy" menu.
Step 2. Next, click on the "Camera" menu to see the available social media apps currently installed on your phone.
Step 3. Locate "Viber" app and then toggle on it to enable the functionality. You should then be able to video call any contacts without experiencing further hitches.

viber camera settings
Hope you can solve your problem after reading the post.

Source article: https://www.tuneskit.com/ios-tips/fix-viber-not-working-on-iphone.html