Apr 30, 2021

How to Play Spotify in Car with Bluetooth [2021]

Spotify, the Swedish company, has become one of the biggest music streaming platforms on the earth. People listen to Spotify at home, at lunch, or in a car. How to play Spotify in a car. Which one is the best method? This passage contains all the information about Spotify in a car.


Play Spotify in the Car through Bluetooth

Most modern cars have built-in Bluetooth functionality. A Bluetooth connection is a modern way of transferring files from any device to another one, such as your car speaker. If you have got a Bluetooth car radio, the only thing to do is to pair your Spotify-enabled iOS or Android OS device with the car stereo because Spotify is well compatible with Bluetooth.

Step 1. This has to be enabled on the iOS or Android device as well as with the car stereo system.

Step 2. Go to find out the Bluetooth settings on your devices, such as smartphones or tablets. And search for the car stereo.

Step 3. Start Playing Spotify in the Car. Open Spotify on your iOS or Android device, select the chosen songs, and hit the Play button.

How to Fix Spotify Bluetooth Issues

You may experience abnormal issues when you try to play Spotify through Bluetooth. You will not be able to stream Spotify music even if other apps are just OK. If you meet any unexpected error, such as 'Spotify won't stream via Bluetooth', you can try these solutions to solve it quickly.

1. Ensure that the devices you are using are close to the car stereo. The recommended distance is within 1 meter. 

2. Both the devices being used should have sufficient power.

3. It is also vital to check whether the connection allows media sharing. Go to the Bluetooth settings and look out for the sharing option.

4. If you have reached the maximum number of devices, you can pair, but Spotify Bluetooth may not work in the car. 

5. Make sure that you are connected to the right device.

Bluetooth Alternatives to Play Spotify in Car

Apart from using Spotify Bluetooth in car, there are other useful ways that you can use to stream Spotify music as you drive along to that far reached land. 

1 Use Aux Cable

Nearly all audio devices including mobile phones, MP3 players, car radios, and more come with the Aux port. Follow the instruction to use Aux cable to play Spotify on a car.

Use the Aux cable to connect your device to the car radio. This cable has two ends, so one end goes to your device and the other should be plugged into the car. Launch the Spotify app so that it streams to the car stereo once you hit Play.

2 Play using Apple CarPlay

Apple CarPlay is available in iPhone 5 and later versions. It also acts as a controller for your iPhone and will enable a car radio to be displayed. Things you can do include making calls, sending and receiving messages as well as listening to music.

To play Spotify music in the car using Apple CarPlay, log into the Spotify app on your device. Next, use a USB cable to connect your iPhone to the car stereo. Go ahead and play your Spotify music on your stereo display.

3 Stream Spotify with USB Drive

Connecting a car radio with a USB flash drive is another effective way to sync Spotify songs to car. However, as Spotify protects the music, it's no easy job to download Spotify to USB drive. In such a case, you'll need some 3rd-party Spotify music downloaders for help. For example, TunesKit Spotify to MP3 Downloader can easily download Spotify songs offline and save them as MP3 without losing any quality. Once downloaded, you are able to transfer any Spotify music to USB or any device or player and connect to the car system for playback. Best of all, it works out with both the Free and Premium accounts of Spotify.


Conclusion

To play Spotify on a car, you can use Bluetooth or USB, or Apple CarPlay. You also have many other solutions if the Bluetooth connection has some problems. I usually use USB after converting Spotify with TunesKit Spotify to MP3 Downloader, since I can enjoy Spotify premium for free.


For more: https://www.tuneskit.com/spotify-music-tips/play-spotify-through-bluetooth.html


Apr 29, 2021

2021 Top 5 Filmora Alternatives You Can't Miss

Top 5 Filmora alternatives 2021

Wondershare Filmora Video Editor is an easy-to-use video editing program for Mac and Windows systems. Now the program has upgraded to the Filmora X, with more powerful features like keyframing, etc. Many of us may like the software as it's easy to learn, especially for those who're just about to the editing field. Yet many users complained that the software always crashed and can't handle big files. If you're also one of them and are looking for an alternative, you can read this post. Here we have picked up the 5 best Filmora alternatives in 2021 for your reference. 

#1. TunesKit AceMovi (Mac & Windows)

TunesKit AceMovi

Speaking of the best Filmora alternatives, TunesKit AceMovi is definitely one of them. Comes with an intuitive interface, you can do most of the basic editing to your video without spending a lot of time learning this program.

You can do split-screen, add sound effects, filters, and transitions to your video. All these features are friendly to beginners which will not require much expertise. What's more, you can even edit with a floating canvas, you can adjust the screen to get the best size to preview your video. After finishing editing, you can export your video based on different devices or platforms you want it to be played on.

To let more people have a chance to use AceMovi, you can get it free by taking part in its Review Campaign. Just download its free trial and install it on the computer. Then share your user experience or thoughts about AceMovi on Trustpilot, sitejabber, or other platforms, you'll receive a 3-month free license as a gift. 

 #2. Camtasia (Mac & Windows)

Camtasia

Another good alternative to Filmora is Camtasia. This video editing tool works on both macOS and Windows. The good thing about this tool is that it is good for both professionals and newbies. The interface is user-friendly and clean.

One thing that is worth mentioning is that Camtasia has the best screen recorder. You can record as many videos as you want, and Camtasia lets you record high-quality videos. If you are a beginner, you can go through Camtasia tutorials.

#3. Adobe Premiere Pro (Mac & Windows)

Adobe Premiere Pro

Are you looking for a master of all video editing tools? Here's Adobe Premiere Pro. This perfect video editing software is loved and preferred by everyone. This rich video editing tool comes along with some of the best features, such as Ripple Edit, rolling edit tool, and slip tool. You can use this tool on both Mac and Windows. The interface and friendly and has a responsive interface.

For beginners, however, Adobe Premiere Pro might not be the right option. But if you would like to watch tutorials to start using its features, there are tons of tutorials, to begin with. This is another plus point of Adobe Premiere Pro.

#4. Apple iMovie (macOS & iOS, iPadOS)

Apple iMovie

Those who would like to use a video editing platform on iPadOS, iOS, and macOS can try Apple iMovie. The good thing about this tool is that it is easy to use, simple, and free. Another advantage is that it lets you edit high-quality video and can also help you produce 4K resolution movies.

This one is Filmora 9 equivalent. You will find all the standard video editing features. However, if you are looking for advanced options, you might want to go ahead with another video editing tool. However, since Apple iMovie is a free-to-use tool, you can try it out.

#5. Final Cut Pro X (Mac)

Final Cut Pro X

The last video editing tool that you can go for is Final Cut Pro X. However; this one is only for Mac users. The best features of Final Cut Pro X are its sophisticated and advanced features, which will allow you to edit your video without any hassle.

Final Cut Pro X offers modern machine learning tools, which allow your widescreen project to automatically transform into custom sizes. The smooth user interface allows users to get creative with their video editing projects. You can create amazing 3D and 2D videos.

Some of the advanced features of Final Cut Pro X that are worth talking about are Flow Dissolve, Key Burns Effects, Smart Conform, and Multicam. These features will let you do magic. If you are a Mac user and looking for programs like Filmora 9, Final Cut Pro X could be the right tool to go for.

This article was first published on TunesKit.com:

https://www.tuneskit.com/video-editing-tips/best-alternatives-to-filmora.html

You may also like:

How to Fix iPad Stuck on Updating iCloud Settings

 As for Apple users, iCloud is an essential tool for them to store and save device data. If the iPad is stuck on updating iCloud settings in the process of updating iCloud, we can imagine that users will extremly upset. In fact, many users have reported this issue, and they did not find the real solutions. To this end, we will talk about the possible fixes in this tutorial.

Fix 1: Check internet connection

As we mention before, the bad internet connection is also a factor. If you are using the cellular data, you can choose to connect to the WiFi. To connect WiFi or check WiFi connection, just go to Settings. Then, choose WiFi.

Fix 2: Sign out and log in of iCloud account

To sign out of your iCloud account may be useful sometimes. To sign out, go to the Settings app. Tap on your name at the top of the left sidebar, and you will see an Apple ID account page which includes iCloud. Scroll down and tap on Sign Out. Then, follow the instruction to sign out the account. Last, log in your account again to see if the issue will be fixed.

Fix 3: Check iCloud working status

When the iCloud updating process does not work fine, it is good for you to check iCloud server working status. To check it, just go to the Apple official website. If the server is down, you need to wait for the server to update the device.

Fix 4: Check iPad storage

It is also feasible for you to check your iPad storage. To check it, go to Settings > General > iPad Storage. If there is not sufficient storage, you need to free up the iPad storage.

Fix 5: Force restart iPad

It is a truism that performing a force restart can be a common solution to device bugs. Forcibly restarting your iPad, differing from factory reset, will not cause any data loss. So this way deserves a try. To force restart iPad, just follow the instructions below.

If you are using iPad with the Home button:

Step 1: Press ad hold the Power button and the Home button at the same time;

Step 2: When the iPad turns off and restart itself, you can release the two buttons.

If you are using iPad without Home button:

Step 1: Press and quickly release the Volume Up button;

Step 2: Press and quickly release the Volume Down button;

Step 3: Next, press and hold the Power button before your iPad restarts itself.

Fix 6: Resort to an iOS repair tool

If you still fail to fix your iPad, you must not miss a powerful tool. It is iOS System Recovery Software. This kind of tool is the enemy of all iOS-related issues and can turn your iPad back to normal. Using this tool, you will not lose anything. It is a good thing for you.

Here, we want to take TunesKit iOS System Recovery as an example to show you how to use such a tool to fix the issue. TunesKit is the desktop software which runs fast. With few simple clicks, you can fix new iPad stuck on updating iCloud settings without any data loss. Moreover, it fixed more than 50 issues of iPhone, iPad, iPod Touch and Apple TV, including iPad stuck in black screen, Apple logo, DFU mode, etc. Users can also enjoy other features, like downgrading iOS or enter/exit recovery mode freely.

Step 1: First, you need to take a USB to connect your iPad to the computer. Then, open and launch TunesKit. If done, the software will detect your iPad. Next, click the blue button Start.

Step 2: Now, you need to select Standard Mode or Advanced Mode. In the software interface, TunesKit will show the detailed feature of the two modes. Here, the Standard Mode is highly recommended. This mode will not erase any data. Or if you have backed up your iPad, you can choose the Advanced Mode as you like.

Step 3: Lastly, you need to download the firmware package. Before downloading, you can check the device information. Then, click Download. Wait for several minutes. When the firmware package is downloaded, click Repair to fix iPad.

Fix 7: Update your iPad

The final solution you can try is to update your iPad. To update, you have two options: update your iPad either wirelessly or by using the computer. Before updating, you can make a backup of your device via iCloud or iTunes.

Option 1: Update your iPad wirelessly

Go to Settings > General, then click Software Update. If there is the latest version available, tap Download and Install. When downloaded, tap Install. Or you can tap Later and choose Install Tonight or Remind Me Later.

Option 2: Update your iPad via iTunes

Open iTunes or Finder on your computer, and then connect your iPad to the computer. Find your device icon. Click General or Settings, then click Check for Update. According to the following instructions to update your device.

The Bottom Line

With all the above-mentioned methods, we hope that your iPad stuck on updating iCloud settings will be fixed. In a word, all these ways are effective. Of course, TunesKit can be regarded as the best option for its one-stop solution.

For more information: https://www.tuneskit.com/ios-repair/ipad-stuck-on-updating-icloud-settings.html

You may also like: https://tuneskit.blogspot.com/2021/04/how-to-fix-bricked-ipad.html


Apr 22, 2021

How to Use Spotify Mini Player in 4 Methods

When you are browsing websites or doing other things on the internet, you may need a Spotify mini player to play Spotify songs. With the Spotify mini player, you can skip songs or stop songs. Read this post to know how to use Spotify mini player to have a better listening experience using Spotify.


How to Use Spotify Mini Player on Windows 10

The official Spotify desktop app doesn’t have a mini player, but you can get it on your computer in several ways, like on Chrome or Lofi.

1. How to Get Spotify Mini Player on Chrome

Chrome can be a great Spotify music player. Spotify provides a web player for both free and premium users to access Spotify music which is much easier than using the desktop app. And you can also get a Spotify mini player on the web player.

1. Open Chrome on the computer and search for open.spotify.com to get a Spotify web player.

2. Sign in to your Spotify account and play a song, then click on the mini player icon to open Spotify mini player. 

3. A small window will pop up, with which you can play, pause or skip through songs using this mini player.

2. Use Lofi Spotify Mini Player

Lofi is a compact desktop client that can play Spotify songs with a small window that only takes up 150X150 pixels of the screen. Just go to lofi. rocks to download the app and log in to your Spotify account. Then you can play, stop, skip forwards and backward in its tiny interface.

How to Get Spotify Mini Player on Mac

Alfred Spotify Mini Player is a useful tool that can control almost everything you can do on the Spotify app. To get started, you’ll have to download the workflow and then set it up. It might be a little tricky for most people, but if you’re patient enough to insist on it, you can explore many things out of this tool.

Best Alternative to Spotify Mini Player

The methods mentioned above are all eligible to get a Spotify mini player, but they also have different shortcomings. Spotify mini player on Chrome can only stream songs in 192kbps and your local files can not be played on web player as well. Third-party Spotify mini players all require a Premium account to get an unlimited song skipping feature, or else there’ll be many ads pop up all the time in the middle of the song.

But theres a workaround to play Spotify songs without a Premium subscription and with the same feature as a mini player. With the TunesKit Spotify Music Converter, you can download Spotify songs to MP3 or other popular formats. You can put these songs in a media player on your computer and use the mini player feature of this media player to play Spotify songs without Premium.

TunesKit Spotify Music Converter can convert Spotify audio files into 6 popular formats such as MP3, AAC, M4A, M4B, WAV, and FLAC. This tool can run at up to 5X faster speed to convert Spotify songs. Almost 100% of the original song quality will be kept after converting process by using this converter. All the converted songs can be played on any media player on your computer like Windows Media Player, VLC, and so on.

1. Launch TunesKit and Import Songs

Open TunesKit software and Spotify will be opened by this software. Then drag and drop tracks from Spotify into the TunesKit.

2. Set Up Output Parameters

After adding Spotify music tracks to TunesKit, you can choose the output audio format for your audios. There are six options including MP3, M4A, M4B, AAC, WAV, and FLAC.

3.  Start the Conversion

Once all the setting is finished, click the "Convert" button. You could browse the converted songs by clicking the "Converted" button.

Play Spotify Songs on Mini Player

After you convert the Spotify songs you like with TunesKit, you are able to use a media player to help you use a mini player for your Spotify songs. Here are some examples.

For Windows: Users

Open Groove Music and play a song downloaded from Spotify. Then click on the "Play in mini view" button to open the mini player to play Spotify songs. 

For Mac Users:

You can play Spotify songs on iTunes.

1. Open iTunes on Mac and load the Spotify songs.

2. Play the Spotify song and then click on the mini player button.

Conclusion

Here are 3 methods to use Spotify mini player. But considering the shortcomings and limits on Spotify mini player, we prepare an alternative way for Spotify mini player. That is converting Spotify songs and use other media players that you are familiar with to play Spotify songs with a mini player.


For more: https://www.tuneskit.com/spotify-music-tips/get-spotify-mi

How to Fix Bricked iPad

 Are you facing bricked iPad? If so, you are not alone. Many users once reflected this issue on Apple Community. If your iPad is bricked, this means that iPad would stop working and you can not use the device normally. However, you do not need to be confused, as we will give you tips and tricks to get through bricked iPad. If you are experiencing this issue, do not miss this article and keep reading.


Fix 1: Charge Your iPad

In some cases, your iPad battery runs down, so the device is bricked. It is normal that you unintentionally forget to charge your iPad. Therefore, you should make sure that you charge your iPad. Take out the original USB cable to plug it into the power socket. Wait for an hour, and check if the iPad can begin to run again. If this way does not work, try the following ways.

Fix 2: Fix Bricked iPad Without Data Loss

Here, we are going to introduce the best ways of fixing bricked iPad quickly and efficiently. In most cases, if wanting to fix an issue, you need a good tool to help you. To fix an iPad problem, iOS System Recovery Software is the best troubleshooting tool. This type of tool is targeted at all iOS-related issues.

Nowadays, with the development of technology, much software has emerged. Here, we want to recommend TunesKit iOS System Recovery. After multiple trials and tests, we can say that TunesKit deserves a try. It can fix bricked iPad at a fast speed and with a higher success rate. More importantly, it will not lead to any data loss. Of course, it can solve other 30+ iOS issues, including iPad stuck on Apple logo, recovery mode, black screen, etc. If you are iPhone, iPod Touch or Apple TV users, TunesKit is also a fix. Whether you are facing minor or major problems, TunesKit is the best tool. Besides, it offers a free chance to enter/exit the recovery mode, or can downgrade your iOS.

Step 1: As TunesKit is the desktop software, make sure that you download the Windows or Mac version on your computer. Before launching TunesKit, take out a USB cable and use it to connect the iPad to your computer. If done, the software will detect your iPad, and then click the blue button Start.

Step 2: Now, TunsKit will ask you to select Standard Mode or Advanced Mode. In the software interface, TunesKit will show the detailed feature of the two modes. Here, we recommend you to choose Standard Mode. This mode will not cause any data loss. Or if you have backed up your iPad, you can choose the Advanced Mode as you like.


Step 3: The final step is to download the firmware package. Before downloading, you can check the device information. Then, click Download. Wait for several minutes. When the firmware package is downloaded, click Repair to fix bricked iPad.

Fix 3: Hard Restart Your iPad

As we know, forcibly restarting your device is a common way to fix iOS system or software glitches. Hence, be free to try this way. To force restart your iPad, there are two different methods based on iPad models.

iPad without Home button: Press and quickly release the Volume Up button, and then press and quickly release the Volume Down. Next, press the Power button before your iPad restarts itself.


iPad with Home button: Press both the Power and Home buttons at the same time for several seconds before the device shutdowns and restart itself. After the Apple logo appears, you can release the buttons.


Fix 4: Restore Your iPad via iTunes

Some people also believe that iTunes is also a good tool. If you have installed the latest version of iTunes on your computer, you can resort to this tool and restore your iPad. But this way will erase your data and you may choose to back up all your data. To use this software, just refer to the following information.

• Open the latest version of iTunes on your computer, and use a USB cable to connect your iPad to the computer;

• Choose your device and then click Summary. Next, click the Restore iPad button;

• Lastly, iTunes will ask if you decide to restore the iPad. If you decide, click Restore.

Fix 5: Try to Enter DFU Mode

The last potential way you can try is to try DFU mode and then restore the bricked iPad via iTunes. The detailed steps are as follows:

• Open the latest version of iTunes on your computer, and use a USB cable to connect your iPad to the computer;

• Press and hold the Power button for 3 seconds. While you're still holding the power button, press and hold down the volume down button. Continue to hold both buttons down for 10 seconds. Release the side button but continue holding the volume button down for 5 seconds;

Note: if you are using iPad with Home button, press and hold the Power button and release for 10 seconds after which release the Power button and keep holding the Home button for 5 seconds.

• If the screen remains black, you can be sure that your device is in DFU Mode. After this, a pop-up window on iTunes will appear. Click Restore and then confirm the command.

Final Words

The bricked iPad is a serious problem, so users should attach much importance to it. However, all will be fixed if using the above-mentioned methods. Although not all methods are suitable for everyone, we can say that TunesKit will be the most effective and efficient. So give it a chance.

To get more details, please visit: https://www.tuneskit.com/ios-repair/fix-bricked-ipad.html

You may also like: 

https://tuneskit.blogspot.com/2021/03/five-tips-to-fix-iphone-ringer-not.html

Apr 15, 2021

How to Make Karaoke Video with Lyrics?

What would you do to relax or have fun with your friends on holiday? In modern life, karaoke is a nice choice for the youth. If you love singing, it can be a wonderful way to spare time. Except for the karaoke outside, have you tried to make a karaoke video with lyrics at home? A karaoke video is not only for singing but also can be useful for different purposes. With the song you like, you can make it a karaoke video with pictures and lyrics. Here is the step-by-step guide.

Use TunesKit AceMovi Video Editor to make a karaoke video with lyrics

Before that, I recommend a multifunctional video editor for you. TunesKit AceMovi Video Editor, as a comprehensive video editor, allows you to edit your video and unleash your creativity in several clicks. With TunesKit AceMovi, you can add black bars to video, make a cinematic video, add subtitles to video, etc. What’s more, you are able to finish all the professional video editing steps without expertise requirement. Let’s read the detailed tutorial about making a karaoke video with lyrics.

Step 1. Import video file

First of all, add the target video file to the TunesKit media library. You can click the File button, and hit the Import Media tab. Or you can drag and drop the media file to the track. When you are trying to make a karaoke video with lyrics, you are allowed to  add an image or a video as the background. Don’t forget to add the audio file to TunesKit AceMovi.

Step 2. Add the media file to the track

Drag the target video and audio to the track. Then hold and drag the edge of the file to adjust the duration.

Step 3. Mute the video file

If the background you added is an image, you can skip to Step 4. If you add a video as the background, you need to mute the video file. Select the video you added on the track, then hit the Audio tab on the top-right panel. You can slide the slider to adjust the audio volume.

Step 4. Add lyrics to the track

Once you have added the audio and video file to the track, you can add subtitles to the track to finish the karaoke video. Click the Text icon, drag the subtitle to the track. You can customize them in the top-right panel. Hold and drag the edge to adjust the timing. Next, find the lyrics of the song from the web, and then copy the lyric sentence by sentence, and paste them into the text box. Repeat the operations until you add all the lyrics to the track.

Step 5. Export the video

Once everything is done and the timing of the lyrics is adjusted to the correct point, you can hit the Export button to export the karaoke video. It should be easy to make a karaoke video with lyrics via TunesKit AceMovi. When the export process is done, you can enjoy your karaoke video. You are free to export your video to every popular format, as the TunesKit AceMovi supports.

Make a karaoke video with lyric online

As an online video editing tool, Kapwing, the online image, video, GIF, and audio editor for modern creators, always makes a good job. Using Kapwing can clip your video, trim your video, or join your video effectively. It would be a good choice for you to make a karaoke video with lyrics online. The advantage of an online video editing tool is that you don’t need to download anything to your computer. Read the tutorial in the following content.

Step 1: Click the Upload button to upload the video to Kapwing. As an online tool, it supports users to upload media by pasting an URL into the box;

Step 2: Then, click the Audio tab, paste the audio URL into the box or upload the audio you have downloaded to your device;

Step 3: Add subtitles as lyrics. You can copy the lyric from the internet, and paste them to Kapwing. You can customize the text to adjust the timing;

Step 4: Having done the editing, you can download and share the video with your friends or enjoy it yourself. You can upload it to YouTube, Twitter, or Facebook. You can also send the message to your friend so that they can watch the video via Kapwing.

Final word

Compared to TunesKit AceMovi, Kapwing comes with fewer features, and you must use it with an internet connection. If you don’t mind downloading video editing software, why not take a try with TunesKit AceMovi. As a comprehensive video editing software, TunesKit AceMovi offers features that can help you make a karaoke video with lyrics, add moving text to video, add music to GIF, and so on.

Read more: How to Make a Time-lapse Video?

Apr 14, 2021

Best Methods to Transfer Spotify Playlists to Tidal

There are many streaming music services on the internet, including Spotify, Tidal, Apple Music, Pandora, Amazon Music, and more. Many people will not use one music app all the time. But some others may change from one to another when they feel tired of the previous one. Many users ask the method to transfer Spotify playlists to Tidal because they want to switch from Spotify to Tidal. So we find 2 methods to move Spotify songs to Tidal.


See Also: Spotify vs. Tidal: Which is Better

Way 1. Transfer Spotify Playlists to Tidal with TunesKit

The first method specially aims at subscribers of the Spotify free plan. As you should know, with a free Spotify subscription, you are not allowed to download Spotify songs for offline listening. Someone will doubt it makes no sense for these free Spotify users to move playlists from Spotify to Tidal because Tidal has better music quality than the same song provided by Spotify. However, you may miss out on the fact that there might be some exclusive songs on Spotify that you can't find on Tidal. In this case, it's necessary to download the tracks that do not exist on Tidal from Spotify firstly and then transfer them to Tidal when you decided to abandon Spotify. Let's get back to the business. In order to download Spotify songs within the free account and make the songs transferable to Tidal, you'll need a special 3rd party Spotify music downloader tool, that is, TunesKit Spotify Music Converter.

As a professional Spotify downloader and extractor, it enables any Spotify users, including both free and premium users to download and convert any Spotify music, playlist, and album to common audio in MP3, AAC, WAV, FLAC, M4A, M4B, etc. It's able to keep the original ID3 tags of the music as well. Once downloaded, you can freely upload the Spotify playlist to your Tidal account without any limits.


Download the free version of this smart Spotify converter and follow the instructions to begin downloading and transferring Spotify to Tidal.

Step 1. Open TunesKit Music Converter for Spotify on a computer. Drag any Spotify tracks or playlists into the TunesKit conversion window. You can also copy and paste the Spotify links to the search box of TunesKit and click the "+" button to load the songs for conversion.

Step 2. Click top menu bar > Preferences and select output format of Spotify audios, adjust conversion speed, output path, bit rate, sample rate, etc.

Step 3. Click the Convert button and it will begin downloading and converting the Spotify playlists to other formats. Once converted, click the Converted button to locate the offline Spotify music files on your computer.

Step 4. Then you can import those converted Spotify playlists to Tidal.

Way 2. Move from Spotify to Tidal with Soundiiz

For Spotify subscribers, there is another method. Soundiiz is an all-in-one account manager for music lovers who use multiple streaming music apps. It handles a wide range of streaming music providers, bringing together all your playlists and tracks between Spotify and Tidal and other streaming music platforms. It's a perfect solution for you who have a huge Spotify playlist while don't want to manually transfer them to Tidal. Now follow these steps to transfer Spotify playlist to Tidal with Soundiiz.


Step 1. Go to Soundiiz's official website and log into your account or create an account if you don't have any.

Step 2. Once logged into Soundiiz, you'll find all streaming music services are listed in this software. Then click the Spotify icon and choose Connect button. You'll be required to input your Spotify account info and then Soundiiz will quickly show all of your Spotify playlists.

Step 3. You can then manage your playlists by creating, deleting, merging, or importing playlists from different apps.

Step 4. Click the Platform to platform button at the top of the account page and follow the on-screen instructions to move all of your playlists from Spotify to Tidal. You can also move a single playlist over to Tidal by using the convert button and you need to choose Tidal as your destination.

All your Spotify playlists will be transferred to Tidal at a time. Although the free plan of Soundiiz will definitely meet your needs to move Spotify to Tidal, it also provides a premium plan which includes more useful tools that cost $3 monthly.

Conclusion

Now you have got the two methods to transfer Spotify playlists to Tidal. Which one do think is better. Most of my friends prefer TunesKit. Why not choose the one you like and start to move Spotify playlists to Tidal now!


For more: https://www.tuneskit.com/spotify-music-tips/spotify-playlist-to-tidal.html

Apr 13, 2021

How to Make a Time-lapse Video?

In a time-lapse video, you can watch the sunrise to sunset in a matter of minutes or even seconds. If you are new to the video editing field, you may think it is a difficult job to make it. In fact, you can make a time-lapse video easily with this tutorial. Let’s see how to make it step by step.

Capture a time-lapse video

In 2021, most of us can capture a time-lapse video easily. But if you need to capture some wonderful or great time-lapse videos, there is something essential for us to know.

Confirm your device

If you are going to capture a video as the moment you see or events happen, you need a device that has the built-in time-lapse feature. Nowadays, the phone you are using or a professional DSLR camera can capture a wonderful time-lapse video. You can use them to capture a time-lapse video easily.

Confirm the subject

Confirm that your device comes with a time-lapse capture feature. Then capture the subject under time-lapse mode.

Stars movement is one of the classic time-lapse recordings. Besides, sunrise and sunset, cloud movement, flower blossoming, city lights are also popular among time-lapse recordings. Capture a time-lapse video will cost a lot of time, before capturing it, get familiar with the area.

If you are heading for the best quality, you should prepare a tripod to stabilize your camera or phone. Don’t forget to record it in nice weather, this is crucial.

Use TunesKit AceMovi Video Editor to make a time-lapse video

What should we do that we are trying to convert a normal video to a time-lapse video? This method for you to make a time-lapse video without the requirement of professional devices but just a computer, video editing software, and the video file you would like to edit. I think that TunesKit AceMovi Video Editor can be the best choice for you, it is a comprehensive video editing tool that comes with several features for you. You can use it not only to make a time-lapse video but also can add transitions to videos, bleep a video, add captions to video, etc. TunesKit develops both Mac and Windows versions. And it can deal with videos with different formats, including MP4, M4V, MOV, MKV, MPG, etc.

Let’s see the step-by-step guide to make a time-lapse video.

Step 1. Import video file

Hit the File button, you can import your video media by clicking the Import media tab or drag and drop the video file to the TunesKit AceMovi media library.

Step 2. Add video to the track

Then, drag the video you added and drop it to the track. Find the speed button, which looks like a lightning bolt. With this feature, you can change the speed of the video.

Step 3. Speed up your video

To make a time-lapse video, speed up the video can finish it. Tap the Speed icon and then select Fast. There are 2X, 4X, 8X, 20X, 50X, and 100X you can choose from. Or you could click the Speed Custom to change the speed to what you want. What’s more, if you are trying to speed down your video, you can use click the Slow tap and slow down your video.

Step 4. Export your video

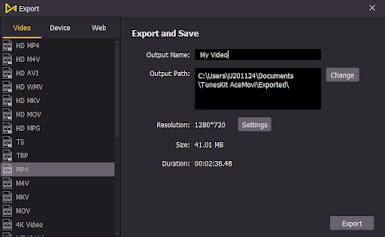
When the editing is finished, it’s time to enjoy your time-lapse video. Click the Export button to export your video. TunesKit supports you to export the video in most formats. You can choose formats, file name, location, and resolution in this pop-up window.

Final word

TunesKit AceMovi Video Editor is a better choice for normal users. As computer software, you can make a time-lapse video at home easily. Not only to make a time-lapse video, but TunesKit can also add a filter to the video, add animation to video, merge video files. You can edit your video files in several steps without expertise requirement.

Read more: How to Make a Cinematic Video?