Nov 28, 2019

Howto: Fix iPhone Screen Sensitivity Too High

As a popular smartphone, iPhone is renowned for its high performace, one of which is its high sensitive touch screen. However, many users have complaint that their iPhone screen sensitivity is too high. So how to solve this problem? In this article, you can find some useful tips.

1. Clear iPhone Screen

There are some obstructions that can be ignored easily but still impede the screen from reacting to finger touches normally, for example, small dust, a screen protector. To eliminate these causes, you should:

1) Clean the screen with a cloth. To clean the screen to the finest condition, wipe the screen cloth soaked with ethyl alcohol (not wine, spirit or beer!) and then dry cloth.

2) Remove the screen protector and see whether the screen functions normally without it. If you have to use a screen protector to ensure the safety of the screen, use a well-established brand that will not block normal screen usage.

2. Turn Down iPhone Touch Screen Sensitivity

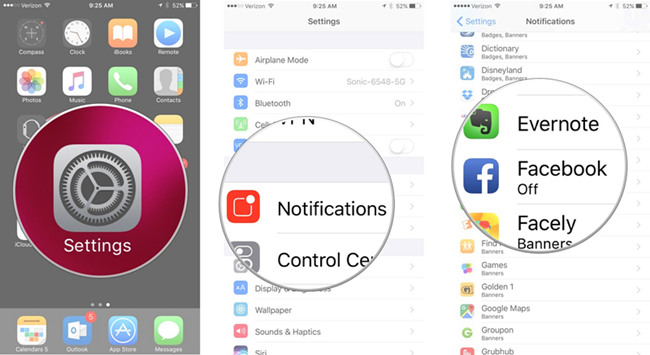
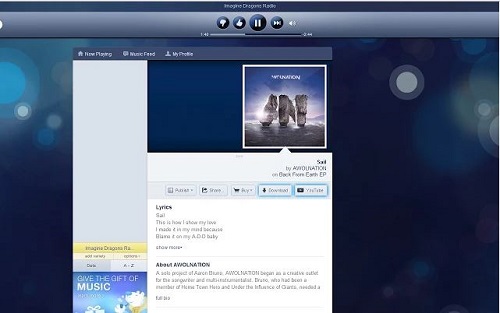
Up until now, iPhone 3D Touch is installed on models from iPhone 6s to iPhone XS Max. 3D Touch can sense how deeply the user presses the screen, intending to provide a multi-functional touching experience. However, over sensitivity of iPhone 3D Touch will cause screen touch hard to use.
To turn down the sensitivity of 3D Touch, you should first find the 3D Touch menu as shown in the image below, then use the slider under the menu to adjust the sensitivity.
tunr down iphone touch sensitivity

3. Hard Reboot iPhone

Easy as it seems, a hard reboot, also called hard restart, can solve a large number of problems for iPhone users. It is different from the normal reboot in that it is more complete.
hard reboot iphone
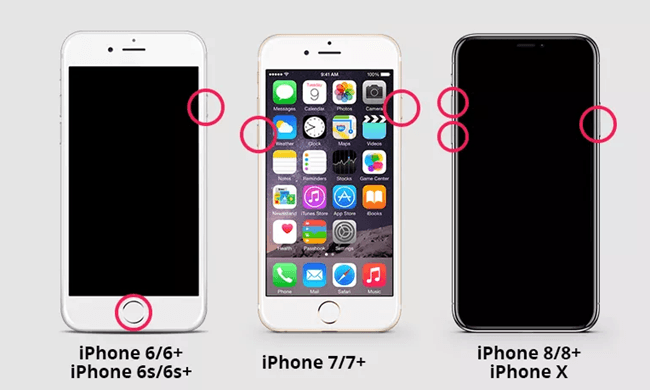
1) iPhone 6s Plus and earlier models:
Press and hold the power button and the home at the same time button until the Apple logo appears as illustrated.
2) iPhone 7 and derivative models:
Simultaneously press and hold the volume down and the power button until the Apple logo appears on your screen.
3) iPhone 8 and other latest models:
Press and release the volume up button and then do the same to the volume down button, and finally hold the home button till the Apple logo appears on the screen.
Before using this method always make sure that your iPhone is not running out of power.

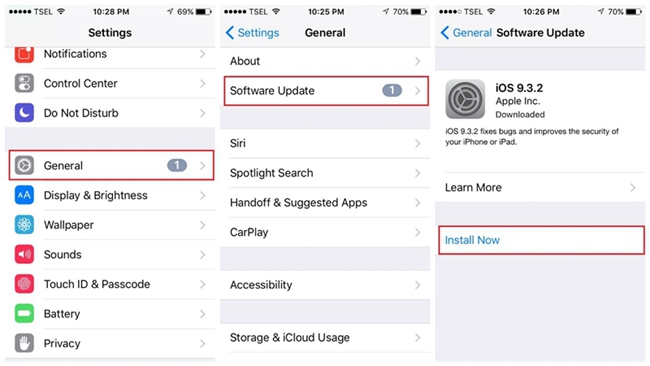
4. Fix iPhone Screen Sensitivity Issue with TunesKit iOS System Recovery

If you find your iPhone touch screen too sensitive only occasionally, it may be caused by the iOS system bugs. However, to identify and tackle the bugs is never easy. Finding out what the specific problem costs time energy, while an iTunes restore will have the data erased. But don't worry, we have prepared an effective and safe tool to help you.
TunesKit iOS System Recovery for Windows (or for Mac) is a multifunctional iOS recovery tool that covers more than 30 issues, such as iPhone white screen, iPhone reboot loop, etc. It can eradicate the glitches that cause iPhone screen sensitivity to become too high without any data loss, which is its most significant feature. All in all, convenience and safety are the reasons why we choose it.
ios system recovery

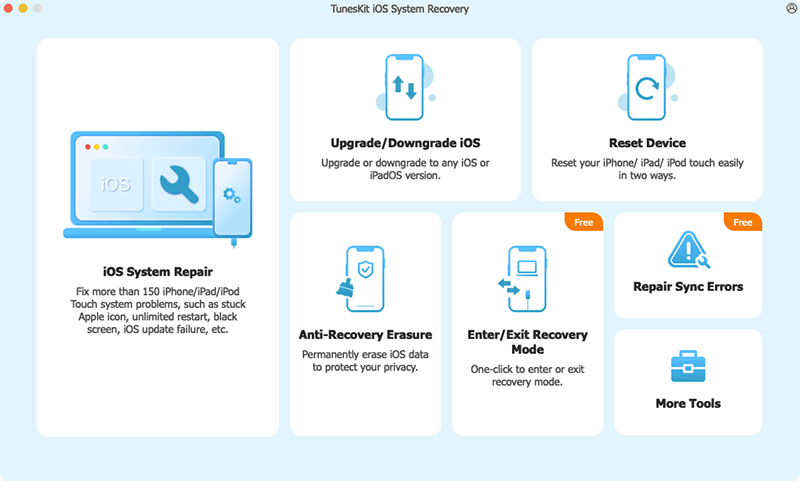
TunesKit iOS System Recovery Key Features

  • Covers 30+ iOS issues, including abnormal iPhone screen sensitivity
  • 3 easy steps to reset iPhone screen sensitivity
  • No data loss in repairing abnormal iPhone screen sensitivity
  • Lowest price among similar products
Here is a brief guide of using TunesKit iOS System Recovery:

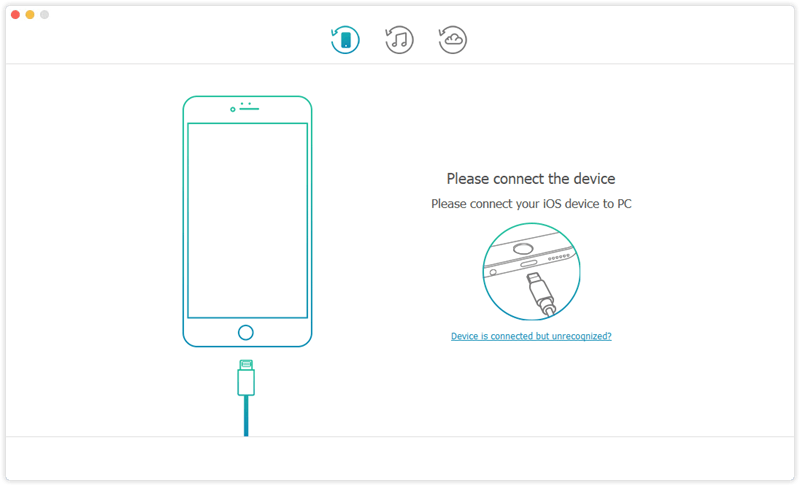
Step 1 Connect iPhone to the Computer
Connect your phone with the computer with a Made for Apple Cable. Wait until TunesKit iOS System Recovery has detected your phone.
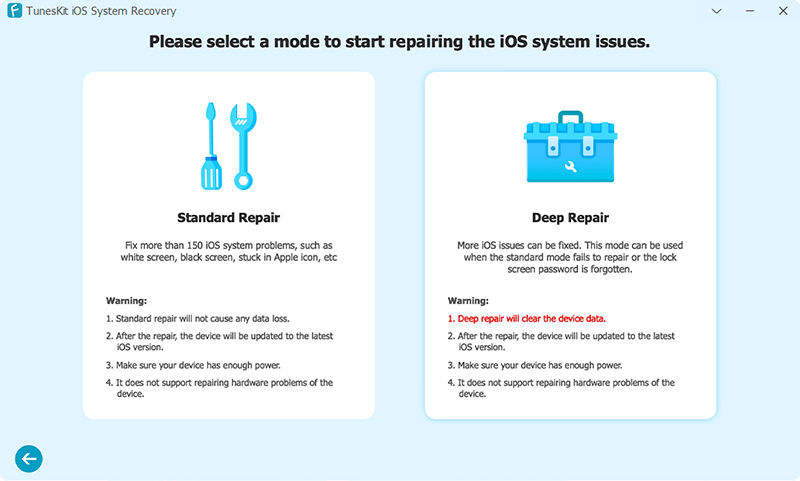
Step 2 Choose the Standard Mode
In the next window, displayed on the screen are two modes to choose, which are the Standard Mode and the Advanced Mode. Choose the former which can solve common troubles like abnormally high iPhone sensitivity without data loss.
select a mode to fix screen sensitivity
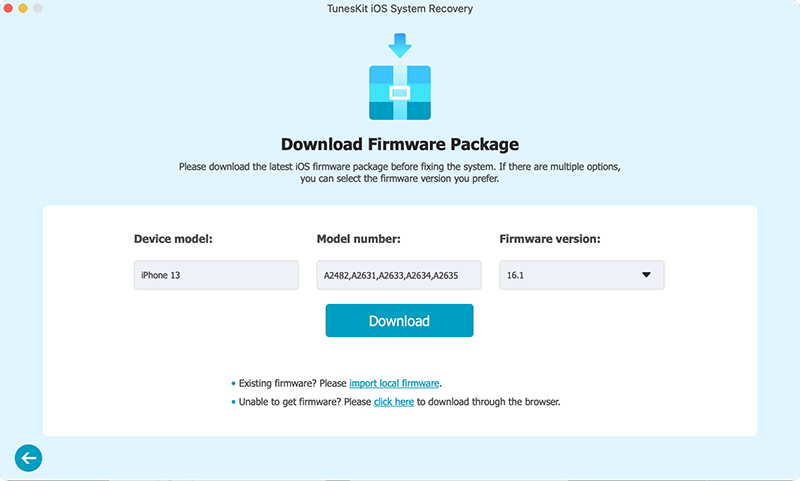
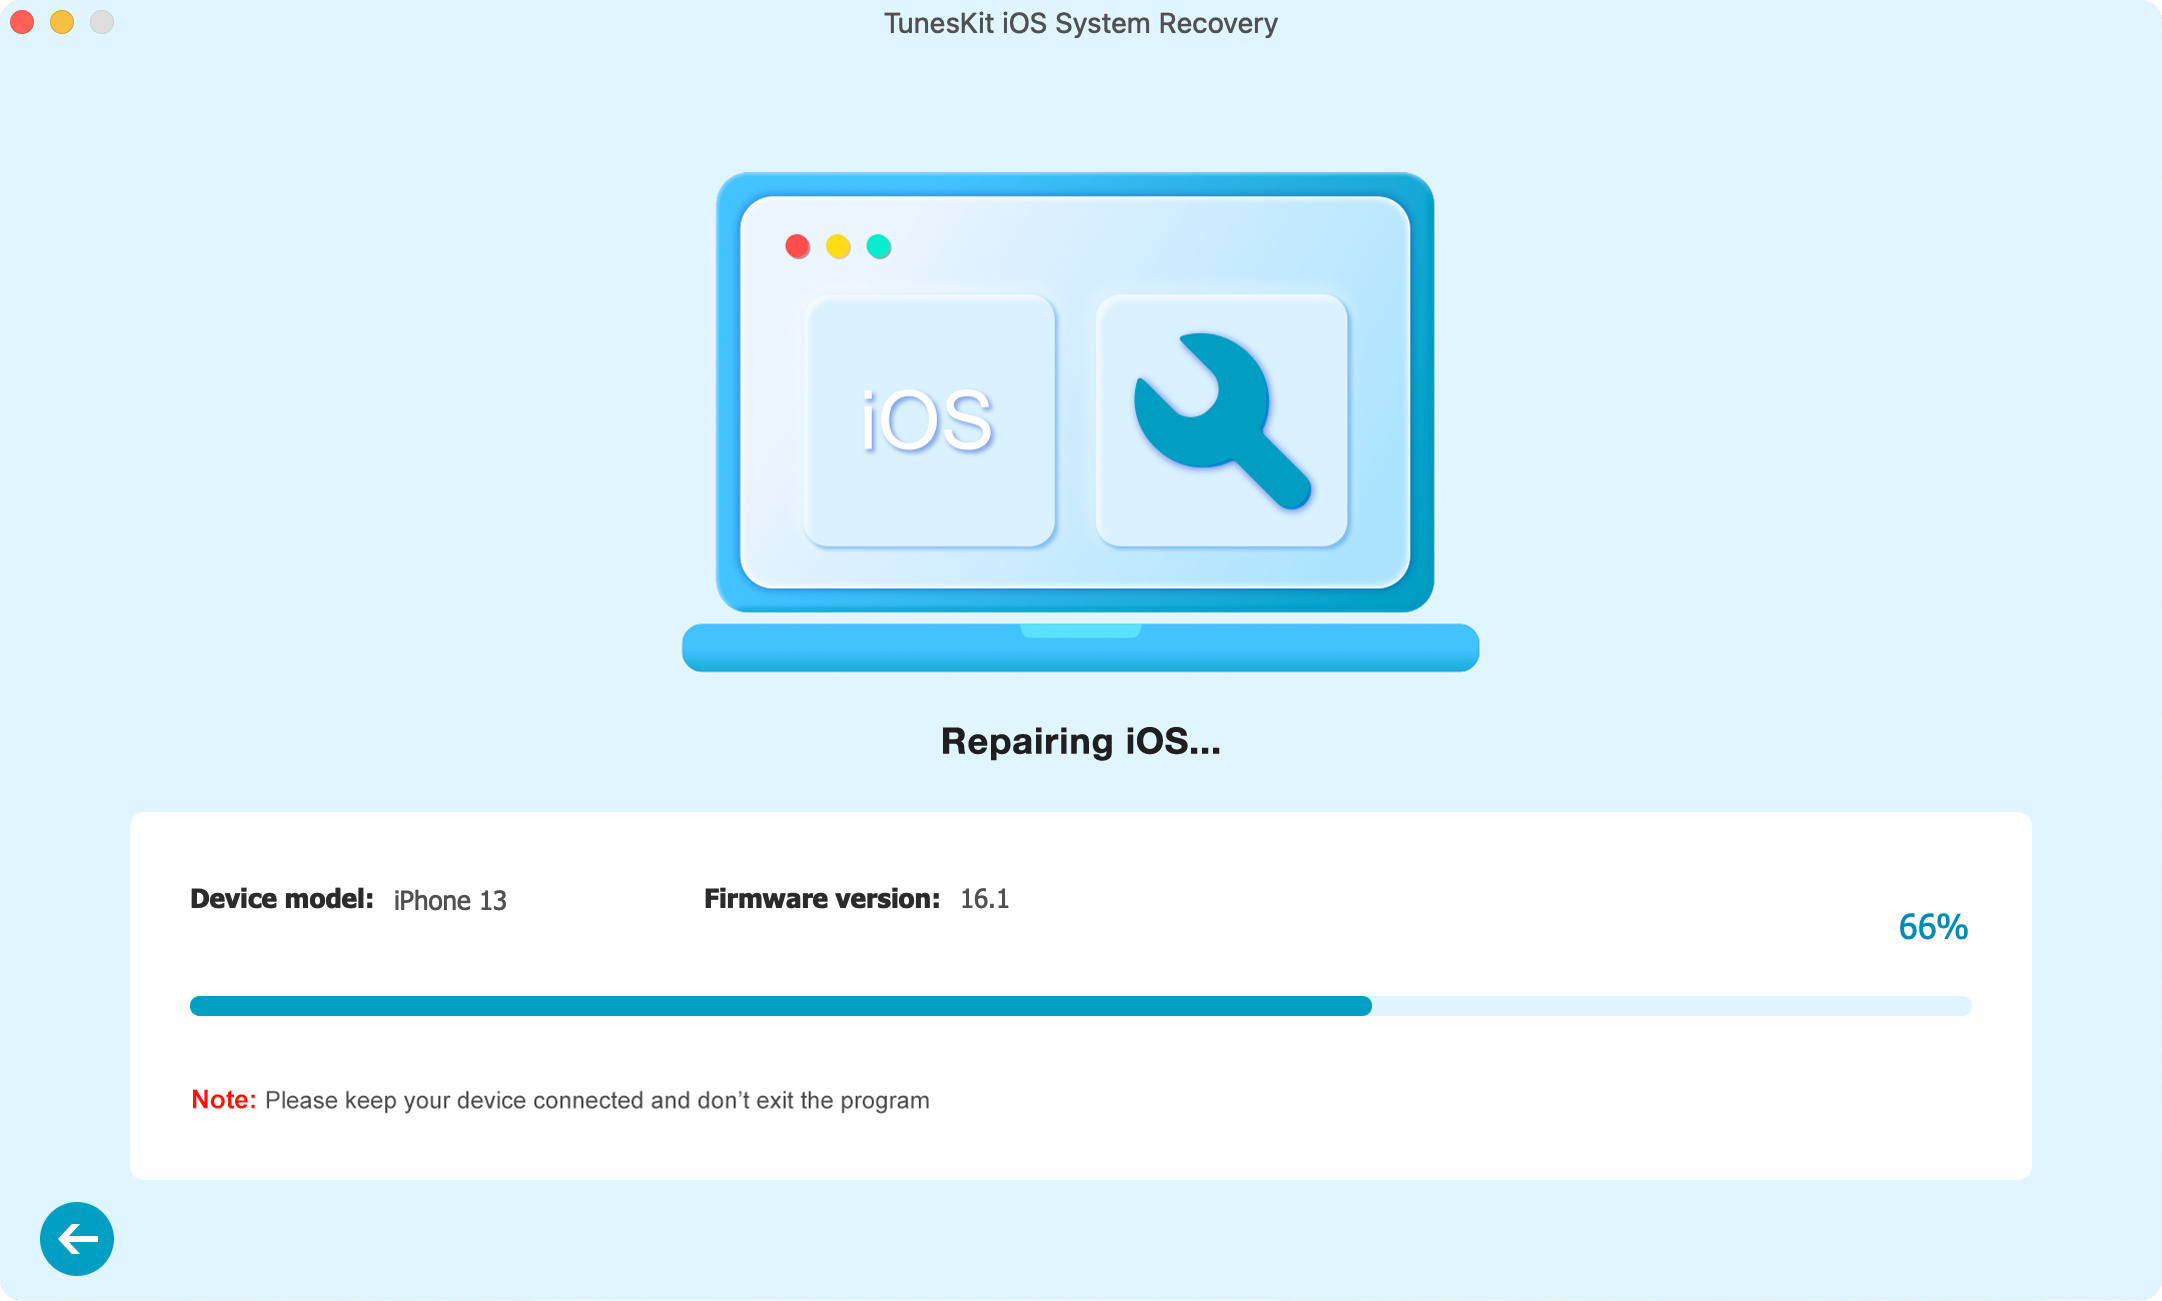
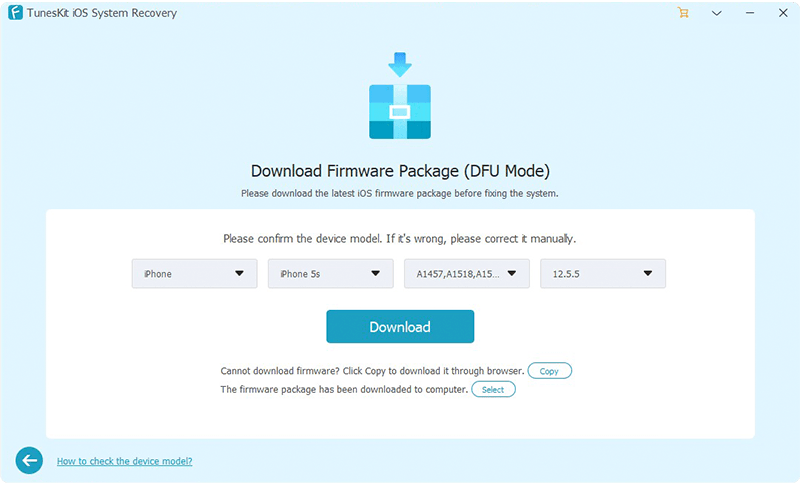
Step 3 Download Firmware Package and Fix
In the window as shown below, TunesKit iOS System Recovery will automatically collect the info of your iPhone, and you need to make sure all of it is correct so that the iOS Recovery tool can download corresponding firmware. Then download the firmware matching your iPhone and tap the Repair button to start repairing. Wait a few minutes, your iPhone should be back to normal.
download normal screen sensitivity firmware

Conclusion

These are 4 simple useful methods that can be used to fix your iPhone screen sensitivity too high problem. You can try them one by one until your problem is solved. In case it's still exist, you can ask Apple Support for help or send it to the professional repair store to have a check. 


Nov 26, 2019

Viber Not Working on iPhone? 6 Tips!

Does your Viber app not work on your iPhone? For instance, you can't use it to send messages or receive any new messages; cannot find contacts; the viber doesn't ring, etc.
If you came across these Viber related problems, you can then read this troubleshooting guide carefully. Here I will offer several tips for your reference.

1. How to Fix Viber Doesn't Ring on iPhone

Effective communication should end up with some feedback. This explains why Viber notifications not working can be an impending thing to wind up a proper communication. When Viber doesn't ring on iPhone, there is no way you will know that some message has arrived or whether a friend is trying to reach you.
Step 1. Solve this by opening the "Settings" app on your iPhone.
Step 2. From the Settings menu, look for Viber and tap on "Notifications".
Step 3. Next, go to the "Alert Style" and enable it. Do this by setting it to "Alerts" or "Banner". This should allow notifications that will let you hear every sound from your Viber app.
viber doesnt ring

2. How to Fix Viber Messages not Sending or Receiving

When you cannot send or receive your messages then this is an indication that your Viber app functionality is deteriorating. You need to do a few fixing from your settings page.
Step 1. Solve this by going to the "Settings" page of your Viber app.
Step 2. Then go to the "Privacy" settings and click on "Disable" the "Collect analytics" button.
Step 3. Next, check your "Messages" setting to ensure it is enabled.
If this solution does not solve the Viber not receiving messages or Viber message not delivered problem, then you can refresh your iPhone by a simple restart.
viber message not sent
Bonus Tip: Lost Viber Messages on your iPhone?
Your important Viber messages are lost after fixed Viber messages not showing problem? No worries. TunesKit iPhone Data Recovery for Windows (or for Mac) can help you get them back instantly. This tool has a high success rate, supporting over 20 data types including Viber messages, imessages, text messages, contacts, photos, videos, reminders, photos and many more. It will also enable you to preview your data before you retrieve them. Furthermore, it is a 100% secure with only three easy steps to the recovery process.
connect ios mac

3. How to Fix Viber Disconnecting Abruptly

Unnecessary disruptions can be so annoying especially when you are in the middle of an important conversation. However, you should be in a position to know whether it is a power disruption or not. Head on to your Wi-Fi connection and confirm that it is rightfully connected and working. In the event that the internet connection is up and running although the Viber app continues to disconnect abruptly, head on to fix the Viber service.
Step 1. The first step is to click on the "Settings" from your Viber app.
Step 2. From the Settings menu, click on "Additional settings".
Step 3. Go to "Battery and performance" and scroll to "Manage apps battery usage". Click on "Choose apps".
Step 4. Then go to "Customs" and look for "Background Networks" From here, select "Stay Connected". This should prevent any further Viber service disconnections.

4. How to Fix Viber Can't Find Contacts

There are those times when you check out for contacts but wonder where probably they might have disappeared to. Well, Viber app usually syncs with your phone's contacts and that is the reason why you can access any number that is on your contacts list via Viber. However, this may not be the case especially when Viber not working iPhone problem is at hand. This then indicates that the sync functionality is facing some disruptions. Don't worry though, just follow these steps to fix it.
Step 1. Open the "Settings" on the app then click on "General" and then on "Sync contacts" to make them viable.
Step 2. Click on "Mail" and then scroll and tap on "Contacts".
Step 3. Select on "Import SIM Contacts" to make them visible on your Viber app.
import sim contacts

5. How to Fix Viber Is Always Online

You should understand that as long as your Viber app is running in the background, it will always portray that it is online. By this, you are able to receive calls, messages and other data from friends as long as both of you are connected via Viber. In this a scenario, you need to change your online status.
Step 1. From your phone's home screen, open your "Viber" app.
Step 2. Tap on "More" menu and scroll to "Privacy".
Step 3. Then disable your status by tapping on "Share Online Status". By this, your phone will show that you are offline. Once you need to go online, simply change your status by enabling it once more.
viber online status

6. When iPhone Camera Refuses to Connect the Camera on Viber

What is the beauty of a Smartphone anyway? I guess it is the capability to do more than our traditional phones, such as video calling. Though sometimes, the problem escalates from Viber free call not working, to iPhone camera not being able to connect to the camera on Viber. Follow these steps for a quick fix.
Step 1. Open the "Settings" on the app and tap on the "Privacy" menu.
Step 2. Next, click on the "Camera" menu to see the available social media apps currently installed on your phone.
Step 3. Locate "Viber" app and then toggle on it to enable the functionality. You should then be able to video call any contacts without experiencing further hitches.

viber camera settings
Hope you can solve your problem after reading the post.

Source article: https://www.tuneskit.com/ios-tips/fix-viber-not-working-on-iphone.html


Nov 20, 2019

How to Convert Spotify to MP3? Tools and Tutorials

Still looking for the best tool to convert Spotify to MP3? Well, you can stop here to pick one from these 5 best Spotify converters to download Spotify music and save as MP3 audio format for listening on any device anywhere.

#1. TunesKit Spotify Music Converter (Mac & Windows) - Best & Lossless Way

tuneskit spotify to mp3 converter
If you are looking for the best Spotify playlist converter tool in the market, you should opt for TunesKit Spotify Music Converter for Windows (or for Mac). It's the fastest Spotify MP3 converter tool that can convert the Spotify songs to MP3 at up to 5X faster speed. It supports downloading and converting all Spotify music types, including tracks, albums, artists and playlists by simply dragging the songs from Spotify app to the conversion window.

Unlike the traditional Spotify converter, TunesKit Spotify Music Converter is not a Spotify recorder but a professional Spotify ripper and downloader that supports losslessly convert the protected Spotify to MP3 with original quality and ID tags retained. In addition to MP3, this smart tool also supports AAC, WAV, FLAC, M4A and M4B output audio formats. Besides, it allows you change the audio properties, like audio channel, bit rate, sample rate, etc. and save the converted MP3 songs automatically by albums and artists, all depends on your own needs.

Pros:
  • 1. Download and convert Spotify music to MP3 offline;
  • 2. Keep 100% lossless music quality after conversion;
  • 3. Support 5× super faster speed and customization.
Cons:
  • 1. It's not free.
Tutorial: How to Convert Spotify to MP3 with TunesKit Spotify Music Converter

Due to the great design and neat interface, it's extremely easy to convert Spotify music to MP3 using TunesKit Music Converter for Spotify even without reading the user manual. The following is the simple steps to show you how to do it.

Step 1. Launch the TunesKit Music Converter for Spotify on your computer, and Spotify app will be opened automatically;
Step 2. Drag the songs/albums/artists/playlists from your Spotify account to the TunesKit program, and then choose the output format and set the parameters in the Preferences window under menu bar.
Step 3. Then click Convert to begin converting the Spotify songs to MP3 or other common formats. For stable conversion, simply set the conversion speed as 1×.

#2. Audials Tunebite Premium 2018 (Windows)

audials tunebite premium
Audials Tunebite is a smart audio recorder software for recording music streams and converting audio formats on Windows. It's also a music player that can manage music for all devices. With Audials Tunebite Premium 2018, you can record Spotify online streams and all other protected as well as unprotected audios from different websites. Then the music will be copied and converted to MP3 up to 40 audio file formats for playing on all popular smartphones, tablets and gaming consoles.
Pros:
  • 1. Record and convert Spotify music to MP3;
  • 2. Support other types of DRM-ed audios.
Cons:
  • 1. A little complicated to operate;
  • 2. Recording could cause quality loss;
  • 3. Support Windows OS only.

Tutorial: How It Works in Converting Spotify Music to MP3

Step 1. Launch the program, click the Save Music in Streaming column and import the downloaded Spotify songs to the main interface.
Step 2. Click "Save" button at the bottom and it will begin to record the songs automatically. Once the recording completes, you should go to Converter panel and convert the recorded audios to MP3 format.
Note: It's not easy to download and convert the Spotify music to MP3 via Audials as there are too many buttons in the conversion window. So it's not recommended if you are not a tech geek.

#3. Wondershare Streaming Audio Recorder (Mac & Windows)

wondershare streaming audio recorder
Wondershare Streaming Audio Recorder, as the name suggests, is also an audio recording software that aims to record music from 500+ streaming sites, including Spotify, iTunes radio, BBC radio, etc. So with this tool, you can easily record and convert the Spotify to MP3 or M4A format while filtering the ads in the songs. Besides, it supports splitting and cutting Spotify songs and other large audio files into small segments according to your own requirements.
Pros:
  • 1. Record Spotify and music from other 500 streaming music sites;
  • 2. Convert and save Spotify songs as MP3.
Cons:
  • 1. There could be some quality loss due to recording.

Tutorial: How to Record Spotify to MP3

Step 1. Simply hit the "Record" button to make the program ready for working.
Step 2. Go to Spotify and start to play the song. Then Wondershare Audio Recorder will detect the Spotify audio and start recording Spotify songs to MP3 or M4A format automatically.

#4. Playlist-converter.net Spotify to MP3 Online Converter (Mac & Windows)

spotify playlist converter
Playlist-converter.net is a free online app allows you to convert Spotify playlists and other services like Deezer, YouTube, etc. It enables you free convert Spotify music to MP3 format without installing any extra software.
Pros:
  • 1. A free online Spotify converter MP3 tool;
  • 2. Support different music streaming sites.
Cons:
  • 1. It takes much time to download and convert the Spotify playlist;
  • 2. Output quality could be poor.

Tutorial: How to Convert Spotify Songs to MP3 Online

Step 1. Firstly open the website and then click Spotify panel. You'll be asked to log into the Spotify account firstly.
Step 2. Next choose a playlist you created in your Spotify account and begin to convert it to MP3 format.
Step 3. Then it will generate the converted playlist with the Download button. You only need to click the Download button to access the converted Spotify music without hassle.

#5. Chrome Extension Deezify (Mac & Windows)

deezify chrome
Deezify is another free Spotify converter and downloader that can convert Spotify music to MP3 without recording. It's an extension from Chrome browser. Under the help of Deezify, you can download music from Spotify, Deezer, Xbox Music without limits and ads on both Windows and Mac as long as you have installed Chrome.
Pros:
  • 1. Free convert Spotify to MP3;
  • 2. Easy to use.
Cons:
  • 1. Not always works when downloading Spotify songs.

Tutorial: How to Convert Spotify to MP3 via Deezify Plug-in

Step 1. First of all, install the add-on Deezify from Chrome.
Step 2. Then open Spotify in the browser and play the Spotify songs you want to convert to MP3 so that Deezify will help you to get the MP3 file.

Note: However it's not stable of all time. So it's worth mentioning it won't work properly sometimes.

Any ideas or suggestion about Spotify to MP3 converters? You can share your experience with us.

Source: https://www.tuneskit.com/spotify-music-tips/top-5-spotify-converter.html

Nov 19, 2019

"Everything I Wanted" by Billie Eilish - MP3 Download Free

Who is Billie Eilish? 

Billie Eilish is an American young singer and songwriter, who has become the first the only artist born in the 2000s, to date, to record a No. 1 single in the America. Her first single was "Ocean Eyes" released in 2016 and she became well-known because of her single "Bad Guy", which hit the No. 1 on the Billboard Charts in August 2019.

Billie Eilish's New Song –"Everything I Wanted"

Released on Nov 13, 2019, Billie Eilish's new single "Everything I Wanted" is a grisly dream about stepping off the Golden Gate and finding out that people didn't like her as much as they let on. It's an impostor-syndrome fantasy, feeling like the love and respect you enjoy are undeserved and easily withdrawn. It's the first song in the 17-year-old singer's growing catalogue that reckons full-on with the meteoric success she has seen since the release of When We All Fall Asleep, Where Do We Go?, her certified double-platinum debut studio album, in March.

That album's bad dreams were about normal teenage American concerns like breakups, anxiety, and how to navigate a house party. "Everything I Wanted" is a window into a newly minted pop star's headspace: "Everybody wants something from me now / And I don't wanna let ‘em down." Do people care or are they bottlenecking because they want something, because they love a spectacle? It's not always easy to tell.

The lifeline in a song about a real dream where Eilish lurks like a ghost as people quickly get on with their lives when she dies is unconditional love. The singer recently told BBC Radio 1's Annie Mac that the song is about her relationship with her brother and collaborator Finneas. The chorus is a loving rebuttal to the feeling of inadequacy in the verses. When your life changes rapidly, it's important to keep people around you who remember where you started, who'll treat you like that person and not the one people now admire. As long as Billie Eilish keeps sight of that, she'll be fine.

"Everything I Wanted" – Free Download to Listen Offline

Now Billie Eilish's new single "Everything I Wanted" can only be listened by Premium subscribers on Spotify. Do you want to listen to this song? Or do Premium Spotify users can download this song for playback offline?

As long as you have TunesKit Spotify Music Converter, you can easily download Billie Eilish's "Everything I Wanted" and convert it to MP3 or other common formats for listening without Internet connection on any device or player you like.


Key Features of TunesKit Spotify Music Converter: 
  • Download Spotify music to MP3 losslessly
  • Keep original audio quality and ID3 tags info
  • Support various devices and media palyers
  • Listen to Spotify music without ads

Now follow the quick steps below to download Billie Eilish's "Everything I Wanted" as MP3 on Spotify.

Step 1: Launch TunesKit Spotify Music Converter on your computer. Then search Billie Eilish's single "Everything I Wanted" on Spotify and copy and paste the link of the single to the search bar of TunesKit.

Step 2: Click the menu bar and select the audio preference. Choose an output format such as MP3 for the song. You can also change the audio channel, sample rate, bit rate, etc. according to your needs.

Step 3: Now click the 'Convert' button at the bottom right corner and start to free download and convert "Everything I Wanted" song to MP3. Wait until the conversion completed and you can find it on the history folder and transfer it to your media player or device for offline listening.

P.S. "Everything I Wanted" Lyrics
 - by Billie Eilish

I had a dream
I got everything I wanted
Not what you'd think
And if I'm being honest
It might have been a nightmare
To anyone who might care
Thought I could fly
So I stepped off the golden
Nobody cried
Nobody even noticed
I saw them standing right there
Kinda thought they might care
I had a dream
I got everything I wanted
But when I wake up, I see
You with me
And you say
As long as I'm here
No one can hurt you
Don't wanna lie here
But you can learn to
If I could change the way that you see yourself
You wouldn't wonder why you hear
"They don't deserve you"
I tried to scream
But my head was under water
They called me weak
Like I'm not just somebody's daughter
Could've been a nightmare
But it felt like they were right there
And it feels like yesterday was a year ago
But I don't wanna let anybody know
'Cause everybody wants something from me now
And I don't wanna let 'em down
I had a dream
I got everything I wanted
But when I wake up, I see
You with me
And you say
As long as I'm here
No one can hurt you
Don't wanna lie here
But you can learn to
If I could change the way that you see yourself
You wouldn't wonder why you hear
"They don't deserve you."
If I knew it all then, would I do it again?
Would I do it again?
If they knew what they said would go straight to my head
What would they say instead?
If I knew it all then, would I do it again?
Would I do it again?
If they knew what they said would go straight to my head

What would they say instead?


Now listen to this song with your full heart~


Nov 18, 2019

Top Method to Set Spotify Music as Alarm on Your Phone

Is your mobile phone alarm pleasant? Do you want to change your dull built-in clock tunes to Spotify song you like? If so, you're in the right place. In this post, I will show you one easy way to set Spotify Music as alarm on your smartphone.

Part 1: Tool you'll need: TunesKit Music Converter for Spotify

No matter whether you are using iPhone or Android, you can set Spotify song as alarm on your device in a much easier way, that is, using a 3rd-party Spotify music tool like TunesKit Spotify Music Downloader to download Spotify songs and playlists offline so that you can directly copy them to iOS or Android as alarm.

The reason why Spotify music can not be set as mobile phone's alarm directly is because that Spotify songs are protected by DRM, a technology that prevents you from sharing Spotify music freely on non-approved devices. Therefore, in order to break the limit so as to set Spotify as alarm easily, you need to remove DRM from Spotify first. And that's what TunesKit Spotify Music Downloader will do for you.

TunesKit Spotify Music Converter Key Features

  • Download Spotify playlists and songs for free and premium plans
  • Convert Spotify songs to MP3, WAV, FLAC, AAC, etc.
  • Preserve lossless audio quality and ID3 tags
  • Download Spotify tracks at up to 5X faster speed

Part 2: Simple steps to Set Spotify Music as Alarm with TunesKit

Next let's see how to use Spotify songs as alarm iPhone and Andorid phone after using TunesKit to remove the restriction.

Step 1 Add Spotify songs

add spotify songs
Open TunesKit Music Converter for Spotify, then directly drag any track or album from Spotify app and drop the files into TunesKit downloading screen. Or in the other way, you can paste the URL of the Spotify songs or albums to the search bar and click 'OK' to locate the songs.

Step 2 Set output format

select output format
Simply click the menu bar and choose Preferences to select the output format, adjust the bit rate, channel, sample rate, etc.

Step 3 Download Spotify songs offline

download spotify songs
Now click 'Convert' button at the bottom right and the program will start to download and convert your Spotify tracks to common formats at up to 5X faster speed.

Step 4 Transfer Spotify songs to iPhone/Android

After downloading completed, you can find the offline songs from history folder. Then you may sync the tracks to iPhone via iTunes or transfer them to Android with USB cable.

Step 5 Use Spotify music as alarm on your phone

set iphone alarm
Take iPhone as an example. To set the converted Spotify songs as alarm, you can simply go to 'Clock' > 'Edit' > 'Sound' and then choose the ringtones that you've saved from Spotify as alarm. Now enjoy your new alarm sound from Spotify every day.

Source: https://www.tuneskit.com/spotify-music-tips/set-spotify-song-as-alarm.html

You may also interested in:
Top 5 Best Spotify Music Downloaders


Nov 12, 2019

Top 4 M4V to MP4 Free Online Converters

Due to its bad compatibility, you may sometimes want to convert M4V files to MP4 format for playing on the device you want. In this case, a good video converter tool will help you out. Since there are many free online tools on the internet and here we have picked up some of the best ones for your reference.

#1 CloudConvert
convert m4v to mp4 online with cloudconvert
This free online M4V to MP4 converter can help you easily convert any M4V file to MP4 or other common video formats in 3 simple steps only. First, add your target M4V video file for conversion and then Choose to save your converted file to cloud service such as Dropbox, Google Drive, OneDrive, etc. if needed. Then press the Start Conversion button to convert M4V to MP4 online. Wait a while until the process ends. You can also edit the video such as change the video and audio parameters according to your needs.

#2 Zamzar
convert m4v to mp4 online with zamzar
Founded in 2006, Zamzar is a free online file converter that enables users to convert files without downloading any software or registering any account. It supports thousands of files, including different media files such as M4V, MP4, MOV, MKV, MP3, FLAC, etc. You only need to upload the M4V file to the website, choose the output format and start the conversion. Besides, it offers you chances to add the files from the computer or paste the URL from the Internet. However, it also has some restrictions, for instance it only supports to convert files that are less than 50MB. Sometimes the loading speed as well as conversion speed is slow which may be caused by your bad internet connection.

#3 Convert Files
convert m4v to mp4 online with convertfiles
Convert Files is another best M4V to MP4 converter online tools that you can adopt. It supports a wide range of video file formats like M4V, MP4, VOB, AVI, WMV, MPEG, MOV, MP3, AAC, FLAC, OGG, etc. The interface is quite clear and any one can easily handle it without trouble. In addition, you can choose to import the M4V file from your computer or download it from the internet directly. After converted, you can either download it to the computer or send it to your email for safe keeping. The maximum supported video file is 250MB. Besides, it's ads supported.

#4 Online-Convert
convert m4v to mp4 online with online-convert
Another popular and free online M4V to MP4 converter is Online-Convert. This is a powerful online converter that allows users to convert a variety of videoand audio formats such as M4V, MP4, FLV, 3GP, MPEG, WEBM, MP3, AIFF, AAC, OGG, M4A, etc. You can simply enter the URL to the website or upload M4V files from your Dropbox and Google Drive. Before conversion, you're also allowed to customize the settings such as video bitrate, frame rate, audio and video codecs, rotate the video, change the quality, etc. But you need to register and log in to save all your settings.

Limitations of M4V to MP4 Converter Online Tools

Although most online M4V to MP4 converters are free and simple to operate, no software and registration required, their disadvantages and restrictions are also obvious. The following are some of limitation you should know.

  • Most M4V to MP4 online tools can only convert M4V files that are not protected by DRM technology.
  • Most online tools have set a restriction to the maximum file size to be converted.
  • Most of them don't support batch conversion, thus it may take you much time if you have many M4V files need to be converted.
  • The editing features and output quality are very basic.
  • The uploading and conversion speed depends much on the internet connection.
  • The platform is not as stable as desktop ones and it's usually ads-supported.

Extra Tip

So if you want to convert DRM-protected iTunes M4V to MP4, what will you do? TunesKit M4V Converter is highly recommended here. It is a professional M4V to MP4 converter that is capable of get rid of the copyright protection and convert iTunes M4V to MP4 quickly and easily.

Solved: How to Convert M4V to DVD on Win/Mac

How can I convert iTunes M4V movies to DVD disc for playback in the future? If you also encountered the same problem, you can read the post then. This post is going to show you the best easy way to convert M4V to DVD on Mac or Windows computer.

Part 1. Remove the Restriction from M4V Videos

As we mentioned above, all iTunes M4V movies and TV shows are encrypted with special technology. If you want to burn iTunes videos to DVD, the first thing you need to do is to remove the DRM protection from them. After that, you can then burn the common iTunes videos to DVD easily. Next, let's show you how to remove the protection from iTunes M4V videos.

Here I'd like to introduce a professional yet easy-to-use iTunes DRM removal tool named TunesKit M4V Converter to you. This is the fastest iTunes M4V converter to convert all iTunes movies and TV shows to MP4, MOV, AVI, WMV, MKV, etc. without causing any original quality loss. Besides, TunesKit M4V Converter is simple to operate and the conversion process can be finished within a couple of easy clicks.

The following is the simple steps to guide you how to get rid of DRM protection with the help of TunesKit M4V Converter. And then you can burn M4V to DVD Mac or PC computer.

Step 1 Launch TunesKit and import iTunes M4V movies

add itunes m4v videos

At first, you need to add your target iTunes M4V videos to the program after completed the installation. You can simple click the "Library" button on the top menu bar and select the ones you'd like to burn to DVD. Or you can simply drag and drop your iTunes moves to the app.

Step 2 Choose audio tracks and subtitles (optional)

select output audio tracks
Next you're freely to choose special output audio tracks and subtitles next to the column of each track. If you don't want to change anything, you can keep all the audio tracks and subtitles by default after conversion.

Step 3 Select output format

choose mp4 output format
Next click the "Format" panel and choose the MP4 (Lossless) as output format which is supported by DVD player. You can also change the codec, bit rate, and other parameters by clicking the 'Gear' icon on the top right corner of the format profile.

Step 4 Remove DRM and convert iTunes M4V videos

convert itunes m4v to mp4
After that, just click the "Convert" button to and it will start to convert iTunes M4V to MP4 at 30X faster speed. You will find all the converted DRM-free videos at the "Converted" folder soon.

Part 2. Burn Unprotected M4V Videos to DVD

Now you've got a lot of unprotected iTunes movies and the next step is to burn M4V to DVD. There are multiple free DVD burners on the internet that can help you burn DRM-free M4V to DVD such as Ashampoo Burning Studio Free, BurnAware Free, WinX DVD Author, etc. Here we just take WinX DVD Author as an example.

convert m4v to dvd with winx dvd author
Step 1. Insert a blank DVD disk first and then open WinX DVD Author once you finished the installation. Choose the "Video DVD Author" option to begin.

Step 2. Click on the "+" icon to add the converted MP4 files you want to burn and then press the ">>" icon to continue.

Step 3. Preset the preferences for your DVD file. You're allowed to choose or add a background picture, text, music or add title menu or chapter menu, etc.

Step 4. Select output folder and output formats and then click the "Start" button to start the conversion. Wait a while until the process ends.

Next time when you want to burn iTunes M4V movies to DVD disc, you can follow this guide to have a try. 

Source: https://www.tuneskit.com/drm-m4v-to-popular-formats/convert-m4v-to-dvd.html

Nov 8, 2019

BBC Radio Download : Best Methods


bbc radio download
Thanks to its credible news reporting and high-quality production, BBC radio is known for its reputed and professional news channels.As a matter of fact, BBC radio not only provides radio service, but also a wide collection of dramas and music. However, official download method is not convenient and has limitations for various reasons.
To help those in need, we have concluded the 2 best ways to download BBC radio.

1. Download BBC Radio on iPlayer Radio App

There are quite a few channels of BBC radio, including BBC radio 1 to 5. To find the download links, you would have to go to the specific channel. Therefore, it would be more convenient to download the radio on the iPlayer Radio app, which is available in Google Play Store and App Store.

iplayer radio download and record

Steps of BBC Radio Download in iPlayer Radio App

Step 1. Open BBC iPlayer and use the search bar to find the radio track or streaming audios you want to download.
Step 2. Once you found your target, click the Download button underneath the playback screen.
Step 3. The selected radio tracks will be downloaded automatically. Once the downloading process is over, you can find the tracks in the app's Download section .

Major Limitations of This Method 

  1. Offline radios will be deleted automatically 30 days after they are broadcast.
  2. Download links for some radios are not available.

2. Download Permanent BBC Radio Audios with BBC Downloader

Compared with the last option, TunesKit Audio Capture is a smarter choice for capturing any BBC radio.
Download Link

Main Advantages

  1. What you hear is what you get - the offline radio downloaded by this tool will retain the original sound quality.
  2. Various formats  - available formats include MP3, AAC, FLAC, M4A, WAV. For instance, BBC radio drama mp3 free download is totally acchievable.
  3. High efficiency - you can download multiple radios at the same time. Each track will focus on downloading only one radio.

Tutorial to BBC Radio Download with TunesKit Audio Capture

Step 1: Open TunesKit Audio Capture and configure the settings


main interface
Launch TunesKit Audio Capture, then click "+" button to add the browser you want to open BBC radio with.
Don't forget to adjust output settings. By clicking the trumpet-shaped "Format" button, you can adjust the output parameters, including format, codec, sample rate, etc.

set output format

Step 2: Play and record BBC radio tracks


record  bbc radio
Tap on the target browser on the program list. The browser and a capture window will be opened automatically. Go to the BBC radio site and play the target radio, and the radio will be recorded on the recording window. You might as well play multiple radios at the same time to capture all of them simultaneously.

Step 3: Customize recorded BBC radio tracks


edit downloaded bbc radio
When all the radios have been downloaded and captured, click the Stop button to enter the result window. In this window, tap the edit button at the rear of each track, opening the built-in editor. With the editor, you are able to trim the tracks however you like. Finally, press the Save button to save the tracks. Open the History tab in the main window, and you will be able to navigate to the folders the tracks are saved.

Summary

Now you have seen the two best methods to download BBC radio. One is the official way, and the other resorts to TunesKit Audio Capture. Which method is better? It can be only answered by you.

Nov 6, 2019

iPhone Stuck on Spinning Wheel? Fixed!

Posted by Brian Davis on Nov 6, 2019 6:52 PM
iphone black screen with spinning wheel

With iOS 13 publised for some time, it is often reported by some users that they found their iPhone stuck on black screen with spinning wheel. In fact, the iPhone spinning wheel problem has never been eradicated. Don't panic! This post will help you understand the problem and how to solve it.

Reasons Behind the Spinning Wheel Problem

The main reason for the iPhone spinning wheel issue lies in software bugs of both Android and iOS, especially iOS 13.

Solving the iPhone Spinning Wheel Issues in 5 Ways

After careful collection of information and tests, we have concluded some simple, fast and effective solutions. All you need to do is them one by one until your problem is solved.

1. Force Restart iPhone

No matter how complex the problem is, there is always a chance that a force restart will fix this problem. It will automatically fix iOS bugs and kill the apps running in the background. Always make sure that the iPhone is charged to reasonable capacity before initiating a force restart.
iPhone 6S and earlier models: Hold both the Power and Home buttons until the Apple logo appears.
iPhone 7 and derivatives: Press and hold the Power and the Volume Down button simultaneously until the Apple logo appears.
iPhone 8, 8 Plus and later models: Press Volume Up and do the same to the Volume Down button; hold the Power button until the Apple logo appears.
hard reboot iphone

2. Turn off App Notifications

The spinning wheel problem may be caused by App notification. To disable it, simply:
• Go to Settings, click the Notifications;
• Click the specific app and toggle the 'Allow Notifications' to turn it off.
turn off app notifications

3. Update iOS to the latest version

The updates of iOS bring in new features while resolving bugs and glitches. If your iPhone stuck on black screen with spinning wheel, it is probably because you are running an old iOS, where some bugs remain unfixed. To update simply;
update ios system
• Click on 'Settings' and turn on the Wi-Fi;
• Go back to the 'Settings' menu and scroll down to 'General';
• On the new windows click "Software Update";
• Click 'Download and Install', and your phone will reboot after the process.

4. Use Third-Party Software to Fix iPhone Spinning Wheel Problem.

If all the above solutions failed, you should consider using TunesKit iOS System Recovery, which can restore your iPhone without data loss. It guarantees to resolve more than 30 iOS issues. In addition, this program is now free of charge due to TunesKit's Halloween Sale, you can find the free coupon and download links here: TunesKit Halloween Sale.

Step 1: Launch TunesKit and connect iPhone to computer

connect iphone
Launch TunesKit software and then connect the device to your computer using a USB cable. After the device is detected, you can put your iPhone into recovery mode with one click.  Click 'Start' and then select 'Standard Mode' on the next window, and then click 'Next'.

Step 2: Download firmware package

download firmware
Ensure that device details on the window are correct. Click 'Download' to download the matching firmware package.

Step 3: Start the system recovery

fix ios
After complete downloading, click 'Repair' to begin the recovery process, by the end of which your iPhone should back to normal

Conclusion

"iPhone spinning wheel problem" is undeniably a common problem for iOS users, but it doesn't mean it can be fixed easily. We sincerely hope that the 5 solutions can help you out of the trouble.

Nov 1, 2019

How to Download Music from Pandora - 2 Best Ways

pandora music station

Pandora is a music streaming and  music recommendation service that can be accessed through a web browser or mobile app. It offers 3 subscription plans for its users. The first option is a free trial, with which users can only listen to the free Pandora music radio online but cannot download it. The other two allow users download music from Pandora but somehow have other limits too. Therefore, we now provide you with best method to download Pandora Radio.

Method 1. Download Music from Pandora with TunesKit Audio Capture

Due to the limit of the subscription plans, a third-party tool would make downloading from Pandora a lot easier. TunesKit Audio Capture, a professional Pandora downloader and recorder that can easily download and convert any Pandora playlist in lossless high quality, and save them in common audio formats like MP3, AAC, WAV, FLAC, etc.
  • Download and record an unlimited number of Pandora music radios
  • Convert Pandora music to MP3, AAC, WAV, FLAC, M4A, M4B
  • Retain the original audio quality and ID3 tags
  • Support multi-track recording, audio cutting and mixing
  • Capture sound from any programs on your computer

Steps to Record and Download Pandora with TunesKit Audio Capture

Step 1. Launch TunesKit Audio Capture

set capture preferences
After launching TunesKit Audio Capture, you'll be prompted with a window where a list of programs displayed. You can add new programs by clicking the "+" button. Make sure the web browser you open Pandora with is added to the list. Next, click the "format" icon at right bottom to set the output format.
set output format

Step 2. Start to record and download Pandora music

tuneskit streaming audio capture
Now any browser from the starting window and it will open automatically. Then go to the Pandora music site and log into your own account.  Then play tracks you want to download in different tabs at the same time. TunesKit Audio Capture will divide them into separate tracks individually and download them.

Step 3. Edit downloaded tracks

edit audio
At the rear of each recorded track, you'll find the "edit" icon which will let you trim the recorded tracks flexibly. You can also edit the ID3 tags of the music in this window.

Step 4. Save and locate recorded Pandora radio

locate pandora music
When you have finished downloading, simply quit the browser. Then the Cancel button will change to Save. Click it and all your recordings are saved instantly. After that, you can find all recorded tracks in the history folder. Then you can play each audio to preview the quality and delete the unwanted audios.

Method 2. Download Pandora Music with Chrome Extension

This solution only works for Chrome, because it provides Pandora extension in Chrome web store which will enable you to download what you are playing in Pandora. The best part is that it is completely free and free from malware and advertisements. You just need to install it in Chrome and you can begin to download Pandora playlist right away.

Step 1. Install Pandora Download Links extension


pandora download links
The extension's name is Pandora Download Links. Visit the store and search the extension, then add it to Chrome.

Step 2. Start to download Pandora music

download pandora radio
Go to the Pandora website, log into your account and begin to play any Pandora radio. Next to the song, you can see a download button. Click on it and save Pandora playlist on your computer. Then you can freely listen to the downloaded Pandora music offline.