Showing posts with label fix ios to normal free. Show all posts

Aug 27, 2020

Troubleshooting Guides to Fix iPhone Ghost Touch

 iPhone ghost touch means that the iPhone pops up being touched by itself as if it is operated automatically or by other people we cannot see. This may seem a little scary yet it can be fixed by many easy methods. So just check out this article.

First, why does the iPhone appear ghost touch? many models including iPhone XR, iPhone 8,7, and etc showing ghost touch may be attributed to a wrong display, injured screen factors, software glitches and errors, defective digital manufacturing, and the like. 

The Best Way

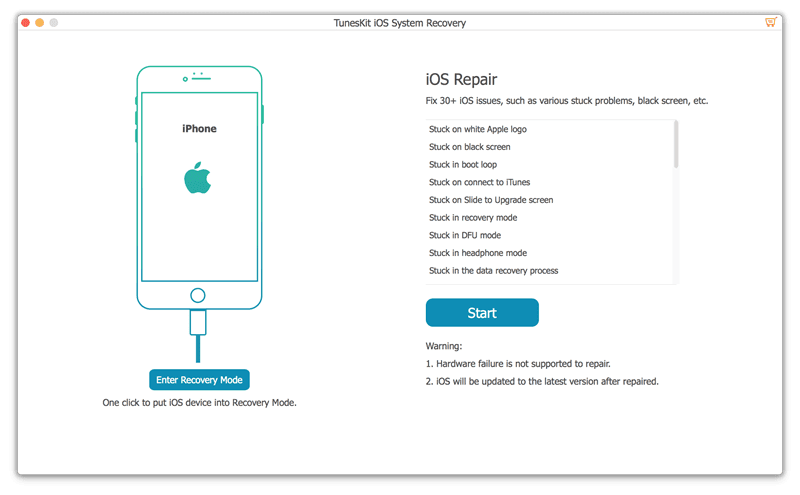
Now let's look at the best way to solve the iPhone ghost touch. That is using TunesKit iOS System Recovery. It is a relatively popular program to bring your iOS system back to normal with almost every problem solved. It fixes all iOS and tvOS system issues including iPhone recovery mode, white Apple logo, black screen, Apple TV issues, etc. Besides, there is no data loss after the reparation with standard mode. Moreover, it supports diverse devices like iPhone, iPad, iPod touch, and Apple TV, and all iOS versions, including the latest iOS 13. Finally, it has a simple interface that is easily understood and operated by customers.

To repair the iPhone ghost touch screen issue, you just follow three steps.

Step 1: Firstly, open TunesKit iOS System Recovery for Windows on your computer. Then you have to connect your iPhone till it's detected. Next, click the "Start" button. Next, choose the "Standard Mode" and "Next". You have to select which device you've connected. Then follow the instructions from the interface and let your device is into DFU mode. After that, click the "Next" button.
Step 2: The application will download the firmware package matched to your device after finishing the first step. Before that, you have to make sure the device info is correct, including the model version, iOS version, etc. You can correct it if there's anything wrong. If all information is correct, click the "Download" and it will start downloading and verifying the firmware.

Step 3: When the firmware has been downloaded successfully, you just click the "Repair" button and the program will automatically begin to fix your iPhone. Don’t disconnect your device until the process is completed. Otherwise, the device might become bricked.

Other Methods

1. Clean the Touchscreen of Your iPhone

You may wonder why cleaning iPhone touchscreen works. It is because some dust and particles on your iPhone may make the device act on its own, especially when the dust is accumulated after a quite long time. It is simple for you to clean the iPhone touchscreen. Before starting, you have to switch the iPhone off and unplug all connected cables. Then you are supposed to get a clean and uncouth cloth or tissue paper with some water. Lastly, you can begin wiping your device’s screen from the top to the end in a gentle manner.

2. Remove Your iPhone Screen Protector

Although the screen protector is usually employed by users to keep the iPhone from scratch, it may sometimes cause some issues about operations like ghost touch. Under such circumstances, you have to take off your iPhone’s screen protector to get the problem solved. Take it from one corner and then step by step, slowly remove it completely.

3. Take off Your iPhone’s Case

Similar to the screen protectors, iPhone’s case also leads to ghost touch problems. When you find that your device’s screen is slightly twisted, you can take away the case of your iPhone. As the hard case may occasionally twist your iPhone’s screen. The iPhone ghost touch screen problem may be fixed after removing the case.

4. Restart Your Device

Whenever the iPhone gets wrong, most people always let their iPhone power off and restart them first. You can also have a try to restart your iPhone after having used above quick fixes which cannot solve the problem as expected.

If you use iPhone X and later, press the slide and volume button. When the slide to power off signal shows, slide it to the right.

If your device is the iPhone 8 and earlier, press the top button and you will see a power-off sign, then swipe it to the right.

5.  Recover iPhone by Putting it into Recovery Mode

If restarting iPhone doesn’t help you, to put your iPhone into recovery mode may also do the trick. But recovering iPhone might cause some data loss. So you are suggested to do data backup before putting the iPhone into recovery mode.

Please follow these steps to get the iPhone into recovery mode.

Step 1: Click iTunes on your computer and connect your device.

Step 2: Hold and release the volume up and down button respectively.

Step 3: Press the side button and enter the recovery mode.

Step 4: Finally click update or restore.

6. Factory Reset Your iPhone

A factory reset usually can fix the problem of ghost touch on the iPhone, because it can remove some settings that cause the problem. But this method will remove all data of your iPhone. So you are suggested to backup data before you try the following steps.

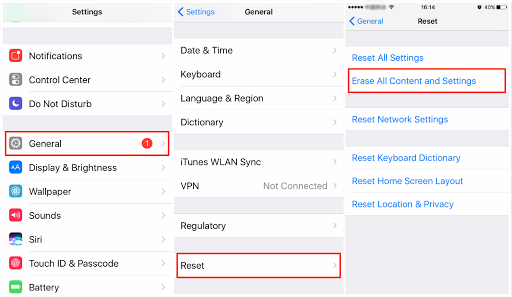
To factory reset your iPhone, go to Settings, then the General, next to the Reset, and finally Erase all Contents and Settings. Enter the device's passcode when prompted and then click on "Erase iPhone" to complete the process.

7. Restore Your iPhone via iTunes

If the above methods don’t work, then you are suggested to try to restore your iPhone in iTunes. If you don’t mind the data loss, you can follow the following steps:

Step 1: Open the iTunes and connect your iPhone to the computer.

Step 2: Click the iPhone icon when the iPhone appears in iTunes successfully.

Step 3: Click “Restore iPhone” in the column of Summary.

Step 4: Click “Restore” again to make sure the process works well and then iTunes will restore the device connected to the factory settings.

8. Contact Apple

If you got this far, it might mean the problem is not solved yet. Then the final try should be bringing your iPhone to the Apple store. The store will provide free and authorized service to make the ghost touch on your iPhone fixed. But first, you have to make sure you have got data backups by iTunes and iCloud.

We sincerely hope this full guides to solve iPhone ghost touch can be useful for you. If you feel it's good, you can share this post with your friends or relatives who have the same problem. And if you have any questions, leave your comment below.

Aug 17, 2020

6 Proven Methods: Fix iPad Screen Flickring

The Apple company launches the iPad as its the "smartest" tablet computer in the world. Thus it has become wildly popular among many people, as they enjoy its beautiful design, powerful performance, and convenience. However, there are also glitches such as iPad screen flickering that occurred on this electronic device. Did you meet with this issue before? If you did, take it easy, in the following, we will guide you on how to solve this problem step by step.

Tip 1: Restart your iPad

Rebooting is one of the most common fixes for a variety of iPad problems as well as any other computers. Restarting helps one override the software glitches that may be inhibiting normal software functioning which may be the core of your iPad screen flickering problem.

For iPad with a home button: simply press and hold the Home button and Top button simultaneously until an Apple logo appears then release both buttons.

Other models: Press and quickly release the Volume Up button, repeat the same for the Volume Down button and then press and hold the top button until an Apple logo appears then release the button.

Tip 2: Check if it is in a particular app

If your iPad mini screen flickering problem is not fixed by restarting, then you should proceed to check if the iPad flickers when running a particular application. The flickering could be as a result of a 'misbehaving' application. If you find such an application, force quitting the application is highly recommended. So, how do you force quit?

For iPads with Home button, you only need to press the Home button to open the app switcher then swipe away the particular application.

For iPads with no Home button, slide your finger from the bottom to open the app switcher then swipe away to force quit the application.

Try re-launching the application and if the flickering persists you can proceed to uninstall the application and install it later on.

Tip 3: Check auto-brightness feature

Usually, iPads have an auto-brightness feature that facilitates screen light adjustment according to light in your environment. If enabled the screen could appear to flicker depending on the change of the surrounding light. However, this may not be issued. To be sure, you need to disable the feature. To disable follow the following steps;

Step 1: Click on "settings" on the interface.

Step 2: Scroll down to tap the "Accessibility" button. 

Step 3: Select 'Display Accommodations' from the options.

Step 4: You will find the auto-brightness feature, move the slider to disable. After disabling the screen light will remain constant.

Tip 4: Reduce motion and transparency

In any case that the iPad Pro screen flickering problem is not solved by disabling the auto-brightness feature, you should proceed to disable the motion and transparency feature. It goes a long way in improving the performance of the iPad. To disable follow the following steps.

Step 1: From the main screen click on 'Settings'.

Step 2: Select 'General' and then 'Accessibility'.

Step 3: Select 'Increase Contrast' and then move the slider forward to enable 'Reduce Transparency'.

Step 4: Go back to the 'Accessibility' and move the slider in front to enable 'Reduce Motion'. This way, the iPad screen flickering on and off may stop.

Tip 5: Use iOS system recovery tools with no data loss

If all the above-stated solutions do not work to resolve your iPad screen flickering won't turn on, then the TunesKit iOS system recovery tool is your best chance to resolve the issue once and for all. TunesKit iOS Repair is designed to help you resolve both common and serious iOS errors without losing any data from your iPad. The screen flickering issue at this point maybe as a result of iOS failures. The software provides you with two repair modes namely Standard Mode and Advanced Mode. It is also compatible with all iOS and iDevices including iPads, iPhones among others.

All you need is to download TunesKit iOS System Recovery and then follow the following steps to fix the problem.

Step 1: Connect Device and Select Repair Mode
Launch the application on Mac and then proceed to connect your iPad to the computer. Once it is detected, click on the 'start' tab to proceed to the next window. Select 'Standard Mode' as your repair mode and click 'next'. You will be requested to put your iPad on DFU or recovery mode. Follow the instruction and click 'Next'.
Step 2: Download the Latest Firmware Package
Here, the program will proceed to download the latest firmware package to recover the iOS back to normal. It is crucial that you confirm the device info to make sure it is correct. If not, you can manually correct it. Proceed to hit 'Download' to download.
Step 3: Recover and Fix iOS System
Once the download is complete, click on the 'Repair' button on your screen to initiate the repair process. Make sure your iPad is connected during this time. The repair will only take a few minutes. If the Standard Mode does not work you can proceed to use the Advanced Mode using the same procedure.

Tip 6: iPad screen repair

If at this juncture, your iPad is still flickering then there must be a hardware problem. It is possible that the gadget was dropped on a hard surface or fallen into the water. iPad screen repair is quite a complicated process and hence it is highly recommendable that you seek a professional assistant. Equally, you can visit the nearest Apple service shop for assistance. They will definitely help you out.

Conclusion

The above methods listed are of great significance to fix iPad screen flickering. When you or your friends come across such a problem, you can use these fixes to resolve this issue. But the best way, as far as I am concerned, is still to employ professional iOS system repair programs like TunesKit iOS System Recovery.


Aug 14, 2020

Fixes to iPhone X Reboot Loop

The Apple company widely promote iPhone X as its processor is different from that of others. However, during the process of using the iPhone X, some iPhone issues such as boot loop still occur. Are you confused or head-stretched by this problem? Take it easy! This post will give you some valuable tips to fix it.


But now let us move onto the first part -- why the iPhone X bump into the boot loop. The followings are the main reasons.

1. Unsuccessful update: An unsuccessful update may be caused by a bad connection of the internet and the halted update process can easily result in a boot loop. A boot loop can occur even though you've already finished the update.

2. Malfunctioning hardware: malfunctioning hardware could probably be a damaged battery connector or a broken component. Under this circumstance, it's better to repair or replace the malfunctioning hardware as soon as possible.

3. Jailbroken iPhone: Jailbreaking is a double-edged sword. You can acquire extra services after jailbreaking while a jailbroken iPhone X is more likely to be affected by malware or virus attack, which can end up in a boot loop as well.

Now it's time to go to the next part. That is how to fix the iPhone X boot loop. There are 3 methods to troubleshoot the boot loop despite what resulted in it.

Solution 1: Force Restart iPhone X

If your iPhone X stuck in a boot loop, the first thing you should try is to force start it. Force restart on iPhone X, XS, XS Max, or iPhone 8 is quite different from iPhone 6S, 7, and 7 plus. The routine requires a three-button procedure, involving pressing and holding the side button and one of the volume buttons.

Step 1: Quickly press and release the volume up button.

Step 2: Quickly press and release the volume down button.

Step 3: Press and keep holding the side button until the screen turns off and then turns back on. Then you can release the side button when the Apple logo appears. After that, your iPhone X will restart automatically.

Solution 2: Restore Your iPhone X Through iTunes

When force restart does not work with your iPhone X, you can try the following steps to restore it via iTunes.

Step 1: Simply connect your boot loop iPhone X to a computer and launch iTunes.

Step 2: A pop-up window will appear not long after iTunes finish detecting a problem of your iPhone X. Just hit "Restore" to get your device out of the boot loop.

Step 3: If the pop-up didn't show up, you can click on "Summary" and then "Restore iPhone" to restore your iPhone X manually.

Solution 3: Use professional tool without data loss

iTunes provides a quick and convenient fix to the problem, but the unavoidable defect is that it may cause data loss to some extent. Therefore, we have another option for you— TunesKit iOS System Recovery. This smarter and faster program focus on rescuing your iPhone from various scenarios including boot loop, black/blue/frozen/white screen, DFU mode, and recovery mode. No data will lose and it works for most iDevices.
Next, we will present to you how easy using TunesKit iOS System Recovery to repair iPhone X stuck in the boot loop can be.

Step 1: Download the free trial of TunesKit and connect the iPhone X to your PC. After that, launch the program and click "Start" to move forward.

Step 2: In the next window, choose the "Standard Mode" and press "Next" on the right bottom.

Step 3: Download the firm package matched to iPhone X. Once the correct package is downloaded, begin to recover the iOS System and get your iPhone X out of the boot loop.

Conclusion

Your iPhone X may be stuck in a boot loop many times, but don't worry, use the above three fixes to solve it. if it cannot be fixed by force restart and iTunes, TunesKit iOS Repair will be worth trying.


Aug 13, 2020

Why My iPhone Screen Stays Green!!

Today I saw a commercial advertisement which showed that a girl held her iPhone, crying: “Why my iPhone screen stays green?”
iPhone green screen issue is a common error and the girl totally has no need to worry. It is usually caused by the wrong screen option and display features on your iPhone or other issues. Here are 6 methods prepared for her and all the iPhone users. Just follow the instructions and you will find the answer you want.


1.Change the Display Settings

You need to make some adjustments on your iPhone display settings such as brightness, true tone, and other relevant options.

To adjust the brightness of your phone, you should go to Settings > Display & Brightness, then drag the Brightness slider to the left or right.


To enable True Tone, you should go to Settings > Select Display & Brightness > Then tap the switch next to True Tone to enable the feature. With this feature, your iPhone display will automatically adapt the lighting conditions that is suitable for your iPhone, and make colors look consistent in different environment.


2. Remove All the Apps Running in the Background

If too many apps run in the background, your iPhone will also run into the situation that the iPhone screen is green. So, you can also fix this problem by removing apps that are running in the background. First, press the home button twice. Then you will see all the apps you have been running. Next, swipe up the apps from the bottom of your phone.

3. Hard Reboot Your iPhone

You can hard reboot your iPhone according to your device model.

iPhone 8 or later (X/XS): Press and quickly release the Volume up button. Then press and quickly release the Volume Down button. Then press and hold the Side button until you see the Apple logo.

iPhone 7, 7 Plus & iPod touch (7th gen): Press and hold both the Side (or Top) button and the Volume Down button for at least 10 seconds until you see the Apple logo.

iPhone 6s or earlier & iPod touch (6th gen) or earlier: Press and hold both the Side (or Top) button and the Home button for at least 10 seconds, until you see the Apple logo.

4. Update iOS System to the Latest Version

As many technical specialists suggested, updating the iOS system on your iPhone can repair some burn-in issues. If you are running an outdated version of the app or haven’t updated the iOS system on your phone, you may encounter some issues like your iPhone X green screen of death.

5. Reset the Settings on Your iPhone

It will be helpful for you to set your iPhone back to the factory settings to clear any customized settings that somehow triggered the iPhone green screen. Doing so will recover your iPhone settings to their original settings. Here are the detailed steps.

Step 1. Go to ‘Settings’ > ‘General’

Step 2. Find the ‘Reset’ button

Step 3. Choose ‘Erase All Content and Settings’

Note: You should aware that all the data on your phone will be erased after resetting, so you must back up your data first with iTunes or iCloud.

6. Fix iPhone Green Screen with TunesKit

If your problem still cannot be fixed after doing the 5 tips above, there is likely something wrong with your iOS system. As a result, you need a professional iOS system repair tool to help you fix this problem. Here we will recommend you to use TunesKit iOS System Recovery.

Regarded as one of the best iOS repair software, TunesKit can fix more than 50 iOS issues like the iPhone green screen of death fix, iPhone stuck on white apple logo, iPhone black screen without any data loss. And you even don’t need to back up the data and can fix your problem with easy 3 steps.

Step 1. Open TunesKit and connect your iPhone to PC

First, you should open TunesKit on your computer. Then connect your phone with computer via a USB cable. Press the ‘Start’ button.

Step 2. Select a repairing mode and Download firmware package

There are two repairing modes you can choose. To fix the iPhone green screen issue, you should choose the Standard Mode first.

Note: Standard Mode can solve the common iOS issues and repair the iOS system without any data loss. Advanced Mode can fix more serious iOS issues but it will erase all data on your phone.

Next, you should confirm your device information is correct and then press the ‘Download’ button.

Step 3. Recover the iOS system

After your firmware package has been downloaded, click the ‘Repair’ button and wait for the recovering process finished.

Summary  

Among the solutions above, you will find that TunesKit is your best choice. It is very easy to operate so you can fix your all iOS issues in minutes without asking for help from technical specialists. The most important is that the standard mode will not cause data loss. Why not download it and have a try?

For more: https://www.tuneskit.com/ios-repair/iphone-green-screen.html