Sep 30, 2020

How to Cut Videos in VLC for Free? Done Here!

vlc video cutter

I believe many people are familiar with VLC Media Player, a most well-known free cross-platform multimedia player. I guess most of them only use VLC Media Player to play videos, audios and DVDs from different sources. But VLC has additional functions. For example, it can also be used as a video trimmer to cut any videos into small clips. It supports many kinds of operating systems, including Mac, Windows, Ubuntu, or Linux. With VLC, you can easily cut out small segments from any video for free. Now let me perform the specific steps to show how to use this VLC cutting tool to cut video clips without hassle.


VLC Video Cutter - How to Easily Trim Videos with VLC

Before keep reading, you should download and install  VLC media player in the latest version on your computer.

Step 1 Launch VLC media player

vlc media player

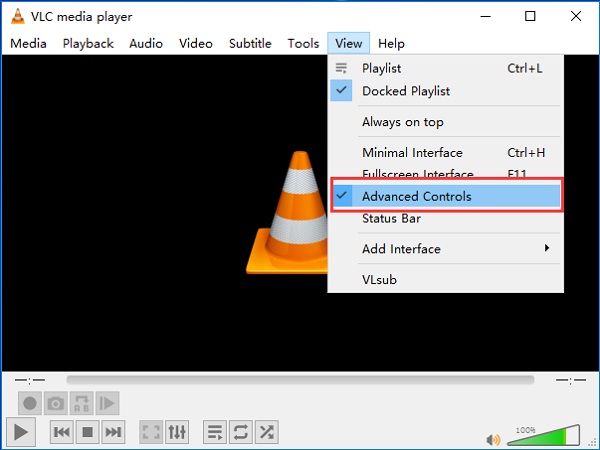
Firstly, double-click VLC Media Player to open this software. Then check the top menu bar, and tap View > Advanced Controls.

Step 2 Add the video you want to cut

add video to vlc

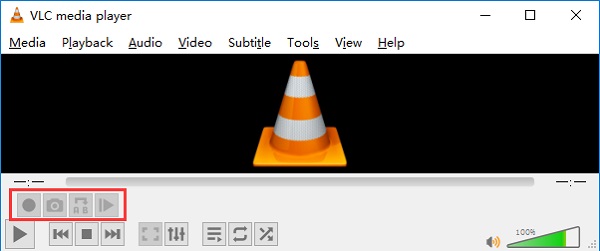
If you have activated the advanced controls, four more buttons will show up above the normal player control buttons. Hit Media, click Open File to add a video you plan to trim. Besides, there is another faster way to import videos: directly drag and drop the video to VLC.

Step 3 Play and record the video

cut videos in vlc

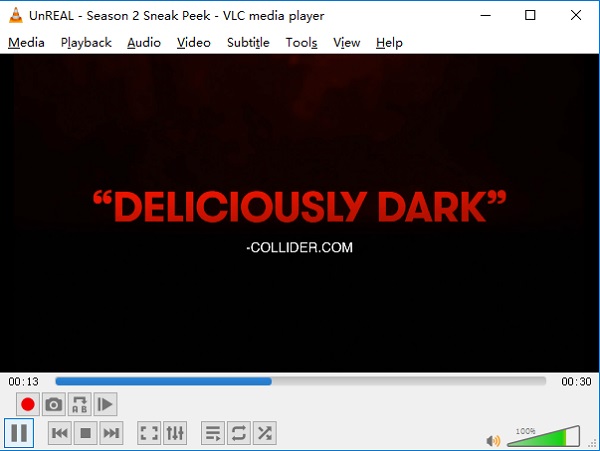
Now start to play the video and scroll around to the starting point from where you want to trim. At the starting point, click on the Record button. For a more accurate recording, you can also use the Frame by Frame button to navigate to the exact frame you want to start recording.

Step 4 Stop cutting

Hit the Record button again once you reach the ending point. Then the trimmed video clip will be saved automatically as the MP4 format under C:\Users\Username\Videos folder on Windows.


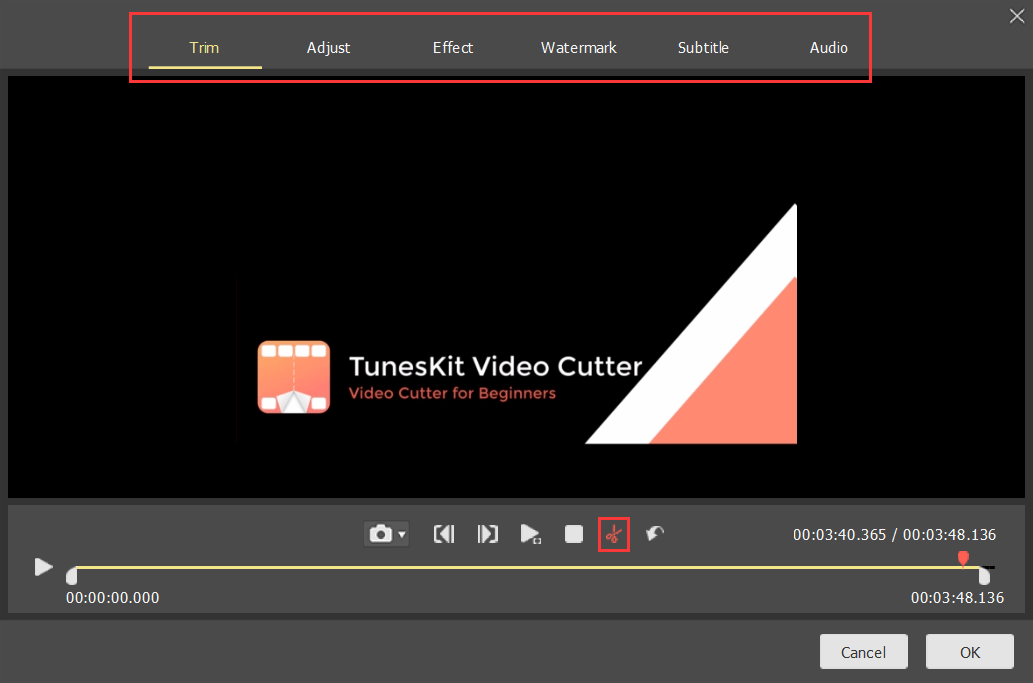
More Tips: How to Cut Video with VLC Alternative - TunesKit Video Cutter

Form the steps above, I believe you have known that using VLC as a video cutter to trim videos is very slow. The reason is that you must sit in front of the computer to keep your eye on this software when VLC trims the video frame by frame. Therefore, if you cut a large video, it may be time-consumed. When you want to cut a video in large size or quantity, VLC is not a reliable solution. 

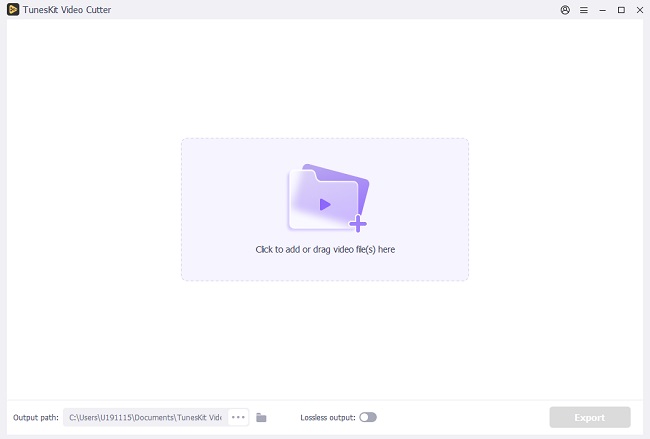
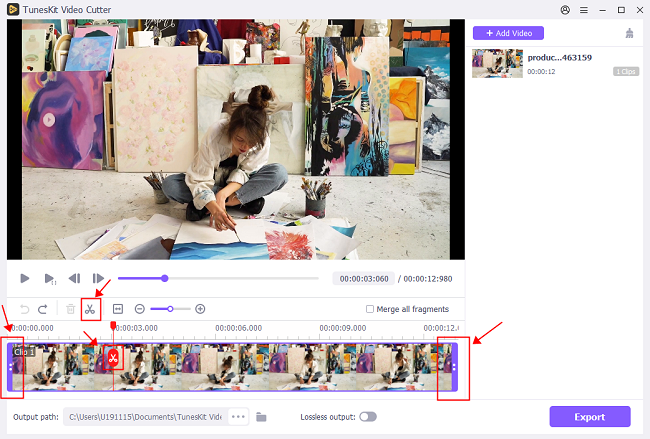
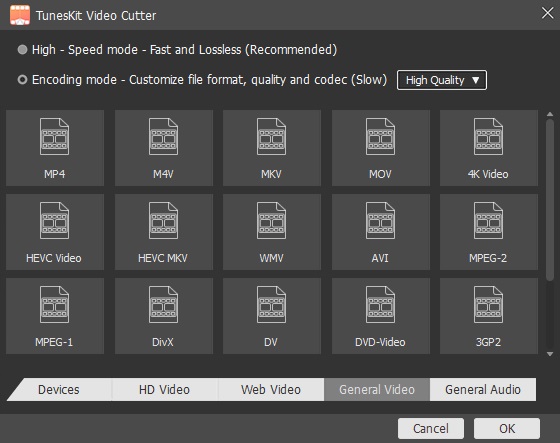
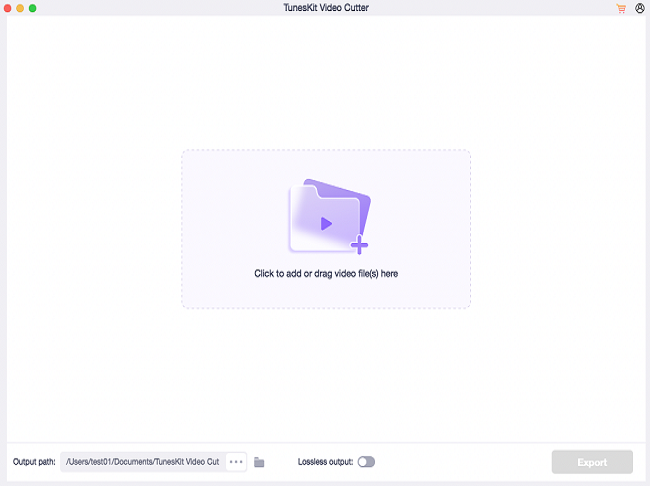
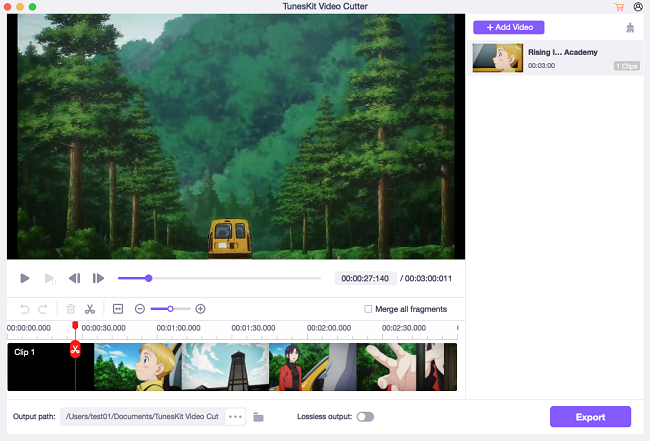
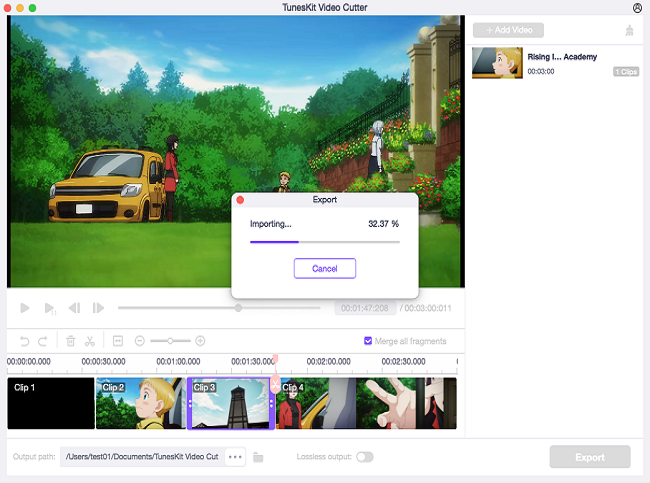
Wonder to find a smart and fast video splitting tool to cut large videos with more powerful and professional functionality? TunesKit Video Cutter is highly recommended, the best alternative to VLC.

tuneskit video cutter

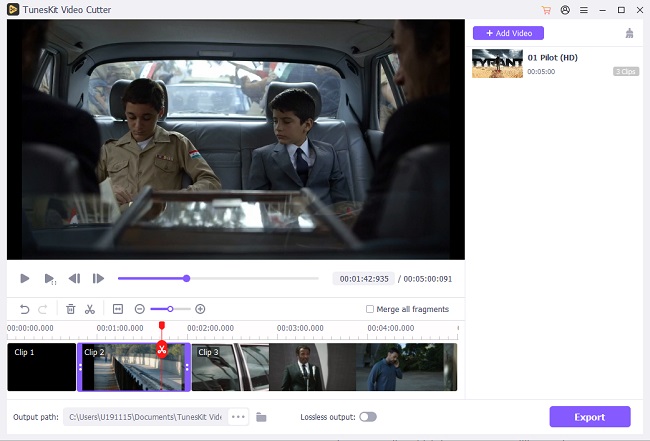
  • Cut any media files without depressing any quality
  • Trim videos/audios at up to 60X faster speed
  • Offer 3 options to trim multimedia files
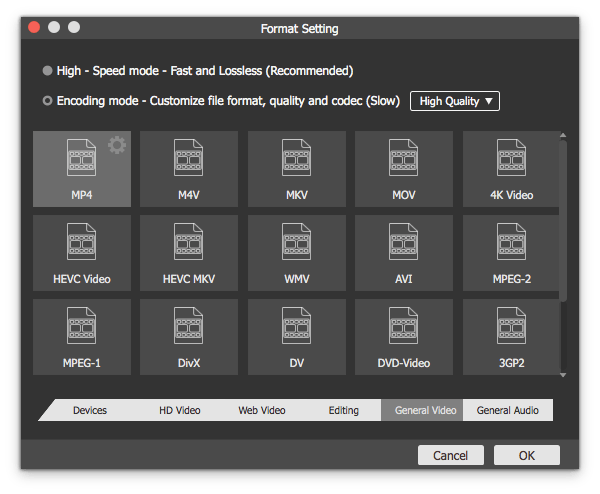
  • Convert the segments to popular formats and devices
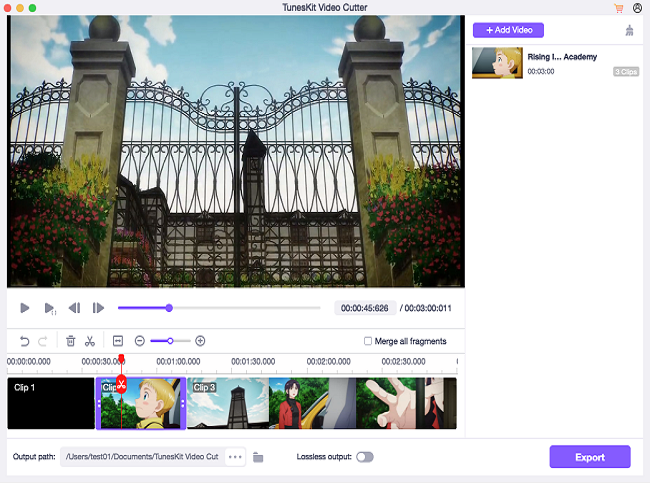
  • Combine multiple sections  from the same source file into a new file
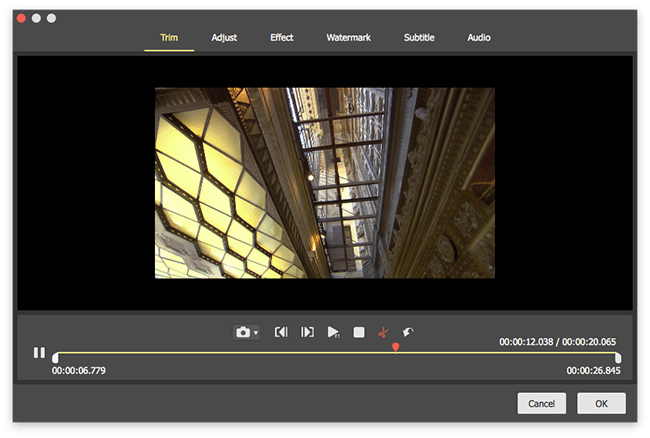
  • Edit the video clips with various editing tools

More Details of VLC Media Player

As a free and open-source, cross-platform media player, VLC media player (also known as VLC), is available for both desktop and mobile operating systems, including Windows, Mac, Linux, Android, iOS, Windows Phone and more. With high compatibility, VLC supports playing many audio and video file formats, including DVD-Video, video CD and streaming protocols.

Input Formats

VLC can read a wide range of formats, including 3GP, ASF, AVI, DVR-MS, FLV, MKV, MIDI, QuickTime File Format, MP4, OGG, OGM, WAV, MPEG-2, AIFF, Raw audio, Raw DV, MXF, VOB, RM, DVD-Video, VCD, SVCD, CD Audio, DVB, AAC, AC3, ALAC, AMR, DTS, DV Audio, XM, FLAC, It, MACE, Mod, MP3, etc.

Output Formats

Besides, VLC can also transcode or stream audio and video into several formats, including ASF, AVI, FLAC, FLV, Fraps, MKV, MP4, MP, JPEG, MPEG-2, OGG, PS, PVA, QuickTime File Format, TS, WAV, WebM, AAC, AC-3, DV Audio, FLAC, MP3, etc.

You may also like:

[Review] Top 4 M4A Cutters 

6 Best Free Video Cutter No Watermark

Sep 29, 2020

Play DVD on Kindle Fire? Check This!

Kindle Fire is a kind of economical and useful tablet. Many people use it to watch movies, listen to music, and so on. Some DVD lovers ask me if it is possible to play DVD on Kind Fire. My answer is YES, but some preparations are needed. if you have the same question, just read this article and you will know how to play your DVDs on Kind Fire.


Preparation

1.     A DVD ripper. You will use it to rip DVD to Kindle Fire.

2.     Your DVDs.

3.     A computer with a DVD drive. If your computer is not with one. Look for an external DVD drive.

Find a DVD to Kindle Fire Ripper

You do not have to prepare multiple things. Most of the work will be done by your DVD ripper. That is to say, get a good DVD ripper is very important for you. What kind of DVD ripper can be called a good one? You need a ripper which can rip DVD into many formats and has the ability to decode DVDs.

TunesKit Video Converter is a good choice for you. This program can decrypt the protected DVDs and convert DVD or other videos to over 250 kinds of formats. So that you can play the output video on 68+devices like Apple, Samsung, Huawei, Smart TV, Game Consoles, and so on. Most people don’t want any quality loss. This software can meet them, too. Besides, the speed of converting is very fast. You only need 2 minutes to convert a 120-minute movie.

You can also split video or audio files into many smaller clips, add effect and frame and use other interesting editing functions with TunesKit.

Follow the 3 steps below to rip DVD to Kindle Fire. And you need to download and install this DVD ripper first.

Step 1 Launch TunesKit and Add DVDs

First of all, put the DVD into the DVD driver of the computer. Let the computer detect them. Open this converter. The main part of the interface is dark purple. The important buttons are all orange. Thus, it is easy to find and operate. On the top part of the interface is located three buttons. When you need to convert DVDs, you should click the first button, then a pop-up appears. Add DVD files by it. Or you can just open the DVD folder on the computer and then drag and drop the target files to the program.

Step 2 Set Target Format

Now, you should start to pick the target format. To play DVD on Kindle Fire, you need to choose the MP4 format, which is used widely as a kind of video format. At the bottom of this interface, there are some buttons. The first one is the Format button. Click this button and the Encoding mode. You can customize format, quality, and codec under this mode. Choose the General Video button and the MP4 button. Click the OK button after all the operations.

Step 3 Convert DVD to Kindle Fire

Click the Output button to find a place to put aside the video on your computer. Then click the Convert button and wait for the conversion which will be one or two minutes. Then just click the Converted button on the top of this page. You will find the converted DVD video.

Summary

Now you already know everything about how to play DVD on Kindle Fire. You need a computer with a drive. Most importantly, you need a DVD ripper to help you rip the DVDs. You can choose TunesKit Video Converter to rip your DVDs without data loss.


Source article: https://www.tuneskit.com/video-converting-tips/convert-dvd-to-kindle-fire.html


Sep 28, 2020

Free MP3 Music Cutter for Windows/Mac? Top 6 Tools Recommended.

Are you music lovers? If so, I guess you may need to cut MP3 audio files. For example, you may want to set the best part of a specific song as the ringtone. No matter what your purpose is, you need to rely on some third-party tools, like an easy-to-use MP3 cutter to help you cut and edit the audio if needed.

Luckily, MP3 is a common format so many free MP3 music cutters are accessible in the market. To save your time and effort, this article is listing the top 6 free MP3 cutters, with which you can split, join and edit any MP3 audio track on both Mac and Windows.

#1. MixPad (Mac/Windows)

mixpad music cutter

MixPad is a professional and free multi-track mixing tool for Mac and PC. In general, people only know that it can merge multiple audio tracks into one. But in addition to that, it is also a great MP3 splitter to cut MP3 files into small pieces. Besides, you can also record and edit any audio.

  • A simple-to-use MP3 music tool
  • Not good enough when compared with professional music mixer

#2. mp3DirectCut (Windows)

mp3directcut

Like MixPad listed above, mp3DirectCut is also free of charge. And it is a lossless MP3 cutter to trim the MP3 track without re-encoding the file. What's more, it is also an audio editor and recorder for encoded MP3, which allows you to record MP3 songs, change the volume on MP3, and more.

  • Fast and lossless
  • Not available on Mac yet

#3. Mp3splt (Mac/Windows)

mp3splt

Mp3splt is a free open-source MP3 splitter. Similar to mp3DirectCut, Mp3splt  can also trim the MP3 files without recompressing any original quality. But different from the second tool, Mp3splt is compatible with Linux, Mac OSX, and Microsoft Windows systems. Under the help of Mp3splt, you can easily split a single or multiple MP3 or OGG files.

  • Cut the MP3 without re-encoding
  • Support to split an entire music album
  • Stop updating for a long time

#4. Free MP3 Cutter Joiner (Mac/Windows)

free mp3 cutter joiner

Like its name, Free MP3 Cutter Joiner supports to cut and merge MP3s without payment. As for quality loss, you don't need to worry about it at all. It can trim audio tracks without losing any quality. You can trim MP3 music precisely within one millisecond. It could be a nice assistance to help you make ringtones.

  • Cut/join MP3 without losing quality
  • Old-fashioned user interface

#5. Free MP3 Cutter and Editor (Windows)

free mp3 cutter editor

Free MP3 Cutter and Editor embraces an intuitive GUI so that even newbies can trim MP3 on with ease. It only supports running on Windows computers for cutting and editing MP3 and WAV audio tracks. It's highly recommended if you are a user without any experience. So you can trim MP3 on Windows 10 or any other old versions without hassle.

  • A straightforward free MP3 cutter
  • Only available on Windows

#6. Mp3cut.net - Online MP3 Cutter

mp3cut.net

If you don't plan to download and install any software, you can use this online MP3 cutter - Mp3cut.net, developed by 123Apps. Under the help of if, you can trim MP3 songs online or extract audio tracks from video. Besides, this web-based MP3 cutter can help you to cut 300 other audio formats right. It is very simple. And you just upload a file, cut the section you need and then save it to your hard drive.

  • Won't occupy computer storage
  • Support over 300 different formats
  • Slow uploading and downloading speed

You May Also Like - TunesKit Media Cutter

tuneskit mp3 cutter

If using MP3 cutter freeware makes you worry about the potential costs or risks, it's important to think twice. One big problem of those open-source tools is that you may lack professional support for technical issues as most free software come without a support package. In this case, you are highly suggested to switch to some shareware from trusted providers, such as TunesKit MP3 Cutter.

As an all-in-one media cutting tool, TunesKit can not only trim MP3 files into small pieces in a lossless way, but also merge several parts of the same MP3 files as well as videos. Then, you can save the cuttings to any popular format such as MP4, AVI, MPG, MPEG, 3GP, MKV, WMV, ASF, VRO, MP3, AAC, AC3, OGG, APE, as well as compatible devices Apple iPhone, Samsung Galaxy, game consoles, smart TV, and so forth. Although it is not a totally free MP3 cutter, it still provides every user 5 free chances to trim MP3 tracks.

You may also like:

[Review] Top 4 M4A Cutters 

6 Best Free Video Cutter No Watermark

Sep 27, 2020

Which Video Trimmer Can Cut Video Frame by Frame

cut video frame by frame

Have you ever cut videos before? I believe most people do that before due to different purposes. Then I guess many people have the same trouble as me: to cut videos in an accurate way, you need to consume much energy. For instance, you may spend a lot of time in defining the cutting points carefully, set the start time and end time as accurate as you can. But to your surprise, when you export the video clips you cut, it turns out to be something slightly different from your expectation. It could be a few seconds extra or a couple of seconds missed than your desired video clips, but it is still not exactly what you want. That sounds like a time-wasted join and finally, you even feel frustrated.

Unfortunately, this condition happens all the time if you are using a video cutter not supporting frame by frame cutting. In general, a compressed video is composed of keyframes and non-key frames. The biggest difference between them is that the former can be displayed independently while the latter has to be displayed along with keyframes. In order to keep the non-key frames and the lossless quality, the video clips may include some undesired keyframes.

But to trim a video accurately is also accessible. What you need is a frame by frame video cutter. Based on my cutting experience,  TunesKit Video Cutter is such a frame-accurate video trimmer, which allows you to cut video accurately to the millisecond. Now get more detailed information about this tool.

Key Features of TunesKit Video Cutter

  • Cut video and audio into clips precisely
  • Save the trimmed videos to any formats with 100% quality
  • Edit the video with effects, frames, watermark, and subtitles
  • Merge video clips from the same video source
Are you interest in this frame by frame video trimmer? If the answer is YES, keep reading. In the following guide, you will learn how to cut video frame by frame with TunesKit's help.

Step 1. Import Video to TunesKit

tuneskit audio cutter

Download, install and run TunesKit Video Cutter. There is the "Open" button on the left corner, click it and choose the video you want to trim to import it to this program. Or you can drag and drop the video file to the screen. Note that TunesKit only supports to add one file each time.

Step 2. Define Cutting Points by 3 Ways

set

Now that the video is loaded successfully, let's start to customize the segments.

1) First of all, pay your attention to the Time Cursor and Slide Bar. Next, move the Time Cursor left and right to preview the video, and then drag the left slide bar to where you want to set as the start time and drag the right one to the end time. This is the most direct method to get an approximate segment.

2) The second way to define cut points is to rely on the Square Bracket buttons under the time board. Let the video stream and when it gets to where you want to cut, click the left square bracket icon to set the Start Time and use the right square bracket icon to set the End Time.

3) By the two methods above, you can set the approximate segment time. Then you need to adjust the time to make it more precise. To that end, simply click the chevron-up and chevron-down icon next to the time board or enter the time manually.

Step 3. Adjust and Edit Video Clips

edit

After finishing the basic cutting, you can either keep adjusting the segments or do some editing to it. Click the Edit icon  and an inbuilt video editor pops up. It plays only the segment you have cut on the main interface.  That means you can use the scissor icon to exclude the frames you don't want. In addition to that, you can add special effects, subtitles, background music or watermark to your video clips.

Step 4. Select the Output Format and Export

edit audio

This is the last step. Click the Format button on the main screen. From this format selection, select the "High-Speed mode" to maintain the frame accuracy. This mode is free of re-encoding and supports to export the clip at 60X faster speed. Click the "OK" icon to confirm one output format. And then return to the main interface again, hit on "Start" to export the video clips. If you want to emerge video clips you cut, check the "Merge Segments" box before exporting. 

The Bottom Line:

When you read here, you have already known about how to trim videos accurately. The best way is to cut video frame by frame. And to do that, you need to rely on a professional frame by frame video cutter. TunesKit Video Cutter is highly recommended. With this software, you can not only trim videos precisely but also keep your clips in 100% original quality.


You may also like:

[Review] Top 4 M4A Cutters 

6 Best Free Video Cutter No Watermark

Sep 26, 2020

Best Ways to Fix iPhone Email Push Notification Not Working

Do you find that the email push notification is not working when you are performing another application? If you did, the following 6 tips can help you to make the email push notification work again. Please continue reading on this post.

Tip 1: Enable Allow Notification

First of all, when Mail push notification stopped working on iOS 11/13 issue happens, you have to see whether you turn on the "Allow Notifications" button. As the option disabled is mostly responsible for this problem and you can get the workaround by the steps below.

Step 1: Go to the "Settings" of iPhone and click on the "Notifications" button.

Step 2: Hit the "Mail" option on the "Notifications" menu.

Step 3: Turn on the switch named "Allow Notifications".

Tip 2: Log in Email account again

Then you could look at the matter of Mail app itself. One possible way to get out of the trouble is logging out email account and logging in again. You just do as follow.

Step 1: Open "Settings" on iPhone and hit on the "Accounts & Passwords".

Step 2: Choose the Mail account and press the "Delete Account" button to log out the account.

Step 3: To log in the account again, repeat the step 1.

Step 4: Tap the "Add Account" option and select the Mail to input account and password.

Tip 3: Reinstall the app

Another potential solution you can find about the Mail application is deleting and reinstalling it, because this could temporarily remove the bugs on the app. To do this, hold the Mail icon on the main screen for a few seconds, then gently tap the cross signal on the app’s left top corner, finally head to the App store to download and install the latest version of Mail app.

Tip 4: Set Fetch New Data

If it is not the problem of the Mail app itself, then you need to check whether you enabled the Fetch New Data feature. This can be able to get rid of the trouble of iOS stuck with email push notification and relates steps are listed here.

Step 1: Launch "Settings" on your iPhone and tap on the "Accounts & Passwords" option.

Step 2: Click "Fetch New Data" and turn on the "Push" switch.

Step 3: Return to the Mail account and enable the "Push" button too.

Tip 5: Disable Low Power mode

Also, you might resolve iPhone email not pushing notification by turning off the Low Power Mode. To fix this, head to "Settings" on your iOS device and press the “Battery” button, then disable the Low Power Mode through sliding the switch to the left.

Tip 6: Fix iOS system (The optimal choice)

If you have read here, then it is evident that the above methods are not effective as the email on iPhone still fails to notify you. In this case, the issue could result from iOS glitches. In this way, using professional iOS system recovery programs, for instance, TunesKit iOS System Recovery is your optimal choice. Besides solving the Mail push notification not working on iOS devices without any data loss, this tool can also deal with other different kinds of iOS issues such as iPhone stuck problems and errors, etc. What's more, it has two reparation modes called Standard Mode and Advanced Mode to work out simple and complex problems. Last but not least, with Windows and Mac versions, it supports iPhone, iPad, iPod, etc. iDevices and is completely compatible with diverse iOS versions including the latest iOS 14.

How to use TunesKit iOS System Repair to fix iPhone email push notification not working?

Step 1: Double or right click to launch TunesKit iOS System Recovery for Windows on the computer and connect your iPhone with the PC through a USB cable. When your device is successfully connected and detected, click the "Start" button.


Step 2: Follow the instructions on the main interface to put your device into the recovery mode, then pick up the Standard mode to solve the email not notifying problem without causing you data loss.


Step 3: Be sure the common information of your iPhone displayed on the screen is correct. If all is right, tap on the "Download" option to make the application download and verify the firmware package matched with your iPhone.


Step 4: When the firmware package is downloaded and verified, press the "Repair" button to fix your device's iOS system. Keep your iPhone connected during the process. After that, the email push notification on your iPhone not working is resolved.

Final words

The above 6 solutions to fix email push notification on iPhone not working are effective and useful. You can choose the one you favor and if you have anything you do not understand, be free to leave your comment below.

Sep 25, 2020

[Top Tutorial] How to Cut YouTube Videos Online/Offline

Q: "I'm looking for an efficient YouTube video cutter that can cut YouTube videos online without losing any quality. I have tried a webtool, but it has so many ads on it. Could you please recommend some clean software that can cut YouTube videos with high quality? Thanks."

cut youtube videos

Do you have the same confusion as the person above? For example, if you came across a video on YouTube with a great attraction, what would you do next? I guess you may want to download it or simply trim off the highlights from this YouTube video. In that case, a smart YouTube video cutter would be a great assistance to cut YouTube videos. To save your time and energy, we have picked out a handful of professional YouTube cutters, with which you can download and cut YouTube videos online & offline, including the free YouTube video trimmers.

Method 1: Cut YouTube Video with YouTube Video Cutter Online

In general, some YouTube videos with large size may consume much time to download. Maybe you just want to trim special parts. In this respect, you'd better use an online YouTube cutter such as YT Cropper. With this smart freeware, you can split and share any YouTube videos to Facebook, Twitter, email or text message.

Using this online YouTube video cutter means that you don't need to install any software, nor to download the YouTube files on the computer. You just need to copy the URL of the online YouTube video you want to cut to YT Cropper. The instruction below will perform how to trim YouTube videos online with this browser-based YouTube cutter.

ytcropper online youtube cutter

Step 1. Copy and Paste the YouTube URL

To begin with, input the URL or ID of the YouTube video needed to be cut. Then hit the "Crop" button to enter the cutting page.

Step 2. Set the Video Length to Be Cut

After that, you should set the video start time and stop time. You can do that by dragging the slider along the timeline bar.

Step 3. Begin to Cut Your Video

It's time to press on the "Crop" button to cut the video instantly. Then this program will provide you with the embed code as well as a direct link. You can use the first one to add the trimmed video into your website or blog;  Or use the second to share the cuttings to social media sharing sites.

More Free Online YouTube Cutters to Trim YouTube Videos

# Online Video Cutter

online video cutter

Online Video Cutter in another priceless video cutting site. Under the help of it, you can split any YouTube video accurately. It is very simple to use and you just need to add the URL to the cutter. This web-based tool has other functions, like cutomizing the speed of the video, combining the clips, personalizing the output quality and format. As for the data security, you don't need to worry about that because the uploaded video file will be automatically deleted after several hours.

# YouTube Cutter

youtube cutter

YouTube Cutter is the third online YouTube video splitter. It supports to trim videos uploaded on YouTube. You have two ways to do that: Enter keywords or URL of YouTube video to search and cut the video file. It's a user-friendly YouTube cutter even for beginners. And you can adjust the output video quality as 1080p, 720p, 480p, 360p, 240p, 144p or auto.


Method 2: Trim YouTube Videos with Desktop YouTube Cutter

Note: This method is highly recommended only if you have already downloaded the YouTube videos onto your computer.

In the software market, TunesKit YouTube Video Cutter is my favorite desktop video cutting software. It could be the best and easiest option to cut offline YouTube videos without losing any quality. Except for being a YouTube video trimmer, it provides additional video functions. For example, you can crop, rotate, and merge the trimmed YouTube videos as you like. Thanks to the built-in video player, you can preview your YouTube videos. And TunesKit integrates an amazing converter, you can also convert the trimmed YouTube video segments to any other popular media formats, such as MP4, WMV, MKV, etc. 

tuneskit youtube video cutter mac

  • Trim YouTube and other types of media files
  • Cut and combine multiple clips from the video
  • Trim YouTube videos with no quality loss
  • Support cropping, rotating, and other effects
  • Convert YouTube videos to other formats and devices

Now simply follow this tutorial to cut your YouTube video clips losslessly on Mac/Windows with TunesKit Video Cutter.

Step 1. Import YouTube video file into TunesKit

add youtube video

Install and launch TunesKit YouTube Video Cutter on your computer. TunesKit provides 2 ways to add YouTube videos: Drag the target video file to the screen; Press on the "Open" button to add it. 

Step 2. Select segments to be trimmed

set cutting duration

To trim YouTube video files, you can move the yellow sliders or input the numbers to the Start Time and End Time. If you want to trim multiple segments from such video, click the "+" button to a new segment.

Step 3. Edit the YouTube video

edit youtube video

Not only just cutting, but TunesKit also supports you to rotate, crop, add watermarks and subtitles, etc. 

Step 4. Select the output format

set output

Hit the "Format" button on the main interface to select the output format or device, such as HD MP4, MKV, MOV, 4K, WMV, DivX, MP3, OGG, WMA, Apple iPhone X, Samsung Galaxy S8, Xbox One, etc. You can also customize the media settings like video codec, size, bit rate, sample rate.

Step 5. Start cutting YouTube video losslessly

cutting youtube video

Click the "Start" button to cut YouTube videos into small pieces. The cutting process is expected to accomplish at up to 60X faster speed. 

The Bottom Line

Among all the online and offline YouTube video cutters, which one will you choose? Or you have other best choices Welcome to leave a comment here to tell us!


You may also like:

[Review] Top 4 M4A Cutters 

6 Best Free Video Cutter No Watermark

Sep 24, 2020

Top 4 M4A Cutters to Trim M4A Audios with No Quality Loss

As a popular audio file extension code, M4A is the first choice of audio formats by most people. It embraces lossy compression technology, named Advanced Audio Coding. Presently, the .M4A extension is largely applied by Apple Inc, which sells its digital audios on the iTunes store. Are you an iTunes user? If so, do you have a collection of M4A audio files on your computer? Then most probably you may like to make ringtones from those M4A audios. In this case, some M4A cutters can help you a lot.

Here we list top 4 M4A audio cutters. No matter free & paid or online and offline M4A cutting tools, you can get the best answer here. Now follow me to split any M4A audios in 100% original quality on Mac and PC.


#1. TunesKit M4A Media Cutter (Mac/Windows)

Based on my cutting experience, TunesKit M4A Media Cutter is the best M4A cutter. You can use it to trim your M4A audio files into small segments in a lossless and fast way. TunesKit not only supports you to remove unnecessary parts from M4A tracks, but also save the cuttings in any other common track formats. such ad MP3, FLAC, AAC and other formats with one click only.

TunesKit M4A Media Cutter is a smart tool. Apart from cutting the audios/videos, it also supports merging the multiple trimmed clips into a new file. More detailed information is that you can cut any M4A file into several parts and then combine those parts into a totally different audio track. Besides, if you have some media editing experience, you can customize the output audio quality by adjusting bit rate, codec, sample rate or other parameters.

This media cutter has high compatibility, excluding M4A, which also supports other audio and video formats, such as MP3, AAC, WAV, FLAC, M4A, OGG, WMA, MP4, MOV, MKV, FLV, etc.


Pros

  • Cut M4A audios in original quality
  • Convert the trimmed audios to any other formats
  • Support a great variety of media formats
  • With a user-friendly interface


Cons

  • Without transition effects


#2. FileLab Audio Editor - Free Online M4A Cutter

FileLab Audio Editor is a free web-based tool, which lets you directly trim any M4A audio with ease. Under the help of this online audio tool, you can cut, mix, trim all your audio files, and you can use dozens of amazing effects in your browser. FileLab is powerful, with which you can cut MP3, WAV, WMA, M4A, OGG and many other audio files. Once finishing cutting audio, you can save it in WMA, FLAC and WAV formats.

As for a wide range of effects and filters, you can easily add the most popular audio effects such as Amplify, Normalize, Auto-Correction, Delay and Equalizer and others to the M4A audios when cutting.


Pros

  • Be totally free
  • Offer many audio effects

Cons

  • Must install a plugin before cutting
  • Only support 3 output formats


#3. My Audio Cutter (Windows)

My Audio Cutter is another intuitive audio cutting software, which allows users to cut M4A and other audios into pieces in several clicks only. To trim M4A accurately, you can cut tracks into segments by setting the start and end time manually.

My Audio Cutter is professional enough to provide some fading effects that can be added to the output audios. In addition to that, it supports audio tagging. That is to say, you can keep the ID tags in the output audio tracks, such as music title, track number, author, artist, album, etc. It supports multiple output formats. For example, you can save the audio sections in some common formats, like AAC, AIFF, MP3, FLAC, WMA, OGG, M4A, and WAV. If necessary, you can extract audio tracks from any video files.


Pros

  • Provide transition effects (fade-in and fade-out)

Cons

  • Only compatible with PC


#4. Filmora Audio Editor (Mac/Windows)

Filmora Audio Editor is the fourth M4A cutter on my list. With Filmora, you can trim M4A audios into various small clips. Besides, it's also a multifunctional media editor that assists you in cutting, mixing, deleting, copying and pasting different M4A segments.

Under the help of this software, you can also cut other formats of media files, as well as join various audios to form one big mixture according to your specific needs. You can not only save your trimmed M4A files in the original format, but also can save it as MP2, WMA, MAV. After that, you can share it on some social media platforms, like YouTube, Vimeo, Facebook, etc.


Pros

  • Cut M4A with high precision

Cons

  • Old-fashioned main interface


Conclusion & Suggestion:

All the M4A cutter I recommended above can work well to trim M4A audio files. But if you want to trim M4A without degrading any quality loss. I highly recommend you to use TunesKit M4A media Cutter. Except for the lossless feature, TunesKit can export the trimmed M4A files at 60X faster speed, which can save your time.

You may also like:

How to Cut and Join Videos Losslessly

6 Best Free Video Cutter No Watermark

Sep 23, 2020

How to Fix Messages App Crashing on iPhone

The default application on iPhone -- Messages is used to communicate with people by sending and receiving messages. However, it may become crashing sometimes due to  corrupted data and caches, wrong settings, iOS system bugs and more. To solve the Messages app bugs on iPhone, 6 ways can be referred to and they are listed as presented below.

1. Use iOS system recovery programs

The most effective and direct solution to resolve Messages app freezing on iPhone is employing professional iOS system recovery software, taking TunesKit iOS System Recovery as an example. Why should you need TunesKit iOS System Repair? It is a powerful and reliable program which is fully compatible with all iOS versions including iOS 13/14. Apart from this, it has two reparation modes – Standard and Advance modes, and there is no data loss under the former mode to fix the problem. With the help of this tool, no matter what kinds of iOS system issues, for example, stuck problems and the like, you can bring your different iOS devices such as iPhone, iPad and iPod back to normal with ease.

The followings are the specific steps to teach you how to solve iPhone Messages app crashing with this easy-to-operate program.

Step 1: Download TunesKit iOS System Recovery for Windows and launch it on the computer. Then connect your iPhone with the PC and when the device is detected, click on the "Start" option.


Step 2: On the main screen, select the "Standard mode" and tap on the "Next" button. Then your device information will be shown on the interface, check if they are all correct. After that, hit the "Download" button and the software will start to download and verify the firmware package matched with your iPhone.


Step 3: After the firmware package is completely downloaded, press the "Repair" button to let the application automatically fix your device's iOS system. When everything is done, your Messages app on iPhone will work efficiently.

2. Reboot Messages app

If the Messages keeps freezing on your iPhone, try force quitting and then relaunch it. To do this, you can double press the Home button twice to make the app switcher appear. Then swipe the Messages app up off the top screen to close it. After a few seconds, re-open the app to see whether it becomes normal.

3. Restart your iPhone

Then you can also try out removing some software errors by restarting your iPhone, which may have the possibility to work out the problem of the Messages bugs. Just give it a shot according to the diverse models of iPhone.

#For iPhone X/11 consumers# hold the Side and the Volume buttons at the same time until the Slider is shown, then pull on the slider to turn off the iPhone, finally press the Side button to turn your device on.

#For iPhone SE (2nd) /8 /7/6 users# hold the Side button until the Slider is displayed and pull the slider to close the iPhone, finally press the Side button to open the device.

#For iPhone SE (1st) / 5 and former customers# press the Top until the Slider appears, then drag on the slider to switch off the iPhone, finally switch on your device again by holding the Top button.

4. Clear app caches

The Messages app becomes frozen on the iPhone may be due to the caches problem. In this case, it is advised that you should clear up the Messages caches to free up the space and improve the performance of the Messages. To achieve this, head to the Settings of iPhone and find out the Messages, then locate Keep Messages option and delete them.

5. Use 3D Touch

If the above methods fail to do the trick when you are in a conversation, then you could use 3D touch to access Messages. First, open the application by virtue of 3D touch, press the icon until the recent contacts show up, select the content and click the Reply button to send messages. Yet this way just temporarily helps you to use the function of Messages and it doesn’t thoroughly let you get out of the trouble.

6. Reset all settings

In case the Messages app on iPhone is still crashing, the final option you can attempt is to reset all settings on your iOS device. But before you proceed in the following steps, it should be noted that this method will remove all the data and settings on your iPhone.

Step 1: Launch Settings option on your iPhone and go to the General button.

Step 2: Tap on the Reset tab and the Reset All Settings button.

Step 3: Enter the passcode and confirm the reset order.

Verdict

These 6 useful methods can help you deal with the Messages app staing crashing on iPhone. But still, the first way, that is using the iOS System Recovery tool is your top choice.