Showing posts with label iOS system repair. Show all posts

Aug 20, 2021

iTunes Error Code 75 Occurs while Updating iPhone to iOS 14/13

iTunes is a practical Apple official tool that can play music for us, transfer movies, books, audio between iOS device and PC, or update and restore our iOS device. However, while using iTunes to update and restore our iPhone may encounter an iTunes error code 75. This issue usually happens in the process of updating the iPhone to iOS 13/14. Unable to update the iOS system version is a severe problem, so what is the best and easiest way to fix this issue? In this post, I will show you some workable ways to fix it.

Part 1. Why my apps disappeared from iPhone?

Unfortunately, there is no official explanation for the reason why the iTunes error happens. But we can still sum up the 3 possible reasons for reference.

1. Poor internet connection. If your internet connection is weak, it will cause the iTunes error code 75. Because iTunes requires a nice connection to get the latest firmware package.

2. Using a broken lightning cable. Change a workable cable or use an MFI certificated cable.

3. Encounter an unknown iOS software issue.

Part 2. Top 6 methods to fix iTunes error code 75

Fix 1. Update iTunes version


As the main tool to update your iPhone, to keep your iTunes always the latest version is necessary. When you face error 75 iTunes, consider whether if you are using the newest iTunes. You can find the Help tag on the top toolbar, and click the Check for Update to update your iTunes.

Fix 2. Disable Antivirus on your computer

A general situation is that most computer users install an antivirus on their computers. Undoubtedly that antivirus protects computers from virus attacks efficiently. However, sometimes it will stop the normal software process mistakenly. Hence, shut down the antivirus while updating the iOS system version is a workable iTunes error 75 fix.

Fix 3. Update your iOS version without iTunes

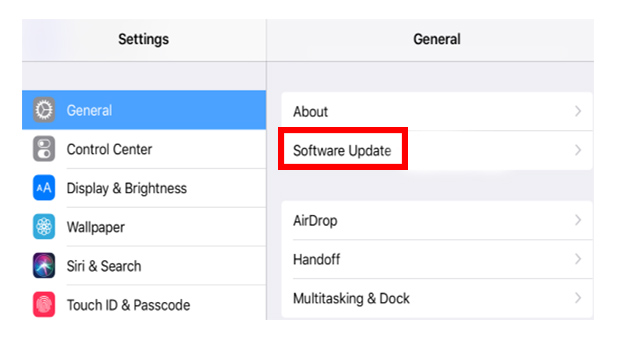
It is a well-known feature that you can update your iOS version directly on your iPhone. You are not required to connect your iPhone to a computer. You just need to keep your iPhone on a stable internet connection. You can update your iOS version via Settings > General > Software Update, and error 75 iTunes will be fixed after the updating.

Fix 4. Restart your iPhone

Force restart your iPhone can refresh your iPhone, which can also fix the iTunes error code 75.

Follow the corresponding way to restart your iPhone.

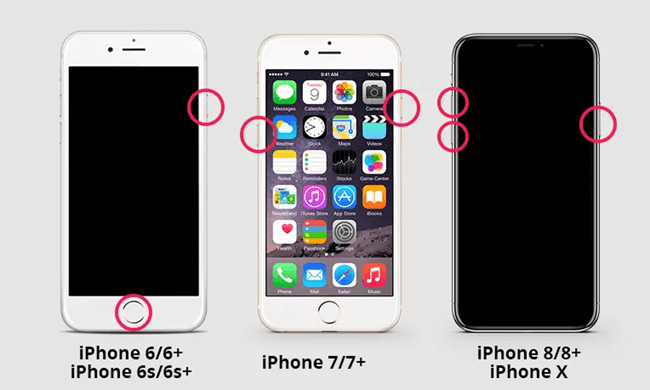
iPhone 6s or earlier: Keep holding the Side button and Home button simultaneously. When the Apple logo appears on the screen, please release the two buttons.

iPhone 7 or 7 Plus: Keep holding the Volume Down button and the Side button simultaneously. When the Apple logo showing up, release the two buttons quickly.

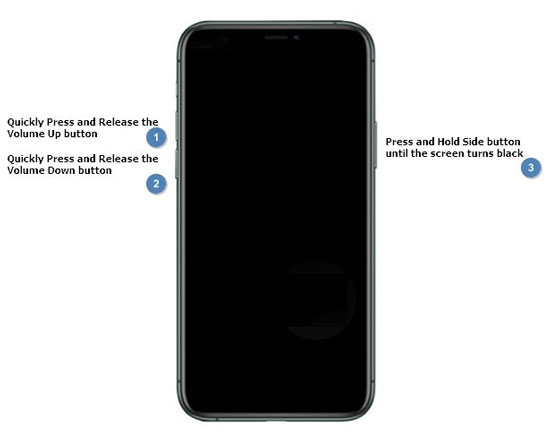
iPhone 8 or later: Hold and release the Volume Up button quickly, and then hold and quickly release the Volume Down button, then press and hold the Side button until the Apple logo appears on the screen.

Fix 5. Fix iTunes error code 75 using TunesKit iOS System Recovery

If you have tried the above 5 methods, but your iPhone still encounters this method, I think you need to use a workable iOS repair tool to fix your iPhone software issues. TunesKit iOS System Recovery, a dedicated and one-stop iPhone recovery tool, can help you fix the common iOS issue within several steps. If you meet iOS problems like iPhone can't hear caller, iPad stuck on Hello screen, or iPhone stuck on backing up, you can trust TunesKit iOS System Recovery.

Let's see the detailed tutorial fixing error 75 iTunes PC.

Step 1 Connect your iPhone to a computer

First of all, please connect your iPhone to a computer with a lightning cable. Wait until TunesKit iOS System Recovery detects your iPhone.

Step 2 Select a mode

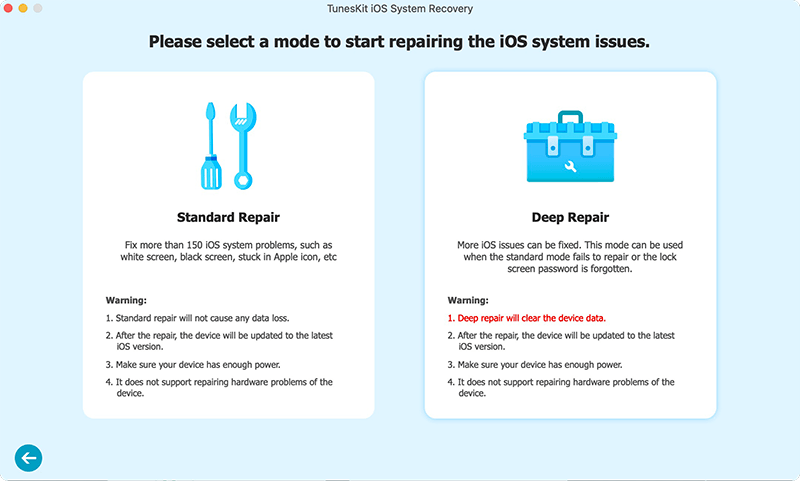
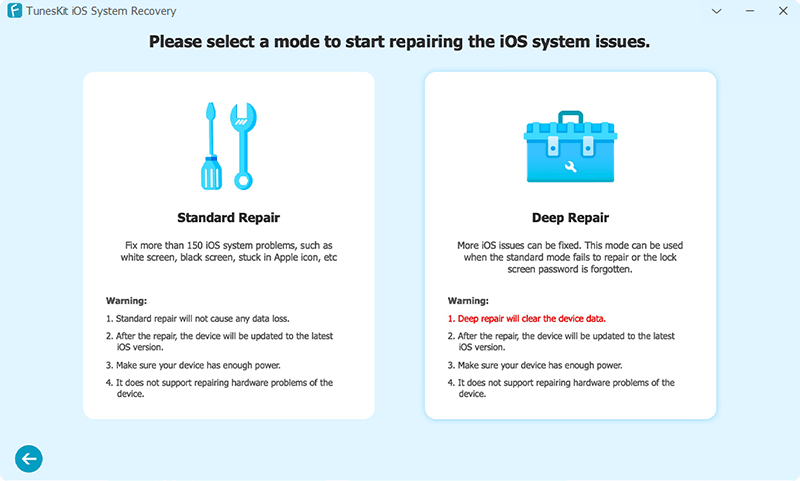
Next up, choose a mode to fix iTunes error code 75. There are two modes for you to choose from, and the Standard Mode is what we need to use to fix this issue. The Advanced Mode should be used in the premise of the Standard Mode not working, which will erase all your iPhone data. If you are going to use the Standard Mode, don't forget to back up your iPhone.

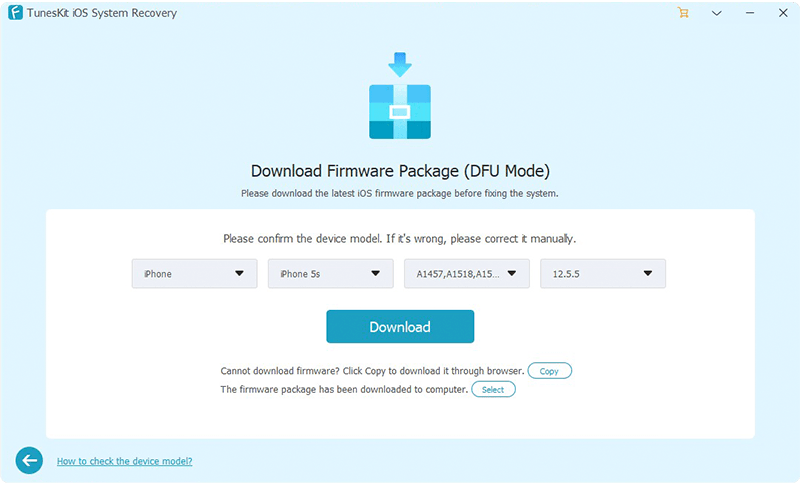
Step 3 Download firmware package

Then, confirm the device information given is correct. If not, please correct it manually.

Step 4 Fix iTunes error code 75

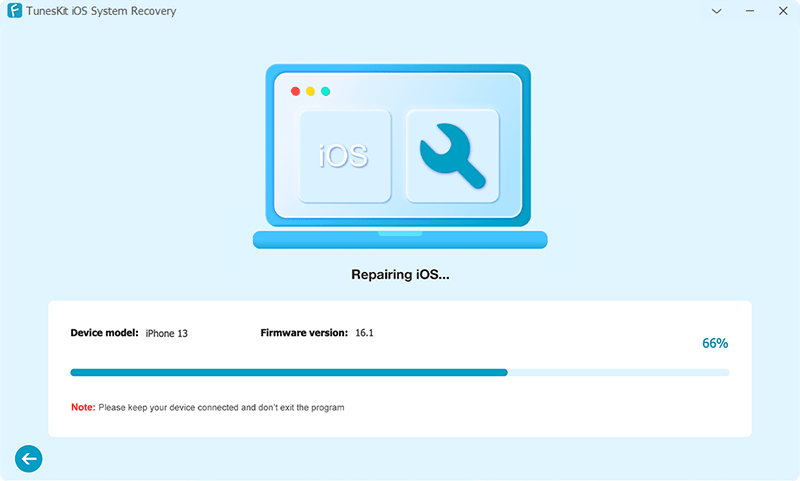
TunesKit iOS System Recovery will start to fix your iPhone when the downloading is finished, and your iPhone will be back to normal soon.

Fix 6. Enter your iPhone to DFU mode and update again [Data Loss]


If using Recovery mode will continuously cause iTunes error code 75, I think the DFU mode is the better choice for you to update your iPhone via iTunes. If you don't know how to put your device into DFU mode, you can connect your iPhone to the computer and then follow the following steps.

iPhone 6 & earlier models: Keep holding the Power button for 3 seconds, then hold the home button at the same time for 10 seconds. Release the Power button and keep holding the home button for another 5 seconds. If the screen turns black, it means that you turn your iPhone into DFU mode completely.

iPhone 7/7 Plus: Keep holding the Side button and Volume button simultaneously for 10 seconds. Then Release the Side button and keep holding the Volume Down button for 5 seconds. If the screen remains black, you have done the DFU mode successfully.

iPhone 8 & later models: Keep holding the side button for 3 seconds, then Hold the Volume down button at the same time. Hold both buttons for 10 seconds and then release the Side and keep holding the Volume Down button for 5 seconds. If your screen is still black, it means that you have entered your iPhone into DFU mode successfully.

Summary

iTunes error code 75 is not a severe issue and we can fix it by ourselves easily. I think downloading and installing an iOS repair tool like TunesKit iOS System Recovery is a convenient thing because it can help us solve common iOS issues.

Its source comes from: https://www.tuneskit.com/ios-repair/itunes-error-code-75.html

Mar 24, 2021

Five Tips to Fix iPhone Ringer Not Working

"When my friends call me or send me a message, I could not hear ringing. What' s happening? Why and how to fix it?"

Actually, this is A common issue that the marjority of iPhone users have once reported. No one wants to ignore this problem, as people are not willing to miss important messages from others. Sometimes, it is because users turn on Do Not Disturb or Mute that the iPhone ringer fails to work well. But it may be caused by your broken iPhone Speaker. Or the device is stuck in headphone mode or encounters system glitches after software updates. 

Althought we can not find a certain reason, we can provide ultimate solutions for you. Therefore, if you are experiencing this issue, feel free to refer to this turtorial.

Fix 1: Adjust the Ringer Volume

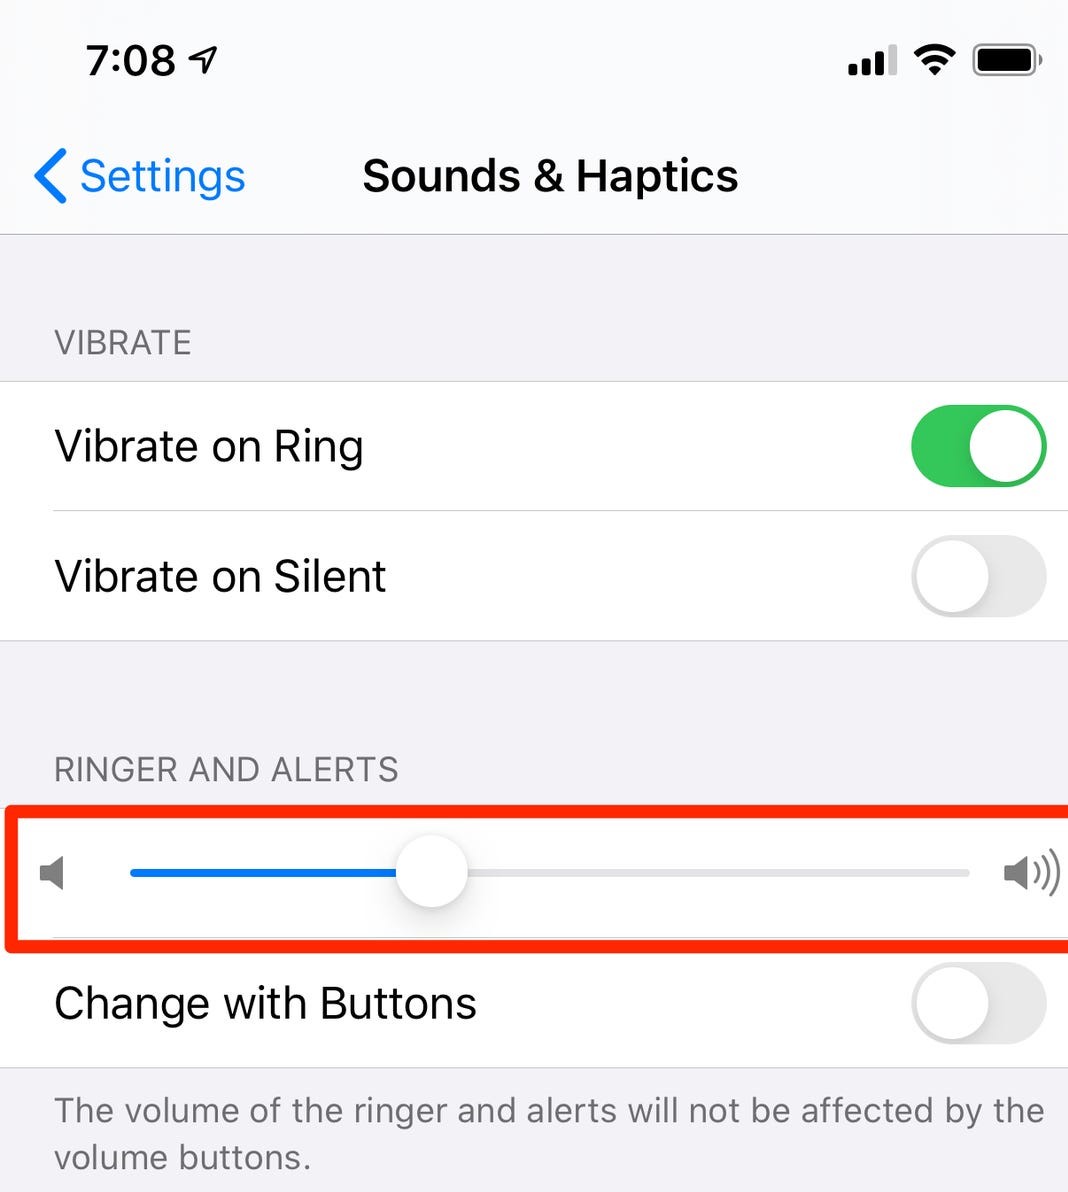
As we know, the ringer volume is different from other sounds on the iPhone. Even if all other sounds are normal, the ringer may do not work when it really has a problem. Therefore, you may need to check if the ringer volume is too low and then make it louder. To adjust the ringer volume, just go to Settings > Sounds & Haptics > Ringer And Alerts. Then, you can drag the slider to the right to increase your ringer volume.

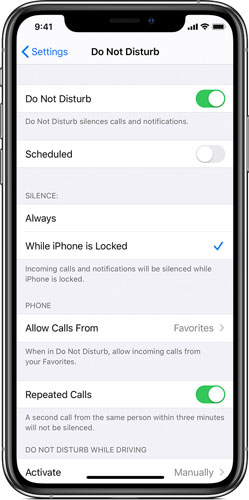
Fix 2: Turn off Do Not Disturb

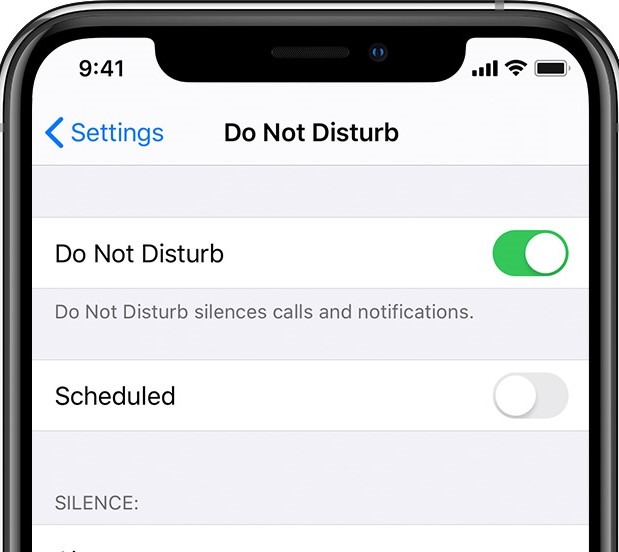
If you make sure your ringer is not silent, you need to check if you turn on Do Not Disturb. If this button is on, you may discover that the iPhone ringer stops working. To turn off Do Not Disturb, two options are feasible.

• Go to Settings > Do Not Disturb. Then, tap the switch to turn it off.


• Open Control Center and find the moon button. Tap the button to turn it off. If the button is white, this means that Do Not Disturb is off.

Fix 3: Turn off Bluetooth

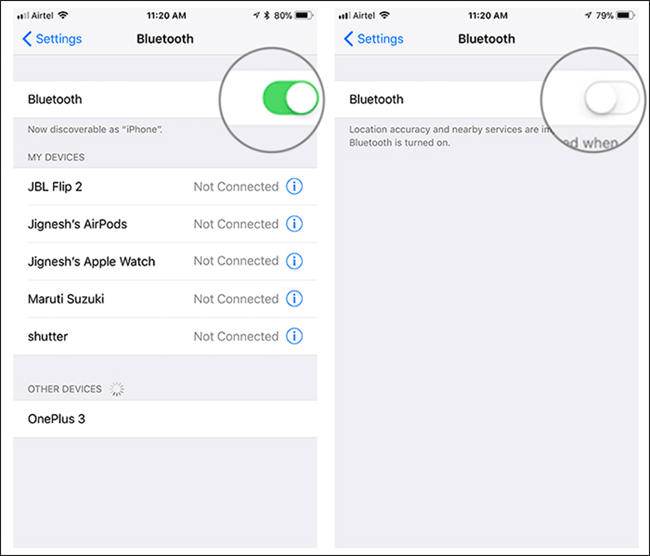
If your Bluetooth is on and connects to other devices, the iPhone ringer may be abnormal. To disconnect Bluetooth, you need to go to Settings > Bluetooth. Then tap the button to turn it off.

Fix 4: Use iOS System Repair Software

If you have tried all the above-mentioned solutions, you have found that these ways still cannot fix your iPhone ringer not working. This means your iPhone may need to have an update or the device has encountered system glitches. In this case, I recommend you to use effective and powerful iOS system recovery software. Although it is a third-party tool, this tool is designed to fix all of your Apple device issues.

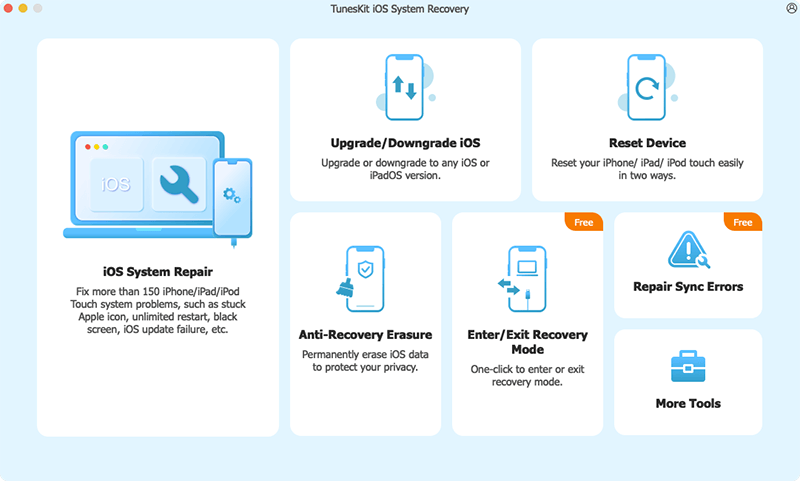
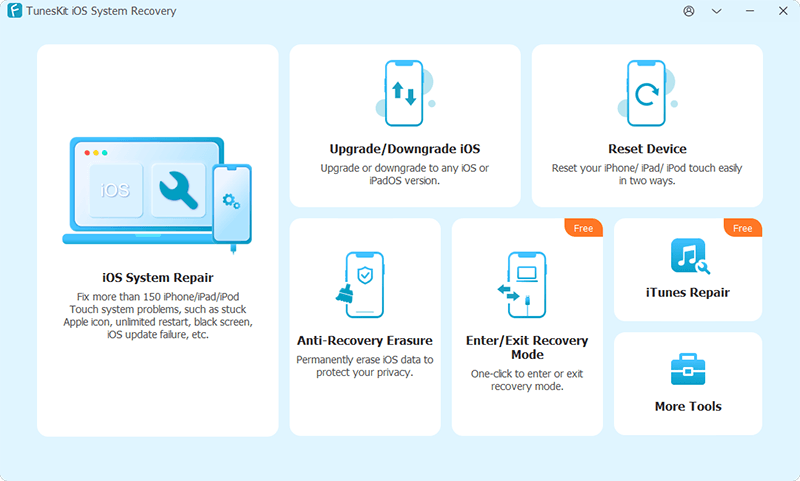
TunesKit iOS System Recovery belongs to a desktop tool that is compatible with both Mac and Windows OS. If your iPhone ringer won' t work, TunesKit will promise a faster processing speed and higher success rate. Gnerally speaking, one of the main functions that TunesKit embraces is to fix your iPhone/iPad/iPod Touch/Apple TV suffering from system issues. For instance, when your iPhone is stuck on black screen, you can ask help from TunesKit. Besides, it can also downgrade your Apple device and let you enter/exit recovery mode with one click.

A step-by-step guide

Step 1: First, you need to launch TunesKit. Then, use a USB cord to connect your iPhone to your computer. Wait for several seconds and the software will quickly detect your iPhone. If detected, just click Start.
Step 2: Now, a pop-up window for you to select a mode will occur. Here, the Standard Mode is recommended, as the mode will not lead to any data loss. Then, click Next.
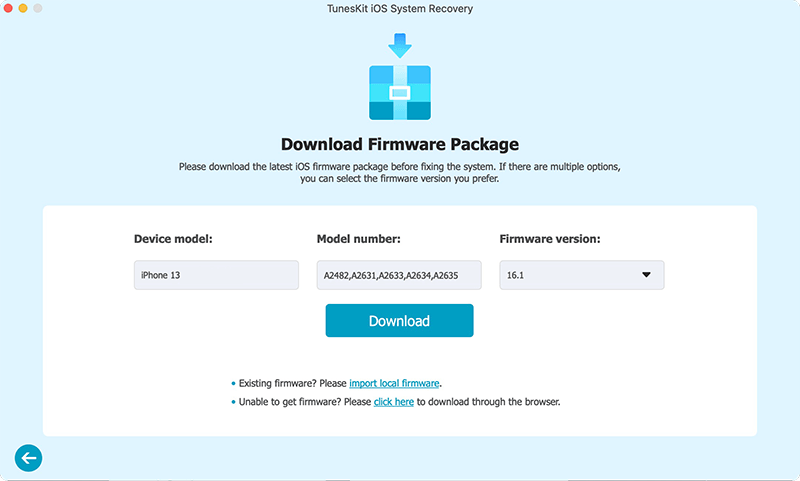
Step 3: TunesKit will let you download firmware package. Before downloading, you can check if the device mode is correct. If no problem, click Download. Wait for a while, and then click Repair to fix your iPhone ringer not working.

Fix 5: Factory Reset Your iPhone

As this method will erase all your data, you may need to take careful consideration if you choose to factory reset your iPhone. The factory reset is also another effective way to fix your unresponsive iPhone. If necessary, you may need to back up your iPhone data using iCloud or other tools. To factory reset your iPhone, just do this:

Go to Settings > Reset > Erase All Content and Settings. When a warning box appears, tap on Erase iPhone to factory reset your iPhone.

Conclusion

To fix iPhone ringer not working, you can follow the above-mentioned ways one by one. All in all, there is always a way out.

To get more details, please visit this article: https://www.tuneskit.com/ios-repair/fix-iphone-ringer-not-working.html
You may also like:

Dec 13, 2020

How to Fix iPhone No Sound Problem

iPhone no sound seems a small glitch, though you cannot fix it whatever you do. You do not want to go out and ask the Apple store to repair it which may cost a lot. But it is not a good choice to put aside this problem. Today, I am here to save you from this dilemma. You will get 6 solutions for this small issue.
1. Clean the speaker, headset plug, and jack

Some of you may only find no sound on iPhone only when you are using a headset. In this case, you can clean the headset plug and jack. And you can change another headset to have a try. When you cannot hear sound only when you play sounds without the headset, maybe your iPhone sticks on Headphone mode.

If you find that some objects clog the speaker, use a clean brush or other handy tools to remove them and clean the speaker. Next, you can check the speaker and follow the next tip.

2. Check the iPhone speaker

There is the possibility of a hardware problem. Maybe you drop your iPhone down and break the iPhone speaker accidentally. Besides, this problem can be caused by water damage. You need to check that if it is caused by a broken iPhone speaker. Follow this: Settings > Sounds & Haptics > Ringers and Alerts. Move the slider to the right. Cannot hear any sound? I am afraid yours is broken. You'd better go to change one. Otherwise, keep reading forward.

3. [Highest success rate] Use iOS repair software

When you find no sound on your iPhone and want to fix it immediately, you can choose this method to fix it directly. The iOS repair software can be an iOS device repairer in your computer and is ready to help you whenever you need it.

Among loads of iOS repair programs, TunesKit iOS System Recovery is the most suitable iOS repair software for you to solve this problem. This software can fix iPhone sound not working, iPhone stuck on Apple logo, and other 50+ iOS system problems on iPhone, iPad, iPod touch, and Apple TV. Don't worry about the operation of this tool. It is as easy as turning on a door. I conclude with 3 steps to use this tool. You can download, install it, and follow my instructions below.

Step 1. Launch TunesKit. Connect the iPhone with your PC using an original USB cable. Start to turn on TunesKit iOS System Recovery. Click the Start button.


Step 2. Choose Standard mode. You can choose the Standard mode to fix your problem without data loss. For a few serious problems, you need to use the Advanced mode to handle them.


Step 3. Download firmware and repair iPhone no sound. Check the information of your iOS device. You can edit it from the drop-down menu. Finding no mistake, you should click the Download button to download the firmware. Finally, choose the Repair button when the download is over and wait until it tells you the repair is finished.

4. Check the Ring/Silent switch

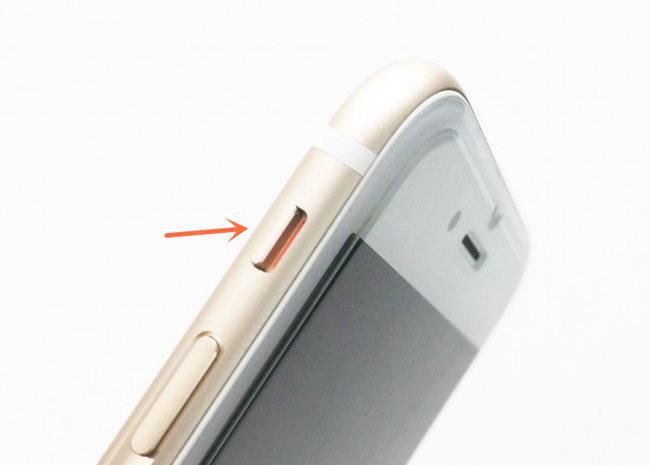
The Ring/Silent switch is set on the left side of iPhone. And you can switch it to change the ring or silent mode of your iPhone. When your iPhone is in silent mode, it shows orange. The silent mode will stop any ringtones and alerts. But it does not influence other sounds. Sometimes, this feature may get some bugs and result in no sound on iPhone. You can adjust it by changing from the Ring/Silent mode and see whether it works.

5. Turn off the Bluetooth

Check whether you have turned on the Bluetooth on iPhone. When you turn it on, the sound which should be output from speaker on your iPhone may be transferred to another device which is connected with yours at that time. And it makes your iPhone no sound as a result. How to disable this feature? Just head over to Settings, and then Bluetooth. Toggle the Bluetooth switch to turn it off.

6. Turn off the Do Not Disturb

The Do Not Disturb feature empowers you to decide a period when you do not want to be disturbed. During it, you will not hear any notification sound or alerts from your iPhone. Maybe you turn it on unintentionally and then you find your iPhone sound not working. If it is on, a crescent moon icon will appear in the status bar. You can go to Settings and Do Not Disturb to turn it off.

Summary

You can also try to restore iPhone to fix iPhone no sound problem. But it is not necessary for youto use this method because it will make your iPhone lose all the data and settings. Compared with it, a third-party iOS repair tool such as TunesKit iOS System Recovery is much more efficient and will not cause any data on your iPhone.

Dec 7, 2020

Top 4 Ways to Solve iPhone/iPad Flashing Apple Logo

Do you encounter issue of your iPhone/iPad flashing the Apple logo? When the trouble appears, many people including you have no idea about what happened and how to fix it. Or you might have seen several solutions elsewhere, yet you are still faced with it after some time. Well, now we are gonna introduce 4 best methods to thoroughly resolve the iPhone/iPad keeps flashing Apple logo. Here we go.

1. Hard reset your iPhone/iPad

At first, hard resetting your iPhone/iPad is a favorable way to deal with the iOS devices flashing the Apple logo on and off. Because the operation would refresh your device’s operating system by removing some errors while causing you no data loss.

To hard reset iPhone

iPhone 8 and later, respectively press down and release the Volume Up and Down buttons, then hold the Side button.

iPhone 7 and iPhone 7 Plus, simultaneously hold down and let go of the Volume Down and Sleep buttons until the Apple logo appears.

iPhone 6, iPhone SE or former, simultaneously hold down and release the Home and Power buttons till Apple logo pops up.


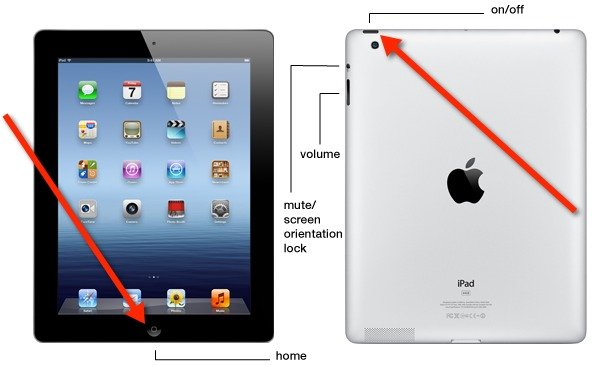
To hard reset iPad, please press the Home button and On/Off button in the meantime until the screen goes black and the Apple logo is shown on the interface.

2. Use TunesKit iOS System Repair (No data loss)

Of course, there is another more effective and workable fix to iPhone/iPad flashing Apple logo, and it won't give rise to any data loss, too. If you would like to try, the professional iOS system repair tool named TunesKit iOS System Recovery is recommended here.

Besides resolving a flashing Apple logo on your iPhone/iPad with an almost 100% success rate, this third-party software can help you solve other 50+ kinds of iOS problems such as iTunes errors and more. In addition, it supports almost all iOS devices including iPhone, iPad, iPod and Apple TV as well as is fully compatible with all iOS versions like the latest iOS 14. Finally, it also supports one-click to enter or exit recovery mode and downgrading iOS versions.

How to use this powerful program with user-friendly interface to fix iPhone/iPad keeping flashing Apple logo? Here are the 4 simple steps.

Step 1: Launch TunesKit. Download and open TunesKit iOS System Recovery. Connect your iPhone/iPad to a computer through a USB cable. Then tap on the "Start" button to proceed.


Step 2: Select mode. Choose the Standard Mode to fix your iPhone/iPad flashing Apple logo on and off without data loss. After that, just click the "Next" button.


Step 3: Download firmware package. Before hitting on the "Download" button to download the firmware package matched with your iPhone/iPad, please check your device's information displayed on the screen.


Step 4: Fix iPhone/iPad keeping flashing Apple logo. After finishing downloading the firmware package, click on the "Repair" button to fix the iOS. When the whole process is completed, your iPhone/iPad will come back to normal and the Apple logo will not flash.

3. Restore iPhone/iPad with iTunes (Data loss)

You might have heard about restoring iOS devices via iTunes when some system issues occur. But this is usually not recommendable as it will erase all data on your device if you don't have a backup. However, if you have backed up data before, let us see how it works in fixing iPhone/iPad flashing Apple logo.

Step 1: Connect your iPhone/iPad to PC with an original USB cable and open the latest iTunes.

Step 2: Let your device enter recovery mode.

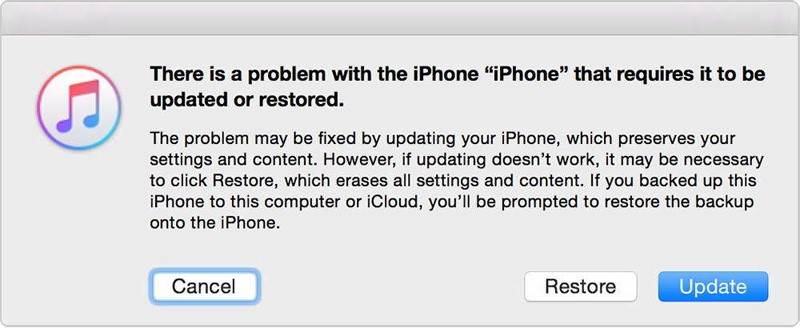
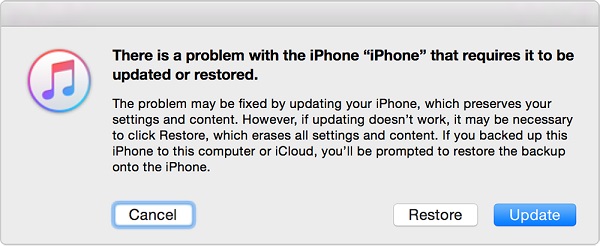
Step 3: On the message shown on the screen, click “Restore” to start the reparation.

4. Resort to Apple Store

Lastly, to fix iPhone or iPad flashing Apple logo on and off, you could also attempt the last resort – go to Apple Store. The professional technicians there will give you a hand to get out of trouble, but you will cost many bucks and much time at the same time.

Verdict

There are do-it-yourself methods and the one that seek other people's help to settle your iPhone or iPad flashing Apple logo. The decision is on yours about choosing which way. In conclusion, we sincerely hope that your problem could be solved completely and please contact us if any questions.

Nov 13, 2020

Complete Tutorials to Fix iOS 14 Downgrade Stuck in Bootloop

What to do if the iOS system stuck in a boot loop when it is downgrading? Here we will help you to get out of the trouble. Taken iPhone as an example, 5 workable solutions are outlined below to fix the iOS 14 beta downgrade stuck in the boot loop.

Part 1: Recommended ways to fix iOS 14 downgrade stuck in boot loop (no data loss)

Now let's get straight to the point and first look at the effective fixes to iOS 14 downgrade stuck in boot loop issue. The following tips will not cause you any data loss and you can try them out immediately.

1.1 Use iOS system repair tools

If your iPhone is landed into the problem of iOS 14 beta downgrade stuck in boot loop, then you will not hope to miss the best iOS system repair tools such as, TunesKit iOS System Recovery. With the help of this program, you can successfully resolve all iOS 14 and other former versions matters. This application is dedicated to fixing all iOS issues without giving rise to any data loss. In addition, one of its spotlights is supporting one click to enter and exit recovery mode. Lastly, you can check out its more shining points presented below.

TunesKit iOS System Repair Key Features

1. Resolve 50+ iOS issues.
2. Fix iOS/tvOS problems with no data loss.
3. Support all iOS versions and iOS devices.
4. Offer two repair modes - Standard/Advanced Mode.
5. Easy to use with a friendly interface.

Step 1: Connect iPhone with computer and launch TunesKit. First, connect your device with the computer with an original USB cable. Then open TunesKit iOS System Recovery on the computer and it will detect your iPhone automatically. Click on the "Start" button to begin and then choose the Standard Mode to fix iOS 14 beta downgrade stuck in boot loop without data loss.


Step 2: Download and verify the firmware package. Confirm your device info and correct it manually if anything is wrong. Next hit on the "Download" button to get the relevant iOS firmware package downloaded and verified. Wait a while until the process finishes.


Step 3: Start to repair iOS 14 beta downgrade stuck in bootloop. Once the download is done, you can tap on the "Repair" button and start solving the problem. Do not plug out your device while it's repairing iOS system, or it may cause other problems. After a few minutes, your device may come back to normal.

1.2 Force restart your iPhone

Of course, you could also attempt the simple quick fix, that is force restarting your iPhone. For different iPhone models, the force restarting procedures are diverse. So, make sure the operation according to the following commands.

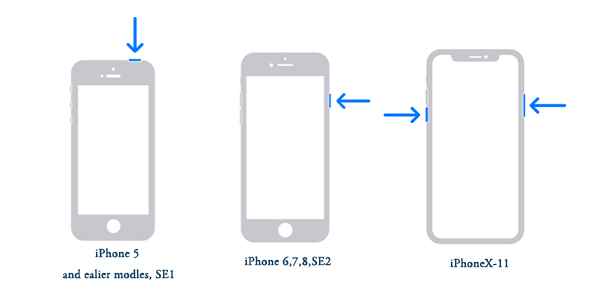
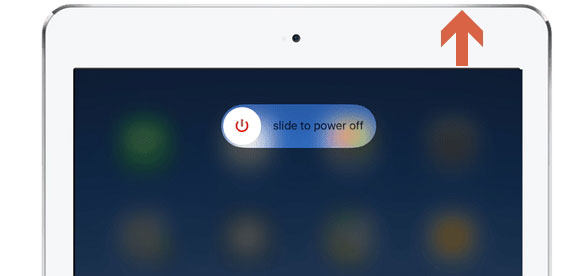
For iPhone X/11, simultaneously press down the Side and the Volume buttons until the Slider appears on the screen, then drag on the slider to switch off the iPhone, finally hold the Side button to switch your device on.

For iPhone SE (2nd) /8 /7/6, press down the Side button until the Slider pops up on the interface and pull on the slider to turn off the iPhone, finally hold the Side button to turn on the device.

For iPhone SE (1st) / 5 and former, hold down the Top button until the Slider shows up on the screen, then drag on the slider to power off the iPhone, finally power on your device again through pressing the Top button.

Part 2: Solve iOS 14 downgrade stuck in boot loop through restore modes (data loss)

Actually, there are other alternatives to work out iOS 14 beta downgrade stuck in boot loop, for example, restoring iPhone in recovery mode and putting iPhone into DFU mode. Yet generally, they are not recommended as they will lead to data loss on your device. However, for some people who don't mind, the respective operating steps are given here.

2.1 Put iPhone into recovery mode

Restoring iOS devices in recovery mode is a resort used to fix iOS issues, which may work in dealing with iOS 14 downgrade stuck in boot loop. To do that, please follow these.

Step 1: Power off your iPhone and connect it with the computer, as well as launch iTunes.

Step 2: Hold down the Volume up and Volume Down buttons respectively, then press down the Power button until your iPhone is into the recovery mode.

Step 3: After that, a message that reads iTunes has detected your iPhone will appear, then just hit on the OK button.

Step 4: On the notification shown on the screen, tap on the Restore button.

2.2 Put iPhone into DFU mode

DFU, Device Firmware Update, is also a mode to solve the bootloop problem, yet official suggests that it should not be adopted as it will make your device getting messing up.

Step 1: Swiftly press and release the Volume Up and Volume Down buttons respectively.

Step 2: Then hold down the Power button until the iPhone screen turns black.

Step 3: Release the Power button.

Part 3: Conclusion

In case you failed after trying the above 4 methods, the final try is to go to the Apple store to seek official help, if the time and money spent don’t matter. But usually, the iOS system repair program can do the trick with ease and it is definitely the best choice for you.

Oct 19, 2020

How to Quickly Fix iPad Volume Button Stuck


Did you experience or are you encountering the problem of iPad volume button stuck? Well, that's why you are reading this article, which I can make sure that you won't be disappointed? Now let's get to the point. Actually, when the iPad gets volume button stuck, you must feel irritated as this circumstance could be one of the worst ones that iPad users face. But don't worry, to fix this issue is what we are going to talk about next, and you can try out the following 7 simple yet effective methods.

1. Press it for a few times

If your iPad has no hardware damage, for example, being dropped or water damaged, then the situation can be that the iPad may be just temporarily landed into the volume button stuck. In this case, what you can do firstly is to put some pressure on the iPad volume buttons. Namely, constantly press and hold the volume up or the volume down button until the volume icon appears on the iPad home screen, finally check out whether the volume button is still stuck on the iPad.

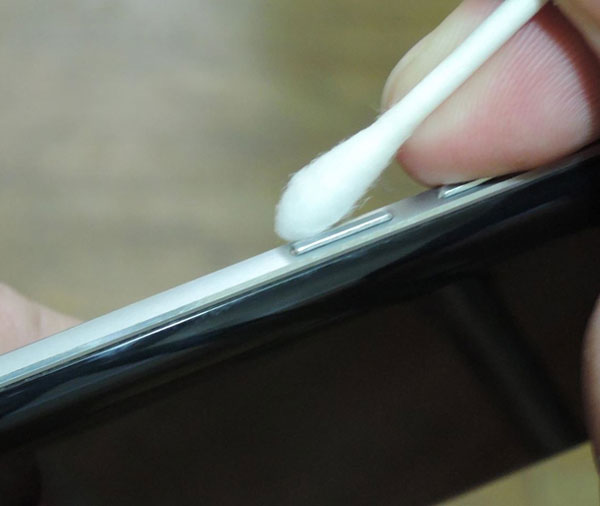
2. Clean the volume button

At most times, the iPad volume button stuck can be attributed to the dust and debris accumulated in the groove. If it is the case, you need to carefully clean the volume button. To do that, make a cotton and some water prepared, drip several drops of water on the cotton, then gently wipe it, finally use a dry cloth to tub it again.

3. Force restart iPad

If the above ways fail to do the trick, then this matter could result from software errors or MacOS system glitches. In this way, you can solve iPad volume button stuck by force restarting the device. The specific steps of rebooting iPad are presented below.

For iPad with Home button users, press the Home and Power buttons down at the same time until the Apple logo is shown on the interface.

For other iPad versions customers, swiftly hold and release volume up and down buttons respectively, then keep the top button until the Apple logo appears on the screen.

4. Update the iPadOS system

Besides, updating the iPad to the latest iOS system may be helpful in dealing with the iPad volume button stuck issue. Please give it a shot with the procedures below.

Step 1: Tap on the General option in Settings of your iPad.

Step 2: Hit on Software Update and Download & Install buttons.

Step 3: Affirm the request.

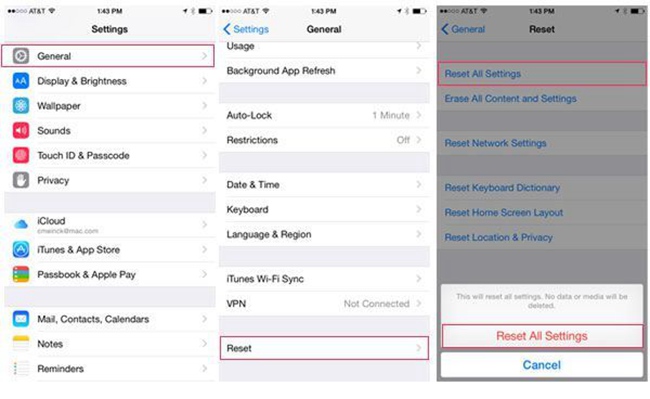
5. Reset all settings

Moreover, resetting iPad's all settings is also worth trying to resolve the problem here. However, this solution, though effective sometimes, will bring the device back to the factory settings which erases all of the data and files on the device.

Step 1: Head to Settings > General > Reset of iPad.

Step 2: Enter your apple ID and according passcode.

Step 3: Click on the Reset All Settings option.

6. Use a third-party tool

In order not to make you feel regretful later, here I will introduce you another fix to get rid of the iPad volume button stuck trouble. That is employing iOS system repair applications such as TunesKit iOS System Repair. Compared with other methods, what make this one stands out is that this program can settle the problem with almost 100% working efficiency and won’t cause you any data loss on the iPad.

Spotlights of TunesKit iPad System Recovery

1. Solve all iOS system matters.
2. Supports other iOS devices like iPhone, iPod touch.
3. Supports all iOS versions.
4. With standard mode and advanced mode in hand.
5. Resolve problems with the fastest speed and highest success rate.
6. A simply understand interface and not complicated operations.

Let's go along the following steps to fix iPad volume button stuck.

Step 1: Choose repair mode. Firstly, launch TunesKit iPOS System Recovery for Mac on your computer. Then you need to connect your iPad with the computer. After the device has been detected, tap on the "Start" button. Next, choose the "Standard Mode". You have to select which device you've connected. Then follow the steps and put your device into DFU mode. After that, click on the "Next" button.


Step 2: Download iOS firmware package. Check if the related info of your iPad including the model version, iOS version, etc.is right, correct it if there's anything wrong. If all information is right, hit on the "Download" button and the firmware package matched with your device will be downloaded. Then verify the package quickly.


Step 3: Fix the iPad volume button stuck. When the firmware has been downloaded and verified successfully, you just press the "Repair" button and the program will automatically start to fix your iPad. Don't disconnect your device until the whole process is finished.


Verdict

When your iPad volume button gets stuck, don't be fretted and stressful, just use the tips mentioned above to fix the issue. Finally, please give your feedback to us and leave your comment below to let us know if this article is workable for you.

Sep 21, 2020

Solved: iPhone Can't Hear Calls

 People now complain that there is no sound on calls from their iPhone 11/XR/XS etc. This is very frustrating as it means they have trouble communicating with people through the calls. To help them get out of trouble, we write this blog to explain the related reasons and ways.


Part 1: Reasons about iPhone can't hear the caller

At first, let's look at the reasons behind it. The problem of the iPhone cannot hear caller is actually quite common, which can result in various causes. The following scenarios are some common ones.

1. iOS system glitches and errors.

2. Some wrong settings.

3. iPhone’s hardware issues.

Part 2: Full solutions to resolve iPhone no sound on calls

Now let's move on to the fixes to no sounds on iPhone calls. Firstly, we would like to introduce the greatest method and it can definitely deal with your problem with a 100% success rate.

The Best way

To resolve iPhone can't hear caller issue, the most effective way is to use related professional iOS system recovery applications, for example, TunesKit iOS System Recovery. This third-party tool can bring your iPhone back to normal no matter whether it has no sound when dialing, not working issues such as its power button and the like, or other intricate problems. Moreover, it can also fix other errors on iPad, iPod, and more iOS devices. What’s more, there is no need to worry about data loss as the software has 2 repairing modes including the Standard and Advanced modes.

The 3 easy steps to solve iPhone have no sound on calls are as presented here through this program with a simple interface and customer-friendly feature.

Step 1: Open TunesKit iOS System Repair for Windows and connect your iPhone with your personal computer by virtue of a USB cable. Then tap on the "Start" option and choose the "Standard mode" appears on the following screen. Finally follow the instruction to put your iPhone into DFU mode.


Step 2: Confirm the device model, iOS version, and other related information. After checking the information is right, click the "Download" button to let the program download and verify the firmware package matched with your iPhone.


Step 3: When the firmware package download is completed, press the "Repair" button to fix the iOS system. after the process is finished, your iPhone has no sounds on calls will be fixed without data loss.

Possible fixes

You may wonder more potential solutions to fix iPhone can't hear caller problem, so we listed some below. But it should be noted that they may not help.

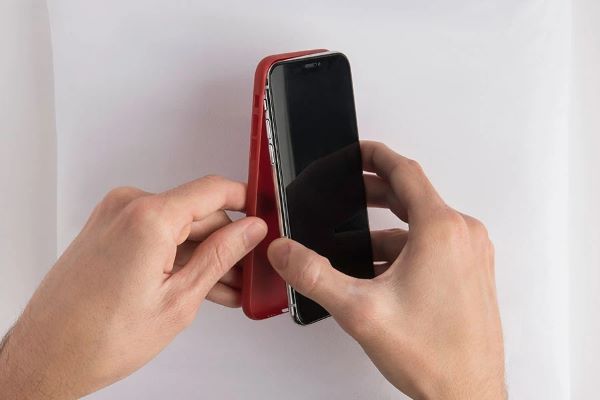
1. Remove iPhone's case

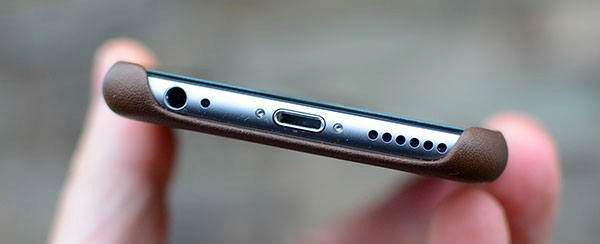
The case on the iPhone may be responsible for the no sounds on calls, as the protector might accumulate some dust and debris that clog the iPhone receiver and microphone. If it is this case, you need to take off the case and clear out the particles, then trying out calling to check whether you can hear the sound on calls.

remove iphone's case

2. Unplug your headphone

Also, you can see if your iPhone is in the headphone mode because the device sometimes still gets stuck in headphones although you removed the jack. You can plug in and out the headphone of the iPhone several times until it is recognized disconnected to disable the headphone mode. And if necessary, clean out the particles and debris in the headphone jack.

3. Turn off Bluetooth

The Bluetooth being abled could also give rise to the iPhone cannot hear the caller and block the sound. So make sure you have turned off the Bluetooth by heading to the Settings of the device and find the Bluetooth to toggle it off.

4. Check some settings

When you did some wrong settings such as turning on the Silent mode and Do Not Disturb, The iPhone can't hear caller is a sure thing. Thus to avoid this situation, it is suggested that you should disable the Silent mode and locate the Do Not Disturb button in the Settings of iPhone, then switch the option off. Besides, you could also switch the Airplane mode on and off to see if the Wi-Fi network or cellular data works well.

5. Hard reset your iPhone

If there is still no sound on calls of your iPhone, then you possibly have to hard reset the device to resolve this problem. You can try the following procedures according to your iPhone models.

For iPhone 6 series, simultaneously hold the Home and Sleep buttons until the Apple logo appears on the screen.

For iPhone 7 series, press the Sleep and Volume Down buttons in the meantime until the Apple logo is shown on the interface.

For iPhone 8 and later, first, swiftly hold the Volume Up and Down buttons, then press down the Power button until the Apple logo pops up.

Bottom line

If there is no sound on your iPhone, try out the above 6 ways to resolve it. and be free to leave your comment and suggestions below.