Aug 22, 2019

Backup and Export iTunes Library before It Disappeared


Apple is going to shut down iTunes, a useful media content management software, and use three separate apps to take the place of it. So, what about the the iTunes files you’ve bought or rented? It may not be gone, but who knows. Why not get them backed up for safe keeping or export iTunes library for enjoying at any time on any device. In this article, I will show you two ways to do it.

Part 1. How to Backup iTunes Library and Media Files

The first way to backup iTunes library is introduced by Apple Support, which is safe but complicated. Now I will give a quick step-by-step guide for you. You can also go to its official documents to get more details.

Step 1Consolidate iTunes library

Before making a backup, you need to consolidate your iTunes media files by going to the File > Library > Organize Library, and then click the OK button to close the popup.
consolidate itunes library

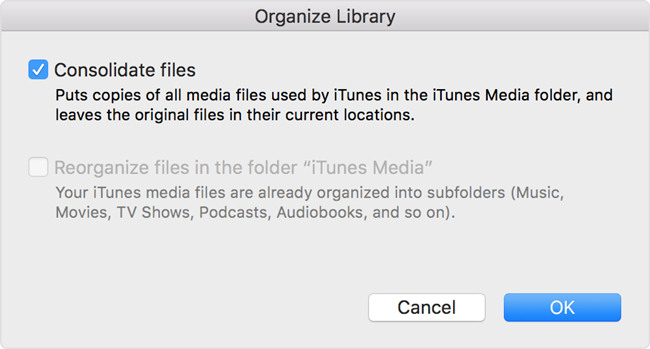
Step 2Move iTunes library to external drive

Now quit iTunes app and find your iTunes folder where your media files exist. Usually, you can find it in the default location:
For Windows 7 or later: \Users\username\My Music\.
For Windows XP: \Documents and Settings\username\My Documents\My Music\.
For Mac: Open Finder windows and press Go > Home > Music > iTunes.
Then simply drag your iTunes folder from here to an external hard drive. Now your iTunes library and all media files are backed up to the drive. When you want to enjoy these media files again, you need to restore the library from the drive to the iTunes library.
Note: If you can't find your iTunes folder in the default location, you can go to the advanced settings and check its real location. To find it, just go to the Edit > Preferences > Advanced if you're a Windows user; if you're using a Mac, you can choose iTunes > Preferences > Advanced.

Part 2. How to Remove DRM and Export iTunes Library

As you see, the method above can help you backup iTunes library to the external hard disk, but it will not allow you to play them with other players expect iTunes. This is because all iTunes media contents are protected by Apple's digital right management (DRM) copyright. Thus here we'd like introduce some powerful DRM removal tools such as TunesKit DRM M4V Converter or TunesKit DRM Audio Converter, which allow you to get rid of the DRM encryption and then export all media content from iTunes to your computer in a common format such as MP4 or MP3, etc.
TunesKit M4V Converter is an all-in-one solution to help users losslessly remove DRM protection of iTunes movies and TV shows whether they're rented or purchased, so that users can watch them on many other common devices expect iDevices such as iPhone, iPad or Apple TV, etc.

TunesKit DRM Audio Converter is otherwise capable of removing DRM and converting all iTunes M4P songs and audiobooks to DRM-free formats like MP3, AAC, etc., without causing any quality damage, and then exporting them to any media device for playback with no limitation.

Steps to Backup and Export iTunes Movies and TV Shows with TunesKit M4V Converter

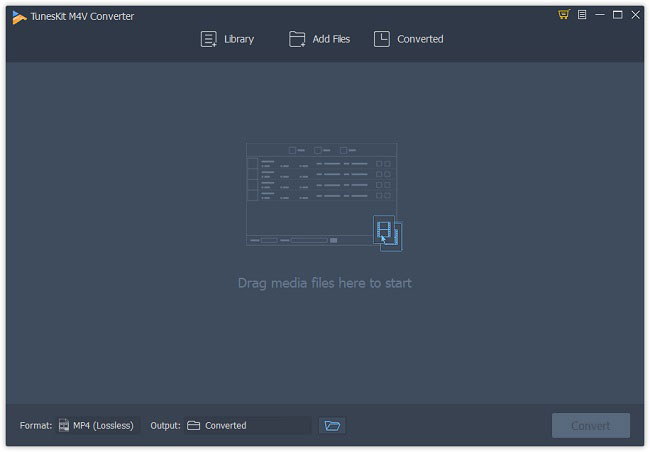
Step 1Launch TunesKit and add iTunes videos

add itunes m4v videos
First, please download and install TunesKit DRM M4V Converter on your PC or Mac and then simply open it. After that, click the "Add Files" button to import the iTunes movies or TV episodes to the program or just drag the files to the program.

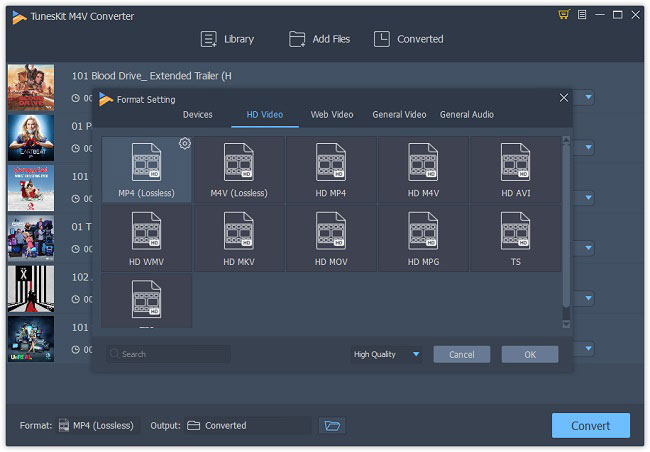
Step 2Set output format and parameters

choose mp4 output format
Next click the Preferences option from the Menu icon on the top right corner and choose an output format such as Lossless MP4 or Lossless M4V. Change the other parameters like bit rate, codec after clicking the Gear icon when necessary.

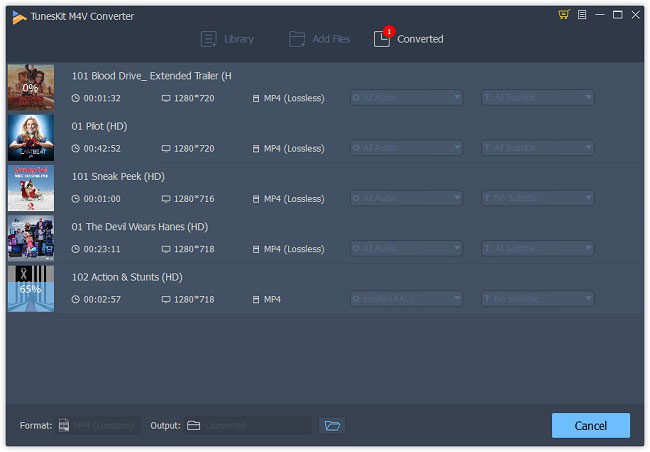
Step 3Convert iTunes files and export them

convert itunes m4v to mp4
Now click the "Convert" button to start the conversion. When it finished, all your iTunes movies and TV shows are saved and exported to the local folder of your computer.

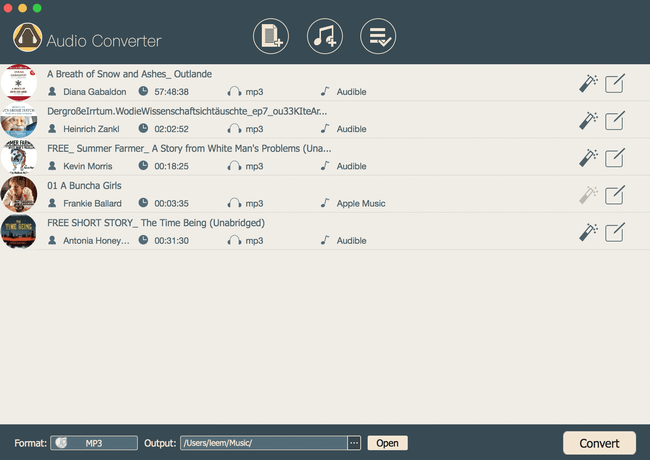
Steps to Backup and Export iTunes Music and Audiobooks with TunesKit Audio Converter

Step 1Import iTunes M4P songs or audiobooks

add apple music songs
Click the iTunes icon on the top menu bar and add the iTunes music and audiobooks you want to back up, after completed the installation of TunesKit DRM Audio Converter.

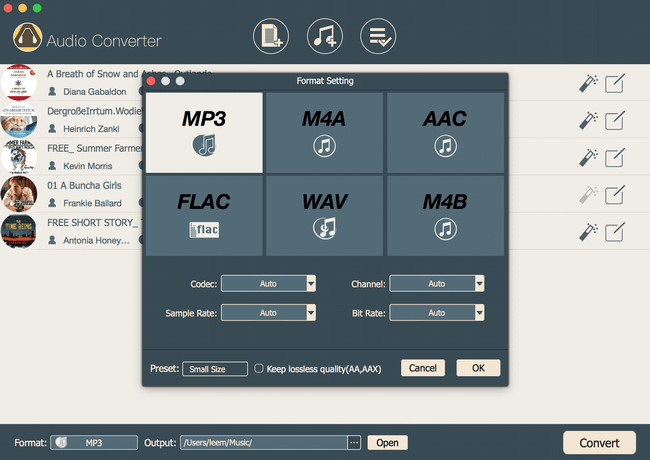
Step 2Choose an output format

set mp3 output format
Now press the "Format" button and select an audio format for your iTunes audio files like MP3, FLAC, etc. You're also allowed to customize the channel, sample rate, etc. as you like.

Step 3Start conversion and save them

convert apple music to mp3

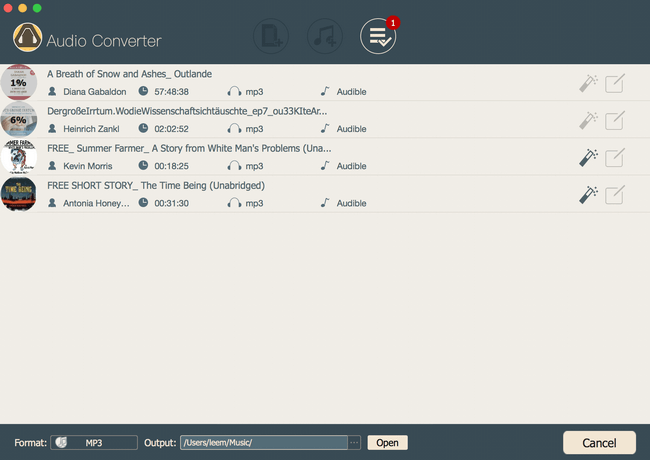
When all settings are ready, you can click the "Convert" button. Then the program will begin to remove the DRM and convert all iTunes audio files to DRM-free ones. You can find that all files are backed up and saved on your computer.

Source: https://www.tuneskit.com/reviews/export-itunes-library.html

Aug 6, 2019

[Fixed] Apple TV Won't Update

Many users have reported that some problems always occur when they're trying to update their Apple TV, which lead to Apple TV update not successful. To solve such problem, I've done some research and test and find out some possible solution to fix Apple TV won't update issues efficiently.


Tip 1. Try to Update Manually Again

If the Apple TV update couldn't be downloaded at this time, you can simply try to update the software again manually. The methods may be a little different depending on the device you have.
For Apple TV 4K and HD, you can go to the Settings > System > Software Updates and choose Update Software. Select the Download and Install option if there is an update. Wait until the update ends.
For Apple TV 3rd generation and earlier, you can go to the Settings > General > Software Updates and pick Update Software option and download and install it if an update is available. Wait for the update to complete.
update again
Note: If you are willing to enjoy the new features of new tvOS, you can simply turn on the automatic update, so that it will help you update your Apple TV automatically to the newest version once there is an update. The method is also simple. Just go to the Settings > System (Apple TV 4K and HD) or General (Apple TV 3rd generation) > Software Updates and turn on the Automatically Update option.

Tip 2. Restart Your Apple TV for Several Times

If it's still not working after manually update again, you can try to reboot your Apple TV for several times since it has become one of the simplest yet effective ways to fix some common iOS or tvOS problems. To restart your Apple TV, there are some quick methods.

Option 1. Restart Apple TV via Settings.

For Apple TV 4K and HD, just go to the Settings > System > Restart. For Apple TV 3rd generation and former, go to the Settings > General > Restart.

Option 2. Restart Apple TV via Remote.

If your remote control are Siri Remote or Apple TV Remote, you can keep pressing the remote home icon Home and Menu buttons. Let them go when you see the light on the box flash. If it is Apple Remote, whether it's white or aluminum, you need to keep pressing the Menu and Down buttons. Don't release them until you see the light on your Apple TV start flashing.

Option 3. Restart Apple TV via Unplugging.

If the two methods above cannot help you restart the Apple TV, you can simply unplug your device from power and then plug it back in after 6 seconds.

Tip 3. Fix Apple TV Won't Update Problem without Data Loss

If you can't update your Apple TV successfully, another easy yet efficient solution is to try a professional tvOS repair tool such as TunesKit iOS System Recovery. This program has a capability of fixing any system problems on Apple TVs, such as Apple TV 2nd generation won't update, Apple TV 3rd generation screen becomes black, Apple TV HD won't charge, no sound, and many others. The most important part of this tool is that it will not causing any data loss while repairing your tvOS system.
What is more, TunesKit iOS System Recovery can also repair all the common or serious iOS issues on iPhone, iPad and iPod touch like stuck in DFU mode, won't turn on, white screen of death, etc. You can also use it to enter or exit the recovery mode in one click, factory reset iOS devices, bypass iTunes errors, downgrade iOS version to previous one, etc.
video cutter      

Highlights of TunesKit iOS System Recovery:

  • Fix Apple TV won't update issue with no data loss
  • Fix other various tvOS problems easily
  • Rapair all tvOS/iOS systems in 3 simple steps
  • Compatible with Apple TV HD/3rd/2nd generation
  • Available for both Windows and Mac platforms

Quick Steps to Fix Apple TV Not Update Problem with TunesKit

To utilize TunesKit iOS System Recovery to fix Apple TV update not successful problem, you can first download and install the program on the computer and then follow the step-by-step guide below to get started.

Step 1 Launch TunesKit and connect your Apple TV

Open TunesKit iOS System Recovery on the desktop after finished installation and then use an original cable to connect your Apple TV to the computer. Plug it with power cable if necessary.
connect iphone

Step 2 Choose repair mode and download firmware package

When your Apple TV is detected by TunesKit, you can simply click the Start button to begin and then choose a recovery mode for repairing. Standard Mode allows you to fix the tvOS problem without data loss while Advanced Mode will erase all the data. Select the Standard one to avoid data loss and press the Next button to proceed.
download firmware
Then confirm your device model info and then click the Download button on the lower right corner to start downloading and verifying the correct firmware package that matched to your Apple TV.

Step 3 Start to fix Apple TV won't update without data loss


Once the firmware package is downloaded successfully, you can now click the Repair button to ask TunesKit to fixing the problem immediately. Wait a while until the process completes. Do not unplug your device during the whole process to ensure the problem can be solved.

Source article: https://www.tuneskit.com/apple-tv-repair/apple-tv-wont-update.html