Dec 30, 2020

5 Fixes to iPhone Stuck on Lock Screen

 Does your iPhone get stuck on lock screen? The reasons behind an iPhone stuck on lock screen could be some apps error, software bugs, iOS glitches, etc. Then in such a case, how to deal with it? Here 5 effective tips are introduced below.

Way 1: Ask someone to call you

Whether you input the passcode or not, does your iPhone merely stay stuck on the passcode screen? In such a case, you could simply ask somebody next to you to call you. Through the call, your iPhone's lock screen may get unfrozen and thus locked.

Way 2: Restart your iPhone

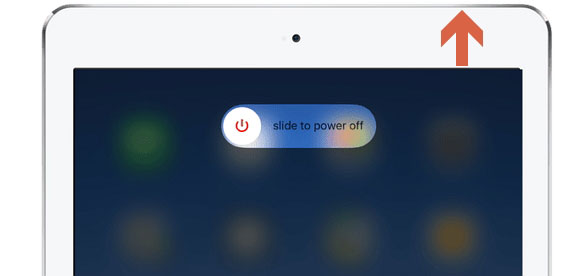
However, if your iPhone is still frozen on the lock screen after the call, then you can try to power off the device. To restart an iPhone, just press down the Sleep/Wake button until the slider that slide to power off is shown, then drag it to the right to turn off your device, finally hold the same button to turn your iPhone on.

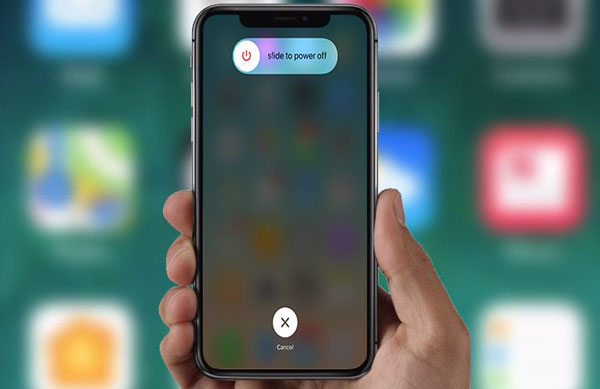
Way 3: Hard reboot your iPhone

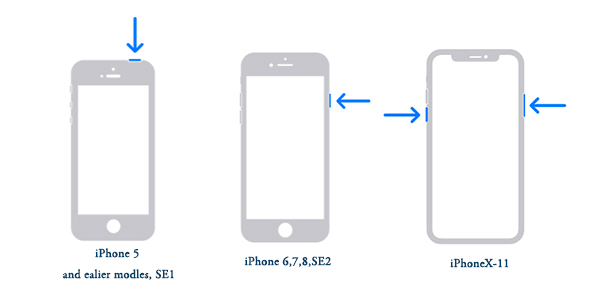
Also, simply hard rebooting your iPhone might also work wonders, and the specific operating steps are presented below.

For iPhone X/11, hold down the Side and the Volume buttons at the same time until the Slider appears, then drag on the slider to close the iPhone, finally press the Side button to open your device.

For iPhone SE (2nd) /8 /7/6, hold down the Side button until the Slider appears and drag on the slider to switch off your iPhone, finally hold the Side button to switch on the device.

For iPhone SE (1st) / 5 and former, hold down the Top until the Slider appears, then pull on the slider to power off the iPhone, finally press the Top button to power on your device.

Way 4: Fix the frozen iPhone by TunesKit

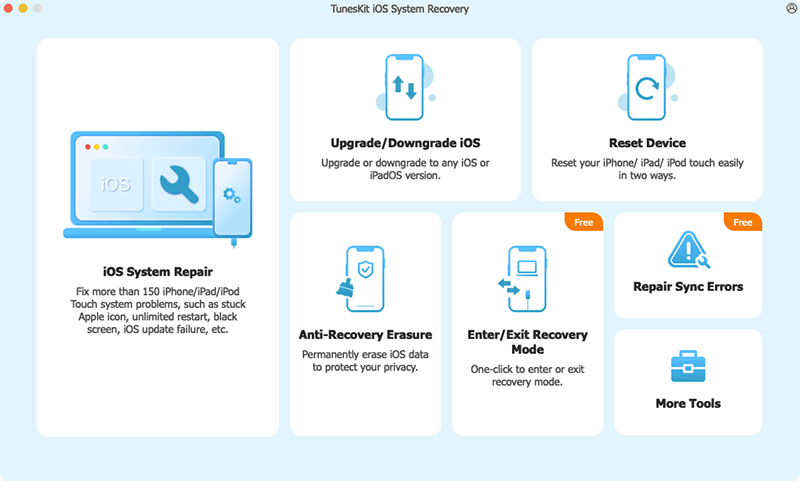
To get out of the trouble we discussed in the article after one attempt, you are suggested to use professional iPhone recovery tools. Here TunesKit iOS System Recovery is recommended. No matter whether your iPhone stuck on the lock screen or stuck on recovery mode, this powerful third-party software can help you to fix them with the fastest speed and with an almost 100% success rate while causing no data loss.

Main Functions of TunesKit iOS System Recovery

1. Solve 50+ iOS and TVos problems.
2. Support almost all iOS devices like iPhone,iPad and iPod.
3. Compatible with all iOS versions including the latest iOS 14.
4. With Standard and Advanced Modes to fix common and complicated issues.
5. One-click to enter or exit recovery mode for free.
6. Support downgrading iOS versions.

Step 1: Connect your frozen iPhone to a computer and launch TunesKit iOS System Recovery. Enter the recovery mode through one-click, then click the "Start" button.


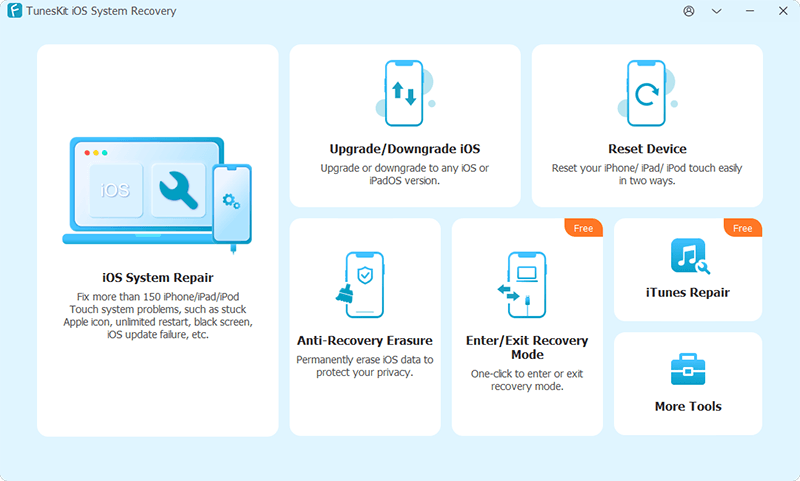
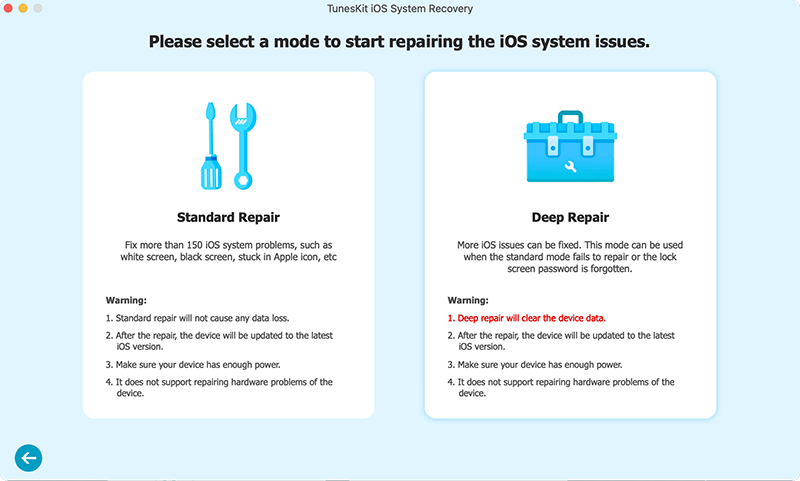
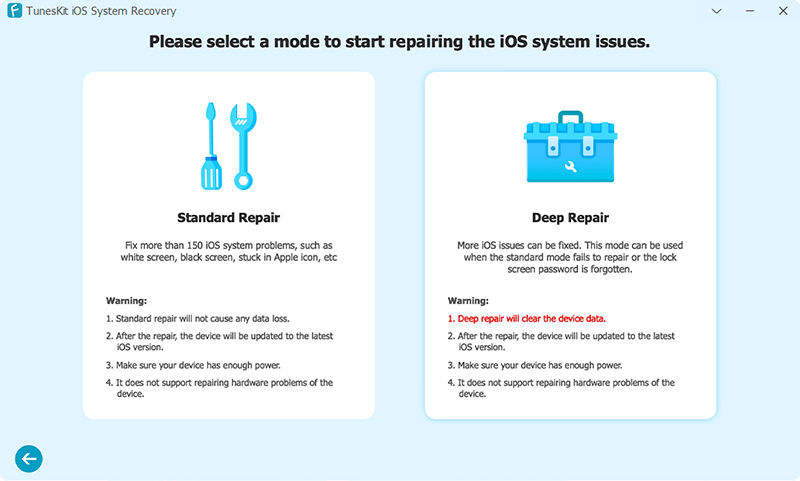
Step 2: In the following window, select the Standard Mode to fix your iPhone frozen on the lock screen without any data loss.


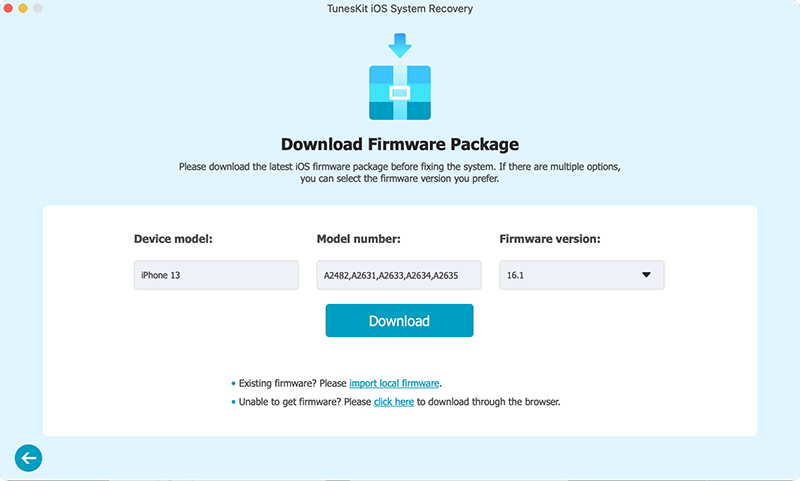
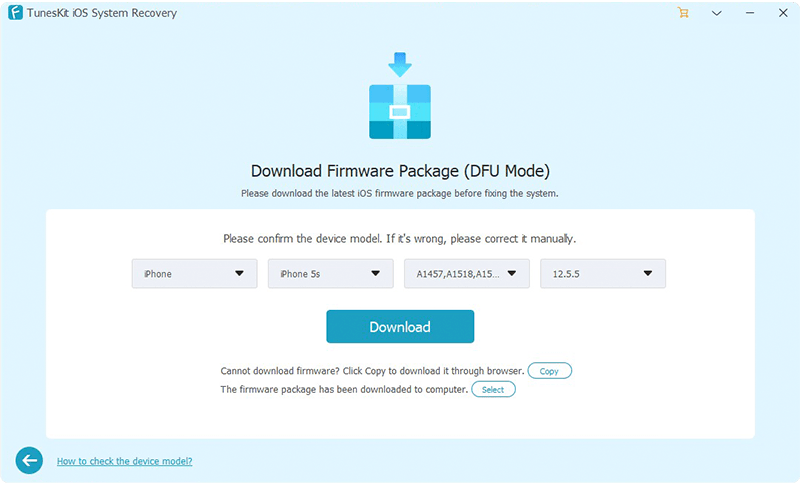
Step 3: Check your iPhone's information and correct it if anything is wrong. Next, tap on the "Download" button to let the application download and verify the firmware package matched with your device.


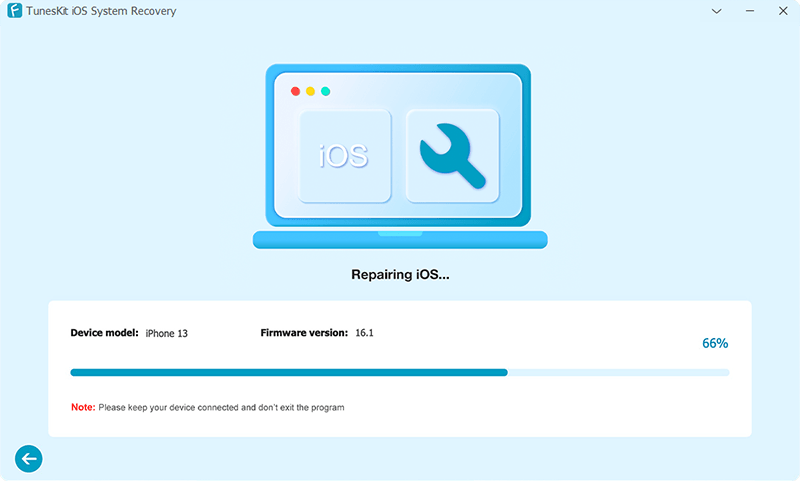
Step 4: After the downloading is finished, click the "Repair" button to fix the iOS. When the process is completed, you can successfully unlock your iPhone.

Way 5: Restore iPhone via iTunes

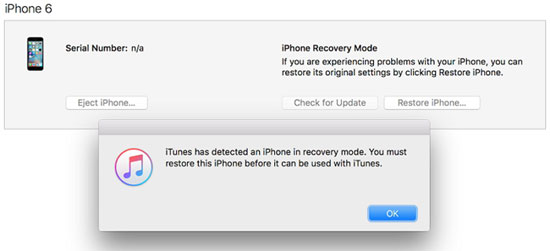
In fact, there is another alternative can be applied to resolve your iPhone frozen on the lock screen. That is restoring your device through iTunes, but it will remove all data on your iPhone. If you have backed them up before, you could do the steps below.

Step 1: Connect your iPhone to PC and launch iTunes on the computer.

Step 2: Make your enter recovery mode.

Step 3: When iTunes detects your iPhone in recovery mode, click Restore iPhone option on the message popping up.

Summary

Hope this guide can help you to fix your iPhone stuck on lock screen. If you have any question about iPhone and other iOS issues, please be free to give your comment below.

How Can I Split Audible Audiobooks by Chapters?

Do you like to listen to Audible audiobooks? When you are listening to them, splitting audiobooks by chapters will make it easier to get to know the structure of this book and to find where to continue next time. But you need the Audible Manager to do this. Without this tool, can you still do it? You can! But you need a tool to help.

The Best Tool to Split Audible Audiobooks

To begin with, Audible already offered the option for users to download chapters one by one officially. This is really time-consuming and they are only playable on the Audible app. It is OK if you have only a few Audible audiobooks, but it won't work if you have a number of Audible audiobooks and chapters.

Another better option is to use a special audiobook splitter tool to help you split all the audiobooks into chapters within a few clicks. Please note a common audiobook splitter may not work since the Audible audiobooks are encoded in AA or AAX formats.

So here I will recommend the best audiobook splitter TunesKit Audible Audiobook Converter which supports to split Audible audiobooks into chapters effortlessly. It runs on both Windows and Mac computers. Please simply download the right version you want to your computer to evaluate it.


Tutorials to Split Audible Files into Chapters

TunesKit Audible AA/AAX Converter supports the bulk converting technology. The processes to convert Audible files and cut Audible files to pieces are done simultaneously with 100X faster speed. Even if you have numerous files, they can be finished within a few minutes.

1.   Import Audible Audiobooks

You have to download the entire audiobooks first. On Windows computers, you can install the Audible Download Manager to help you download the Audible files. On Mac computers, you can download them into iTunes directly. After downloading, you can locate the Audible files AAX or AA from the Windows Explorer or Mac Finder and drag them to TunesKit Audible AAX Converter.

2. Split Audible Files by Chapters

TunesKit Audible Audiobook Converter offers many options for you to customize your Audible audiobooks such as splitting audible books, changing the output format, adjusting the playback parameters. To split the Audible AAX or AA files, you can click the editing icon which looks like a pen, then you will open the settings window where you can select the option to split files by time or chapter as you want. Besides, TunesKit Audible AA/AAX Converter can convert Audible AA/AAX to M4A, MP3, AAC, WMA, FLAC, WAV, etc. In addition, you can change the playback speed, volume, pitch.

3. Convert the Audible Audiobooks

Finally, you can click the Convert button. It takes a few minutes only to convert couples of audiobook files effectively.

Conclusion

Except for splitting Audible audiobooks chapters, the more useful function of TunesKit Audible AA/AAX Converter is to convert AA/AAX to MP3 to completely give you the freedom to deal with the audiobooks you have paid for.

More details:

https://www.tuneskit.com/audiobook-tips/split-audible-audiobooks-by-chapters.html


Dec 29, 2020

TunesKit AceMovi Video Editor Officially Released

Hong Kong, December 29, 2020 - The professional software developer TunesKit recently released its star video editor application – AceMovi. Equipped with a lot of editing features, TunesKit AceMovi offers users a chance to spark imagination and creativity.

TunesKit AceMovi Interface

"Nowadays, most people tend to watch videos instead of reading text or photos. Video has become a great way to share ideas. But we found that most video editing software on the Internet are quite complex. Users need to spend much time and effort learning, especially for the novice," said Henry Ramon, the Product Manager of TunesKit. "That's why we developed AceMovi. This is quite a simple video editing program, but full of all features you need. Every video creator can easily use it and enhance the video to the next level." added he.

TunesKit AceMovi Video Editor is a non-linear video editing tool for Windows and Mac. It offers abundant basic and advanced editing features to help users make more charming videos. Creators can easily do some basic editing such as cutting, trimming, cropping, splitting, adjusting clip speed, etc. or apply some cool effects like filters, transitions, animations, behaviors, split screen, picture in picture, background music, titles, and many more.

Besides, it also offers plenty of free media resources or templates for users. They can easily use them by simply drag-and-drop to the timeline. Moreover, TunesKit AceMovi allows users to choose any output format, device or social platform when they finished the editing. They can also customize the output parameters accordingly, including quality, resolution, codec, bit rate, sample rate, etc.

Key Features of TunesKit AceMovi Video Editor

* Enable users to do some basic editing like recording, cutting, splitting, etc.

* Provide users with a wealth of advanced editing tools including filters, transitions, animations, background music or text, etc.

* Allows users to select any output format, device or online social platforms such as MP4, MOV, M4V, iPhone, iPad, Galaxy, YouTube, Facebook, Vimeo, etc.

* Offer a growing number of free video templates and resources

* Easy to use, quick to learn, and the interface is extremely intuitive

TunesKit AceMovi--Best Video Editor for Beginners

Price and Availability

TunesKit AceMovi Video Editor offers a trial version for users to use the program for free, but the export video will be added with watermarks. To unlock the limit, users need to upgrade it to the full version, ranging from $19.95 for a one-month license, $39.95 for a one-year license to $59.95 for lifetime use. All the packages can only be used on one computer (If you want to use it on multi-PCs, just check more of its options or contact TunesKit for business plan.), but are provided with free software update and tech support. As for the availability, it works well on all Windows and Mac platforms, including the latest Win 10 and macOS 10.13 High Sierra, 10.14 Mojave, and 10.15 Catalina.

Media Contact

Andres Green

Email: support@tuneskit.com

Website: www.tuneskit.com

About TunesKit

TunesKit Studio is a professional software provider, offering high-quality multimedia software and iOS utilities to help customers enjoy the digital world better. It has two product lines: multimedia and iOS solutions, including media converter, video cutter, screen recorder, iOS system recovery, iPhone data recovery, and so forth. All the programs have received numerous satisfied users from 150 countries all over the world.

Source: https://www.tuneskit.com/releases/tuneskit-released-acemovi-video-editor.html

Dec 28, 2020

Top Ways to Solve iPhone Stuck on "Hello" Screen

 There are many iPhone stuck issues including the iPhone stuck on "Hello" screen that some people are complaining about right now on the tech forum. Why does the iPhone go to the "Hello" screen? The reasons behind it could be the iOS glitches, software bugs, and more. Do you also have the same trouble? Don't be frustrated, as you could use the top solutions presented below to solve your iPhone stuck on “Hello” screen problem.

Way 1: Repair iPhone without data loss

To resolve your iPhone stuck on the "Hello" screen with the fastest speed and an almost 100% success rate, you are highly suggested to use a third-party iOS repair tool as many other people do. Taken TunesKit iOS System Recovery as an example, it is one of the most powerful applications to fix iPhone issues without data loss.

Key Features of TunesKit iOS System Repair

1. Fix 50+ iOS and TVos issues.

2. Two repairing modes: Standard Mode and Advanced Mode.

3. Supports different iOS devices like iPhone,iPad and iPod.

4. Compatible with all iOS versions including the iOS 14.

5. One-click to enter or exit the Recovery mode for free and downgrade iOS versions.

6. Lifelong free update and easy-to-operate interface.

Step 1: Connect your iPhone to a computer and launch TunesKit. Then click the "Start" button directly.

Step 2: Choose the Standard mode which will not cause any data loss during fix your iPhone stuck on "Hello" screen and click the "Next" button.

select mode

Step 3: Confirm your device info and tap on the "Download" button to download the firmware package matched with your iPhone. Next, press the "Repair" button to fix the issue.

download firmware

Way 2: Force restart your iPhone

If the last fix doesn't work, then please try to force restart your iPhone to fix some software errors that may result in your iPhone stuck on the "Hello" screen.

#iPhone X/11# simultaneously hold down the Side and the Volume buttons until the Slider appears, then pull on the slider to switch off the iPhone, finally press the Side button to switch on your device.

#iPhone SE (2nd) /8 /7/6# hold down the Side button until the Slider pops up and drag on the slider to turn off the iPhone, finally press down the Side button to turn on the device.

#iPhone SE (1st) / 5 and former# hold down the Top until the Slider appears, then drag on the slider to close the iPhone, finally hold the top button to open your device.

force restart iPhone

Way 3: Restore iPhone via iTunes

iTunes is usually used to solve some problems on the iPhone, so you can restore your device through iTunes to settle iPhone stuck on the "Hello" screen matter. Here's how to do it.

Step 1: Connect your iPhone to PC and open the latest iTunes.

Step 2: Enter recovery mode till an iTunes logo appears on your iPhone's interface.

Step 3: Tap on the "Restore" button on the message shown.

restore iPhone via iTunes

Notice: The above procedures will delete all data on your iPhone. Thus, it is not recommendable if you don’t back them up before.

Summary

This new iPhone stuck problem seems to be difficult to be dealt with, but the best methods introduced in this article are all feasible for you. Simply choose the one you would like to fix your iPhone stuck on the "Hello" screen.

Dec 24, 2020

Error Connecting to Apple ID Server? How to Fix it on iPhone/iPad?

 "There was an error connecting to the Apple ID Server" message sometimes appearing may be attributed to a poor internet connection, Apple servers down, software bugs, iOS glitches, etc. This problem seems to be difficult, yet it's easy to fix. Please read the following tips. 

1. Force restart the device

When the error first showed up, the first and quick way is to force restart the device.

For iPhone X/11, simultaneously press down the Side and the Volume buttons until the Slider is shown, then drag on the slider to turn off the iPhone, finally hold the Side button to turn on your device.

For iPhone SE (2nd) /8 /7/6, press down the Side button until the Slider is dispalyed and drag on the slider to switch off the iPhone, finally hold down the Side button to switch on the device.

For iPhone SE (1st) / 5 and former, press down the Top until the Slider is presented, then pull on the slider to power off the iPhone, finally hold the top button to power on your device.


For iPad with Home button, hold down the Home and Power buttons at the same time until the Apple logo appears on the interface.

For other iPad versions, each quickly hold and let go of volume up and down buttons, then press the top button until the Apple logo appears on the screen.

2. Check network connection

Since a strong network connection is necessary when logging into Apple's servers, you may be wondering whether the Internet connection is poor. Thus, just check it and do a reset about the network.

Steps: Head to Settings > General > Reset > Reset Network Settings.

3. Re-sign in the account

However, it is not the matter of network connection leading to her iPhone error connecting to Apple ID server. So try to log out her Apple ID account and log in it again.

Step 1: Launch Settings and click her own name.

Step 2: Hit the account and tap on Sign Out option.

Step 3: Re-sign in the account.

4. Check Apple servers

As the error connecting to Apple ID server still exists, you might start to think whether the Apple servers are down. In such a case, she visited the Apple system status official page and found all are good. Usually, if an Apple server goes down, then it is due to the maintenance. Then the only thing that can be done is to wait.

5. Apply a third-party repair tool -- TunesKit iOS System Recovery

Yet none of them worked after my friend tried the above solutions and "There was an error connecting to the Apple ID server" message still popped up on her iPhone. Getting tired of this issue and wanting to resolve it as soon as possible, she applied a professional iOS repair tool called TunesKit iOS System Recovery.  After that, she discovered that the problem was completely solved and there was no data loss on her device.

Key Features of TunesKit iOS System Recovery

1. Fix 50+ kinds of iOS issues like apple errors, etc.
2. Supports different iOS devices such as iPhone, iPad and iPod.
3. Compatible with all iOS versions including the latest iOS 14.
4. Offer Standard Mode and Advanced Mode.
5. One click to enter or exit the recovery mode for free
6. Support downgrading iOS versions.
7. Easy operating steps and friendly interface.


Here are the steps of her using TunesKit iOS System Recovery to fix error connecting to Apple ID server.

Step 1: Connect iPhone to computer via a USB cable and open the TunesKit iOS System Recovery for Win software. Then tap on the "Start" button. In the next window, select Standard Mode to fix iPhone error connecting to Apple ID server without data loss.


Step 2: Check iPhone's information and then click on "Download" button to download the firmware package matched with the device.


Step 3: After the firmare package is downloaded, press the "Repair" button to quickly verify it and begin to fix the iOS. When everything is completed, the error is removed.

Conclusion

Well, these are almost all methods to fix error connecting to Apple ID server on iPhone or iPad. Nonetheless, this issue can also happen on the computer. When “There was an error connecting to the Apple ID server” appears on the computer, simply rebooting the computer. Of course, the above solutions can be also applied. Finally, if you have any questions, please be free to contact us.

Dec 23, 2020

Import Audible Audiobooks to an SD Card

If you use a smartphone to download Audible audiobooks for listening, you might find that there isn’t enough space to store these audiobooks. You will obviously think of importing Audible audiobooks to your SD card. But how to do this?

Transfer Audible Audiobooks to an SD Card with the Audible Manager

The official way that Audible provides to play Audible audiobooks is through the Audible Manager. If you have already installed Audible Manager on your phone, you just need to change the download folder on the settings on Audible Manager. Before you get started, please make sure you have already inserted an SD card into your phone, and then you can refer to the following steps:

1. Tab the icon to launch the Audible app on your mobile phone.

2. Press the hamburger menu and choose the 'settings' menu.

3. Click the option 'Download Settings', you will see the option to change the 'Download Location'.

4. You can then swap the download folder from the internal memory to the SD card. When it is done, the new Audible files will be saved to the SD Card automatically.

Note: For the downloaded Audible audiobooks, you may not transfer them directly. If you want to do that, you might delete them from the internal memory first and then redownload them again to the SD card.

Move Audible Audiobooks to SD Cards by Converting Audible Audiobooks

The way above does work somehow for the users who mainly listen to Audible files on a mobile phone. But it may not work for users who have multiple mobile phones or devices especially for the users who listen to Audible audiobooks across different devices like mobile phones, and so on. So, is it possible to copy and paste the Audible files to move to the SD card? The answer is yes. However, since the original Audible audiobooks are in a proprietary format AAX or AA, they may not be playable after transferring. Hence, you need to convert the Audible AAX or AA to a universal music file such as MP3, WMA, AAC, etc. before moving them to an SD card.

TunesKitAudible AA/AAX Converter for Windows/Mac is a renowned Audible audiobook converting tool to transcode the audio files. It is well-designed with powerful features yet the operating process is pretty simple. You can simply download it to your computer to try it out.

1.   Prepare the Audible files

Before converting the audiobooks, please locate the AA or AAX media files from your computer folder. Next, you can simply drag and drop the Audible files from the computer folder to the Audible audiobook converter screen.

2. Customize audible files

TunesKit Audible Audiobook Converter offers many output options such as AAC, MP3, WMA, FLAC, OGG, etc. Please just pick up one output format you want to convert the videos for your SD card. Besides the format, you can also customize the volume, speed, pitch for the output files too.

3. Convert the Audible audiobooks

Finally, you can click the 'Convert' button to convert the Audible files at a 100X faster speed. When it is done, you can copy the audible files to an SD card by a card reader and then insert it into a compatible mobile device.

Conclusion

These are the two methods to transfer Audible audiobooks to SD cards. You can use the Audible Manager to do this, but that will not change the AAX/AA format of the audiobooks. If you use TunesKit Audible AA/AAX Converter, you can convert Audible AAX/AA to MP3 and own them completely.


For more: https://www.tuneskit.com/audiobook-tips/move-audible-files-to-sd-card.html

Dec 21, 2020

How to Fix iPhone Keeps Disconnecting from Bluetooth

 After the Bluetooth not working happens on iPhone, some iPhone 11/12 users meet with the issue of Bluetooth keeps disconnecting iPhone. It's really annoying. Don't worry, keep reading to get the causes as well as the methods to fix it.

1. The reasons behind Bluetooth keeps disconnecting iPhone

You might be wondering "why does my Bluetooth keeps disconnecting from my iPhone?" Actually, there are many factors that cause the problem between Bluetooth and your iPhone. 
1. some faulty updates are the culprits behind the iOS 14/13 Bluetooth disconnecting. 
2. software bugs can be also attributed to the iPhone Bluetooth issues. 
3. Lastly, iOS glitches and errors are responsible for the Bluetooth keeps disconnecting iPhone. 
Fortunately, this matter is simple to settle and all methods to fix iPhone keeps disconnecting from Bluetooth are presented in the next part.

2. Effective solutions to solve iPhone keeps disconnecting from Bluetooth

2.1 Force restart your iPhone 11/12

The first easy fix to Bluetooth keeps disconnecting your iPhone 11/12 is to force reboot the device. To force restart the iPhone 11/12, just respectively hold down and release the Volume Up and Volume Down buttons, then press down the Power button until the Apple logo appears on the main screen.

2.2 Toggle Bluetooth off and on

Since some updates may damage the link between iPhone and Bluetooth, please refresh your iPhone's Bluetooth connection by toggling the function first off and then on. You could go to iPhone's Settings > Bluetooth to achieve that, or simply launch the control center and find the Bluetooth icon to operate.


2.3 Re-add Bluetooth

The Bluetooth continues dropping from your iPhone may be due to the improper pairing. You could re-pair it with your device to fix it and here are the quick steps.

Step 1: Head to Settings > Bluetooth.

Step 2: Tap on the "i" icon next to the device you connected.

Step 3: Choose the "Forget This Device" option and confirm the order.

Step 4: Pair up the Bluetooth with your iPhone model again.

2.4 Fix iPhone Bluetooth with TunesKit

If the above common solutions don't solve the iPhone Bluetooth problem, then you could resort to related professional third-party tools like TunesKit iOS System Recovery to fix your iPhone keeps disconnecting from Bluetooth. This iOS system recovery software can be definitely working well while causing no data loss on your device. And it is able to resolve up to 50 kinds of different iOS issues including simple and complicated ones.

Other Features of TunesKit iOS System Recovery

1. Supports diverse iOS devices such as iPhone, iPad and iPod.
2. Compatible with all iOS versions including the latest iOS 14.
3. With Standard Mode and Advanced Mode.
4. One click to enter or exit the recovery mode for free
5. Support fix Apple tv issues and downgrading iOS versions.

Step 1: Connect your iPhone to a PC through an original USB cable and launch the TunesKit iOS System Recovery for Win or Mac. Press the "Start" button to begin the fixing.


Step 2: To fix the Bluetooth keeps discoonecting iPhone or other common issues, you need to select the Standard mode. Then tap on the "Next" button.


Step 3: Check the information given on this page which is the information of your iOS device. Once you are sure that there is no mistake, click the "Download" button to download the firmware package.


Step 4: Finally, hit on the "Repair" button and wait until it tells you the repair is finished. Then your iPhone will not always be disconnected from Bluetooth.

Verdict

If you want to fix your iPhone keeps disconnecting from Bluetooth and other common as well as complicated iOS and Apple tv problems with the fastest speed and 100% success rate, then TunesKit is your best choice. Lastly, hope you have a wonderful problem-solving experience.

TunesKit Started Christmas Sale 2020: Up to 100% Off

Hong Kong, December 22, 2020 – TunesKit Studio, a professional software developing company, has just started its grand sale this Christmas season to reward its customers and supporters with plenty of special offers. Both registered or new users are able to get a free gift (its brand-new video editor), a super 4-in-one bundle at $9.95 only, and up to 70% discount on its popular multimedia software, iOS utilities, and exclusive bundles. 

The 2020 TunesKit Christmas & New Year Sale is now live and will last until Jan. 15, 2021. You can grab the last chance of this year to get free software or any of the toolkits at a favorable price!


Now let's see more details about this Christmas special deals. 

TunesKit AceMovi Video Editor: Free Gift for Customers

To be one of the outstanding software brands, TunesKit’s highly anticipated multimedia program – AceMovi Video Editor finally comes to the market. To those who love editing videos, this is a great chance to get a totally free excellent video editing software. It allows users to make and edit any video file easily with powerful features and numerous cool effects. If some users use the software and like it very much, they can buy it at a very favorable price of only $4.95 for one-year use. 

TunesKit 4-in-1 Video Solution Bundle: $9.95 Only

Another huge discount on TunesKit software is a four-in-one video software bundle, which includes Video Cutter, Screen Recorder, Video Converter and Video Repair. Original priced at $ $219.8, this Christmas exclusive pack now only sells at $9.95 only. With the bundle, users can easily record any video or audio on computer and remove unwanted parts losslessly. Buyers can also convert lots of video formats without re-encoding or fix the corrupted video files with ease. 

TunesKit Hot Software and Special Bundles: Up to 70% Off

To celebrate the holiday with users, TunesKit popular media converters and iOS utilities are now on sale, with up to 70% discount. Customers can purchase its hot Spotify Music Converter, Audio Converter, Audio Capture at Audible Converter, or any two of these products at a lower price. Of course, its practical iOS System Recovery and iPhone Data Recovery are also provided at this Offer.


Don't miss this rare opportunity and take action now while there is still time!

Learn more at https://www.tuneskit.com/special/xmas-sales/


Media Contact

Andres Green

Email: support@tuneskit.com

Official Website: https://www.tuneskit.com/


About TunesKit

TunesKit Studio is an innovative consumer software provider, providing customers with easy-to-use yet powerful multimedia and iOS utilities. Currently, it has developed some popular applications such as media converter, video cutter, screen recorder, iOS system recovery, and some other freeware. All its programs have received numerous satisfied users from more than 150 countries worldwide.

Dec 18, 2020

How to Fix iPhone/iPad Stuck in DFU Mode

 You might know what iPhone DFU mode is, when to use DFU mode, and how to exit iPhone/iPad DFU mode. But if your iPhone gets stuck in DFU mode, what could you do to save it? One of my friends encountered this problem several days ago, and he shared his fixing process with me. 

1. Restore iPhone via iTunes

At first, he tried to restore his iPhone by virtue of iTunes, but later he found this may take risk in losing data. And he searched the Internet and what he found is really right. Whatever the related steps are presented below for some people who have backed up theirs data or don't mind.

Step 1: Launch the latest iTunes and connect your iPhone in DFU mode to a computer.

Step 2: When the iTunes detects that your iPhone/iPad is in DFU mode, hit the "Restore" button.

Step 3: Ater that, tap on the "OK" button to continue.

2. Use a third-party ios repair tool


My friend saw that iTunes can't fix his iPhone in DFU mode in a fundamental way, so he resorted professional iOS system repair tools. The software he tried is called TunesKit iOS System Recovery. Results have shown that it is effective and doesn't cause his iPhone any data loss.

Key Features of TunesKit iOS System Repair

1.  Fix 50+ types of iOS issues.
2. Fully compatible with almost all iOS devices like iPhone/iPad/iPod/Apple TV.
3. Support all iOS versions including the latest iOS 14.
4. One-click to enter or exit recovery mode and downgrade iOS versions.


Step 1: Connect iPhone to the computer. Launch the software and connect your iPhone to the computer via a USB cable. Click "Start" button to move forward. Select the "Standard Mode" and tap on the "Next" button. Choose the device model you've connected. After that follow the instructions to continue.

(Notice: If you are using an iPad, the steps are basically the same as the program can also help you to solve the iPad DFU mode in no time.)

Step 2: Download firmware package. Confirm the info of your iPhone before the software start downloading the latest firmware package. Correct it if you find any message is wrong. Hit the "Download" button to let the program download and verify the firmware package.
Step 3: Fix iPhone stuck in DFU mode. Once it completed the download process, just hit the "Repair" button and start repairing the iPhone DFU mode. Remember to keep your device connected to the computer during the recovering to avoid any further problems.

Conclusion

The above is all the useful contents on how to get your iPhone stuck in DFU mode fixed. There are different advantages and disadvantages of diverse methods as some gives rise to data loss while others possess not only efficiency but also the safety like the trustworthy software TunesKit iOS System Repair. Whatever, we sincerely hope your problem could be resolved after reading this context.


Dec 16, 2020

TunesKit AA/AAX Converter VS. TunesKit Audio Converter

You need an audiobook converter to convert the protected audiobooks from Audible or iTunes. You may have used the TunesKit Audible AA/AAX Converter or TunesKit Audio converter to convert your audiobooks. But do you know the differences between them? When you need to convert Audible audiobooks, which one is better? What if you need to deal with the iTunes audiobooks? In this passage, I will compare TunesKit Audible Converter with TunesKit Audio converter and let you know clearly about them.

Price and Speed

Both TunesKit Audible AA/AAX Converter and TunesKit Audio Converter cost $34.95. But regarding the speed, the Audible AA/AAX Converter could convert at up to 100X faster speed while the conversion speed of the Audio Converter is 30X faster. 

Formats

TunesKit Audible AA/AAX Converter was developed for Audible users only so that it only supports Audible AA and AAX audiobook files. At the same time, it can convert AA/AAX to M4AMP3, AAC, AC3, OGG, AIEF, WMA, M4B, M4R, MKA, AU, etc. TunesKit Audio Converter supports to input both Audible and iTunes audiobook files M4B, M4A, AA, AAX and output MP3, AAC, M4B, M4A, WAV, FLAC. Another big difference between the two is that Audible AA/AAX Converter supports preserving the 100% original quality, including bit rate, audio channel, etc., which Audio converter cannot.

As for the supported formats, the TunesKit Audio Converter is doing better than Audible AA/AAX Converter on input formats, as it supports both iTunes and Audible audiobooks. But on the other hand, TunesKit Audible AA/AAX Converter takes the upper hand as it supports more output formats than Audio converter.

How They Work

After launching the TunesKit Audible AA/AAX Converter, you can simply drag your Audible audiobooks to the software screen and start to convert by doing a few clicks only. It's easy and convenient for anyone to use. You are required to install iTunes in order to make TunesKit Audio Converter work. You should import and authorize the audiobooks with your iTunes or Audible account you used to purchase the audiobooks before you can start the conversion. In a word, the Audio converter will require you to install iTunes to work together, while Audible AA/AAX Converter won't.

Conclusion

We talk about the differences between TunesKit Audible AA/AAX Converter and TunesKit Audio Converter from the format, speed, price, and how they work. I believe that you must know more about them. If you only want to listen to Audible audiobooks, you can choose TunesKit Audible AA/AAX Converter, which is much faster. If you use Audible and iTunes to listen to audiobooks, you can choose TunesKit Audio Converter.

For more: https://www.tuneskit.com/audiobook-tips/audible-converter-and-audiobook-converter-comparison.html


Dec 13, 2020

How to Fix iPhone No Sound Problem

iPhone no sound seems a small glitch, though you cannot fix it whatever you do. You do not want to go out and ask the Apple store to repair it which may cost a lot. But it is not a good choice to put aside this problem. Today, I am here to save you from this dilemma. You will get 6 solutions for this small issue.

1. Clean the speaker, headset plug, and jack

Some of you may only find no sound on iPhone only when you are using a headset. In this case, you can clean the headset plug and jack. And you can change another headset to have a try. When you cannot hear sound only when you play sounds without the headset, maybe your iPhone sticks on Headphone mode.

If you find that some objects clog the speaker, use a clean brush or other handy tools to remove them and clean the speaker. Next, you can check the speaker and follow the next tip.

2. Check the iPhone speaker

There is the possibility of a hardware problem. Maybe you drop your iPhone down and break the iPhone speaker accidentally. Besides, this problem can be caused by water damage. You need to check that if it is caused by a broken iPhone speaker. Follow this: Settings > Sounds & Haptics > Ringers and Alerts. Move the slider to the right. Cannot hear any sound? I am afraid yours is broken. You'd better go to change one. Otherwise, keep reading forward.

3. [Highest success rate] Use iOS repair software

When you find no sound on your iPhone and want to fix it immediately, you can choose this method to fix it directly. The iOS repair software can be an iOS device repairer in your computer and is ready to help you whenever you need it.

Among loads of iOS repair programs, TunesKit iOS System Recovery is the most suitable iOS repair software for you to solve this problem. This software can fix iPhone sound not working, iPhone stuck on Apple logo, and other 50+ iOS system problems on iPhone, iPad, iPod touch, and Apple TV. Don't worry about the operation of this tool. It is as easy as turning on a door. I conclude with 3 steps to use this tool. You can download, install it, and follow my instructions below.

Step 1. Launch TunesKit. Connect the iPhone with your PC using an original USB cable. Start to turn on TunesKit iOS System Recovery. Click the Start button.


Step 2. Choose Standard mode. You can choose the Standard mode to fix your problem without data loss. For a few serious problems, you need to use the Advanced mode to handle them.


Step 3. Download firmware and repair iPhone no sound. Check the information of your iOS device. You can edit it from the drop-down menu. Finding no mistake, you should click the Download button to download the firmware. Finally, choose the Repair button when the download is over and wait until it tells you the repair is finished.

4. Check the Ring/Silent switch

The Ring/Silent switch is set on the left side of iPhone. And you can switch it to change the ring or silent mode of your iPhone. When your iPhone is in silent mode, it shows orange. The silent mode will stop any ringtones and alerts. But it does not influence other sounds. Sometimes, this feature may get some bugs and result in no sound on iPhone. You can adjust it by changing from the Ring/Silent mode and see whether it works.

5. Turn off the Bluetooth

Check whether you have turned on the Bluetooth on iPhone. When you turn it on, the sound which should be output from speaker on your iPhone may be transferred to another device which is connected with yours at that time. And it makes your iPhone no sound as a result. How to disable this feature? Just head over to Settings, and then Bluetooth. Toggle the Bluetooth switch to turn it off.

6. Turn off the Do Not Disturb

The Do Not Disturb feature empowers you to decide a period when you do not want to be disturbed. During it, you will not hear any notification sound or alerts from your iPhone. Maybe you turn it on unintentionally and then you find your iPhone sound not working. If it is on, a crescent moon icon will appear in the status bar. You can go to Settings and Do Not Disturb to turn it off.

Summary

You can also try to restore iPhone to fix iPhone no sound problem. But it is not necessary for youto use this method because it will make your iPhone lose all the data and settings. Compared with it, a third-party iOS repair tool such as TunesKit iOS System Recovery is much more efficient and will not cause any data on your iPhone.