Feb 25, 2021

Fix iPad Can't Rotate with 4 Effective Ways

 Just like iPhone screen not rotating sometimes, the iPad may not rotate, too in some cases. If your iPad does not fall down and becomes broken, one of the possible reasons for your unnormal screen is the Device Orientation Lock turns on. This button is designed to lock the screen in either portrait or landscape mode. Other factors such as hardware or software issues are also related to iPad screen not rotating. If the device screen has been severely damaged or broken, you have to contact Apple Support Center. Otherwise, you could use the following tips to get the problem resolved.

Fix 1: Use iOS recovery system software-the most effective

This way is fatal to serious system problems. If your iPad screen not rotating is not simply caused by wrong button settings, you may try this fix. Here, TunesKit iOS System Recovery is taken as the example to show you the detailed steps to fix iPad not rotating.

Thanks to its several years of development, now TunesKit has grown into a powerful and versatile iOS system repair tool. Besides getting iPad out of locked screen, it also aims to solve more than 30 types of iOS system woes including iPad boot loop or Apple logo. What' s more, if your iPhone, iPod Touch or Apple TV has been stuck in similar issues, TunesKit also helps you.

Now, the ultimate steps are ready and do not forget to download and install TunesKit on your PC.

Characteristics of TunesKit iOS System Recovery:

1. Fix iPad screen not rotating without data loss
2. Repair different tvOS/iOS issues by yourself
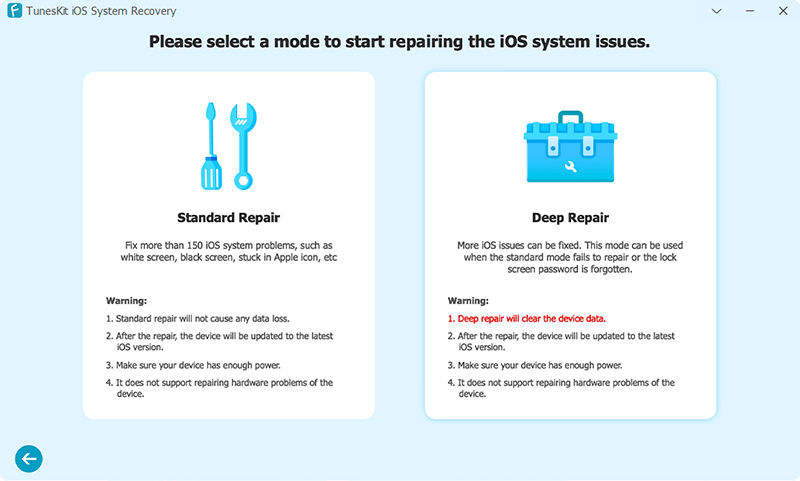
3. Provide Standard Mode and Advanced Mode
4. Easy to use with friendly interface

Step 1: Connect iPad to TuneKit on computer. Open the repair software. Next, use a USB cord to connect and let the software recognize your iPad. If iPad is successfully connected, click Start.


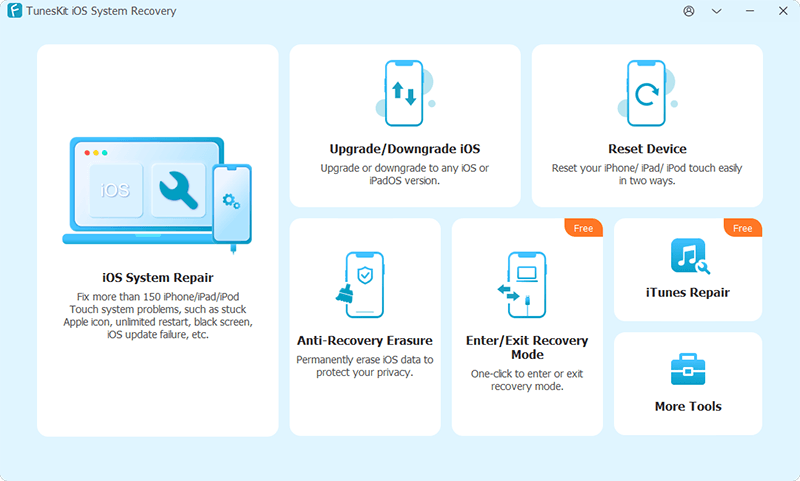
Step 2: Click Standard Mode. Now you will see an interface with two modes. Just choose Standard Mode without data loss and click Next.


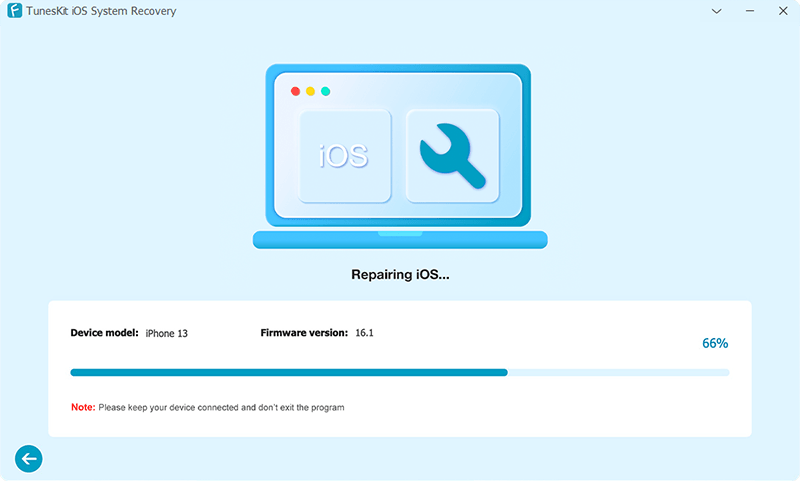
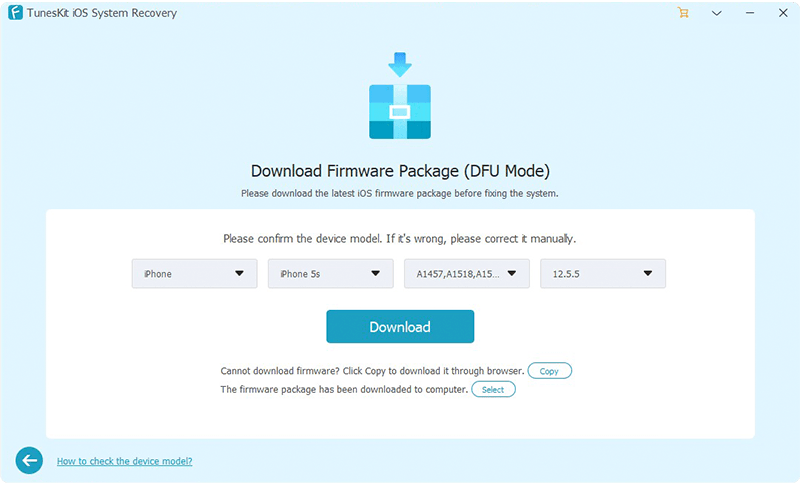
Step 3: Download the firmware to repair. Now, the remaining step is to download firmware package which will spend several minutes. Then click Repair to fix your iPad.


Note: if the Standard Mode fails, choose Advanced Mode with data loss and then follow the same steps above. And do not forget to have a backup.

Fix 2: Turn off Device Orientation Lock

As users may inadvertently turn on the Device Orientation Lock, the iPad can fail to rotate itself. Therefore, the first simple solution is you should turn off this button. Due to different types of iPad, two options are available:

1. Turn off from the top or bottom of screen

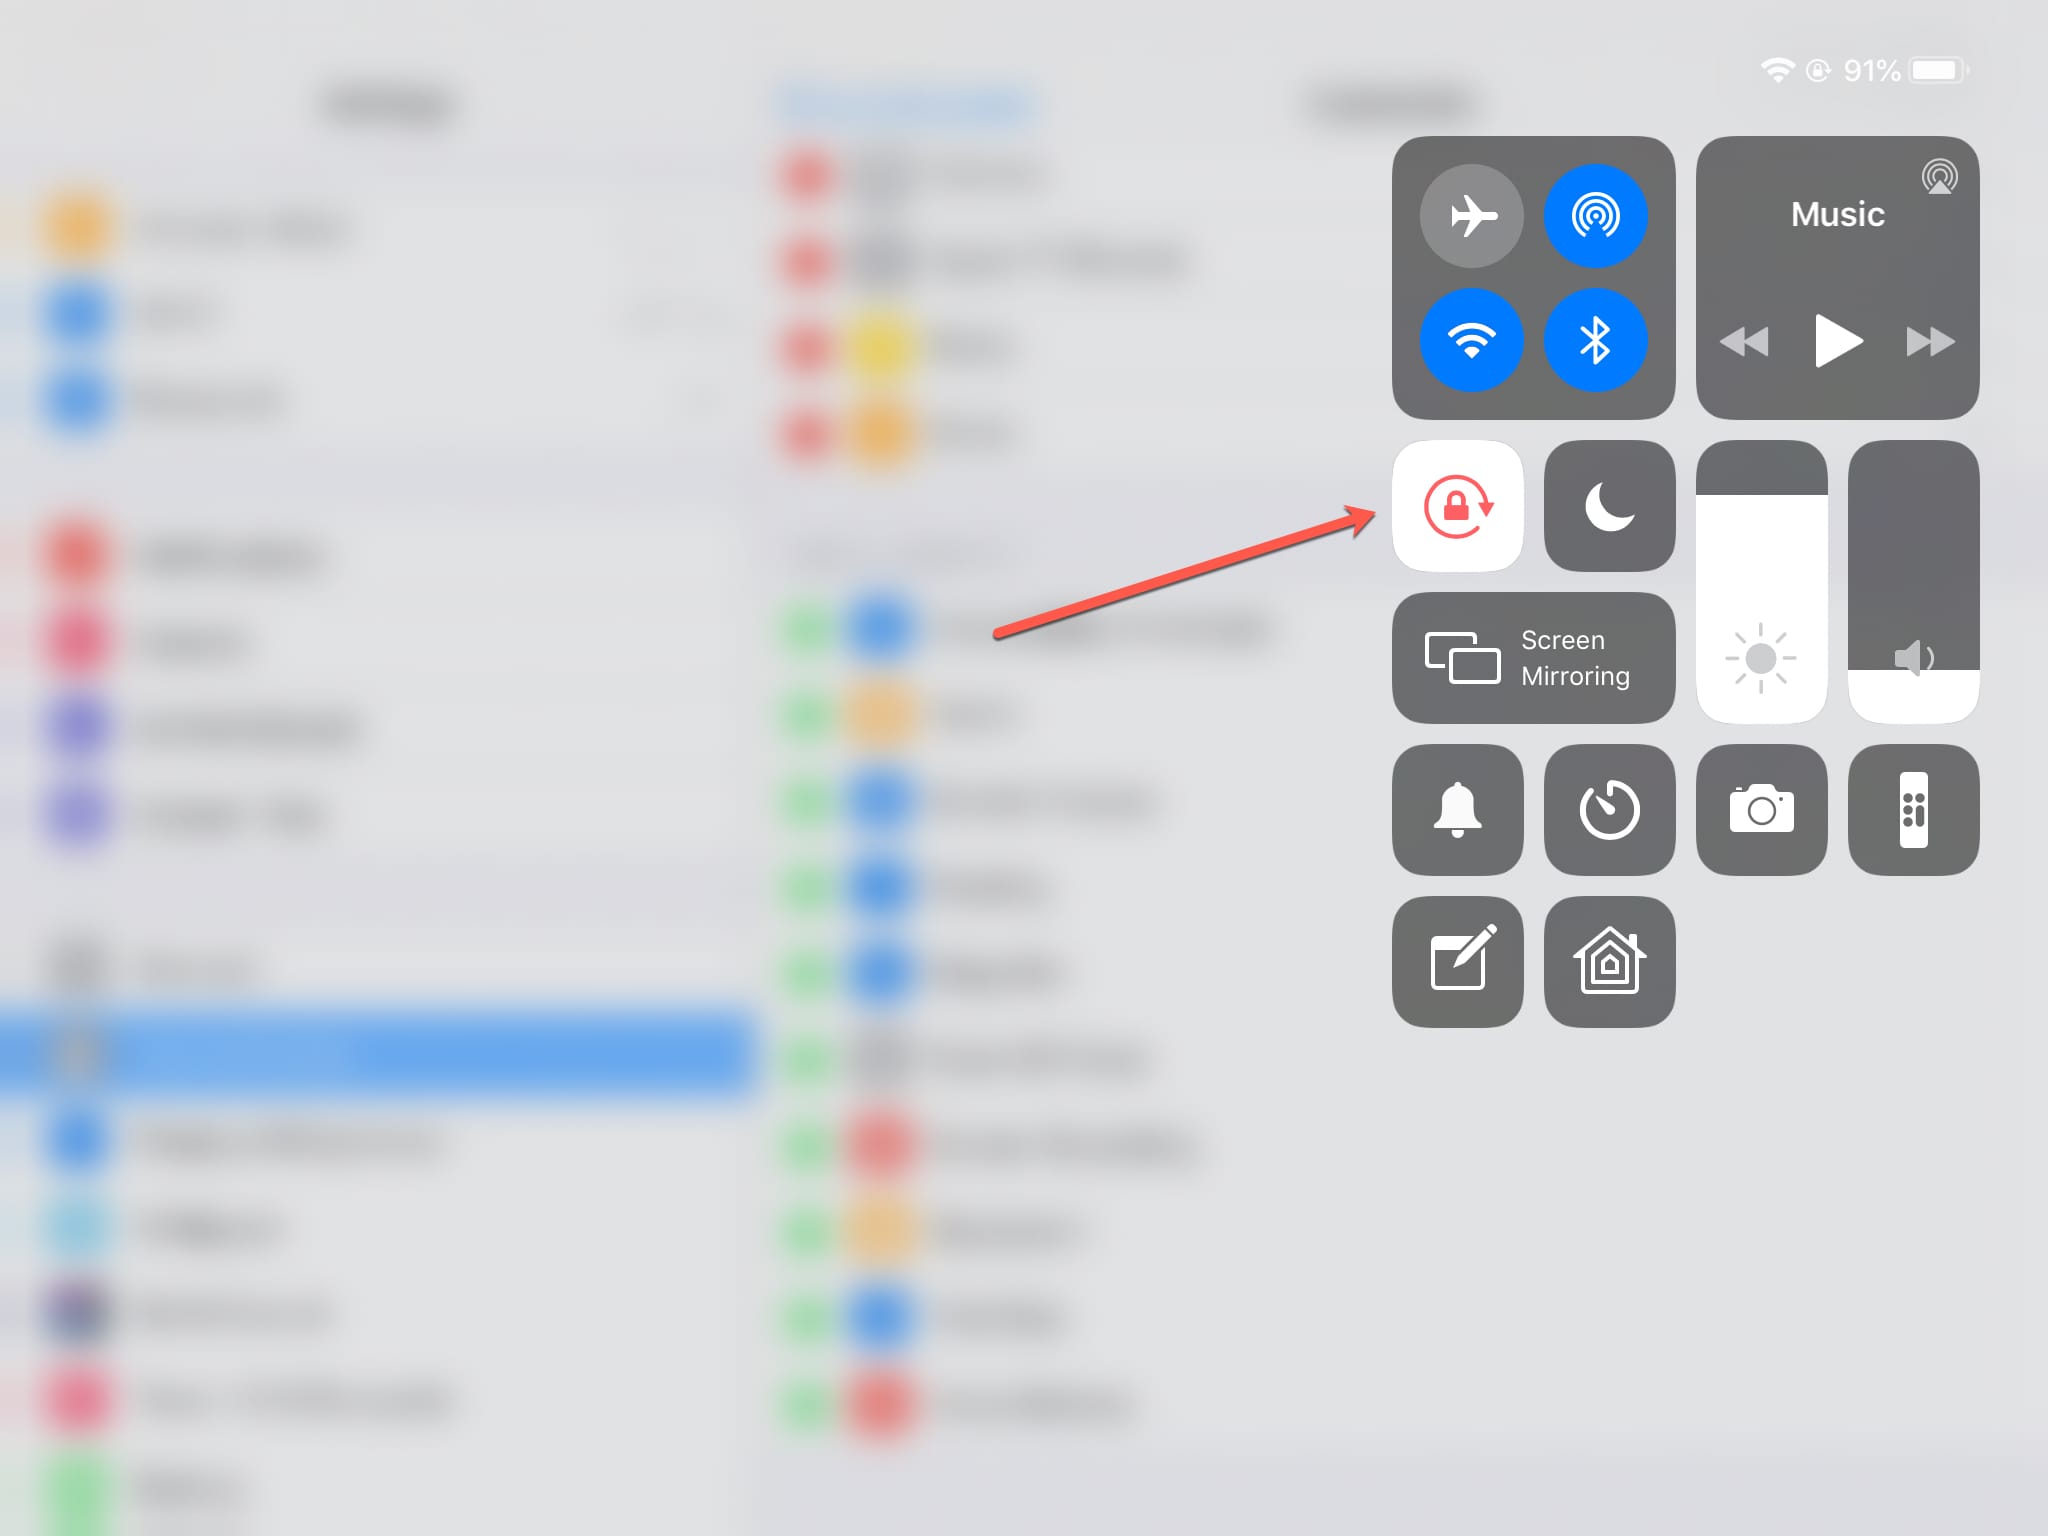
For iPad with iOS 12 or later: Scroll down from the top-right corner of your screen to open Control Center. Find the Device Orientation Lock button and click it to make sure it turns off. If the button turns white from red, it means you may rotate your iPad screen again.


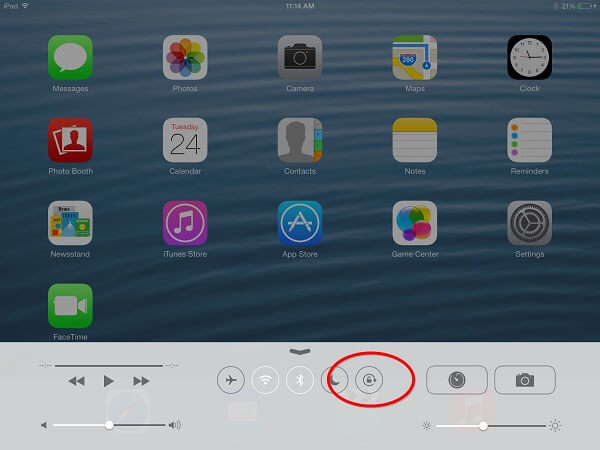
For Pad with iOS 11 or earlier: Scroll down from the bottom edge of the screen to open Control Center. Just click the same button to let it turn off.


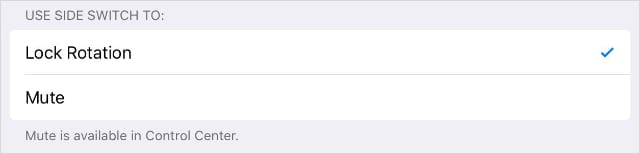
2. For iPad with a Side Switch

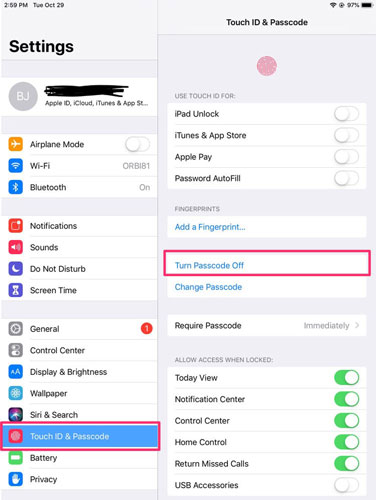
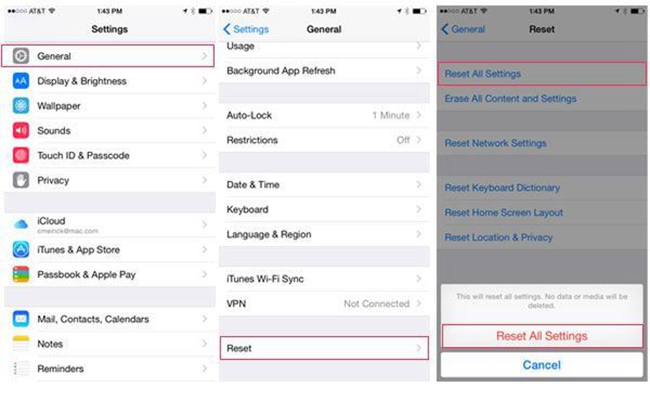
If you do not find the Rotation Lock Button, just see if your device has a Side Switch. If you have an iPad with a side switch, you can set the side switch to work as a rotation lock or mute switch. Next, you need to open Setting and then General. Find User Side Switch To select Mute, so your iPad can rotate automatically.


Lastly, after you finish one of the steps, try to test whether iPad gets normal. If this does not work, try the following fixes.

Fix 3: Try different apps to test the iPad screen

Maybe, some apps cannot support portrait or landscape mode. If you are using them, your iPad will not rotate its screen. You may try to use Apple standard apps for a test, such as Safari, Photos or Calendar. If the screen can be rotated again, then it is the app' s issue rather than iPad itself. And you can search online to see if others face similar problems when using the specific app.

Fix 4: Force restart iPad

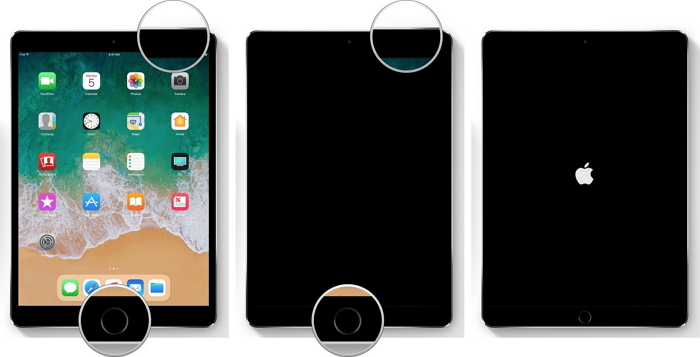
Force restart is the common solutions for most iPad issues. Before you force restart iPad, you need to quit all apps on your device.

For iPad without home button: quickly hold and release the Volume Up button, and then the Volume Down. Next, hold the Power button until the Apple logo occurs.


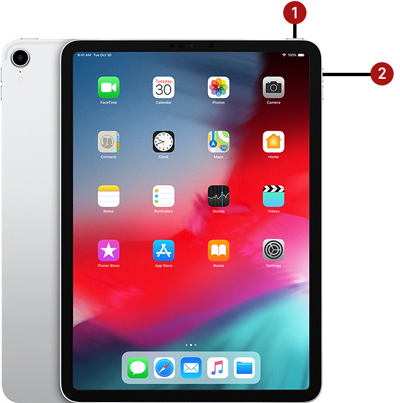
For iPad with home button: simultaneously press the Sleep/Wake and Home buttons for several seconds before the device shutdowns and restart itself. After the Apple logo appears, you can release the buttons.

Conclusion

Each solution has its advantage and you are free to choose the one you like to fix your iPad screen can't rotate. Besides, many other ios issues can be fixed by the first method -- TunesKit iOS System Recovery.

Play Audible Audiobooks on Bose SoundTouch

Play Audible Audiobooks on Bose SoundTouch

Bose SoundTouch is famous for its audio quality, battery, and more features. Some users try to play Audible audiobooks on SoundTouch. But most of them have not found the correct methods. In this post, there are two methods prepared.


Stream Audible Audiobooks to SoundTouch via Bluetooth

Bose SoundTouch doesn't support many music streaming apps, but it supports the Bluetooth connection feature. This offers an easy way to enjoy music from a lot more devices straightforwardly. So, it is highly recommended you stream Audible audiobooks to SoundTouch speaker via Bluetooth. What you need to do is only to pair your device which has the Bluetooth feature with the SoundTounch device. Once it is paired, a record of the connection information is stored in the memory of each device and you don't need to pair again the next time. Before you begin to pair them, please make sure your SoundTouch system supports Bluetooth, too.

1. Install the SoundTouch app. You can install it on your phone, tablet or computer, etc., then it will become a controller for playing on SoundTouch.

2. Turn on Bluetooth on SoundTouch. Open the SoundTouch app, click the three-dash icon in the top left corner, click "Settings" > "Speaker Settings", and then you will see the SoundTouch system details. Then choose the "Bluetooth" menu and click "Pair".

3. Turn on the Bluetooth on your Bluetooth device like your phone, tablet, or computer. You can go to the settings of the Bluetooth device you want to pair and turn on the Bluetooth. 

4. Pair the two devices. In the device's Bluetooth settings, you can click 'Search for devices' or 'Add new device' to set up the Bluetooth connection.

5. Stream Audible audiobooks to SoundTouch.

Sync Audible Audiobooks to SoundTouch from Computer

Playing Audible audiobooks on SoundTouch through Bluetooth is simple, but not all of your devices support Bluetooth. For instance, the previous SoundTouch series 1 and series 2 and some computers or NAS drive don't support Bluetooth. Except for the Bluetooth streaming, you can also convert the AA/AAX files to a well-recognized format of music files for your SoundTouch system by a third-party Audible converting tool.

TunesKit Audible AA/AAX Converter/Mac is an exquisite software to do this job. Unlike other tools in the market which require you to authorize Audible files to play on iTunes before you can start to convert them, TunesKit Audible Audiobook Converter does not have this hassle. Normally you just need to drag and drop to import all your Audible AA/AAX files and click the "Convert' button to convert your Audible files.


Following is the 3-step guide on how to convert Audible audiobooks:

1. Import Audible audiobooks

In order to convert the Audible files, you must download them to your computer through the Audible Download Manager on Windows or iTunes on Mac first. After that, you can drag them to the main screen of the software.

2. Customize output settings

SoundTouch supports playing unprotected music files such as MP3, AAC, M4A, WMA, OGG, etc., so you just need to pick up one of the output formats you want. The default output format of the TunesKit Audible AAX Converter is set to MP3. You may keep the default MP3 or choose one format you want. In addition, TunesKit software has abundant options for you to customize your Audible audiobooks such as editing the Tab information, splitting audiobooks, and adjusting the playback parameters.

3. Convert the Audible audiobooks

To convert all your files, you just need to click the Convert button. The converting speed is the fastest with surprisingly 100X faster speed. No matter how many files you imported, they will be converted quickly. When it is done, you will get the SoundTouch compatible music files.

Play converted Audible audiobooks on SoundTouch

Sound Touch supports playing audio files from a NAS drive or a computer with iTunes or Windows Media Player. You only need to add a new music library to your SoundTouch after getting the converted Audible audiobooks.

1. Open the SoundTouch app. Click the top three-dash menu and choose "Add Service". Then select 'Music Library on Computer' if you want to import your converted Audible audiobooks from a computer or select 'Music Library on NAS" if your music library is stored on a NAS drive. 

2. You can choose the type of library to be added by selected the blue circle next to Windows Media Player, iTunes, or NAS drive. Note: If you are using Windows Media Player or iTunes library, please make sure you have enabled the option of sharing the library.

3. Enter a name for the new library and select "Add Music Library". It may take you a few minutes for the music library to sync to your SoundTouch. Please wait patiently. When it is completed, you can play the music files freely.

Summary

Now you know how to play Audible audiobooks on SoundTouch with Bluetooth or after converting. My suggestion is to convert Audible books first because you can play Audible on SoundLink, Sonos, and more devices.

For more:

https://www.tuneskit.com/audiobook-tips/play-audible-audiobooks-on-soundtouch.html


Feb 24, 2021

Top 2 Methods to Crop MP4 Videos on Windows or Mac

A useful video cropper tool is able to help you get rid of the unnecessary black bars in the video, change the aspect ratio to fit the screen, etc. If you’re looking for such a tool to crop your MP4 video file, you are in the right place. Here I’m going to introduce two easy solutions to help you crop a video efficiently. 

Method 1: Crop MP4 Video with TunesKit AceMovi

The first good cropping tool introduced here is the AceMovi Video Editor from TunesKit. It can help both Windows and macOS users to crop any video file within a few clips. Most important is that, it will not lose the original quality of the file after cropping. You're also allowed to change the aspect ratio according to your needs. Besides MP4 files, it also supports a wide range of media file formats such as WMV, MOV, AVI, 3GP, MPEG, etc.

TunesKit AceMovi is well-designed with a simple interface, with neat buttons and navigations. Both beginners and professionals can easily learn how to use the program in a few minutes. In fact, this video editing software is equipped with many advanced editing tools as well. You can record the screen and edit the video by applying filters, transitions, animations, split-screen effects, text or background music, etc. In addition, there are so many flexible output options for you, including various media formats, mobile devices or web video sharing platforms, etc.

Next, I'll show you how to use AceMovi to crop MP4 video on Mac or PC computer.

Step 1: Launch AceMovi and Add MP4 File. Open TunesKit AceMovi Video Cropper program on your computer. After that, click the big "+" icon or "Import" button to add your target MP4 video footage. Next, you need to drag the file from the media bin and drop it to the timeline.


Step 2: Crop MP4 Video. In this step, you have two ways to crop your MP4 video files. First, right-click on the file and choose the "Crop" option. A new window will come, along with two preview sections for you. You can now crop the unnecessary parts of your file and see every change you made on the preview windows. The second method is to click on the file and then click the "Crop" icon crop icon on the toolbar. And then crop the MP4 file based on your needs.


Step 3: Export the Cropped Video. After you've set it all, just click the OK button and exit the windows. Then click the yellow "Export" button to save your cropped MP4 video file. Here you'll be able to select an output format for your file, change the file name or output path. Then click the Export button again to confirm the action. Your cropped file will be saved to your local computer in one minute.


Method 2: Crop MP4 Video with Online Tool

The next easy solution that you can use to crop MP4 video for free is to take advantage of some online video cropping tools. There are several such tools on the Internet such as Online Video Cutter, Ezgif.com, Clideo, etc. After tested some of them, Online Video Cutter is recommended here because of its speed and simplicity. The following is the quick instruction to show you how to use crop MP4 video online on the computer. 

Step 1: Upload MP4 video file. First of all, please visit the official site of Online Video Cutter on your web browser. Then click the Choose file button and import the MP4 video you want to crop. Click the small dropdown triangle button and it offers you opportunities to upload video from Dropbox, Google Drive or online. 

Step 2: Crop the MP4 video. Then you'll see your MP4 video in the preview window. You can now move the blue frame to crop the MP4 file based on your requirements. Or click the Crop icon on the left to choose a resolution ratio you want. There are several ratios for your reference like 4:3 for classic TV, 4:5 for Instagram, 16:9 for widescreen TV, etc.

Step 3: Save the cropped MP4 video. After set all the preferences, now click the Save button on the lower right corner. Wait a while until the processing is done. Afterward, you can click the Download button to export the new video to your computer or transfer it to Dropbox or Google Drive. 

To learn more solutions, you can visit here:

https://www.tuneskit.com/video-editing-tips/crop-mp4-video.html

More related articles:

Feb 23, 2021

How to Fix "Unable to Activate Touch ID on This iPhone"

 Touch ID is essential as a way to access iPhone, but sometimes an error message will appear telling that unable to activate Touch ID on this iPhone. In most cases, this issue can be attributed to software and iOS-related glitches. When you have this trouble, you can try the following workable tips to fix your iPhone Touch ID can't be activated.

Tip 1: Force Restart iPhone

When "Unable to activate Touch ID on this iPhone" error message first appears, what occurs to you primarily should be force reboot your device.

For iPhone 8 and newer, respectively press down and let go of the Volume Up and Down buttons, then hold the Side button until the Apple logo is presented on the screen.

For iPhone 7 and iPhone 7 Plus, simultaneously hold down and release the Volume Down and Sleep buttons until the Apple logo is shown on the interface.

For iPhone 6, iPhone SE or older, press down and release the Home and Power buttons at the same time till Apple logo is displayed.

Tip 2: Reset Touch ID

Once your iPhone fails to activate Touch ID After you reopen it, in this case, you could delete the older fingerprint and re-add one to take a shot. Please follow the steps here to complete the process.

Step 1: Open Settings on iPhone and go to Touch ID & Passcode tab.

Step 2: Enter your password.

Step 3: Find your added fingerprint and swipe to remove it.

Step 4: Reset Touch ID by adding a fingerprint again.

Tip 3: Toggle Passcode off and on

If it is still unable to activate Touch ID on this iPhone, then you could try to turn off Passcode temporarily and turn it on later to see whether this fix works.

Step 1: Click Settings > Touch ID & Passcode.

Step 2: Select Turn Passcode Off and confirm the order through inputting password.

Step 3: After a few minutes, turn passcode on again.

Tip 4: Fix Unable to Activate Touch ID on This iPhone with TunesKit

Having tried the above 3 methods, you would not like to miss this option to fix unable to activate Touch ID on this iPhone with the help of TunesKit iOS System Recovery. This professional third-party iOS repair tool had relevant successful experiences before in dealing with other problems like unable to activate iPhone. TunesKit iOS System Repair, the powerful software, will not cause you any data loss during fixing the issue discussed. Wonder how to apply it to resolve unbale to activate Touch ID on this iPhone? Just do the steps.

Other Mighty Functions of TunesKit iOS System Recovery

1. Resolve 50+ iOS problems
2. Fix iOS/tvOS problems with no data loss
3. Two repair modes - Standard/Advanced Mode
4. One click to enter or exit the recovery mode for free
5. Compatible with all iOS versions
6. Support almost all iOS devices

Step 1: Connect iPhone to computer and open TunesKit


To begin with, connect your device to a computer with an original USB cable. Then run TunesKit iOS System Recovery on the computer and wait it detects your iPhone automatically. Hit the "Start" button to begin and select the Standard Mode to fix unable to activate Touch ID on this iPhone without data loss.

Step 2: Download and verify firmware package

Confirm your device info and correct it if anything is wrong. Next tap the "Download" button to get relevant iOS firmware package matched with your iPhone downloaded and verified.

Step 3: Fix unable to activate Touch ID on this iPhone

Once the download is done, you could press the "Repair" button and start fixing the iOS problem. Do not plug out your device while it's repairing iOS system.

Tip 5: Restore iPhone via iTunes

If you are an iTunes supporter, you could also use the app to restore your iPhone, thus potentially getting unable to activate Touch ID on this iPhone problem solved. But to remind you, this would lead to data loss, so you had better back them up earlier.

Step 1: Launch the latest iTunes and connect your device to a computer.

Step 2: When your iPhone is detected, choose Summary tab.

Step 3: Click Restore iPhone option.

Tip 6: Reset All Settings of iPhone

Another fix, for example, factory iPhone settings, is offered lest you may want to give a shot. As is widely known that it deletes all information and data on your device once finishing related procedures. In this way, it is advisable that you have a backup of your iPhone. Then you can navigate to Settings > General > Reset and tap on Reset All Settings.

Conclusion

on't miss these 6 effective ways to solve unable to activate Touch ID on this iPhone. Any other suggestions, be free to give your comment below.

Feb 22, 2021

Top 10 Best MKV Cutters for 2021

You may have your favorite MKV files, but sometimes they don't meet your expectations, like the desired length or quality. There are various video cutting tools in the market to assist the users' trimming demands. Each tool is different in quality, cutting features, or interface. Those MKV handy cutters that offer you various features for removing the unwanted parts and maintaining the quality are high in demand. 

Fortunately, you don't need to be an expert to use the MKV cutter. In this article, we will list out the 9 best MKV cutters that will greatly reduce the storage pressure on your computer and allows you to share MKV files without any worries. If you have not ever know the best and handy MKV file cutting tools, then this article is really not to be missed.

Free MKV cutters make everything simple and easy. You can choose and remove the specific unwanted parts from any MKV file. These cutters lessen the shortage issues and allow you to share the files without any worry. In this part, we will list out the best MKV cutters that are really not to be missed. 

1) TunesKit Video Cutter

TunesKit Video Cutter is exactly a nice option. It is an MKV video cutter, splitter, editor and converter. With the program, you can easily cut an MKV file without re-encoding. In other words, your file will be cut and converted with 100% the same quality as the original file. Besides, the program is simple to operate with a super-friendly interface. And it offers 5 chances for you to cut any video file with no cost. 

Pros: 

Cut MKV video files without quality loss.

Support various output formats and devices.

Easy to use with a clear UI.

Cons:

Can only deal with one MKV file at a time.

2) VSDC Free Video Editor

A free editing tool that you can use to retouch or polish the videos on your computer. VSDC Free Video Editor offers many features to make changes in your MKV files as you want. 

Pros: 

Supports advanced features and large number of effects.

Support MKV and other formats too.

Cons:

Lengthy exportation process.

Not easy interface.

3) Avidemux

Avidemux is a basic video editor that offers you many features and allows you to cut your MKV files. You will also find out new features and improvements as it gets updated very often. 

Pros:

Smoothly cut the MKV files.

Work on various platforms.

Cons:

No available keyboard shortcuts.

Random crash. 

4) iMovie

It is an MKV cutter free available for Mac that provides an option to cut and edit your MKV files. iMovie is merged with MacOS so that the user can easily work with the local files and iTunes files as well.  

Pros:

Interactive tool to cut MKV videos.

Various tools to edit videos.

Cons:

Restricted video formats.

Complicated interface. 

5) Freemake Video Converter

Freemake Video Converter is more of a fil converter tool that is used to trim several parts from your MKV files. This tool lets you cut and trim the MKV files before you convert them. You can trim, join, and rotate the video file with the basic editing tools in this converter.

Pros:

Several options of file formats.

Handy cut features.

Cons:

Rendering takes time.

Program crash. 

6) Gihosoft Free Video Cutter

Gihosoft Free Video Cutter is free software that allows you to add and edit videos in various formats as well as MKV format. It provides full control of the editing range precisely so that you can trim the videos in the same quality. 

Pros:

Simple and free tool.

Trim videos without quality loss.

Cons: 

Only trim feature for video editing.

Limited video formats. 

7) Free Video Cutter

Another best MKV cutter has the ability to cut and split the large video files into segments of high quality. You can also cut the black content at the start and end of the videos. 

Pros:

Free and easy video cutter.

Trim videos with high quality.

Cons:

Only a few video export formats available.

No real-time preview feature. 

8) VideoPad

VideoPad is a professional MKV cutter Mac that assists you in cutting and edit your videos. You have a playhead that is moveable so that you can select the point from where you want to trim your video file. Then the tool will cut that part and makes it better. You even share the MKV files after trimming. 

Pros:

It can edit all type of audio files.

Trim videos with great precision.

Cons:

No advanced editing tools.

Some features come in the paid version. 

9) OpenShot

It is a rare open-source tool that provides you extra-ordinary video editing and MKV cutting tools. You can trim your videos and apply various video effects that can be applied in MKV files before or after cutting them.

Pros:

Easy to access and use MKV cutting tools.

Support audio, video, or image files.

Cons: 

A bit confusing interface for beginners.

The tool gets frozen-up. 

10) Moo0 Video Cutter

It is a fairly light trimming tool that is ideal for cutting the needless sections of your large MKV files. Moreover, Moo0 Video Cutter supports several output formats such as FLV, M4V, MP4, WMV, etc. It has a well-arranged time adjuster and provides you efficient results with no quality loss.

Pros:

Provides a preview option.

Basic features for trimming only.

Cons:

Limited for Windows.

Only cutting features and tools. 

Conclusion

So these are the 10 best MKV cutters available for Windows or Mac users in the current market. All of them provide high-quality results, and you can pick the one you like best. TunesKit Video Cutter full version offers five free opportunities for you to have a try. If you want to cut MKV with no quality loss, just try TunesKit!

Download TunesKit Video Cutter for Windows Now>>

Download TunesKit Video Cutter for Mac Now>>

Source: https://www.tuneskit.com/video-cutting-tips/cut-and-convert-mkv-file.html

Read more:


How to Make Video From Photos on PC? Here is the Step

Thanks to the camera of moblie phones, people can take photos everywhere at any time. In their phones, they store many amazing photos. Some people now want to make them active and forms a video. So they may ask  what is an easiest way to create a video from a bunch of photos? In fact, making a photo slideshow is not thorny but easy. The following information will be a proof and just keep reading.

Steps to Make A Photo Slideshow on PC

In this part, you'll learn how to create a photo slideshow on the computer. But first, you'll need to get yourself a video editor. You might have been searching for it for a while, but this will be the end of your search. With TunesKit AceMovi, you can easily make a photo slideshow with transitions and other effects.

TunesKit AceMovi Video Editor is a one-stop video editor that provides multiple effects and transitions. It comes with a screen recorder which can record images as well as the sound coming out of your computer. As a well-established video editor, AceMovi is mounted with features like split screen, filters, animations, texts, and music library. The self-explanatory user interface comes with all the effects and tools you need to embellish your video. You can import as many photos as you want to AceMovi and edit them altogether without any limitations.

Next, I'm going to show you how to make a photo slideshow in TunesKit AceMovi. Before you add text to your video, make sure that you have already installed TunesKit AceMovi on your computer, this software currently supports Windows and Mac systems.

Step 1: Add multiple photos to AceMovi

Open TunesKit AceMovi on your computer, then import your photos to the media box. You can click on the import button to upload or directly drag and drop the photo files into the box.

Step 2: Add photos to the timeline

To add your photos to the timeline, you can directly drag and drop them one by one. Or you can press Ctrl+A to select all the photos and drag them to the timeline. To adjust the order of the photos, directly drage the photo you want to change and drop it to the place you want. This won't cover the original photo so you don't have to add the photo from media box again.

Step 3: Add transitions between photos

You have basically finished making the slideshow, but to make your slideshow look smoother, you'll need to add transitions between photos. Click on the Transition icon and then drag and drop a transition in between photos, you can add diifferent transitions in the whole slideshow. To edit the transition, go to the top right panel to change the duration and mode.

Step 4: Export video
Once done editing your video, click the Export button on the middle left and export your video. Click the Settings, you'll be able to choose the output parameters. And by clicking the Change button, you can change the output location.

More Rewards: How to Make A Photo Slideshow with Music


Step 1: Import a song to TunesKit AceMovi, or you can pick a song from AceMovi music library.

Step 2: Drag and drop the song to the timeline, and then trim the song to fit the length of the slideshow.
Step 3: Export the slideshow with music.


Final Words


I hope this blog helps you understand how to make your own video from a bunch of photos. If you really interested in a photo slideshow, just follow the steps above and start your video making journey.

To get more details, please visit this article:

You may also like:

Feb 19, 2021

2 Easy Ways to Rotate a Video in Windows/Mac

It would be so frustrating to find that your video is upside down or sideways after shooting by smartphone or camcorder. When you transfer your video to the computer, no matter it's a Windows or Mac, most media players will allow you to rotate it and watch in the right orientation. Yet it's just for this time, which means the player will not rotate the video and save it permanently. To fix this problem, this tutorial will introduce two ways to help you rotate a video on Windows or Mac with ease.

Method 1. Rotate a Video with TunesKit AceMovi

The first way I’d like to recommend is to choose and download a powerful video editing tool. In contrast to online tools on a Web browser, it can edit and save your video files smoother. Usually, this kind of tool will not consume too much memory.

Among various video editors, AceMovi Video Editor is one of the best video rotators for users. So why it works well? Firstly, with clear buttons, rotation or flip can be regarded as its basic function. Whether you hope to rotate left and right, or upside and down at any angle,  AceMovi will not depress you. What's more, it offers a bonus to let you add animation, transitions, or dynamic texts to make your video animated.

Steps to rotate a video by AceMovi:

Step 1: Import a video

After downloading AceMovi, just launch it and directly drag the video to the track. Or when you open the software, find the Import or File buttons to input your video.


Step 2: Start to rotate or flip

In terms of rotation:

Now, as your video clip is in the track, click it and you will see a setting panel on the right side. Just find the Rotate button and drag the sidebar to any angle you want or manually change the angle. Of course, if you only need to rotate 90 degrees clockwise or counterclockwise, you can directly right-click the Rotate 90 CW or Rotate 90 CCW.


In terms of flipping:

Similarly, based on the same manner, just click the Flip button which lets you flip horizontally or vertically.


Step 3: Output your final video

Lastly, the video, after rotating or flipping, can be outputted by clicking the Export button. If you want to change the format or size of your video to suit YouTube or other platforms, you can also change it freely.

Method 2. Rotate a Video with TunesKit Video Cutter

Well-known as a useful video cutting tool, TunesKit Video Cutter also serves as a good video rotator that can easily rotate any video 90-degree right or left, or flip it vertically or horizontally. Specific speaking, it supports various media file formats like MP4, MOV, M4V, MPG, MPEG, AVI, WMV, 3G2, 3GP, ASF, RM, DAT, FLV, MKV, RMVB, VOB, OGV, and many others. In addition, it allows you to export the rotated video onto different common mobile devices including Apple iPhones, iPad, Samsung Galaxy, Windows iPhone, smart TVs, game consoles, etc.

TunesKit Video Rotator offers two preview windows for you to see any change you've done to the file in real time. Moreover, this program can also help users to edit the videos such as crop the video, overlay special effects, insert watermarks, add subtitles, or import background music to the video, etc.

Complete guide to easily rotate and flip video with TunesKit Video Cutter:

In this part, you'll know how to rotate a video on Mac or Windows computer easily with the help of TunesKit Video Cutter. TunesKit program supports both Windows and Mac operating systems and here we will take the Windows version as an example.

Step 1: Launch TunesKit and import video file

After completing the installation of TunesKit software on your computer, you can simply open it. Next click the Open button to add the video file you'd like to rotate or flip. Or you can just drag and drop the file to the program.


Step 2: Rotate or flip the video file

After the video is successfully imported, click the Editor icon on the right of the file, and a new window pops up. If you don't see your file after added, just press the Show Segment List icon and your file will show up. Next, choose the Adjust option from the top menu bar and you can see the rotation options for you. Now just hit the 90-degree clockwise or counterclockwise, or flip it horizontally or vertically until you see the video is in the right direction.


Step 3: Choose the output mode

Next press the Format panel and choose the second Encoding mode, which will allow you to customize file format, device, code, quality, etc. After finishing the setting, click the OK button to shut down this window.

Step 4: Save and export the video

Now press on the Start button and TunesKit will start to rotate the video as you set. Wait a minute and then you can locate the rotated file on the destination folder.

The Bottom Line

After reading the guide below, you must have a clear idea about how to rotate a video in Windows or Mac. TunesKit AceMovi and Video Cutter are such efficient tools that you can rely on. Both are easy to operate with an intuitive interface, and anyone can easily learn how to use them with no effort. Just give it a shot and if there is any problem, please let me know in the comment below.

To know more methods, please visit its source: