Jun 28, 2021

iPhone 12/12 Pro Stuck on Apple Logo? Solved!

 Have you ever met the situation that your iPhone 12 stuck on the white Apple logo? Many Apple users have reported the same issues. When their iPhone 12 or 12 Pro get stucks on Apple logo, they can't use it anymore. 

It must be very frustrating if you're one of them. But don't worry! Here in the following, we'll show you 4 possible effective ways to solve the iPhone stuck on Apple logo problem. 

Way 1. Force Restart Your iPhone

The first option you can try is to force restart your iPhone device. It is also the easiest solution to take when facing common iOS issues like iPhone stuck on Apple logo. Even if it may not work, it's still worth trying as the operation won't be harmful to anything on your device. Plus you can perform the hard reset without a computer.

hard reboot iphone

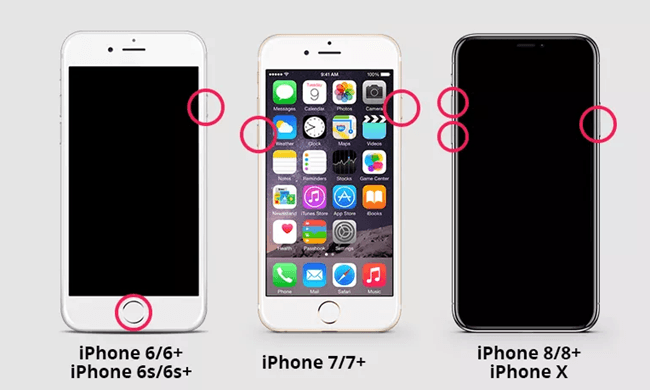
1# On an iPhone 6s and earlier models,

Press and hold the Power button and Home button together until you see the Apple logo appear on the screen.

2# On an iPhone 7 and 7 Plus,

Press and hold the Volume Down button and the Power button for about 10 seconds. Release them until the Apple logo displays on the screen.

3# On an iPhone 8 and newer models,

Quickly press and release the Volume Up button, then hold down and release the Volume Down button. Finally press and hold the Side button until you see the Apple logo.

Way 2. Fix iPhone 12 Stuck on Apple Logo with TunesKit [No data loss]

It seems that you've become one of the 99% of users which means that the forcibly reboot didn't help to resolve the problem. All you can see from the interface remains the same, the iPhone wont turn on stuck on Apple logo screen. The good news is, you can get your faulty device repaired with an outstanding iOS system recovery tool specifically developed by TunesKit Studio.

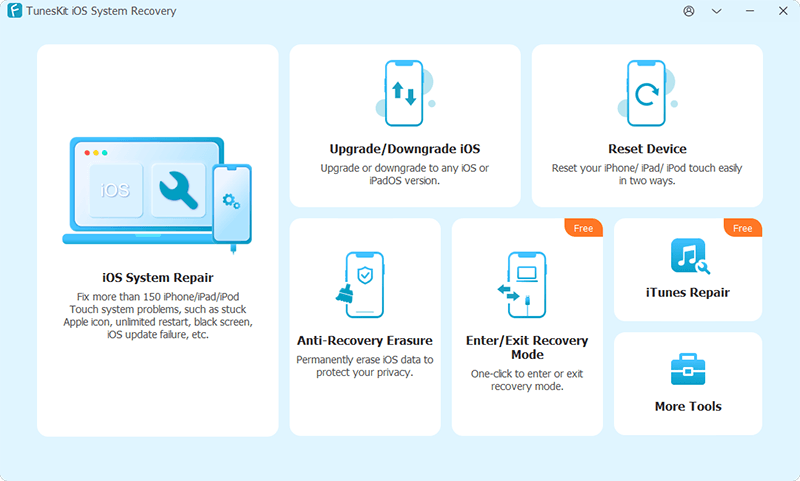
No matter which situation your iPhone is stuck in, this software, TunesKit iOS System Recovery can get rid of them in 2 smart repair modes, Standard Mode and Advanced Mode. It is totally user-friendly as what you only need to do is to open it and connect your device. Then the software will handle the rest work for you and recover your iOS to normal causing no data loss or leak. That would be the most important part for most iPhone users.

Step 1: Connect iPhone to the computer

Open the program and find a USB cable to connect your device to the computer. Tap on the Start option, and then set the repair mode as Standard Mode and click the Next button. After that follow the prompts from the window to put your iPhone into recovery mode or DFU mode and click the Next button once finished.

You can also click the Enter Recovery Mode on TunesKit's main interface to put your iPhone into recovery mode in one click.

connect iphone

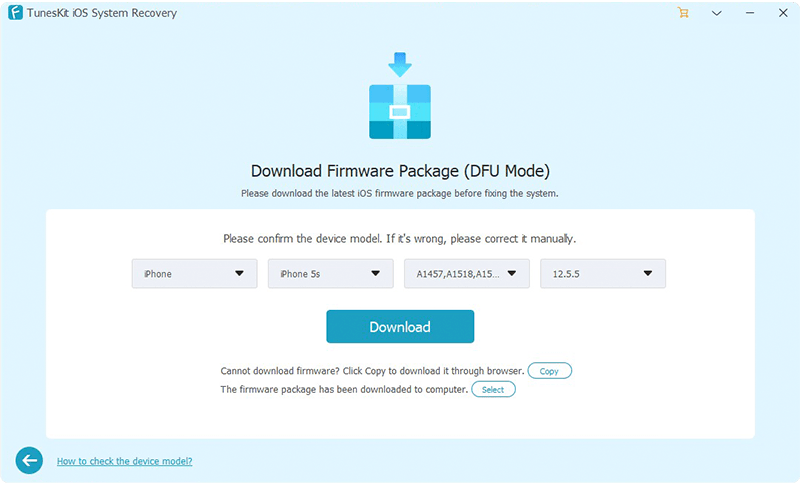
Step 2: Download firmware package

This software will download the firmware package matched to your iPhone. You need to confirm the device info before that. Correct it manually if any information is wrong. Then press the Download button at the lower right corner, TunesKit will then begin downloading and verifying the firmware.

download firmware

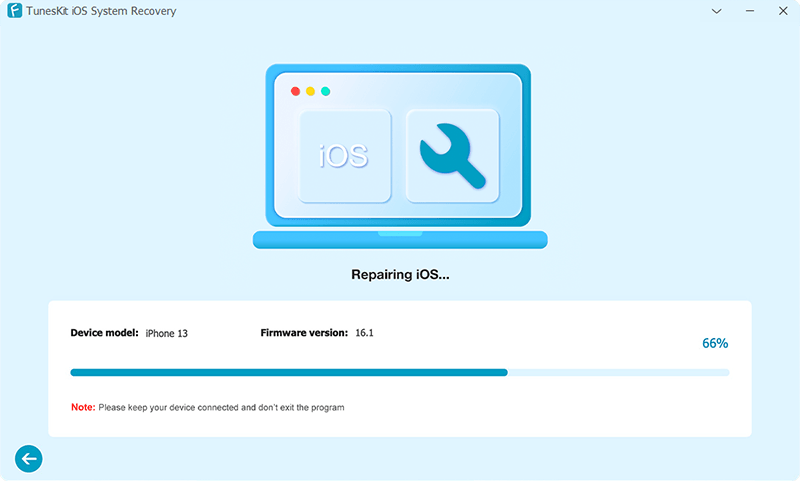
Step 3: Fix iPhone stuck at Apple logo

As soon as it completes the downloading process, just press the Repair option to let the software fix the error of iPhone stuck on Apple screen. Keep your iPhone connected to the computer until the program finishes fixing. Or your device may get bricked unexpectedly.

fix ios

Video Tutorial: How to Fix iPhone Stuck on Apple Logo


Way 3. Put Your iPhone in Recovery Mode

There's another way to fix the issue of iPhone wont turn on and being stuck in Apple logo which is to put your device into recovery mode. However, all the files on your iPhone will be removed if taking advantage of this method. Therefore, just make sure that you've backed up your device to iTunes or iCloud previously. Before you get started, check the iTunes installed on your PC to see whether it is the most current version.

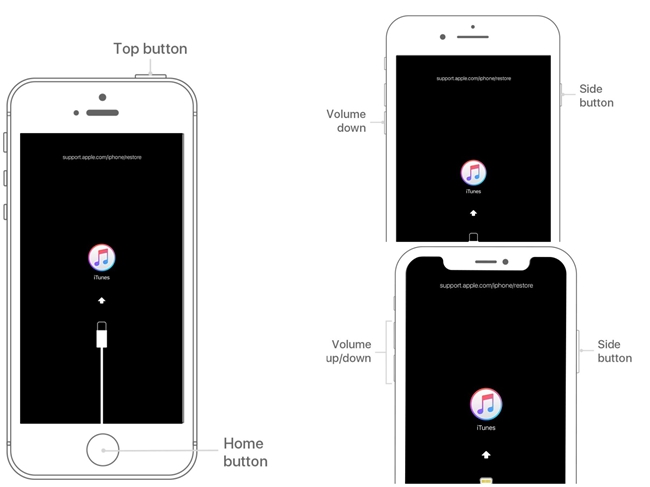
1# For iPhone 6s or older devices,

Step 1. Connect your iPhone to PC and launch iTunes. Hold both the Power button and the Home button at the same time.

Step 2. You will see the white Apple logo coming up. Do not release the buttons until the Connect to iTunes screen appears.

2# For iPhone 7 or 7 Plus,

Step 1. Connect your iPhone to the computer and open iTunes. Press the Power button and the Volume Down button concurrently.

Step 2. Similarly, the Apple logo screen will display. Simply hold them until you see the Connect to iTunes screen.

3# For iPhone 8 or later devices,

Step 1. Open iTunes and connect your iPhone to the computer. Press and fast release the Volume Up button, do the same thing on the Volume Down button.

Step 2. Press and hold the side button, release the buttons once the Connect to iTunes screen appeared.

iphone recovery mode

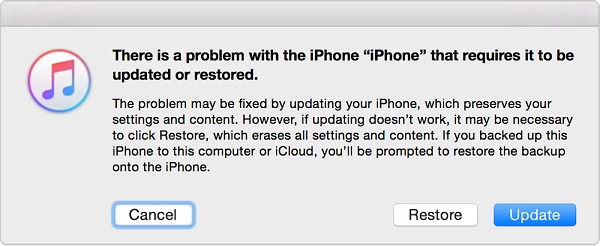
At this time you may need to tap on the Restore option from the interface since you've finished the process of entering recovery mode. Then just follow the prompts to restore your iPhone to fix the iPhone stuck on Apple logo issue.

Note: There's an alternative way for you to place the iPhone into the recovery mode, which is to TunesKit iOS System Recovery we introduced above to implement it. Just open the software and click the "Enter Recovery Mode" or "Exit Recovery Mode" on the left of the main interface to put your iOS device into/out of recovery mode.

Way 4. Put Your Device into DFU Mode

A DFU (Device Firmware Update) restore actually reloads the firmware (controls the hardware of your device) thoroughly but not only the software. This feature makes it different from other restoration types as well as the recovery mode. And it is the deepest type among all the iPhone restore.

To go on with this mode of solving the problem, you will need to connect your device through a USB cable to your PC and sign in to iTunes. For the respective iPhone devices, you will need to initiate the pressing of the keys reminiscent of the force reboot manner. This is until a message pops saying that iTunes has detected a phone in recovery mode. After this release the buttons when the screen goes blank and you will be able to restore your device.

iphone dfu mode

Note: A DUF restore will deeply flush your device out and it may permanently mess your phone up. So please avoid using DFU mode and check the other options first.

Summary

Here are 4 solutions for you when your iPhone 12/12 is stuck on the Apple logo. Generally speaking, the first two methods are easy to operate, and using TunesKit iOS System Recovery to fix it will be more effective. Most importantly, it will keep all your data kept on the device. But it will cost you a little since the trial version will not let you achieve the repair process. The last two methods are complex, and you can also give them a try.

All these ways will help you solve the issue if it's related to the software issue. However, if your iPhone stuck on the Apple logo problem is caused by hardware, you'd better resort to Apple Support for help. 

You may also like:

Jun 24, 2021

Fix Spotify Songs Disappeared

You may find that some songs you downloaded from Spotify disappeared. This is so weird because you think the downloaded songs are quite safe. But they disappear without any signs. Can you get them back? How to fix this Spotify songs disappeared problem? Follow this post. We find some possible reasons for you and a powerful tool to help you solve this problem.


Part 1. Reasons and Solutions for Spotify Saved Songs Disappearing?

The disappearance of Spotify offline songs could be caused by various reasons:

1. The original songs and playlists may be deleted by their artist or creator. This mostly happens to the songs or playlists that are grayed out after you've downloaded them to your device. It's probably because that the artist or the creator of these songs or playlists does not want these tracks on Spotify for some reason.

See also: Fix Spotify songs greyed out

2. Something got wrong with your Internet connection when you check or download these downloaded songs in Spotify. While you are saving any track or playlist offline on Spotify, an Internet connection is required. So you should confirm the network runs well when you are downloading the songs or playlists from Spotify. If it is this reason that causes your problem, you should download the songs again with a good internet connection.

3. Your downloads of songs from Spotify exceed the 10,000 number limit. As Spotify only allows Premium users to download up to 10,000 tracks in total, you should check whether you have hit that limit or not. If so, Spotify will delete the previously downloaded songs automatically if it finds you adding some new tracks. Normally, you'll be noticed by Spotify with a warning message once you reached this limit.

4. You may be out of Spotify Premium. So you need to verify your premium membership.  You are required to log into your account online every 30 days even if you use Spotify Offline mode. Otherwise, the downloaded songs would disappear from your Spotify account.

In other cases, the previously downloaded songs could become unavailable on Spotify if you changed the region of your VPN network. That's because some Spotify songs are not allowed in certain countries and regions. To get the music back again, you should change your VPN network settings.

Part 2. Best Solution to Fix Spotify Songs Disappeared Issue

Unfortunately, we can't cover all the reasons and solutions to stop the disappearance of Spotify songs. But the better news is that we can fix the 'Spotify songs disappeared' issue permanently now.

First of all, you should figure out where the songs go when they are downloaded from Spotify so that you can solve this problem. In fact, any subscribers don't "own" the music even if they have saved it offline. When you are doing this, you only "rent" those songs from Spotify for the time you subscribe to Spotify as you can only play them within the Spotify app. You can't then take the offline files and play them elsewhere. In other words, these downloaded Spotify songs are not downloaded. They are just cache and may keep disappearing occasionally, making you frustrated every now and then.

To prevent the Spotify offline songs from disappearing, all you'll need is a special Spotify music downloader called TunesKit Spotify Music Converter. It's a well-designed Spotify downloader that can download and save Spotify tracks, playlists, and albums as MP3, AAC, WAV, FLAC, etc. for both premium and free plan users.  It's able to remove Spotify ads while preserving the ID3 tags and 320kbps bit rate of the tracks.

With the assistance of this tool, you are able to get full ownership of the downloaded Spotify songs and keep them as long as you like in the Spotify library or other devices or players, without worrying about they could expire or disappear one day. Now let's get started to fix Spotify songs disappeared with the help of TunesKit Spotify Music Converter.


Step 1. Launch TunesKit Spotify Converter and it loads the Spotify app for you. Then find any song or playlist you want to download from Spotify. Drag the file to TunesKit main window.

Step 2. Go to the top menu of this Spotify to MP3 Converter and choose the "Preferences" button. Then click the "Convert" section and select output format and other settings, including channel, bit rate, and sample rate.

Step 3. When everything is done, click the "Convert" button to start downloading Spotify songs offline as MP3 or other formats. After that, you can find the downloaded songs from the Converted button. Till now, you are able to save Spotify songs on any device forever.

Conclusion

Now you may find the real reason for this Spotify songs disappeared issue. And you will find the corresponding solutions in the first part. But to avoid this problem or similar problems forever, you’d better download and convert Spotify songs you like with TunesKit or other Spotify converters. This is the safest backup method for your songs.   


For more: https://www.tuneskit.com/spotify-music-tips/fix-spotify-songs-disappeared-issue.html

How to Fix Apple TV No Signal

Apple TV has no signal? Tired of searching solutions hither and thither? You are not alone. If the Apple TV no signal issue faces you, it is not hard to imagine that you will be extremely frustrated. With no good signal, the Apple TV content can't be accessed properly. Hence, in this tutorial, we will provide you with all possible solutions to help you fix the Apple TV no signal issue.

Fix 1: Ensure All Cables Work

If Apple TV says no signal, this may indicate that the cables concerning the internet and power may be disconnected. So first, check all the Apple TV cables including the power and HDMI cables. You need to ensure that all these cables are in good status. If the simple and quick check is done and there is still no signal, try unplugging these cables. Then, plug these cables into the Apple TV source again.

Fix 2: Reboot Apple TV

It is possible that most users may not work out the Apple TV no signal issue through cable check. Here, the second way is for you. Just reboot your Apple TV. It is a regular method that will not be harmful to your device. There are two options for you to power off the device and then turn it on.

Option 1: From Settings

• If you are using Apple TV 3rd Generation and earlier models: Open the Settings app. And then scroll down and tap the General option. When you see the Restart option, just tap it. The device will restart automatically.

• If you are using Apple TV 4K and HD: The steps are similar. Just go to Settings > System > Restart.

Option 2: Using Remote

• For the Siri Remote: press and hold the Home and Menu buttons together. When the Apple TV status light blinks rapidly, release the buttons.

• For other Apple remote models: Press and hold the Down and Menu buttons at the same time.

Fix 3: Resort to TunesKit iOS System Recovery

If applying a reboot does not fix the signal error, give the third-party iOS repair tool a shot. As the name implies, using such a tool to fix any iOS-related can turn your iDevice back to normal. On the condition that all the usual ways are not so workable, the repair tool is a good choice. Without visiting any store, you can fix any issue at home. Here, TunesKit iOS System Recovery is highly suggested. It certainly can fix the Apple TV error.

TunesKit iOS System Recovery is the desktop repair software targeted at iOS issues. It has both Windows and Mac versions. More than 50 issues are included in its scope of repair. For example, you can fix Apple TV black screen, recovery mode stuck, no sound issue, and much more. Of course, you can also fix Apple TV no signal within several steps. Surprisingly, TunesKit can prevent your data of device from being lost when you fix the device issue.

Now, there are detailed steps to use TunesKit.

Step 1: First and foremost, open and launch TunesKit on your computer, if you have downloaded the program. Then, the device is needed to be connected to the computer via a USB cable. Within seconds, TunesKit will recognize your device. After this, click the Start button.

Step 2: Second, you need to select a repair mode. Here, try to choose the Standard Mode, as it will not erase your data. Well, if have backed up your data to iCloud, you can also choose another mode.

Step 3: Last, the firmware package should be downloaded. Before doing this, you can review the device information. Then, click the Download button. TunesKit will need several minutes to download the firmware. After downloading, click the Repair button to fix Apple TV says no signal.

Fix 4: Reset Apple TV

Resetting the Apple TV means a factory reset. So be careful that the device data has been backed up. To do this, the steps are simple and effortless.

• For Apple TV 4K and HD: You need to open the Settings app first. Then, go to the System option. Next, you will see the Reset option, and just tap it.

• For other Apple TV models: Go to Settings > General > Reset. After clicking the Reset option, the device will reset itself.

Fix 5: Call Apple Suppport

Whenever your Apple device is facing problems, you can call the Apple support center. So it is also practical to call them when facing the Apple TV no signal error. And the staff will tell you how to do and repair the Apple TV for you.

Summary

All in all, the tutorial talks about 6 ways to the Apple TV no signal issue. If you are facing the issue, and want to fix it without data loss, TunesKit iOS System Recovery will be your best choice.

Its source comes from: https://www.tuneskit.com/apple-tv-repair/apple-tv-no-signal.html

Jun 17, 2021

How to Cancel Apple Music Subscription with Songs Saved

Feel tired of Apple Music? The monthly fee of Apple Music is too much for you? Service of Apple Music cannot satisfy you? For whichever reason, you may decide to cancel Apple Music. Here is a complete tutorial for you to cancel Apple Music on your iPhone or computer. And you will also find a tip for saving the downloaded Apple Music tracks after canceling.

See also: How to cancel Audible membership


1. How to Cancel Apple Music on iOS Device

If you want to cancel Apple Music on iOS devices like iPhone or iPad, just follow this guide.

Step 1. Log into Apple ID

If you use Apple Music directly on your iPhone, iPad, or iPod touch, you can cancel the Apple Music service on your iOS devices. Go to App Store and tap on your Apple ID Avatar. Tap View Apple ID and enter your password when you are prompted.

Step 2. Manage Subscription of Apple Music

On the Account Settings page, select the "Manage Subscription" > "Active Subscriptions" > "Apple Music Membership" to change your Apple Music subscription options.

Step 3. Cancel Apple Music Membership

On the "Edit Subscription" page, select the "Cancel Subscription" button. You'll be asked to confirm your choice. Just tap the "Confirm" option to complete the process. On this page, you can also change your subscription plan to Family Plan or Student Plan, which is more economical than the Individual plan.

2. How to Cancel Apple Music on Mac or PC

If you want to cancel Apple Music on Mac or Windows PC, just follow these 3 steps to cancel easily.


Step 1. Log into Apple Music account in iTunes or the Music app

To cancel Apple Music on Mac or PC, you'll need to be running iTunes 12.2 or higher version. Launch iTunes, sign in to your account with Apple ID, and then click your account name.

Step 2. Go to Manage Subscriptions

Once the Account Info page loads on your computer, scroll to the bottom until you see the section labeled "Settings". Find the entry for your Subscriptions and click the "Manage" button.

Step 3. Cancel Apple Music Membership

In this section, find the "Apple Music Subscription" button and click "Edit".To cancel your Apple Music membership, you need to select the "Cancel Membership" choice. You'll then return to the "Your Membership" page. And the auto-renewal options should be gone, indicating that you've successfully canceled your Apple Music subscription.

3. Bonus Tip: Save Apple Music after Unsubscription

When the Apple Music service is unsubscribed successfully, you'll still have access to the Apple Music library until the end of the three-month trial or billing cycle. But after that, you will lose all of the downloaded songs from Apple Music. So if you do not want it to happen, use an Apple Music Converter to convert and save Apple Music to MP3 so that you will not lose them. You can listen to these songs at any time anywhere.

You need to use TunesKit Audio Converter, third-party software to convert the protected M4P Apple Music songs to common MP3, AAC, WAV, etc. You can refer to the tutorial below to see how to truly save Apple Music songs offline.


Step 1. Add Apple Music to TunesKit

First, please download and install TunesKit Apple Music Converter from the above link. To add Apple music, please download the songs you wish to convert and authorize iTunes to play them on your computer. And click the Add Files button or drag the files to it directly.

Step 2. Customize Apple Music Output Format

The Format panel is at the bottom left of the converter. MP3 is the recommended output format. Open Format panel and you can select the output format other parameters for your files in the pop-up window. If you want to make the song shorter or make some changes, you can cut it before the conversion. Click the "Edit" icon at the end of each column of the audio track enables you to do some editing for each track and add some special effects to your audios. When you are all set, please click on the "OK" button to save the settings.

Step 3. How to Convert Apple Music to MP3

Click the Convert button to convert Apple Music to MP3. Then you can find them from the Converted button.

Summary

So those are the 2 methods to cancel Apple Music. Before you start to cancel it, do not forget to use TunesKit Apple Music Converter to download Apple Music to MP3, or you will lose them all.


For more: https://www.tuneskit.com/apple-music-tips/howto-cancel-apple-music-subscription.html

How to Fix iPad Screen Blurry

There is no denying that the screen of the iPad and other devices is a window on the device or app content. If the iPad screen is blurry, we can imagine how serious the situation is. Users may be frustrating and worried. However, there is always a way out. In this tuorial, we are going to describe how to fix iPad screen blurry. In total, there are 6 tips and tricks for the issue. Let's see them one by one.

Fix 1: Use TunesKit iOS System Recovery

On condition that if all the ways above do not work out the issue, it is time to use a professional iOS repair tool to repair your iPad. When all regular solutions are not workable, such a tool is your best choice. This tool is used to fix any issue caused by system glitches or software bugs. Here, TunesKit iOS System Recovery is highly suggested.

Generally speaking, TunesKit iOS System Recover is a desktop repair tool supporting Windows and Mac, which can fix more than 50 iOS-related issues. For example, iPad black screen, red screen, blue screen, and more are its scope of repairing. With simple clicks, you can fix iPad screen blurry. Moreover, users do not need to worry about their device data, as TunesKit will not erase any data. Apart from this, it can also help you downgrade iOS and enter/exit recovery mode with one click.

Now, follow us to see how to use TunesKit to turn your iPad back to normal.

Step 1: Open and launch TunesKit on your computer. Then, take out an original USB cable to connect the iPad to the computer port. After connecting, TunesKit will detect your device. Then, click the Start button.
Step 2: On the next page, TunesKit will tell you that you need to choose a repair mode. Here, you’d better choose the Standard Mode, as the mode will keep your iPad data intact. If you want to select Advanced Mode, you need to ensure that the data has been backed up.
Step 3: Last, you need to download the firmware package by clicking the Download button. Wait for a while. After the firmware is downloaded, click the Repair button to fix the burry screen.

Fix 2: Adjust iPad Brightness

Blurry screen means your iPad screen is unclear and unable to be visible. This may because that your iPad is too dark or bright. To the end, the first way you can try is to change the iPad brightness. To adjust it, there are two options.
Option 1: Quick adjustment via control center

First, open Control Center by swiping down from the top right corner of the home screen. But you should swipe up from the bottom of the screen, if your iPad is running the version older than iOS 12. Then, find the Brightness icon and drag the icon to increase or decrease iPad brightness. Last, after adjusting to a suitable brightness, check if the iPad screen is still blurry.
Option 2: From the Settings app

The alternative way is to go to the Settings app. Scroll down and choose Display & Brightness. Under the BRIGHTNESS option, drag the slider to alter the brightness.
Extra tips: If possible, we recommend you close the Auto-Brightness and Bold Text options. Some users once fixed the iPad screen blurry issue through the way.

Fix 3: Clean iPad Screen

If the first way fails to fix the issue, try to wipe the iPad screen. A dirty screen may lead to the blurred screen. Before cleaning the screen, make sure the iPad is off. Then, use the soft cloth dampened with a little amount of water. In this way, the dirt on the screen should be removed, and try to check if the blurry screen is fixed.

Fix 4: Restart Your iPad

Performing a restart may temporarily address the issue. This way is not complex, but easy to use. To restart your iPad, attempt to identify your iPad model and then follow the steps below.

For iPad with Face ID: You need to press and hold the Volume up and Power buttons at the same time. When the Slide to Power off option occurs, release the buttons and then drag the slider to power off the iPad. Wait for several seconds and then press the Power button to turn on the device.
For iPad with Home button: To turn off the iPad, just press and hold the Power button and drag the power off slider. Then, press the Power button again to turn on the iPad.

Fix 5: Force Quit Apps

In the case that your iPad screen turns blurry when you are using a specific app, you should close the app. To do this, you need to open the app card by swiping up from the bottom of the screen. Use fingers to move tight or left to view apps and find the one you want to close. Then, swipe up the card to force quit the app. Afterward, reopen the app to check if the iPad screen blurry issue still occurs.

Fix 6: Replace iPad Screen

The final place you can resort to is the Apple repair store. If your iPad screen is broken or in serious trouble, this way is better. Go to the store and the staff will repair the screen for you.


Final Thoughts

When you read the final part, we believe that you get the iPad screen blurry fixed. If making a comparison, TunesKit iOS System Recovery can be your best choice.


Jun 10, 2021

Best Methods to Enjoy Free Apple Music Forever in 2021

We can listen to iTunes songs forever after we purchase them. But we can only listen to Apple Music within the subscription. Is there a method to listen to Apple Music free? You can try to find an answer in this post.


See also: How to Get Apple Music 6 Months Free Trial

1. How to Get Free Apple Music for 3 Months

To listen to Apple Music for free, you can use the free trial of Apple Music. There are two ways to get Apple Music's free trial version for three months. Open iTunes to do this or sign up for the subscription on the Apple Music app on your iOS device for free.

After signing up for the free trial, you can listen to Apple Music for free lasted for 3-month-time without paying. But then, it will automatically charge a monthly fee of $9.99 without additional notice to you. Hence, it's advisable to cancel it by setting an alarm right before the free trial expires if you do not want to pay for the subscription. You can follow the instructions below.

Step 1: Open iTunes on your computer and then choose Music.

Step 2: Tap on the For You menu, and click on the free trial offer. After that, select the subscription type from the 3 kinds of subscription plans - Individual, Family, or College Student. You are recommended to choose the Student plan if you are a college student.

Step 3: Log into your Apple Music account with your Apple ID and passcode. You need to confirm the payment message to begin the 3 months free trial.

Please notice that when three months pass, you will be charged automatically so don't forget to cancel the service as you can cancel anytime.

2. How to Keep Apple Music Forever

You will realize that although you pay for it every month, you will not access Apple Music once the subscription expires. In other words, the music you acquire from Apple Music or other music streaming service is basically "rental" rather than "owned." You will face another thorny issue besides territorial restrictions, where local music storage will be deleted by Apple Music.

If you want to get nothing at all in the end, one question you should ask is, how to get Apple Music free forever? What may excite you is that there is indeed a way to get Apple Music free forever, that is, TunesKit Apple Music Converter. TunesKit is a professional audio solution specialized in converting protected audio to MP3, M4A, AAC, FLAC with high quality. It is capable of dealing with Apple Music tracks, Audible AAX, AA audiobooks, iTunes M4A, M4B audiobooks, as well as iTunes protected songs. In this way, you not only can keep them playable but also play them on any device or player you like.

Now simply download the software which is available for both Mac and Windows and follow the instructions below to learn how to convert Apple Music to MP3 easily.


Step 1. Load Apple Music to TunesKit

First of all launch TunesKit Audio Converter. Click the Add Files button to import Apple Music songs and other audios. It is also applicable for iTunes or Audible audiobooks.

Step 2. Select Output Format

Now the files may be imported to TunesKit Audio Converter as expected. At this point, you should open the Format panel and choose the output format you would like to convert the Apple Music to. It supports M4A, M4B, AAC, WAV, FLAC, and MP3 at present. You are also allowed to customize the audio properties like sample rate, codec, or channel, etc.

Step 3. Convert Apple Music Songs

Press the Convert button to convert the protected Apple Music to common formats. When it completes the conversion, you are able to locate the converted files and transfer them to any popular devices for playback.

Conclusion

They are the 2 methods to listen to Apple Music free. My advice is that use the Apple Music free trial first and before the expiration, download and convert the songs you like with TunesKit Apple Music Converter, and then listen to them at any time for free.

For more: https://www.tuneskit.com/apple-music-tips/get-free-apple-music-forever.html

How to Fix iPhone Skype Not Working

Among various outstanding sotware, Skype stands out from its counterparts for the audio and video calls. With Skype, people can keep in touch with others for business or personal use. We can imgine that most iPhone users have downloaded the app on its device. But sometimes, users, if unluckily, may face the Skype not working on iPhone issue. To this end, we are going to talk about how to turn the Skype back to normal. If you are into the topic, just keep reading.

Fix 1: Power off and on Your iPhone

Before getting into other solutions, the first thing that you should be doing is restarting your device. No matter which iOS device you are using to operate Skype, you should always restart your device first. In most cases, common device glitches can be resolved when your phone gets restarted. Restart your device, and then try if Skype is working fine now.

To power off iPhone, press and hold the Power button (for iPhone X, 11, or 12, press the Volume and Power buttons. When you see Slide to Power off, release the buttons and then drag the slider.

Fix 2: Force Quit the Skype App

If you are using Skype for a long time, it may crash in between. In this case, just force close it and reopen it. By doing this, temporary crashes will be fixed right away. To force quit the app, double-press the Home screen (For iPhone X and later, swipe up from the bottom of the screen), Find the app card and then swipe up the app card to close it.

Fix 3: Upgrade the Skype App

When you are using an outdated Skype version, you may face issues using it. Hence, go to the App Store, and check whether the update needs to be updated or not. If it does, click on the Update option right away to update the Skype app. Once you do, try to restart Skype and try using it once. When you update an app, see if the Skype not working issue is fixed.

Fix 4: Delete and Reinstall Skype

If Skype is updated already, and you have tried the first two solutions as well, the fourth option will be to reinstall the Skype app on your device once again. But first, you will have to uninstall Skype from your device by pressing and holding the Skype app icon. Once you do that, you will see the x icon on top of it. Click on it, and the app will be deleted. Now, visit the App Store, search for Skype and reinstall it once again. Try using Skype now. And the Skype not working on iPhone error should be fixed.

Fix 5: Check Internet Connection

Skype will need good internet connectivity to function correctly. Check if your device is receiving good internet connectivity. Click on the Wi-Fi option to check first. If you are using cellular data, then check if cellular data is turned on or not. If not, switch it on, and try using Skype now.

Fix 6: Use an iOS Repair Tool

If none of the solutions works, then for the last resort, you can try using TunesKit iOS System Recovery. This tool will help you get rid of all kinds of iOS system crashes and bugs, like iPhone white screen of death, red screen, green screen, etc. The best thing about this tool is that it is very easy to use, and you can repair most of the iOS problems by using TunesKit iOS System Recovery efficiently and with no data loss.

Step 1: Visit the official website and download and install the software first. After that, connect your iOS device using a USB cable on the computer where you have downloaded TunesKit iOS System Recovery. Launch the tool once and click on the Standard Mode to begin the repairing process. Standard Mode won't let you lose any data from your device.

Step 2: You will see the firmware package download option. Before you download it, you should check whether you have connected the right iOS device or not. Once you are sure, click on the download option, and the firmware package will be downloaded.

Step 3: After the firmware package is downloaded, you need to click on the repair option to begin the repairing process. Once everything is done, you need to disconnect the device from your computer and check whether you can operate Skype or not.

Fix 7: Update the iPhone System

If you are using an older version of iOS, then you may encounter apps crashing down. If Skype and other apps keep crashing down, then you may not have the latest iOS version. If not, update it right away. Here is what you need to do. You will first have to visit Settings, then go to About, and then click on the Software update. If you see an update available, click on it to update iOS.

Summary

Skype not working on iPhone is not rare problem, and many users often try to search for the solution for this issue. Fortunately, you can get 7 best ways from the tutorial. And we sincerely hope that you can fix the issue.

Its source comes from: https://www.tuneskit.com/ios-repair/iphone-skype-not-working.html

Jun 3, 2021

How to Listen to Spotify on Sonos

 Spotify and Sonos have cooperated. And since then Spotify listeners can directly play any Spotify tracks and playlists on Sonos with the assistance of the Spotify app. For those who start to connect Spotify to Sonos for the first time, we work out the detailed steps to play Spotify on Sonos. Plus, in addition to the traditional method, we find you a new but powerful method to do that.


See also: Play Apple Music on Sonos.

Part 1. How to Play Spotify on Sonos Directly

Here is the official way to connect Spotify to Sonos. Before you start the playback on Sonos, you should have the latest version of the Sonos app as well as the Spotify app. After that, you can follow the steps below to get started.

Step 1. Launch the Sonos app on your smartphone. Set up the Sonos device on Wi-Fi, following the steps in the app.

Step 2. Tap Add Music Services button and select Spotify. Make sure you have turned on the option of Control Sonos from Spotify in Settings.

Step 3. Play a Spotify song and select the Devices Available option. Select your Sonos speaker and start enjoying and controlling the Spotify music.

Note: Make sure your Sonos and the phone or tablet you're using for Spotify are on the same Wi-Fi network.

Part 2. Play Spotify on Sonos with Spotify Free

Many users have reported that they cannot use Spotify on Sonos caused by some unknown issues. Since Sonos supports adding common music tracks, if you can have the Spotify songs downloaded, it will become easy to stream Spotify to Sonos speaker by uploading downloaded Spotify songs to Sonos. Therefore, the key point here is to find out a solution that can download Spotify to MP3 and other common audios.

Here we highly recommend TunesKit Music Converter for Spotify, a smart and powerful Spotify downloader, which can download any Spotify music tracks including songs, albums, playlists, and convert Spotify music beats to common audio formats. After that, you'll be able to freely transfer the converted Spotify music to Sonos speakers for playback and keep them forever. Here is a tutorial for you to use TunesKit to convert Spotify to Sonos.

Step 1. Launch this Spotify playlist downloader on your computer. Log into your Spotify account and drag any track, playlist, or album from Spotify to TunesKit.

Step 2. Click the top menu bar and choose the Preferences button. Then choose MP3 or other formats that are accepted by Sonos as the output audio format.

Step 3. Press the Convert button to download Spotify playlist to MP3. Then click the Converted button to browse all the converted Spotify music files.

Step 4. Then we need to transfer Spotify to Sonos. Open the Sonos app on your computer. Go to the Manage menu, select the Music Library Settings option. Then click "+" on Mac, or "Add" on PC. Then import the converted Spotify music tracks. Once added, you can freely play Spotify on Sonos speaker without any limit.

Conclusion

Now you know 2 different methods to listen to Spotify on Sonos. The advantage of the first one is that you do not need to use a computer. But the second method enables you to use Spotify Free and keep the converted Spotify forever. Which one will you choose?


For more:https://www.tuneskit.com/spotify-music-tips/listen-to-spotify-through-sonos.html


How to Fix WhatsApp Notifications Not Working

If mentioning WhatsApp, nobody is not familiar with the app. If is an message program used to send and receive messages, documents, videos, and music files. Due to its powerful functions, most people are accustomed to using it in daily life. When people receive something on WhatsApp, there should be notifications. However, some users said that the WhatsApp notifications did not work. Do not be worried. In this tutorial, we are going to describe how to fix WhatsApp notifications not working. Let't see. 

Solution 1: Check Network Connection

If you face iPhone WhatsApp notifications not working, the first and essential thing to do is to check your network connection. There could be some problems with the network connection. Therefore, try to reset your network setting; it should solve the problem. Here is what you need to do. Go to Settings on your iOS device and then click on the General option. After that, go to the reset option, then click on the Reset Network Settings. Your device will ask you to enter your passcode, enter it, and tap on the Reset Network Settings again.

However, one thing that you need to keep in mind is that by doing this, all your network settings will be removed, for example, your Wi-Fi passwords.

Solution 2: Update WhatsApp

Like all the other apps, WhatsApp will have to be updated from time to time. You may face the problem iOS WhatsApp notifications not working when WhatsApp is not working on your iOS device. Before trying other steps, visit the App Store once and search for WhatsApp. Check if you have the latest version or not. If you see the update option, click on that to update to the latest version of WhatsApp. This will resolve the bugs and fix them. By doing this, you should be able to see the notifications once again.

Solution 3: Delete and Reinstall WhatsApp

Another tip that you can try is reinstalling WhatsApp on your device. Sometimes by deleting WhatsApp completely and downloading and installing it can resolve a lot of bug issues. However, do create the backup for all the messages and media files shares because when you uninstall WhatsApp, you will be deleting the messages and media files as well.

Consider creating a backup on iCloud. Once you have done that, you can go to the App Store and uninstall it completely. After that, reinstall it.

Solution 4: Turn on Notifications

You might have turned off the notifications for WhatsApp and might have forgotten about it altogether. Rather than worrying about what happened, why don't you go to the notification setting and see whether you have kept the notification for WhatsApp on or off? Here's what you need to do. Go to the Settings option on your phone, and look for the notification option. Now, switch on the notification for WhatsApp if it is turned off.

Solution 5: Force Restart Your iPhone

Sometimes by simply restarting a device, a lot of issues can be resolved. Try this simple trick and see if notifications are appearing. Press and hold the home and sleep/wake buttons for a few seconds. Once you see the Apple logo, simply let go of the buttons, and the device will restart automatically. This is another basic solution that you should try. Depending on your iOS device model and version, you can try restarting your phone automatically.

Note: For iPhone 7, you need to press and hold the volume down button and the Sleep/Wake button. While for iPhone 8 and earlier models, press and quickly release the volume up button, and then the volume down button. Next, press and hold the side button.

Solution 6: Turn Off Do Not Disturb

Check if you have turned on the DND option by mistake. In case the DND option is switched on, notifications will not appear. To turn it off, you need to open the Control Centre. From there, you can turn off the DND setting.

Solution 7: Try Using TunesKit iOS System Recovery

If none of the solutions mentioned above work, you can try using the TunesKit iOS System Recovery tool. This repairing tool is one of the best and can help you fix multiple iOS issues. TunesKit iOS System Recovery can be used for numerous problems, such as iOS update failure, iPhone boot loop, black screen, and much more. Moreover, without losing any data, you can fix iOS-related issues.

Step 1: TunesKit iOS System Recovery is available for iOS and Windows. Download the tool on your computer and launch it. Now take a USB cable and connect your iOS phone to the computer. The tool will detect your phone. On the main screen of TunesKit, you will see the start option. Click on it to begin the process. Another window will pop with two recovery settings, one is Standard Mode, and the Second is Advanced Mode. Please select Standard Mode. Now, click on the Next option.

Step 2: In the next step, you will see an option to download the firmware package. Make sure that your device information is correct. If everything is right, click on the Download option.

Step 3: After the firmware is downloaded, you need to click on the Repair option, and the repair process will begin automatically. Make sure to keep your device connected throughout the time the repair is under process.

Conclusion

These are the seven solutions that you can try, and we hope one or the other solutions will work for you to fix WhatsApp notifications not working on iPhone problem. Out of all the seven, the most powerful and robust solution is TunesKit iOS System Recovery. Try it out if none of the solutions work.