Jan 28, 2021

How to Transfer Photos from iPhone to Computer Without iTunes

 As is known that the storage space on iPhone is limited and if you want to enlarge it, you have to pay the price. In such a case, it's necessary for you to delete some files or pictures on your device to leave the room for normal operation. However, there is an alternative for you to replace the photo deletion. That is trnafering them to your computer. In this way, what should you do to achieve that? In the next, we will introduce the most effective way to transfer photos from iPhone to PC.

But firstly let us see some answers to several mostly frequently asked questions.

1. Why it’s hard for users to transfer photos from iPhone to PC?

iPhone archives files and data in a different way than PC or Android devices do. Thus, you cannot simply plug your iPhone into the PC, find the location of the photos, copy and paste them to your PC storage. Normally, you have to use iTunes to transfer iPhone photos on Windows.

2. Is it possible to transfer photos to the PC without iTunes?

Since iTunes doesn’t function well on Windows and preventing the PC from reading your iPhone storage, many users inevitably want to transfer photos without iTunes. Luckily, there is an alternative way to bypass it. Using professional iPhone Data Recovery can transfer the photos from iPhone to PC without iTunes on Windows 10, 8, or 7.

3. How can I transfer Hidden or deleted photos from iPhone to PC?

Technically, a PC cannot read your hidden or deleted photos, but TunesKit iPhone Data Recovery can. This powerful data recovery program can detect your hidden or lost photos and recover them to the PC. The free trial version already allows you to scan the photos and see if the program is authentic.

The Best Way to Transfer Photos from iPhone to Computer

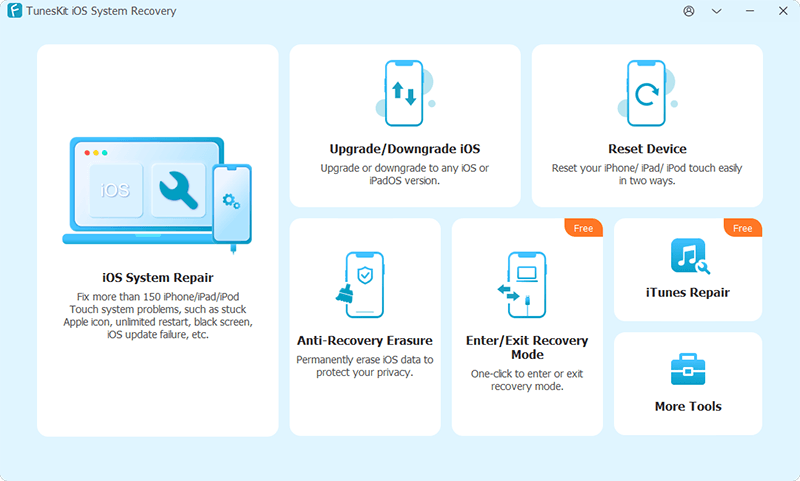
Now let's look at how to transfer photosfrom an iPhone to a computer without iTunes. The tool you will need is the TunesKit iPhone Data Recovery. This is a master software to manage and save your files and data from iPhone/iPad. The program can surely transfer your photos from iPhone/iPad to the PC devices as it is able to easily navigate and preview all the data in your iCloud, iTunes, and the Apple devices themselves. Even deleted photos can be recovered by this program. Besides, it is so user-friendly that even beginners can complete the whole process at home. Therefore, TunesKit iPhone Data Recovery is hands-down the best way to transfer photos from iPhone.

Key Features of TunesKit iPhone Data Recovery 

1. Transfer photos and pictures from iPhone, iCloud, and iTunes to PC local storage,
2. Recover various lost data from iOS devices, iTunes backup, and iCloud backup,
3. Supports the recovery of all types of Apple devices like iPhone, iPad, and iPod,
4. Quickly recover lost data on iPhone, iPad, and iPod touch in simple steps.

Steps to transfer photos from iPhone to computer.

Step 1: Download and launch TunesKit iPhone Data Recovery for Windows. Connect your iPhone to the computer and choose the "Recover from iOS" as the recovery option. Remember to trust the device on your iPhone if this is the first time you connect it to the PC.


Step 2: The program should detect your device, and then you will be asked to select the data you want to scan which may contain the photos you want. Tick the boxes of the data you want, and press the "Scan" button to initiate the scanning process.


Step 3: By the time scanning is finished, you can check the data categories on the left of the interface. Click on the "Photos" option and the "App Photos" option, in which you need to tick the photos or images you want to transfer. Tap on the "Output" option at the bottom left so that you can choose where the photos will be transferred to.

Step 4: Press the "Recover" button and the photos will be transferred to your PC storage. You will then be taken to the transfer location, where you can now see those photos.

Conclusion

Transferring data including photos from an iPhone to a computer seems hard to operate. But with this program, you have no need to worry about and you will not be afraid of the data loss on your iOS devices later.

Jan 27, 2021

How to Add Transitions to Video? Three Steps!

More people, whether they are a pro or just video fan, have begun to join in video editing. In the digital world, video, just like book in the past, has played a more important role in people' s daily life. To make their own video, some people long for more things rather than simple video cutting, trimming or merging. Although video editing is more complex, making full use of professional video editing software helps. 

However, video editing involves various aspects. In this article, I' d like to focus on how to add transiitons. This is a common special effect used in video editing.

1. What is Transition?

Transition is a popular component of special effects used in video editing to connect one shot to another. Its roles are akin to conjunctions and transitional words in sentences. It gives viewers a smooth and rational shift between scenes, and sets the stage for the next scene. Compared with abrupt cut between two scenes, adopting transition effects can make your video more active and creative. Usually, transitions can be classified into fade in/out, zoom, push, insert, wipe, slide, etc. These various types of transition represent different meanings and can deliver diverse active effects, so users may need to think thoughtfully based on their purposes and preferences.

2. Best Video Editor Accessible

Considering that users may have no enough time to search and retrieve wonderful video editor, here are examples of best software: TunesKit AceMovi Video Editor, NCH VideoPad Video Editor, Movavi Video Editor, VSDC Video Editor and CyberLink PowerDirector. All these are multi-functional. However, I' d like to recommend TunesKit for a pro, because concerns about the complicated operation are just overblown when using the software.

AceMovi has more than 40 categories of transitions for users to select and choose, such as fade in/out, slide left/right, row whisk, cross merge, etc. And the operation to add transition is easy-to-use. Just drag and drop. Thanks to simple methods, users can change the duration of transition and add several transitions to a video or several videos. 

Besides the benefits above, TunesKit has its free trial version without too much functional limit. What' s more, you will discover a great variety of special effects including texts, background music, filters and split screen. With these effects, your video will be colorful. Beside these features, you can try to be a creator by using in-built screen recorder. Well, it also supports audio files. 

Let us start with how to add transitions to video. 

3. Steps to Add Transitions by AceMovi

After having a rough knowledge of creative transitions, you can' t wait to have an realistic experience to add transitions to video. Let' s start by taking AceMovi as the example. When you use AceMovi, you only need three simple steps to produce an awesome work by yourself. Before referring to the following instructions, make sure that you download and install the software TunesKit AceMovi Video Editor.

Step 1: Import your local video files


When you open the home page of AceMovi, you can click the first button on the left side, and then you will find the button "Import" which is used for you to open your local video files. Another alternative way AceMovi offers is to click "File", choose "open project" or "import media" or use the keyboard shortcut "Ctrl+O" and then the media file will be showed in the screen.

Step 2: Add transitions as you like


First of all, before you add transitions, avoid forgetting adding the video you import to the track. You can directly drag the video and drop it to the track or select the video and right click "add to the timeline".

Next, find the option "transition" (see picture above) and you will see a lot of transition effects. You can freely select a type and then drag it to the timeline.

Of course, you can also control and adjust the duration of transitions according to personal need. The fix is to circle the transition frame and then drag its border line to extend or lessen the frame size.

Step 3: Output the file after finishing editing

After finishing editing and preview and confirm that there is no mistake, you can click the button "export" and output you final but creative video.

User may discover that when they export the adjusted file, they can select various video formats and devices, and share the file to platforms such as YouTube and Facebook. This kind of benefits must be a boon for users. 

4. FAQ about Adding Video Transitions

I guess you may be concerned about other issues. Here, some representative questions are listed and answers given. 

1. Can I add and edit two or more video files at one time? 

Of course, yes. Just follow the first step above, and you just click "import" for several times. As for your wishes to add transitions between two different video files, AceMovi is also ready to come true your wishes. What you need to do is just to drag the two videos to the same track and add transitions to video.

2. Can I add several transitions in a video?

Yes. See the following picture.

So how to realize this kind of effects?
Prior to adding two or more transitions, you should firstly split the video timeline into several segments. The splitting method is to drag the red line to the section you want to cut and then right click "split" or click the icon below.

3. Can I leave blank space between two segments?

I' d like to say to avoid blank space between two segments.

If you run into the occasion depicted above, you will fail to add or drag any transitions to the timeline. Be aware of this point. The right solution to this issue is to drag the third segment to seamlessly connect the central segment.

4. Can I drag the transition to the center of the two segments?

Yes, you can. The answer can also be showed in the following picture.

5. Summary

May you think that transitions are associated with professions? If so, I believe that this article will come as a revelation to you. By using AceMovi, three steps are enough for you to get what you want. Even if you are confronted with a new question in practice, more technical specifications and instructions are available for you. The software has its free trial version. Just try it to start your video editing travel.

To get more details, please visit this article:

https://www.tuneskit.com/video-editing-tips/how-to-add-transitions-to-video.html

You may also like:

How to Add Music/Audio File to Video Easily

Best Video Editing Software for YouTube Beginners

Can I Play Audible Audiobooks through Bluetooth?

 Many people use phones to listen to Audible audiobooks. But there are still some Audible users who want to use other devices like speakers to play. So, can we play Audible audiobooks through Bluetooth to reach other devices? You will know how to do in this passage.


Knowledge about Bluetooth

Bluetooth is a wire-replacement communication protocol designed for low power consumption. It is similar to Wi-Fi such as similar applications like settings up networks, transferring files, and so on. The difference is that Wi-Fi is intended as a replacement for high-speed cabling in the work area or home while the Bluetooth is for portable devices to connect without cables.

Bluetooth exists in many products such as phones, tablets, media players, speakers, game consoles, and so on. For example, Bose SoundSport Wireless, V-Moda Crossfade 2 Wireless, Plantronics BackBeat Pro 2, JBL Pulse, Amazon Echo are some of the best Bluetooth headsets and speakers. They are well-designed with a solid construction which is sure to bring convenience for your everyday music enjoyment.

How to Play Audible on Bluetooth

Normally Bluetooth speakers or headsets won't read audio files including Audible audiobooks directly, so you have to depend on another Bluetooth device to stream Audible audiobooks to them. Here I will take a Bluetooth phone and a Bluetooth speaker to show you the detailed method to play Audible audiobooks via Bluetooth step by step.

1. Turn on the 'pairing mode' on your speaker. The instruction may vary on different brands of speakers, so you can follow the manual or consult the vendor where you bought it. Normally you just need to hold down a button on the outside of the speaker to put it in 'pairing mode'.

2. Find and enable 'Bluetooth' on the settings of your phone. Just click 'settings', you will see a Bluetooth icon under the 'Network connections' panel. Please just enable it and then it will start to searching Bluetooth devices within its range.

3. Start to pair both devices. It takes a few seconds for the smartphone to detect the speaker. When the search is done, you can tap the speaker to connect. Sometimes it may prompt you to input the pin code too. If so, just find the pin code on the speaker and input it to pair your phone with the speaker.

After paring successfully, you just need to play Audible audiobooks on your phone via the Audible manager and it will stream the Audible files to the speaker automatically.

Play Audible on Devices without Bluetooth

Sometimes if you have another device which is neither in the Audible support list nor does it have a Bluetooth, you won't be able to enjoy Audible files from it easily. Thanks to TunesKit AudibleAA/AAX Converter, you can turn the protected Audible AA and AAX into common universal audio files such as MP3, then you will be able to transfer the MP3 files to any devices for playback.

TunesKit Audible Audiobook Converter is for converting Audible AA and AAX files, it is light-weight but has powerful features such as multiple output formats, splitting audio files, customize audio parameters. The most significant is that the converting process is lossless with an amazingly 100X faster speed. It offers a free trial version. If you are interested in this tool, just download the right version to try it out. In a word, it takes only 3 steps to convert your Audible files. For more details, please visit: How to Convert Audible AA/AAX to MP3.

Conclusion

TunesKit Audible Audiobook Converter is obviously a good helper to listen to Audible audiobooks. Except for converting Audible audiobooks to Bluetooth, it can also enable you to play Audible on PS4, smartwatch, and many more devices.


For more: https://www.tuneskit.com/audiobook-tips/stream-audible-audiobooks-through-bluetooth.html

Jan 26, 2021

Troubleshooted: iTunes Error 4010

 Why does iTunes error 4010 happen? It could be anti-virus software interruption, iTunes app too old, iOS bugs and more. Then how to fix iTunes error 4010 when you are faced with this issue? 4 Common yet workable solutions are illustrated below and you could check them out one by one.

Way 1. Shut down anti-virus software

To protect the security of our computer, the anti-virus software sometimes mistakenly functions by interrupting the normal restoring of iTunes. And the interruption will further make the iTunes error 4010 takes place. That's why I want you to shut down all the anti-virus software you have and try to restore iPhone again.

Way 2. Update iTunes version

As told in the former part, the outdated iTunes version is bad for the health of iTunes and is easy to cause this iTunes to restore error 4010. You must check and update iTunes to the latest version.

Update iTunes on Mac: If you use a Mac computer, you can go to the App Store directly and check if there is a need to update iTunes.

Update iTunes on Windows: Open iTunes. Click the Help option and choose the Check for Update choice.

Way 3. Restart iPhone

When people have some problems that they do not know on iPhone, they always like to restart iPhone. And mostly it really works! In this case, restarting iPhone is still worth trying.

Hold the (top button for iPhone 5, or earlier models; side button for iPhone 6, 7, 8; either volume button and the side button for iPhone X, 11, 12) until the power off slider appears on your iPhone. Drag it and wait 30 seconds to turn off iPhone. Hold the (top button for iPhone 5, or earlier models; side button for other models) until you see the Apple logo appears.

Way 4. Fix iTunes error 4010 caused by iOS system problems

To effectively fix iTunes error 4010, you would not hope to miss professional and powerful iOS system repair tools such as TunesKit iOS System Recovery. With the help of this software, there is no need to worry about any iTunes errors and during the repairing process by TunesKit, no data loss would be caused. It's really safe and effective. Come and try the simple steps to fix iTunes error 4010 as soon as possible.

Key Features of TunesKit iOS System Recovery

1. Fix 50+ iOS and Apple TV issues.
2. Compatible with almost all iOS devices and all iOS versions.
3. One-click to enter or exit recovery mode for free.
4. Support downgrading iOS versions.

Step 1: Download and open TunesKit iOS System Recovery software on your computer and connect your iPhone to the computer through a USB cable. Then click the Start button and in the next window, choose the Standard Mode.


Step 2: Check the information and correct the wrong one. Then tap on the Download button to download the firmware package matched with your device.


Step 3: Click the Repair button to unzip the firmware package and wait for it to fix the iTunes error 4010 completely.

Final words

the above methods are also working for other iTunes errors and hope you could successfully resolve the iTunes error 4010 on your iOS device. Any problems or confusion, be free to leave your comment below.

Jan 21, 2021

What If iPad Won't Download Apps

 It is inevitable for some problems to happen on iPad and it has been reported that their iPad won't download apps according to a few Apple users. Do you also have this trouble? In such a case, why will your iPad not download apps from App Store? The reasons could be poor internet connection, enabled installing restrictions, iPad system bugs, iOS glitches, etc. But there is no need to worry about as you could use the following ways to fix app won't download on your iPad.

1. Force restart iPad

In the first place, you can have a try force rebooting your iPad to settle down your iPad won't download apps.

To force restart iPad with Home button, press down the Home and Power buttons at the same time until the Apple logo appears on the interface.

To force restart other iPad models, quickly hold and release volume up and down buttons respectively, then press the top button until the Apple logo pops up on the screen.

2. Check network settings

Then, a stable network connection is the prerequisite for a successful app downloading. In this case, you have to make sure the Wi-Fi connected on your iPad runs smoothly. To do that, you could open the Settings and locate Wi-Fi option to switch to a stronger network. Or you can go to Settings > General > Reset and click the Reset Network Settings button.

3. Check restrictions for installing apps

If you set some limits on iTunes and App Store, then chances are that you can't download apps on your iPad. The following steps are about how to lift app installation restrictions.

Step 1: Launch Settings and open General button.

Step 2: Find the Restrictions feature.

Step 3: Under the Installing Apps, switch Allow button on.

4. Fix iPad won't download apps through iOS repair tools

Here, resolving apps won't download on iPad through fixing iOS has been proven useful. And at most times, it's the iOS bugs leading to this matter. So you are highly recommended to apply any iOS system repair tools, for instance, TunesKit iOS System Recovery. This software won't cause you any data loss during the process and it has much simple steps to get rid of the problem.


Key features of TunesKit iOS System Repair

1. Solve iOS and Apple TV problems with an almost 100% success rate.
2. Supports iOS devices like iPhone, iPad, iPod touch and Apple TV.
3. With standard mode and Advanced Mode to fix common and complicated issues.
4. Compatible with the latest iOS 14 and older versions.
5. One-click to enter or exit recovery mode for free.


Step 1: Connect your iPad to PC and open TunesKit iOS System Recovery on computer. Make your iPad enter recovery mode and click Start button. Next, selext the Standard Mode.


Step 2: Ensure the information related to your iPad is right and correct the wrong information. Then tap on the Download button to download the firmware package matched with your iPad.


Step 3: When the firmware package is downloaded successfully, hit on the Repair button and wait until the screen shows repair completed.

5. Check iPad's storage space

Apart from that, a sufficient storage room on iPad is also important for you to download apps from App Store. To ensure there is much space available on your iPad, please head to Settings > General and open the iPad Storage option to manage it. You can uninstall several unwanted programs or delete some photos to leave out the space for the app you desire to install.

6. Refresh App Store

After checking the above three points, does your iPad still can't download apps? Under this circumstance, it could be the App Store itself going wrong. To fix the issue and remove the errors occurred in the app, you are suggested to refresh it by tapping on any buttons on the bottom of the app’s main screen. Then force quit and restart it to try to download an app.

7. Re-sign in App Store

The disruption between your iPad and the App Store may prevent you from downloading apps on your device. Besides, the changing in some settings after an iOS update could cause problems. To save it, you could attempt to re-sign in your account on iPad.

Procedures: Click Settings and iTunes & App Store, then choose your Apple ID to log out and log in it later.

Bottom line

Finally, you can still restore your iPad via iTunes, but this is usually not recommendable as it will remove all data on your device unless you have backed them up before. To conclude, hope you can successfully resolve your iPad won't download apps problem if you are beset with it. 

Jan 20, 2021

Change the Playback Speed of Audible Audiobooks

 Nowadays, people more and more tend to live a fast life. Even when they listen to Audible audiobooks, they always want to listen to them faster. Also, there are some people who would like to listen to audiobooks at a slower speed sometimes. But not everyone knows how to do it. If you want to know the way to change the speed of Audible audiobooks, check this passage.

Set the Playback Speed for Audible Audiobooks

Audible files are supported to be played on some apps like Audible Manager, Audible Cloud Player, Windows Media Player, iTunes. But only the Audible mobile version and Windows Media Player come with the options to adjust the speed.

Audible for phone: Go to the Player screen of the Audible app, tap the 'Narrator Speed' button, you will find the options to choose the speed: 0.5x, 1x, 1.25x, 1.5x, 2x or 3x.

Windows Media Player: You can load your audiobooks to play on Windows Media Player first, then you can right-click on the play button to choose the playback speed including slow playback, normal playback, or fast playback.

The drawback of this method is that the options are limited and sometimes the sound may be distorted. In addition, many other players don't have the options to change the speed, so you can't enjoy the audiobooks with the same speed anywhere.

Convert Audible Audiobooks with a Customized Speed

Thanks to TunesKit Audible AA/AAX Converter, you can now customize the playback speed you required for Audible files and convert them to new formats like MP3, AAC, M4A of audio files. After converting, you can copy and paste the files to play on any device in theory.

Easy Steps to Speed Up Audible Audiobooks

TunesKit Audible Audiobook Converter has a most intuitive screen yet powerful features to convert Audible to Windows phone, LG TV, and formats like M4A, MP3, MKA, M4B, AAC, FLAC, AC3, M4R, split chapters, change the playback speed, and so on.

1.Add Audible audiobooks

Before changing the speed, please make sure you have already downloaded Audible audiobooks to your computer first. On Windows PC, you can use the Audible Download Manager to help you download the AA or AAX files. On a Mac computer, you can download them into iTunes. When they are downloaded completely, you can drag them to the TunesKit Audible AA/AAX Converter or click the 'Add Files' button to import them.

2. Change narration speed

TunesKit Audible Converter offers the option to change your format, speed, volume, pitch, tags, chapters. To change the playback speed, please click the icon beside the Audible audiobooks you imported. Then you can select the right playback speed you want from 1% ~ 200%. 

3. Convert Audible audiobooks to MP3 

At last, you can click the 'Convert' button to transcode your Audible audiobooks to the new audio files with the speed you customized. By adopting the advanced lossless converting technology, the output quality will be the same as your source files and you don't need to worry about if there is a quality loss.

Conclusion

If you listen to Audible audiobook on phone or with Windows Media Player, you can use the first method to change the playback speed of Audible audiobooks. If not, TunesKit Audible AA/AAX Converter will help you.


For more: https://www.tuneskit.com/audiobook-tips/change-playback-speed-of-audible-audiobooks.html


Top 6 Free Video Watermark Software for Windows and Mac

Nowadays, people are editing their own videos. They don't have to hire video editors to edit their videos for them. There are free video editors available to everyone that allows them to produce professional-looking video edits. Now, most people don't know about copyright laws. When they create some videos, if someone decides to steal their digital property and use it, they don't know how to protect their property.

best-video-editing-software

One of the simplest methods to protect your digital property is to add watermarks to the video. This way, people won't be able to use it without showing your logo or watermark. Here in this article, we are going to introduce the 6 best free video watermark software for Windows and Mac that allows you to add watermark on the video.

Now that you got to know why you need to use a video editing software that allows you to add a watermark to the video, we are going to introduce the top 6 best video editing software that allows you to add watermark on your videos.

1. TunesKit AceMovi

The first free video watermark software for windows on our list is TunesKit AceMovi. This is basically the best video editing software that allows you to create some great results and add a watermark to the videos. It has built-in presets that make it easier for you to make edits as you don't have to make your effects. It is simply the most simple and intuitive software that allows even beginners to make video edits without any prior editing experience. The best part about this software is that it is free to use, and you don't have you pay to use its premium features. You can easily watermark your video using TunesKit AceMovi.

tuneskit-main-interface

Pros:

  • Has a simple and easy-to-interact interface.
  • Is full of built-in presets.
  • Is feature-rich.

Cons:

  • UI is only available in English.

Video Guide: How to Add Watermark to Your Video in AceMovi


2. Shotcut

Shotcut is an open-source, free video watermark software for pc that is accessible on different operating systems like Windows, Mac, and Linux. Shotcut is an astounding proficient program that permits you to make extremely excellent alter to your video. You can alter the video in the course of events and can see the improvement progressively, meaning you don't need to download and play it. It likewise has various sound and video design presets, making it significantly more adaptable. Shotcut has the greater part of the top of the line features to make the quality better.

shotcut-main-interface

Pros:

  • Has an intuitive and easy interface.
  • It has 4k video support.
  • Has 4k resolution support.

Cons:

  • Needs a high-end computer to work properly.
  • Not easy for beginners to learn.

3. OpenShot

OpenShot is another splendid expert-level video editor that permits you to alter videos consistently. It permits you to make proficient-looking films and slideshows out of your videos and crude pictures, respectively. It has numerous highlighting features like having the option to add captions, professional-looking video effects, transitions, sound, and so on. It bolsters numerous formats, which implies that the video altered by OpenShot can be traded to gadgets like cell phones, gaming supports, projecting gadgets, and so forth. It has a genuinely basic interface when contrasted with other altering programs. In addition, the plus point of this product is that it is free to use.

openshot-main-interface

Pros:

  • This program is open-source.
  • It gets regular updates.

Cons:

  • The program crashes a lot.
  • The software is inefficient.

4. DaVinci Resolve

DaVinci Resolve is a video editing program that is loaded with proficient features. This editing program is named after the acclaimed craftsman DaVinci and anything related to DaVinci is intended to be extraordinary. It is an element rich and complex editing program made for experts. It allows you to easily add a watermark to the video using a few simple steps. It comes furnished with a high-level tone corrector and multitrack altering capacity. This altering program is amazing to use in an expert studio. It has an assortment of expert-level tools, for example, multitrack uphold, built-in color grader, sound editorial manager, and so on. It is an open-source altering program, and you can add the watermark to the video easily.

davinci-resolve-main-interface

Pros:

  • It can easily add watermarks.
  • Has a built-in professional color grader.
  • It is full of highlighting features.

Cons:

  • Has no multi-camera support.
  • It is hard to learn.

5. iMovie

As we are moving toward the finish of this rundown, the following free video altering program on our rundown is called iMovie. It is a local basic level video altering program made by Apple for its own gadgets. It is an inherent video manager on a Mac OS computer means that it comes pre-installed. It is a free video altering program that makes it easier for you to add watermarks to the video. It likewise has an implicit library of themes, effects, filters, green-screen effects, and so on. It is extremely straightforward and simple to utilize an altering program that permits any learner to make some epic outcomes. It additionally has 4K support that allows you to create some great results. Given underneath is a rundown of the pros and cons of the iMovie video altering program.

imovie-main-interface

Pros:

  • Is free of cost.
  • Has 4K resolution support.
  • Has a huge library of built-in presets.

Cons:

  • Only is available on Mac devices.
  • Doesn't have a built-in color grader.

6. Windows Live Movie Maker

Last but not least, the video editing software on the list is Windows Live Movie Maker. It is one of the most simple and easy-to-interact video editing software. It allows you to do basic video editing without prior video editing knowledge. It allows you to add basic text, images, watermarks, etc., to your videos. You can easily add the watermark, and you can also specify the time duration for how long it will be shown on the video.

windows-live-movie-maker

Pros:

  • Is available for free on the Windows OS.
  • Simple and intuitive.
  • Has a huge library of presets.

Cons:

  • The program crashes a lot of the time.
  • Cannot do complex editing.

Conclusion

Now that we are at the end of this article, we got to know all the best video editing software list. We learned about the 6 best free video watermark software for Mac & Windows. It is up to your personal preference to choose an editing software, but according to us, TunesKit AceMovi is the best video editing tool. It is also available on both platforms, Windows and Mac.

To get more details, please visit this article:

https://www.tuneskit.com/video-editing-tips/add-watermark-to-video.html

You may also like:

Jan 19, 2021

4 Proven Fixes to iPhone/iPad Stuck on Connect to iTunes

 iPhone/iPad stuck on connect to iTunes is a common issue and there are different reasons behind it. Firstly, wrong operations like your unfamiliar with the process would disrupt the connection between iPhone/iPad and iTunes. Secondly, a broken iPhone/iPad system or iOS bugs can also lead to iPhone/iPad stuck on connect to iTunes. Finally, some hardware damages including buttons and cables are mainly responsible for iPhone/iPad stuck on connect to iTunes at times.

Then in such a case, how do we completely and successfully resolve the problem? In this article, 4 most effective and workable ways are introduced. Come and give it a shot.

Way 1: Force restart iPhone/iPad

To force reboot iPhone 8 and later, press down and release the Volume Up button first and then the Down button, then hold the Side button to open it. 

iPhone 7 and iPhone 7 Plus, simultaneously hold down and release the Volume Down and Sleep buttons until the Apple logo appears. 

For iPhone 6, iPhone SE or former, hold down and let go of the Home and Power buttons at the same time till Apple logo pops up.

To force restart iPad with Home button, press down the Home and Power buttons at the same time until the Apple logo appears on the interface.

To force restart other iPad models, quickly hold and release volume up and down buttons respectively, then press the top button until the Apple logo pops up on the screen.

Way 2: Fix iPhone/iPad stuck on connect to iTunes with TunesKit

The most useful to resolve iPhone/iPad stuck on connect to iTunes problem is to apply a professional ios repair tool such as TunesKit iOS System Recovery. This software can be used to fix more than 50 kinds of iOS and Apple TVOS issues without data loss. Besides, it is compatible with all iOS devices and all iOS versions. In addition, it can enter or exit your iOS devices recovery mode with one click for free. Lastly, with Standard and Advanced Modes in hand, it also supports downgrading iOS versions. For this powerful software, how to fix iPhone/iPad stuck on connect to iTunes via it? 3 simple steps are presented below. Here we go.

Step 1: Install and launch the software on your computer and connect your iPhone/iPad to the computer through an original USB cable. Then on the main screen, click Enter Recovery Mode and Start buttons.

Step 2: Select the Standard Mode and check your device info shown on the interface. Next click the Download button to download the firmware package matched with your iPhone/iPad.

Step 3: After download is completed, click Repair button to unzip the firmware package and repair your iPhone/iPad. When the whole process finishes, the iPhone/iPad stuck on connect to iTunes is successfully resolved.

Way 3: Reinstall iOS

Step 1: Open the latest iTunes and connect iPhone/iPad to computer.

Step 2: When iTunes automatically detects the iPhone/iPad, a piece of message that reads your iPhone/iPad need to be updated or restored will appear.

Step 3: Click on the Restore button.

Way 4: Repair iPhone/iPad at Apple Store

If your iPhone or iPad still stays stuck on connect to iTunes screen, then hardware glitches could be the culprit. In this way, you are suggested to send it to a nearby Apple Store for check and reparation. The professionals there would fix it while at the cost of many bucks.

Final Suggestions

When problems happen on your iOS devices, don't worry, there are always ways to solve them. Similarly, the iPhone/iPad stuck on connect to iTunes can be fixed through the above 4 methods. If you have the same issue, just try them and settle it down.


Top 10 Best Split-Screen Video Editor 2021

Video editing is such a huge and interesting career choice. Millions of people are moving toward this field as it is not very hard to edit video because of all the latest video editing tools that are easy to use and do not require any prior knowledge to operate them. They allow you to create some professional-looking results. One of the ways to make your video look more professional is by adding the split-screen effect. This effect is relatively easy to pull off. It allows you to explain your story in better ways.

There are thousands of video editing tools, but only a few editors support split-screen editing. In this article, we are going to introduce the 10 best free split-screen video editor.

best-split-screen-video-editors

Now that you know the importance of split-screen video editing and how helpful it can be in explaining the story, in this part, we will be introducing the best split-screen video editors available on the market that you can use to add the split-screen effect to your videos.

  1. TunesKit AceMovi

TunesKit AceMovi is the first and most probably the best free split-screen video editor for Windows 10 & Mac on this list that allows you to add a split-screen effect to your videos. It also allows you to perform basic video editing tasks easily. TunesKit AceMovi has a built-in color grader and also has a huge library of built-in presets, which makes it easier for the user to make some splendid results without much effort. TunesKit AceMovi is available to use on both Mac and Windows. It allows you to add multiple videos on the split-screen, unlike other video editors in this article.

tuneskit-acemovi-interface

Pros:

  • Supports multiple videos on split-screen.
  • Is free of cost.
  • Has a simple and intuitive interface.

Cons:

  • Does not work on old versions of Windows.

  1. iMovie

The second video editor in our rundown is called iMovie that allows you to add the split-screen video effect on your videos to provide a more immersive experience. iMovie is a free video editor that is available on both Mac OS and IOS devices. It allows you to perform basic video editing tasks like adding effects, trim, crop, cut, etc. It has a very simple interface, which makes it very easy for the user to interact with and make some astonishing results.

imovie-interface

Pros:

  • Is free of cost.
  • Has an easy to interact interface.

Cons:

  • Is only available on Apple devices.
  • Supports up to only 2 videos on the split-screen.

  1. Wondershare Filmora Video Editor

Quite possibly, the most powerful applications that are on the list and after editing applications like Adobe Premiere Pro and Final Cut Pro X, Wondershare Filmora, is likewise a split-screen video editor. The product is accessible for Windows and Mac PCs and offers brief specialized help to its buyers. Even though Filmora Pro that stuffed with further developed features, is likewise accessible, on the majority of the occasions, Filmora fills the need quite well.

wondershare-filmora-interface

Pros:

  • Doesn’t require a lot of storage.
  • Allows multiple videos on the Split screen.
  • Has built-in split-screen presets.

Cons:

  • Software crashes a lot.

  1. VSDC

Another free and efficient video editor on our list is VSD. It is a professional level editing tool that can easily create some good looking edits. It can easily do the split-screen effect with multiple videos. It also has built-in split-screen effects.

vsdc-interface

Pros:

  • Totally free to utilize.
  • Supports unlimited video on the split-screen.

Cons:

  • Does not support automatic video positioning.

  1. ShotCut

It is free, open-source software that allows even the beginner to make some amazing edits. It supports split-screen features means it can create some amazing results. It is available in both x64 and x84 variants for different architectures on both Windows and Mac.

shotcut-interface

Pros:

  • It is available to download on both Windows and Mac.
  • Has built-in presets for split-screen.

Cons:

  • Require some knowledge and practice to make split-screen edits.

  1. Lightworks

The next video editor on our list is Lightworks, which is a professional editor. This editor has helped prepared movies like L.A. Confidential, The Wolf of Wall Street, Bruce Almighty, etc., which means that it is a full-fledged video editor that can create some splendid results. You can easily make the split-screen effect with some basic knowledge.

light-works-interface

Pros:

  • The free version supports split-screen.
  • It is an all-in-one tool.

Cons:

  • Doesn’t have multiple split-screen presets.

  1. Adobe Premiere Pro

Adobe Premiere Pro is no doubt the most famous video editing tool on our list and easily create some amazing results. If you have some basic video editing knowledge, you can make split-screen edits to your videos effortlessly.

premiere-pro-interface

Pros:

  • One of the most feature-rich tools.
  • Can add unlimited video in the split-screen.

Cons:

  • It is not free to utilize.

  1. Corel VideoStudio

The next video editing tool is an award-winning video editing tool that allows you to create some great professional looking edits. It is an easy to access interface and can create split screen video effects effortlessly.

corel-video-studio

Pros:

  • Has a huge built-in library.
  • Supports up to 4k videos.

Cons:

  • Requires a lot of space.

  1. VideoPad Video Editor by NCH

As we are approaching the end of our list, the next video editor on our list is VideoPad video editor. It has native support of multiple presets and formats. It can create some excellent results effortlessly and supports multiple videos in the split-screen edits.

videopad-video-editor-interface

Pros:

  • Has native support to the latest formats.
  • Can edit 360-degree video.

Cons:

  • The software is unreliable and glitchy.

10. Cyberlink PowerDirector

The last software on our list is Cyberlink PowerDirector, which is a high-performance editing tool that you can use to make basic and advanced edits to your videos. It has is a very powerful animator. It can also perform video editing actions such as trim, cut, crop, split-screen, color grade, etc.

power-director-interface

Pros:

  • Is a professional all-in-one video editor.
  • It can make animations.

Cons:

  • Difficult to understand.

Conclusion

In this article, we discussed the top 10 best split-screen video editing software that is available on the market. We provided you with the best tools; now, it is your personal preference. We suggest you use to TunesKit AceMovie video editor as it a powerful free tool that is easy to interact with.

For more info, please read the source of this article:

https://www.tuneskit.com/video-editing-tips/how-to-make-a-split-screen-video.html

You may also be interested in: