Nowadays, more and more people use music streaming services to listen to music. As one of the biggest music streaming platforms, Amazon Music has extensive experience in this area. It has about 75 million songs on Amazon Music which attracts millions of users to choose Amazon Music. But you know, to save music from Amazon is not an easy thing.
After you download an Amazon song for
offline playing, you can only play the song on the Amazon Music app. The Amazon
Music file is a cache file so it cannot be played in other places. So, if you
want to play the downloaded Amazon songs in other places, you need to convert Amazon
Music to MP3. Don’t worry, follow this post and it will show you how to download
Amazon Music to MP3.

Part 1. Download Amazon Music with Tunelf Amatune Music Converter
To save your time, I have picked the best Amazon
Music converter for you - Tunelf Amatune Music Converter. It is an all-in-one Amazon
Music download & converts tool. With this great Amazon Music downloader,
you'll simply transfer your favorite songs from Amazon with lossless quality.
Then you'll download Amazon songs to MP3, AAC, M4A, M4B, FLAC, WAV with no
limits at high speed. And the ID3 tags will be preserved too. Then you’ll be
able to transfer them to any device. By Tunelf Amatune Music Converter, you can
get high-quality Amazon Music at ease.
Part 2. Download Amazon Music Using TunesKit Audio Capture
Another powerful tool to download Amazon Prime Music to MP3 is TunesKit Audio Capture. It is a professional sound recorder that can help users to record any sound on the computer easily. It is a comprehensive and easy-to-use audio recording tool that captures various sorts of computer audio in high quality, including streaming music, live radio, music games, movies, and so on. You can also use TunesKit to download music form 8tracks. It supports multi-track recording and audio file conversion to MP3, AAC, WAV, FLAC, M4A, and other formats for playing on any device.
Step 1. Install and Launch TunesKit Audio Capture
TunesKit Audio Capture offers a free trial for
consumers to try before purchasing the full software. The list of target
programs is the first window you see when starting the audio recorder. Check
the list to check if the browser you wish to use to listen to Amazon Music is
included; if it isn't, touch the "+" symbol to add it. Drag &
drop the browser into the list for a quicker solution.

Step 2. Modify Output Setting and Parameters
Modifying the output options is also important.
The settings menu will appear when you click the "Trumpet-shaped"
icon in the main window. Change the output
format, codec, channel, and other settings here.

Step 3. Record Music from Amazon Music
When you tap the browser's icon, a capture window
will appear on its own. In the browser, listen to the music. After a few
seconds of pause, the download should begin, and the title and ID3 tags of the
songs will be matched after around 25-30 seconds. When the downloading is
complete, go to the right bottom and select the "Stop" button.

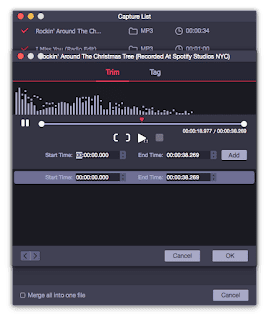
Step 4. Editing Download Amazon Music
There may be some undesired portions or
advertisements in the downloaded songs after recording. If this is the case,
you may enter the editing window by pressing the Edit icon at the back of each
track in the ripping result window. You may cut the music as you like using
this editing tool. You may use editing to create ringtones, trim out
undesired bits, and so forth. You can also make changes to the ID3 tags.

Step 5. Save the Record Files
Click the Save option to export the records
to the output folder. You can also locate the audio files from the icon at the
bottom of the window.

Part 3. How to Convert Amazon Music to MP3 for Free
Another way to record audio from a Chrome
browser is to use Chrome Audio Capture, a Chrome extension that captures audio
playing on the current tab. Depending on your preferences, you can save such
captures as MP3 or WAV files. Furthermore, you may record many tabs at the same
time and choose to mute the tab being caught at the time.

Step 1. Launch Chrome browser on your
computer and visit Chrome Web Store.
Step 2. Enter Chrome Audio Capture in the
search bar, and download and install it on Chrome by clicking the “Add to
Chrome" option.
Step 3. Tap on the red button from the top
left side of Chrome and press the “Start capture” button to record the sound in
Chrome.
Step 4. Tap on the “Save capture” to save
the file on your computer as soon as it completes the recording.
Summary
We have shown you 3 quick tips to convert Amazon
Music to MP3. When you choose an excellent tool, to rip Amazon Prime Music to MP3
will not be so tricky. Go to the official website and try TunesKit Audio
Capture right now. Then you can enjoy your Amazon Music at any place.
For more: How to Download and Convert Amazon Music to MP3 in 4 Ways