Showing posts with label ios repair. Show all posts

Jul 23, 2021

Top 5 Ways to Fix iMessage Not Syncing Between Mac and iPhone

Recently, some friends told me that their messages are not syncing between iPhone and Mac normally as they should. It is a frustrating issue if we can’t read or send our message as our wishes. After trying, I list up the top ways for iOS users to fix the message not syncing between iPhone and Mac. Now let’s see the detailed tutorial.

Method 1. Turn off the iMessage and turn it on again


The rebooting of iMessage should be an efficient way to fix iMessage not syncing between Mac and iPhone. Turn the switch to grey to turn it off. Wait for several minutes and turn it on again, and your iMessage should sync properly between your iPhone and Mac. You can enter iMessage via Settings>Message.

Method 2. Check the iMessage settings


The second method is to check if you have activated your Apple ID and Email address correctly. Both your iPhone and Mac should log in to the same Apple ID and add the same Email address.

For iPhone, go to Settings > Messages > Send & Receive.


For Mac, go to Messages > Accounts > Preferences.

Method 3. Reboot your iPhone


In addition, you can try to reboot your iPhone. It is a quick and efficient way to help you deal with this glitch.

iPhone 6s or earlier: Press and hold the Side button and the Home button simultaneously. When the Apple logo appears, release the two buttons soon.

iPhone 7/7 Plus: Hold and press the Volume Down button and the Side button simultaneously. When the Apple logo appears, release the two buttons soon.

iPhone 8 or later: Hold and release the Volume Up button quickly, then hold and quickly release the Volume Down button, then press and hold the Power button until the Apple logo appears.

Method 4. Update your iOS to the latest version


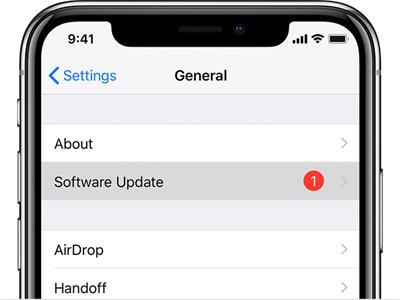
Sometimes it is an iOS issue that iMessage not syncing between Mac and iPhone. If you are using the outdated iOS system version, and updating can be an efficient fix. You can update your iPhone via Settings > General > Software Update. Besides, iTunes is also a working way for Apple users to update the iOS version.

Method 5. The best fixing tool - TunesKit iOS System Recovery

With the above four methods, I hope that your iMessage can sync your iPhone and Mac properly as usual. If this issue still exists, it indicates that some software glitches occur. Here, I recommend TunesKit iOS System Recovery for you. TunesKit iOS System Recovery is a professional and specialized iOS repairing tool that can fix the most common iOS glitches such as iPhone blank screen, iPad won’t rest, iPhone asking for wrong Apple ID, etc. What’s more, TunesKit iOS System Recovery can protect your data from loss.

Let's see the detailed tutorial in fixing iMessage not syncing between iPhone and Mac.

Step 1 Launch TunesKit iOS System Recovery


Launch the TunesKit iOS System Recovery on your computer (Win/Mac). Then, connect your iPhone to it with a working cable. When all are done, click the Start button to the next step.

Step 2 Select a mode


TunesKit iOS System Recovery provides two modes for users to fix their iPhone issues. To fix the iMessage not syncing between Mac and iPhone, please choose the Standard Mode. Generally, the Standard Mode is powerful enough to fix this issue. Though you may not use the Advanced Mode, I need to tell you that the Advanced Mode will erase all of your iPhone data. Use it under the premise of Standard Mode not working well.

Step 3 Download firmware package


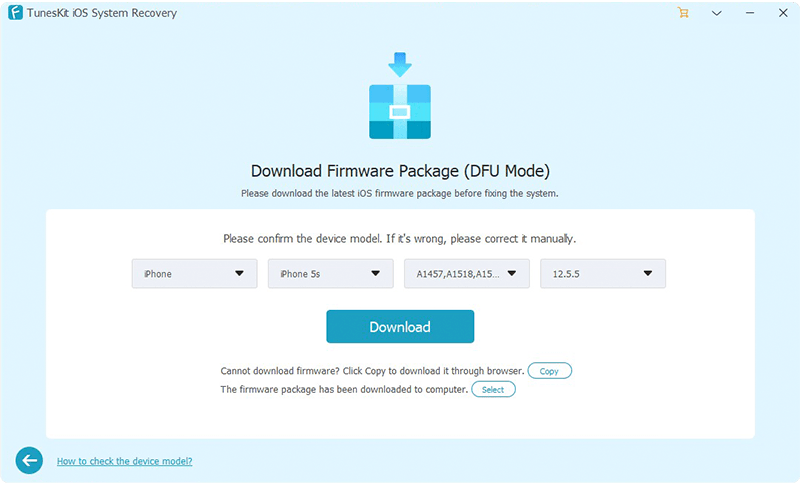
Download the corresponding firmware package so that you can start to fix your iPhone. Before downloading, make sure that the information given is alright. If the device information is wrong, please correct it manually.

Step 4 Fix iMessage not syncing between iPhone and Mac


Finally, TunesKit iOS System Recovery will fix your iPhone after downloading, and the iMessage will sync between iPhone and Mac normally.

The bottom line

Through this article, I think you can learn the best methods to fix some iOS issues. In most situations, these issues won’t make sever damage to our phone but are very annoying. Fortunately, we have TunesKit iOS System Recovery, a powerful guard of our iPhone, which can solve iOS issues within several clicks.

It's source comes from: https://www.tuneskit.com/ios-repair/imessage-not-syncing-between-iphone-and-mac.html

Apr 22, 2021

How to Fix Bricked iPad

 Are you facing bricked iPad? If so, you are not alone. Many users once reflected this issue on Apple Community. If your iPad is bricked, this means that iPad would stop working and you can not use the device normally. However, you do not need to be confused, as we will give you tips and tricks to get through bricked iPad. If you are experiencing this issue, do not miss this article and keep reading.


Fix 1: Charge Your iPad

In some cases, your iPad battery runs down, so the device is bricked. It is normal that you unintentionally forget to charge your iPad. Therefore, you should make sure that you charge your iPad. Take out the original USB cable to plug it into the power socket. Wait for an hour, and check if the iPad can begin to run again. If this way does not work, try the following ways.

Fix 2: Fix Bricked iPad Without Data Loss

Here, we are going to introduce the best ways of fixing bricked iPad quickly and efficiently. In most cases, if wanting to fix an issue, you need a good tool to help you. To fix an iPad problem, iOS System Recovery Software is the best troubleshooting tool. This type of tool is targeted at all iOS-related issues.

Nowadays, with the development of technology, much software has emerged. Here, we want to recommend TunesKit iOS System Recovery. After multiple trials and tests, we can say that TunesKit deserves a try. It can fix bricked iPad at a fast speed and with a higher success rate. More importantly, it will not lead to any data loss. Of course, it can solve other 30+ iOS issues, including iPad stuck on Apple logo, recovery mode, black screen, etc. If you are iPhone, iPod Touch or Apple TV users, TunesKit is also a fix. Whether you are facing minor or major problems, TunesKit is the best tool. Besides, it offers a free chance to enter/exit the recovery mode, or can downgrade your iOS.

Step 1: As TunesKit is the desktop software, make sure that you download the Windows or Mac version on your computer. Before launching TunesKit, take out a USB cable and use it to connect the iPad to your computer. If done, the software will detect your iPad, and then click the blue button Start.

Step 2: Now, TunsKit will ask you to select Standard Mode or Advanced Mode. In the software interface, TunesKit will show the detailed feature of the two modes. Here, we recommend you to choose Standard Mode. This mode will not cause any data loss. Or if you have backed up your iPad, you can choose the Advanced Mode as you like.


Step 3: The final step is to download the firmware package. Before downloading, you can check the device information. Then, click Download. Wait for several minutes. When the firmware package is downloaded, click Repair to fix bricked iPad.

Fix 3: Hard Restart Your iPad

As we know, forcibly restarting your device is a common way to fix iOS system or software glitches. Hence, be free to try this way. To force restart your iPad, there are two different methods based on iPad models.

iPad without Home button: Press and quickly release the Volume Up button, and then press and quickly release the Volume Down. Next, press the Power button before your iPad restarts itself.


iPad with Home button: Press both the Power and Home buttons at the same time for several seconds before the device shutdowns and restart itself. After the Apple logo appears, you can release the buttons.


Fix 4: Restore Your iPad via iTunes

Some people also believe that iTunes is also a good tool. If you have installed the latest version of iTunes on your computer, you can resort to this tool and restore your iPad. But this way will erase your data and you may choose to back up all your data. To use this software, just refer to the following information.

• Open the latest version of iTunes on your computer, and use a USB cable to connect your iPad to the computer;

• Choose your device and then click Summary. Next, click the Restore iPad button;

• Lastly, iTunes will ask if you decide to restore the iPad. If you decide, click Restore.

Fix 5: Try to Enter DFU Mode

The last potential way you can try is to try DFU mode and then restore the bricked iPad via iTunes. The detailed steps are as follows:

• Open the latest version of iTunes on your computer, and use a USB cable to connect your iPad to the computer;

• Press and hold the Power button for 3 seconds. While you're still holding the power button, press and hold down the volume down button. Continue to hold both buttons down for 10 seconds. Release the side button but continue holding the volume button down for 5 seconds;

Note: if you are using iPad with Home button, press and hold the Power button and release for 10 seconds after which release the Power button and keep holding the Home button for 5 seconds.

• If the screen remains black, you can be sure that your device is in DFU Mode. After this, a pop-up window on iTunes will appear. Click Restore and then confirm the command.

Final Words

The bricked iPad is a serious problem, so users should attach much importance to it. However, all will be fixed if using the above-mentioned methods. Although not all methods are suitable for everyone, we can say that TunesKit will be the most effective and efficient. So give it a chance.

To get more details, please visit: https://www.tuneskit.com/ios-repair/fix-bricked-ipad.html

You may also like: 

https://tuneskit.blogspot.com/2021/03/five-tips-to-fix-iphone-ringer-not.html

Apr 6, 2021

How to Fix iPhone Calendar Not Working?

Have you come to a situation that the Calendar is not working on your iPhone? The alert is not working and you get no notification before the event important? How can we fix it? If you are troubled by the problem, you land on the right page. Here I will show you some tips to fix iPhone Calendar not working.

Tip 1. Reset the event and alert time

If you have no idea about the Calendar alert not working, reset the alert should not be a bad choice for you. You can open the Calendar and reset the event. You can click the button to manage your event. If your alert not working on your phone, delete it and add it to the Calendar again.

Tip 2. Restart your iPhone

Restart iPhone can help you solve the problem iPhone Calendar not working. Here are the detailed steps for the different models of the iPhone.

iPhone 6s or iPhone SE: Hold both the "Power" button and the "Home" button at the same time. When the Apple logo appears, release both buttons.

iPhone 7: Hold both the "Volume Down" button and the "Power button" at the same time. When the Apple logo appears, release both buttons.

iPhone 8,iPhone SE2,iPhone X, iPhone XS, iPhone XR, iPhone 11, or iPhone 12: Press and quickly release the "Volume Up" button, press and quickly release the "Volume Down" button, then press and hold the side button until the Apple logo appears.

Tip 3. Update iOS system

If your iOS system has not been updated for a long time, it may be the problem. I think it is necessary for iOS users to upgrade the system as soon as it is available. A new iOS upgrade patch contains bug fixes, new features, and so on. It should be effective to help you repair the Calendar not working.

Follow the following steps to update your iOS system:

Settings>General>Software Update>Download and Install/Install Now

Though I advise you to update your system, the latest operating system is not suitable for all models of the iPhone, please check that your iPhone is suitable for updating before you update your iOS.

Tip 4. Use TunesKit iOS System Recovery to fix iPhone Calendar not working

If the above ways are failed to fix your iPhone Calendar not working, it means that there are some unknown issues happened on your phone. A suitable iOS system recovery tool can solve the problem for you. TunesKit iOS System Recovery is the best choice for you. It is a professional iOS system recovery tool that can fix most of the common iOS issues. With TunesKit iOS System Recovery, you can fix your iPhone Calendar not working in several steps. Besides, Spotify not working, iPhone stucks on Recovery Mode, or other issues can be fixed by using TunesKit iOS System Recovery.

Let’s see how to fix your iPhone with TunesKit iOS System Recovery.

Step 1. Connect your iPhone with the computer

First, you need to connect your iPhone with your computer. It is the main interface of TunesKit iOS System Recovery, the fixing will be started if you click the Start button.

Step 2. Select the recovery mode

TunesKit iOS System Recovery offers 2 different recovery modes for users. Both modes can fix your iPhone Calendar not working, but it doesn't mean that you can choose the mode randomly. It would be better for you to choose Advanced Mode under the premise of the Standard Mode fixed your iPhone failed. Though Advance Mode can fix most of the iOS system issues, it will erase your iPhone data at the same time. If you have to use Advanced Mode, please back up your iPhone before it.

Step 3. Download firmware package.

Finish choosing the recovery mode, the next step is to download the firmware package. Please confirm the device model, make sure it is right before downloading. If not, please correct it manually.

Step 4. Fix your iPhone

This is the last step, you just need to wait for the fixing process done. After it, your iPhone is fixed and you can enjoy it now.

The bottom line

As an iOS user, TunesKit iOS System Recovery helps me a lot. It is my best assistant with solving the iOS common issues such as iPhone stuck on the Apple logo, Apple music not working, GPS not working, and so on. If you are an iOS user, you won’t be regret downloading TunesKit iOS System Recovery.


Read more: TunesKit official website

Mar 24, 2021

Five Tips to Fix iPhone Ringer Not Working

"When my friends call me or send me a message, I could not hear ringing. What' s happening? Why and how to fix it?"

Actually, this is A common issue that the marjority of iPhone users have once reported. No one wants to ignore this problem, as people are not willing to miss important messages from others. Sometimes, it is because users turn on Do Not Disturb or Mute that the iPhone ringer fails to work well. But it may be caused by your broken iPhone Speaker. Or the device is stuck in headphone mode or encounters system glitches after software updates. 

Althought we can not find a certain reason, we can provide ultimate solutions for you. Therefore, if you are experiencing this issue, feel free to refer to this turtorial.

Fix 1: Adjust the Ringer Volume

As we know, the ringer volume is different from other sounds on the iPhone. Even if all other sounds are normal, the ringer may do not work when it really has a problem. Therefore, you may need to check if the ringer volume is too low and then make it louder. To adjust the ringer volume, just go to Settings > Sounds & Haptics > Ringer And Alerts. Then, you can drag the slider to the right to increase your ringer volume.

Fix 2: Turn off Do Not Disturb

If you make sure your ringer is not silent, you need to check if you turn on Do Not Disturb. If this button is on, you may discover that the iPhone ringer stops working. To turn off Do Not Disturb, two options are feasible.

• Go to Settings > Do Not Disturb. Then, tap the switch to turn it off.


• Open Control Center and find the moon button. Tap the button to turn it off. If the button is white, this means that Do Not Disturb is off.

Fix 3: Turn off Bluetooth

If your Bluetooth is on and connects to other devices, the iPhone ringer may be abnormal. To disconnect Bluetooth, you need to go to Settings > Bluetooth. Then tap the button to turn it off.

Fix 4: Use iOS System Repair Software

If you have tried all the above-mentioned solutions, you have found that these ways still cannot fix your iPhone ringer not working. This means your iPhone may need to have an update or the device has encountered system glitches. In this case, I recommend you to use effective and powerful iOS system recovery software. Although it is a third-party tool, this tool is designed to fix all of your Apple device issues.

TunesKit iOS System Recovery belongs to a desktop tool that is compatible with both Mac and Windows OS. If your iPhone ringer won' t work, TunesKit will promise a faster processing speed and higher success rate. Gnerally speaking, one of the main functions that TunesKit embraces is to fix your iPhone/iPad/iPod Touch/Apple TV suffering from system issues. For instance, when your iPhone is stuck on black screen, you can ask help from TunesKit. Besides, it can also downgrade your Apple device and let you enter/exit recovery mode with one click.

A step-by-step guide

Step 1: First, you need to launch TunesKit. Then, use a USB cord to connect your iPhone to your computer. Wait for several seconds and the software will quickly detect your iPhone. If detected, just click Start.
Step 2: Now, a pop-up window for you to select a mode will occur. Here, the Standard Mode is recommended, as the mode will not lead to any data loss. Then, click Next.
Step 3: TunesKit will let you download firmware package. Before downloading, you can check if the device mode is correct. If no problem, click Download. Wait for a while, and then click Repair to fix your iPhone ringer not working.

Fix 5: Factory Reset Your iPhone

As this method will erase all your data, you may need to take careful consideration if you choose to factory reset your iPhone. The factory reset is also another effective way to fix your unresponsive iPhone. If necessary, you may need to back up your iPhone data using iCloud or other tools. To factory reset your iPhone, just do this:

Go to Settings > Reset > Erase All Content and Settings. When a warning box appears, tap on Erase iPhone to factory reset your iPhone.

Conclusion

To fix iPhone ringer not working, you can follow the above-mentioned ways one by one. All in all, there is always a way out.

To get more details, please visit this article: https://www.tuneskit.com/ios-repair/fix-iphone-ringer-not-working.html
You may also like:

Mar 11, 2021

Top 6 Remedies to Fix Apple TV Could not Sign in

Now, Apple TV has grown into a popular device and widely used by people. It can receive digital data for visual and audio content and play it on a connected television.  But in some cases, this smart device will get stuck in some serious issues. Apple TV could not sign in is one of the issues. If your Apple TV fails to sign in, this will prevent you from watching your favorite TV shows or movies.  
To solve users' questions, here we sort out several ways to fix Apple TV could not sign in. If you are facing this issue, do not miss it and just keep reading. In this tutorial, you can always find a way up.

Fix 1: Restart your Apple TV 

To restart your device, just refer to the following steps:

• Press and hold the Menu and Home (for 3rd generation and earlier, tap Down) buttons on the Siri Remote until the Apple TV status light blinks rapidly;

• Disconnect Apple TV from the power outlet, wait five seconds, then reconnect it;

• As for Apple TV 4K or 4th Generation, just Go to Settings, choose System and then click Restart. But for the 3rd generation and earlier, just go to Settings > General > Restart.


Fix 2: Reset your Apple TV 

If restarting can not fix Apple TV stuck on could not sign in, then you may try to reset your Apple TV. To achieve this, you simply need to go to Settings > System > Reset. If you are using Apple TV 3rd generation and earlier, just select Settings > General > Reset.

Fix 3: Disable two-factor authentication

• Open the iCloud;

• Select Apple ID and then Password & Security;

• Turn off the 2-factor verification option and log into iTunes.

Fix 4: Use verification code

The issue may occur on older Apple TV, especially if you are using two-factor authentication. To fix it, you may follow the guide below:

• Get an iPhone/iPad and the Apple ID;

• Go to Settings > iCloud > your iCloud > Password & Security > Get Verification code;

• Next, enter the six-digit code.

Fix 5: Restore Apple TV with iOS system recovery software (No Data Loss)

If all the solutions above fail to help you, we guess your Apple TV may suffer more serious issues. In this situation, users may download a professional iOS system recovery software to fix Apple TV stuck on could not sign in. This kind of tool takes the success rate and effectiveness at its centers. Whenever your devices, it will deliver an impressive result.

Among different software, TunesKit iOS System Recovery can always take a leading place in the market. In general, it is can fix over 30 system issues of iPhone, iPad, iPod Touch and Apple Watch. In terms of the Apple TV problem described in this tutorial, TunesKit can fix it at a faster speed and ensure a higher success rate. Besides, TunesKit can also be an effective tool when your Apple TV is stuck on Apple logo, black screen, airplay screen, etc. 

A step-by-step guide:

Step 1: : When TunesKit is launched on your computer, you need to use a USB cord to connect your Apple TV to the computer. TunesKit will detect your device. Next, you need to tap Start. 

Step 2: Now, it is time to select a mode (Standard Mode is recommended). Next, just click Next. 

Step 3: The final step is to download the firmware package. Before downloading, you can choose to check the device mode to see if it is wrong and then click Download. The download process will not require a long time. When downloaded, you can click Repair to fix your Apple TV. 

Fix 6: Restore Apple TV with iTunes (Data Loss)

Using iTunes is another solution to fix Apple TV system issues. Resorting to iTunes to restore means that your Apple TV will be subject to factory settings and lose all data. To use this method, you need to download the latest version of iTunes on your computer. If necessary, you need to back up all of your data.

• Unplug the power and HDMI cables from Apple TV, and open the latest iTunes on your PC;

• Plug the Apple TV power cable back in (3rd and 4th generation only). If you have a 2nd generation Apple TV, leave it disconnected from the power source;

• Wait for some time to let iTunes recognize Apple TV. If the summary page appears, just select Restore Apple TV;

• After the restore process is completed, you can disconnect the Apple TV from the computer and power it on. This Apple TV is now restored to factory settings, and you can check if your Apple TV becomes normal.

Final Words

With all these thorough fixes, we hope that this article can give you a hint to fix Apple TV could not sign in. You can try these ways one by one. If using TunesKit, you can no longer need to leave your home to fix your Apple TV. The benefit is that this tool can fix your device stuck in any system issues at any time. 

Mar 9, 2021

How to Fix Twitter Not Working on iPhone

 Twitter not working on iPhone could result from various situations including the app itself, software or system glitches and poor internet connectivity. Do you have this problem? Well, in this problem-solving guide, we will introduce you some simple and advanced ways to get it resolved. 

Easy and Quick Fixes for Twitter Not Working on iPhone

1. Close out all of running apps

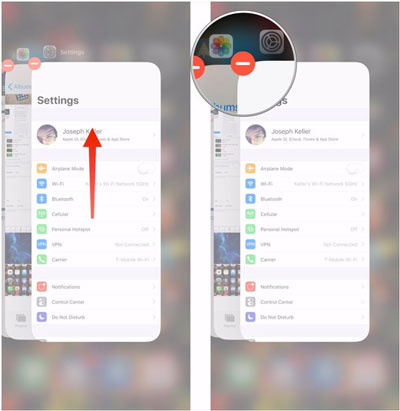
Apart from the Twitter app, closing out all other running apps is recommended. By doing so, you may fix the Twitter issue more effectively. To close out all of running apps, just follow the guide below:

• Double-press the Home button to open the App Switcher (for iPhone SE, iPhone 8 and earlier), or from the Home Screen, swipe up from the bottom of the screen and pause in the middle of the screen (for iPhone X and later);

• Use your finger to swipe up on the app’ s preview until it disappears from the App Switcher.

2. Clear cache and data on Twitter

To clear the cache and data on Twitter, you need to:

• Open the Twitter app and click the Me button in it;

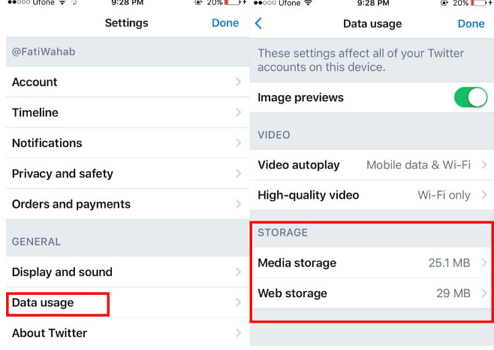
• Click Settings > Data Usage > Media Storage one by one, then clear the cache;

• Next, choose Web Storage and clear the cache.

3. Update the app

To fix some app issues, software developers would release the updated version. Therefore, you may need to update the app to let it work normally.

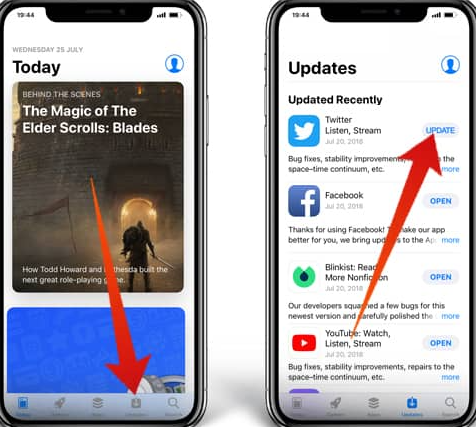
To check if you have the latest version of Twitter, open the App Store and tap Updates to see a list of the apps that can be updated. If there’s an update available for the Twitter app, tap the blue Update button.

4. Delete and reinstall the app

If all of the three solutions above are not useful, you can try to delete and install a new Twitter for your iPhone.

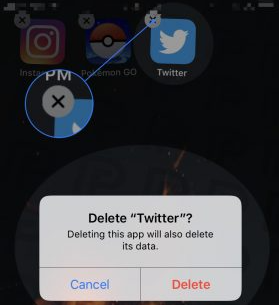
To delete the app: From your home screen, press and hold your finger on the Twitter app icon. An x will appear in the top left corner and then tap the x. Next, Tap Delete.


To reinstall the app: Open App Store, tap the search tab at the bottom of your iPhone, and type in Twitter. Next, click Get and then Install.

Advanced and Effective Methods to Solve Twitter Not Working on iPhone

If the app troubleshooting solutions listed above cannot fix Twitter not working on iPhone, you may try the remaining methods below one by one.

5. Use an iOS system recovery software to repair without data loss

In some cases, the Twitter app itself does not have any issue, so there is a possibility that your iPhone system is in trouble. While iOS system recovery software is just used to repair your iOS system.

TunesKit iOS System Recovery is a well-known desktop software that can easily fix your Twitter not working on iPhone due to system glitches. Besides, the main function of this software is to fix your iPhone stuck recovery mode, white and black screen, or boot loop. Of course, if your other Apple devices including iPad/Apple TV/iPod Touch are stuck in similar issues, TunesKit can help you. And users do not need to worry about its reliability, as TunesKit will ensure 100% security.

Characteristics of TunesKit iOS System Recovery:

1. Fix Twitter not working on iPhone without data loss.
2. Repair different tvOS/iOS issues at home.
3. Fix iOS system issues at a fast speed.
4. Easy to use with friendly interface.

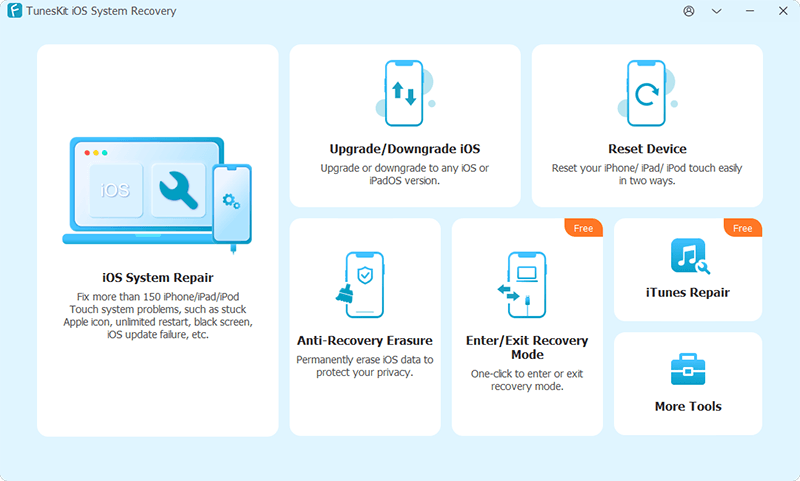
Step 1: Open Tuneskit and use a USB cord to connect your iPhone to the computer. If TunesKit detects your device, just click Start.


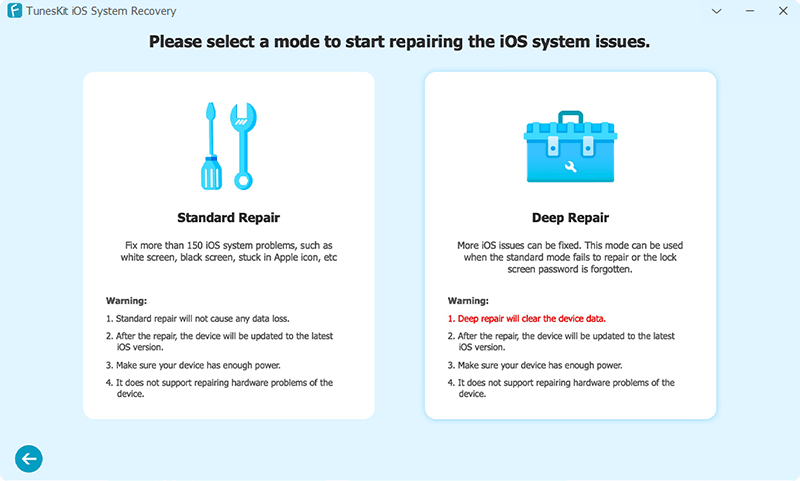
Step 2: Now, according to the software hint, select a mode (Standard Mode is recommended) and click Next.


Step 3: Lastly, you only need to download the firmware package. Wait for a while and then click Repair to fix your device.


Note: If you do not fix the issue, there is another Advanced Mode offered for you. But this may erase your data, so be careful that you need to back up your data before using this mode.

6. Power off and power on your iPhone

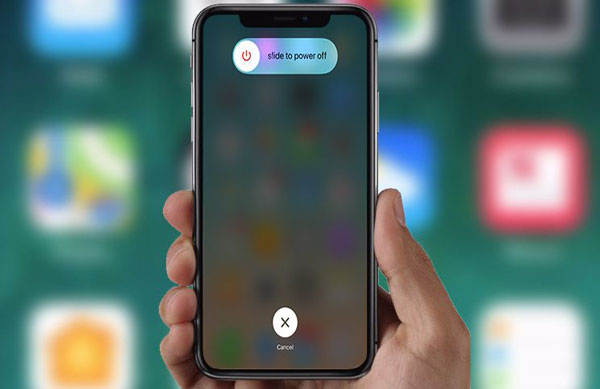
To restart your device, press the Power button (also Sleep/Wake button), and release the button when Slide to power off and the red power icon appear near the top of the screen. Swipe the icon from left to right to turn off your iPhone. Wait for a couple of seconds, and then press and hold the Power button until you see the Apple logo appears.

7. Update to the latest OS

When your iPhone may suffer from specific software issues, your device could be addressed by updating to the latest iOS version.

You need to tap Settings > General > Software Update. If you see an update, tap Download and Install.

8. Check internet connection

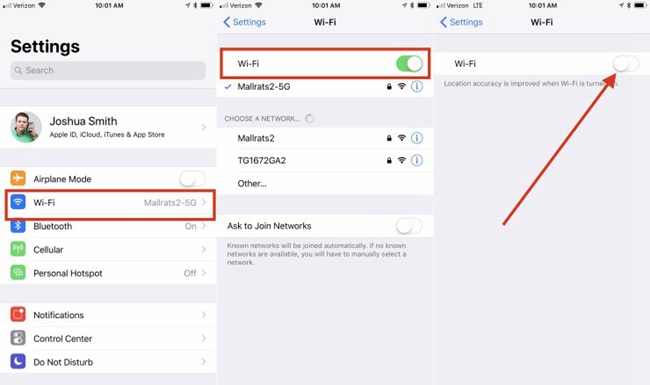
• Turn off and turn on WiFi: you can turn it off in the Control Center by tapping the WiFi icon. Or you may tap Settings > WiFi and then toggle on the button to turn it off. Wait for a while and turn it on again.


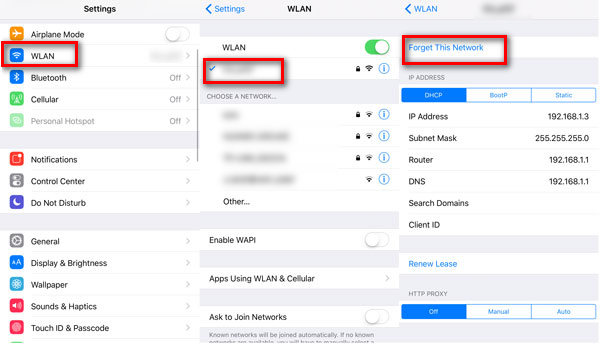
• Forget WiFi network: Tap Settings and then WiFi besides the WiFi network you want the iPhone to forget, tap more information (look like blue “ i ” icon), and then select Forget This Network. After you’ve forgotten the WiFi network, wait for a while and reconnect WiFi again.


• Connect a different network: Try to connect to a friend’s Wi-Fi network, or visit your local library, Starbucks, or restaurants to connect to free public WiFi.

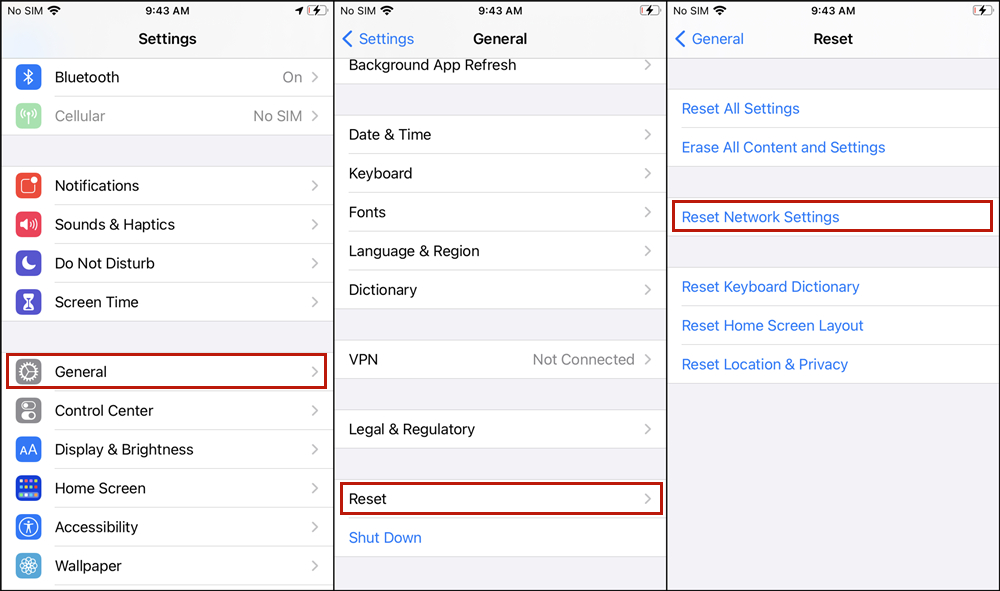
• Reset network settings: Launch Settings > General > Reset. Then, choose Reset Network Settings and enter your passcode. (Before doing so, make sure your WiFi passwords are noted.)

Conclusion

Whenever the Twitter app won't work on your iPhone, you can check the real solutions from this tutorial. All the fixes are easy, but TunesKit is well-positioned to fix the Twitter app not working on iPhone quicker. So download TunesKit is not a bad thing, and it can help you whenever you have a need.