Mar 29, 2017

How to Downgrade iTunes 12.6 to 12.5 on Mac


Recently, Apple released the iTunes 12.6 and introduced the new function "Rent once, watch anywhere" to its users. According to the release notes, this new feature enables Apple users to play iTunes movie rentals across all devices with iOS 10.3 or TVOS 10.2. That is the good news, but the bad one is that the update of iTunes causes many problems to some DRM removal programs before they are updated to be compatible with iTunes 12.6.

My M4V converter can't start the conversion but it worked great for me. I think the iTunes 12.6 maybe potentially caused this conversion issue. Although I may did a correct diagnosing but how can I remedy this? Downgrade the iTunes perhaps can make my converter return back to normal. Any assistance would be appreciated.

Since iTunes was updated to 12.6, many users have encountered the same issue and sent email to support@tuneskit.com for seeking a help. Actually, TunesKit has released the updated Windows version of M4V Converter, Apple music Converter, AudioBook Converter to apply to iTunes 12.6. The updated Mac version will be released soon. 


Tutorial: Downgrade iTunes 12.6 to 12.5


Before TunesKit launch their official updated Mac version, this step by step introduction on "How to downgrade iTunes 12.6 back to 12.5" would be helpful if you need TunesKit to convert files on your Mac right away.

Step 1: Uninstall iTunes 12.6 from Mac

1. Quit iTunes 12.6 on your Mac.

2. Go to Applications > iTunes app file (/Applications/iTunes.app)> Get Info.


3. Click on the padlock icon (on the bottom right side of the window)> Enter your admin password.


4. Then expand the Sharing & Permissions >Adjust the privileges for “everyone” to Read & Write.


5. Close the Get Info window > Delete iTunes application file.

Step 2: Reinstall iTunes 12.5 on Your Mac

You can download the previous version of iTunes from iPhonefirmware.com and then install it on your Mac.

Step 3: Rebuild iTunes library

To make iTunes library work for the older version, in this step we need to rebuild the iTunes library.


Go to your home directory > Music > iTunes and find the file named iTunes Library.itl. You can rename it or just delete it. Then go to the folder of previous iTunes Libraries in the same directory, and find the most recent iTunes Library.itl and copy the specific file to the iTunes folder by removing the date info from the file name.

Step 4: Turn off iTunes automatic upgrade

 This step is necessary to avoid the auto updating of iTunes. Otherwise, all above attempt will be in vain.Choose iTunes > Preferences > Advanced. Disable the Check for new software updates automatically option and then click OK to save the setting.


If you don't wish to downgrade iTunes version, there are other workarounds here: "How to Run TunesKit Successfully with iTunes 12.6 on Mac".


Mar 22, 2017

How Can I Enjoy iTunes Videos on Samsung Smart TV?


“Last month I bought a new Samsung Smart TV to my family as my best friend recommended it to me. It really provides me with excellent audio-visual experience and makes all our family members fondle admiringly. However, just one thing makes us feel frustrating. You know, we can't play our purchased iTunes TV shows and movies on it. What should I do for this? Anyone can assist me?”

This is an Apple user's voice that posted in Apple Support Communities to find a help. Do you have the same problem as the case above-mentioned? Your Samsung TV gives you a quick access to TV shows, movies, apps, games. Plus, it also supports many stream media application like Netflix,Amazon, You Tube, On TV, Spotify, but iTunes isn't in the list. It is due to the DRM protection of iTunes.

DRM protection is a encode method that Apple apply to their iTunes videos, which prevent users from watching these videos on non-apple devices even they have paid for these videos. It is disgusting and unfair for iTunes users. Many users have submitted this inconvenience to Apple Inc. They are waiting for a great App like Amazon Instant Video to help them simply enjoy their iTunes videos on Smart TV. However Apple Inc hasn't developed any app to meet users'requirement. You may need a iTunes video converter that enables you to watch iTunes TV on Samsung Smart TV, it is much preferable and easier than waiting for Apple Inc to develop an app maybe named "Apple Instant Video".

TunesKit M4V converter is great choice for you to convert iTunes videos to your Samsung Smart TV with fast speed and High quality persevered. It can easily strip the DRM from iTunes videos without touch the original quality. It can convert M4V format to various formats during removing the DRM protection. As long as you could follow the 1-2-3 instruction below, you can handle this converting thing easily even you are not good at computer operation.

Steps to convert iTunes video to Samsung TV


Step 1. Download and Install TunesKit

TunesKit M4V converter has Mac version and Windows version can be selected, you can download and install the proper one depending on your system.

Step 2. Launch TunesKit

You can purchase the full version after you test their trial version, then you will receive license name and code that used to register the program. iTunes would auto launch once you launched TuensKit, don't forget authorize your iTunes with your Apple ID you used to purchase TV shows or movies.

Step 3. Add Files


Click "Add Files" button on the program to select iTunes movies or TV shows that you want to convert. Click "OK" to load the M4V files. You can also import the iTunes M4V files by dragging and dropping.

Step 4. Customize Output Settings and Convert


You can adjust the output audio tracks, subtitles, formats and output path as you like. After you finished the adjustment, you can click the "Convert" button to begin conversion.

Step 5. Import The Converted Videos to Your Samsung Smart TV

Find the target converted movies from output path folder, then just import them to your Samsung Smart TV via USB port.

Dose this article can solve your problem? If you want more details on how to convert iTunes video to Samsung TV, please visit TunesKit official website: http://www.tuneskit.com/drm-m4v-to-devices/watch-itunes-movies-on-samsung-smart-tv.html

Mar 14, 2017

How to Share iTunes Purchases to Others


If you and your family members are using different iTunes accounts for purchasing digital content from iTunes Store, you may meet the problem that you can’t share your purchases without family sharing. But the downside of the family sharing is that it only supports 6 person in total to share the iTunes purchases. What’s worse, it’s also known that one single iTunes account (or Apple ID) can only authorize up to 5 computers. What if you want to share the iTunes purchases on the sixth machine or more?

Don’t worry. If you are just facing this kind of problem, simply read on the following guide, from which you’ll find the two best ways to share your iTunes purchased content, including movies, TV shows, audiobooks, iBooks, Apple Music to others with a few steps only.

Method 1. Share Purchased iTunes Media with Others via Family Sharing


If you have less than 6 people to share the iTunes purchases with, then you are recommended to use iTunes Family Sharing to share the iTunes content. It lets you add up to six family members. Once added, all members will get instant access to each other’s purchase and can view and download them on demand just as you already can from your own account. Family Sharing works in the iTunes store, iOS App Store, and the Mac App Store, so you can share content across all of your devices. Besides, with Family Sharing, you don’t have to share your passwords with each other, but must use one credit card for all devices.

How to Set Up Family Sharing to Share iTunes Purchases on Mac


Note: Family Sharing only works on Mac OS X Yosemite or later.

Step 1. Choose Apple menu > System Preferences, then click iCloud.

Step 2. Click Manage Family.

Step 3. Click your name and review your account information next to Family Purchases.

Step 4. Make sure that Share my purchases is selected.

After you join a family, you can see and download items from each family member’s purchase history, and enjoy them on your own devices. You can download music, movies, TV shows, and books on up to 10 of your devices, five of which can be computers. You can download apps to any devices that you own or control.

Method 2. Share iTunes Purchases with Others by using iTunes DRM Removal Tools


This could be the best option if you need to share the iTunes purchased media to unlimited number of persons or computers. It helps you get rid of the DRM protection from all the protected iTunes content so that you can freely share the files to others as you like. Here we are talking about TunesKit DRM removal solutions, which will help you permanently remove DRM from all kinds of iTunes media, including iTunes movies, TV episodes, audiobooks, ebooks, songs, etc.

How to Share iTunes M4V Movies and TV Shows to Others


If you got a large number of movies and TV shows in your iTunes library that you want to share with others, then you should firstly use TunesKit DRM M4V Converter for Mac/Windows to bypass the DRM protection from the video files. This smart and powerful iTunes video converter enables you remove DRM from iTunes purchased and rented movies, TV shows and music videos while converting the M4V format to unprotected MP4, M4V losslessly as well as other common formats, such as MOV, AVI, FLV, MKV, MPEG, etc. For the complete guide on how to remove DRM from iTunes M4V movies with TunesKit, you should simply follow the post here: http://tuneskit.blogspot.com/2014/12/how-to-transfer-protected-itunes-m4v-movies-to-mp4-players.html.

How to Share Protected iTunes Music Purchases to Others


For iTunes music users, TunesKit Apple Music Converter for Mac/Windows could be the best options to help you get rid of DRM from old iTunes M4P songs and Apple Music tracks in seconds. It can easily convert the old DRM-protected iTunes songs as well as offline Apple Music streams to DRM-free MP3, AAC, WAV, FLAC, etc. at 30X faster speed. In the meantime, it will keep the original ID tags and metadata in the output files. For more info, you can refer to this tutorial: http://tuneskit.blogspot.com/2016/08/how-to-crack-drm-lock-from-apple-music.html

How to Share iTunes Audiobooks and eBooks to Others


To share the DRM-protected audiobooks or iBooks to others, you are suggested to use TunesKit iBook Copy or DRM Audiobook Converter for Mac/Windows to remove DRM from the books. The iBook Copy will losslessly make copies of the DRM-ed iBooks by preserving the original metadata, while the Audiobook Converter is able to convert your iTunes audiobooks to MP3 and other formats with ID tags kept. You can visit the following posts to learn how to bypass DRM from iTunes books step by step: http://tuneskit.blogspot.com/2016/03/ibook-drm-remover-tuneskit-drm-ibook.htmlhttp://tuneskit.blogspot.com/2015/03/how-to-convert-itunes-drm-m4b.html.

Best Ways to Remove DRM from Your iTunes Music


As you know, Apple dropped the DRM encryption from its iTunes M4P music tracks in 2009. But the problem is that the songs you purchased before the year of 2009 were still locked by the FairPlay DRM and you can’t freely play them on your non-Apple devices. So have you ever thought about stripping off the DRM from the iTunes music? If so, you should follow these two solutions as below to learn how to easily remove DRM from iTunes music.

Burn iTunes M4P Songs to CD/DVD


The good news is that although Apple doesn’t let you convert DRM-protected iTunes music to MP3, it lets you burn them to a CD. So here the first way to remove DRM from your iTunes songs is to burn the M4P tracks to DVD or CD disc.

1. Create music playlist in iTunes

Insert a blank CD or DVD disc in the drive and open iTunes on your computer. Select the File > New Playlist option. Add a name to the new playlist.

2. Add iTunes songs to playlist

Now select all the iTunes M4P music files that you want to remove DRM from and drag them to the playlist that you just created.

3. Burn iTunes music to CD

Once the tracks are imported to the iTunes playlist, right-click the playlist and select the option “Burn playlist to Disc”. iTunes will now present you a dialogue box where you can select the kind of CD/DVD that you want to burn. Make sure you select the Audio CD option. Then iTunes will start burning the iTunes music to the CD automatically.

4. Import iTunes songs from CD/ DVD

The final step is to rip the songs that you burned onto audio CD, back to digital music files. Simply open iTunes, select the Edit > Preferences > General tab, click on Import Settings. To start ripping the audio CD, you should insert it into your CD drive on your computer and click the Yes button to start.

Wait for a while till the ripping finishes. Now all the files that have been imported into your music library will be free from DRM so that you can transfer them to any MP3 device for playback.

Note: The downside of using this method is that iTunes only lets you burn the same song once. Besides, if you have a lot of music files to burn, it will take a rather long time to finish the whole process. So if you have the need to convert a large amount of iTunes songs for more than once, you’d better use a legal DRM removal tool as mentioned in the following method.

Convert DRM-protected iTunes Music to MP3


The other common way to remove DRM from iTunes M4P is using a third-party DRM removal tool for iTunes. With this method, you can completely and permanently bypass the DRM lock from iTunes songs so that you can transfer the files to any devices at anytime without limit.


Here you meet TunesKit iTunes Music Converter which is designed to kill DRM from the protected iTunes M4P songs and convert the music files to DRM-free MP3, AAC, WAV, and other common formats with ID tags preserved.

Key Features of TunesKit iTunes M4P Converter


  • Remove DRM from protected iTunes and Apple Music songs
  • Convert DRM-ed M4P songs to MP3, M4A, M4B, AAC, FLAC, WAV
  • Work at 30X faster speed with ID3 tags kept
  • Fully compatible with the latest iTunes
  • Guide on How to Remove DRM from iTunes M4P with TunesKit

1. Import iTunes songs to TunesKit


Launch TunesKit DRM M4P Converter and click “Add Files” to load the iTunes M4P files from your library. You are also allowed to add the songs to the converter by drag-and-drop.

2. Set output format


Once the M4P songs are loaded successfully to TunesKit iTunes Converter, you can select the output format as you like, as well as the other settings, such as output folder, bit rate, audio channel, etc. Currently TunesKit iTunes M4P Converter supports MP3, M4A, M4B, AAC, WAV, FLAC outputs.

3. Remove DRM from iTunes music


Now click the “Convert” button and it will begin to convert the DRM-protected iTunes songs to MP3 or other non-DRM formats at 30X faster speed. After the conversion, you’ll get DRM-free iTunes songs playable on any MP3 player without limit.

For more details, you can visit the source page here: http://www.tuneskit.com/apple-music-tips/remove-drm-from-itunes-music.html.

Mar 8, 2017

One Solution to Convert iTunes and Audible DRM-protected Audiobooks to MP3 Format


Love listening audio books? Nowadays, more and more people become interested in audio books as well as e-books. Both of them are more convenient than traditional books to carry with. The difference between them is that audio books enable users to set their eyes free while they are “reading” the content. So, Audiobooks are regarded as the best friends for joggers and bikers who want to keep their mind doing something while their eyes are focusing on the scenery along the way.

Well, we love audiobooks. But how can we search and acquire these audiobooks? There are two mainstream approaches to get audiobooks: Audible.com and iTunes.

Audible.com

Thanks to 100,000 professionally voiced audio books, Amazon-owned Audible.com is probably the most popular consumer choice. AS long as Audible apps are installed on your devices, you can transfer your audiobooks from device to device. It's convenience that costs you in other ways. Due to the audio books are protected by DRM, you're restricted from using non-Audible apps or downloading the file to too many devices at once.

iTunes

You can purchase audio books via iTunes store or iBooks Store. The book resources of iTunes also are abundant and comprehensive. Unfortunately, the audio books are also be DRM protected which means you can't play audiobooks in just any app or Android devices.

Because of DRM protection, even you have paid for those audio books from Audible.com or iTunes, you can only enjoy them on limited devices or apps. That is unfair and inconvenient for you. Actually, you are not alone.

Don't worry, there are some programs that are designed for removing DRM protection can help you. If you're an audiobook buff who has high requirements on quality, TunesKit Audiobook Converter is a fantastic selection for you to strip the DRM from Audible or iTunes.

As a professional audiobook DRM remover, TunesKit Audiobook Converter for Mac can easily convert any DRM-protected audiobooks, such as M4A, M4B, AA, AAX to MP3, AAC, WAV, M4B, M4A and FLAC at super-fast speed with original quality preserved. For example, you can use TunesKit to convert audiobooks from DRM-ed to MP3 that is a standard audio file format for most popular devices and apps, just do as bellow:

Steps to convert audiobooks from DRM-ed to MP3

Step 1. Download and install Tuneskit Audiobook Converter

Depending on your PC system, you can choose Tuneskit Audiobook Converter for Windows or for Mac. Then follow the instructions to finish installing the software.

Step 2. Run and register the program 

Run the program, then use the lifetime license name and code to register the program after you paid for it.


Step 3. Add the file you want to convert

You can drag the target file to the the middle blank area or just click the button"add files" , like this:


Step 4. Customize the the output settings

Click the "gear" icon next to the audiobook to select the output audio format as MP3 format. BTW, there are also other output formats can be selected, like AAC, WAV, M4B, M4A and FLAC. You can also select the output path through click the button at the bottom of the page.

Step 5. Start to convert the audio books

Just click the button "convert" to begin transforming. After a second, you can find the converted files in the output folder. Then please enjoy your audiobooks on iPod, PSP, Zune, Creative Zen, Sony Walkman, iRiver, etc and other mobile phones or tablets.

Just a few simple steps, your DRM-ed audio books can be set free! What's the next, you should download this useful tool!

>>Get TunersKit Audiobook Converter for Mac Here<<

>>Get TunersKit Audiobook Converter for Windows Here<<


Mar 7, 2017

Everything You Want to Know About Apple Music


During the rise of digital music, Apple also introduced its first own streaming music service Apple Music in 2015. As one of the largest streaming music services around the world, Apple Music is regarded as the biggest competitor for Spotify since Apple Music is equipped with many great features and outstanding integration: users don’t need to install extra applications to sync the music tracks on different devices, and if you have a Mac, iPhone, or Apple TV, you can use Siri to control it. By far, Apple Music supports over 110 countries, provides about 40 million songs to its users, has more than 20 million paid subscribers from all over the world.

Perhaps you are considering whether to subscribe Apple Music to keep up with the digital music times, or you are planning to switch from other streaming music platform to Apple Music, you may need to know more information about Apple Music to help you make the decision.

Major Features of Apple Music

There are three major features of Apple music: Apple Music, which lets users to select music to stream to their device on-demand or use an already-existing playlist curated by "music experts"; Beats 1, the service's 24-hour radio station led by DJ Zane Lowe that broadcasts in over 100 countries; and Connect, which allows artists to share "lyrics, backstage photos, videos or even release their latest song directly to fans directly from their iPhone".

How to Become a Subscriber for Apple Music?


If you are first time subscribing Apple Music, you can get access to three month free-trail, and you can sign up your Apple Music account on you iPhone, iPad, iPod, Mac, Android, or PC to enjoy the streaming tracks from the catalog. Once those three months are up, you need to pay $9.99/mo to maintain the streaming music service.

The company also offers family plan to its users to meet multiple requirements, if your family members also like streaming music, you can simply sign up for $14.99/mo family plan and up to six people in your family can use Apple Music. Aside from that, family members also can built their own separate music libraries and playlists.

Does My Device Support Apple Music?

What devices can support Apple music songs?


• iOS devices (running iOS 8.4 or later): iPhone, iPad, and iPod touch.
• Apple Watch 1.0.1 or later.
• Macs and PCs running iTunes.
• Android devices with Apple Music App installed.
• Apple TV.
• Aging iPod touch, the new iPod nano and iPod shuffle are limited to Apple music tracks.
• Sonos system: Sonos app is installed on your iPhone, iPad, or Mac.

In which case you can't enjoy your Apple Music songs?

• You are limited to listen to the Apple Music on up to 10 devices with authorization.
• The iOS devices which run the version lower than V.8.4 also can't get access to Apple Music.
• You won't be able to stream your previously purchased and ripped music to your other devices once you unsubscribe the Apple Music.
• Android devices don't have Apple Music app installed.

Apple's FairPlay DRM on Apple Music Audio Files

Unlike those songs from iTunes, steaming tracks from Apple Music don't really belong to you. It is because songs you purchased from iTunes are all in DRM-free AAC format while your paid Apple Music tracks are all in DRM-loaded M4P format. You can go to your iCloud Music Library to check the status of music tracks that downloaded from Apple Music streaming catalog. Then you will find all your purchased songs from Apple Music are all in this status:


It shows you that all these Apple Music files are stored as 256k AAC (M4P) format files and have FairPlay DRM applied to them. Music files with M4P format are locked by DRM protection which means even you have paid for Apple Music Subscription, you can only have access to limited devices and you are not to own any single songs. What's worse, once you decide to unsubscribe Apple Music, you will loss the access to them forever.

Break The Restriction: Convert Apple Music from M4P to MP3

If you don't want to stand the DRM protection anymore and you want to save these paid Apple Music songs forever without any limitation, you can simply convert Apple Music songs from M4P to MP3 which can be compatible with almost popular media players.

Tuneskit Apple Music Converter is a specific music converter for Apple Music users, it help Apple Music files get rid from DRM protection while converting them into high-quality MP3 files at a very fast speed. TunesKit also meets the requirement of maintaining ID tags in converted music files and is totally clean and easy to use, especially suitable for beginners.

Tips: How to Set Free Apple Music Files to MP3 files?
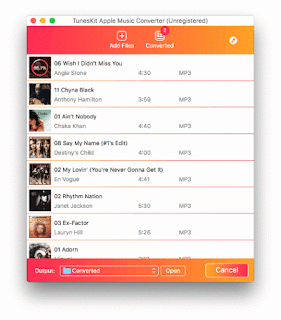

>> Download TunesKit Apple Music Converter for Mac or for Windows;
>> Add Apple Music files by clicking "Add Files" button or directly dragging-dropping the files to middle area;
>> Customize the output format as "MP3" by selecting the output format;
>> Click "Convert" icon to start the conversion, batch conversion also is available.

Only need easy 4 steps, the Apple Music songs conversion to MP3 files will complete in a few seconds. Converted Apple Music are all in DRM-free MP3 format, hence, you have the ability to play the music track on any devices as you like since they actually belong to you.

Also want to learn: How to Convert Apple Music from M4P to MP3?