Jul 23, 2024

How to Fix iOS 18 Beta Battery Drain Issue

With the release of the iOS 18 beta, many users are excited to test out the new features and enhancements. However, as with any beta software, there are bound to be some issues. One common problem that users are encountering is rapid battery drain. This can be particularly frustrating, especially when you're eager to explore all the new updates without being tethered to a charger. In this guide, we'll explore several effective strategies to mitigate battery drain and help you get the most out of your iOS 18 beta experience.

fix ios 18 battery drain issue

Part 1. Why Does My iPhone Battery Drain So Fast After Updating to iOS 18?

Several reasons may lead to your iPhone battery drain fast, and some of the main ones are as follows:

1. iOS 18 beta bugs or system problems. Updating to the most current version iOS 18 beta might cause your iPhone battery to drain faster than usual. Since it brings several significant new features and it is still not as stable as a beta version.

2. Some apps are not compatible with iOS 18. Some apps are not optimized with the new iOS 18 version. Some may still run when you are not using them and even when the screen is off. Besides, your iPhone will always record where you are and monitor your location. All of these make your iPhone battery draining faster.

3. Your battery is unhealthy. A big factor is the battery itself. There may be some problems with the battery of the iPhone. Moreover, there is also the possibility that the battery is damaged.

Part 2. How to Fix iOS 18 Battery Drain Issue?

In this part, we've tested 10 possible solutions to help you solve iPhone battery drain so fast after the iOS 18 update. You can try them one by one and share your experience with us if you have any other questions.

Method 1. One-Stop Solution to Fix iOS 18 Battery Drain Without Data Loss

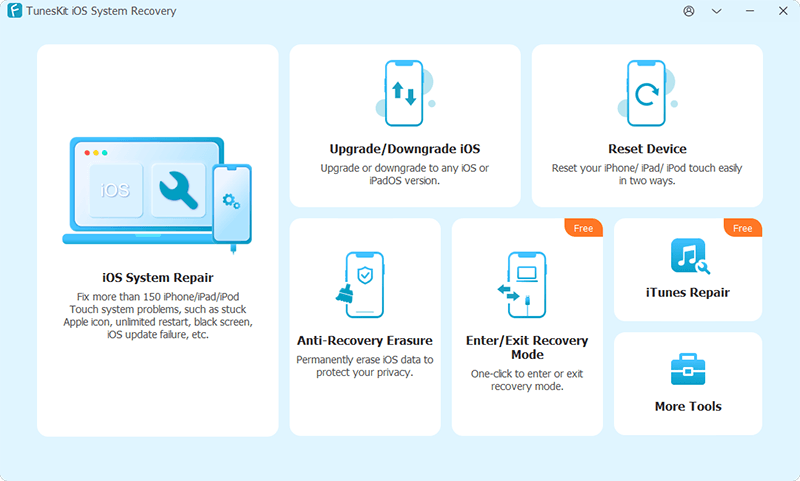
Once your iPhone has some iOS system problems like iOS 18 battery drain issue, I would like to suggest a kind of useful software -- TunesKit iOS System Recovery. This professional software focuses on solving the system errors of the iOS, which supports the latest iOS 18.

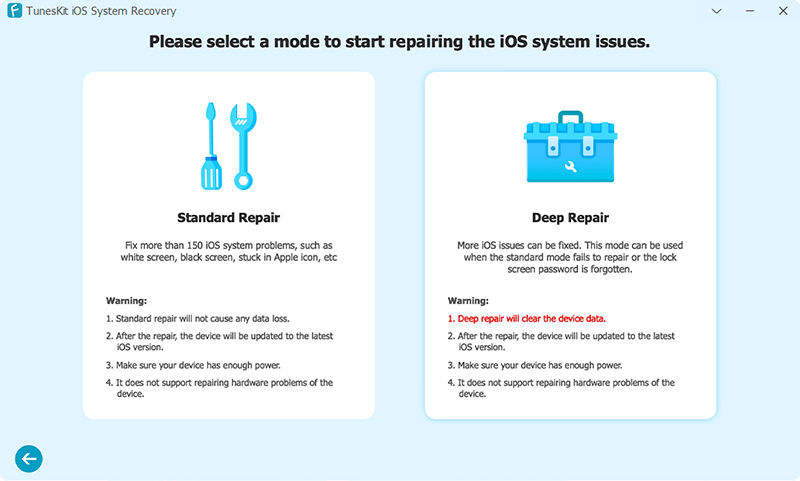
TunesKit iOS System Recovery software can fix 150+ iOS system issues, including iPhone stuck in recovery mode/DFU mode/white Apple logo, or becoming black/blue/frozen/disabled screen, etc. The iOS System Repair feature offers two modes for you: Standard Mode and Advanced Mode. The Standard Mode is to solve some glitches that are usually seen and the Advanced Mode is for more serious issues. Another important feature that you must know is that there is no data loss during the repairing process with the Standard Mode. So, there is no necessity to worry that you have to reset everything on your iPhone.

Only in 3 steps can you fix the iPhone battery drain fast after the update issue using TunesKit iOS System Recovery.

Step 1: Connect iPhone to PC

Connect the iPhone via the USB cable. Start TunesKit iOS System Recovery after downloading it. Then you can choose the "iOS System Repair" option on the main interface. Click "Start".

connect ios device

Choose the "Standard Mode" button and "Next". (If the Standard mode cannot solve your problem, try again and use Advanced Mode. But do remember that the Advanced Mode will clean all data of your iPhone.)

select mode

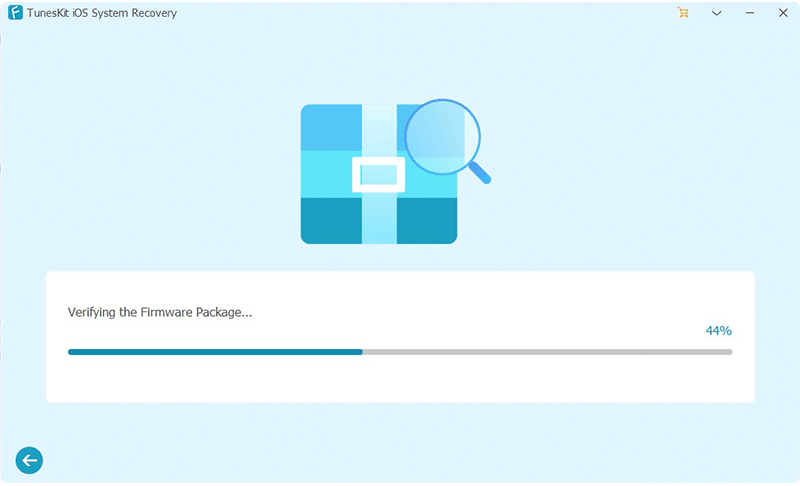
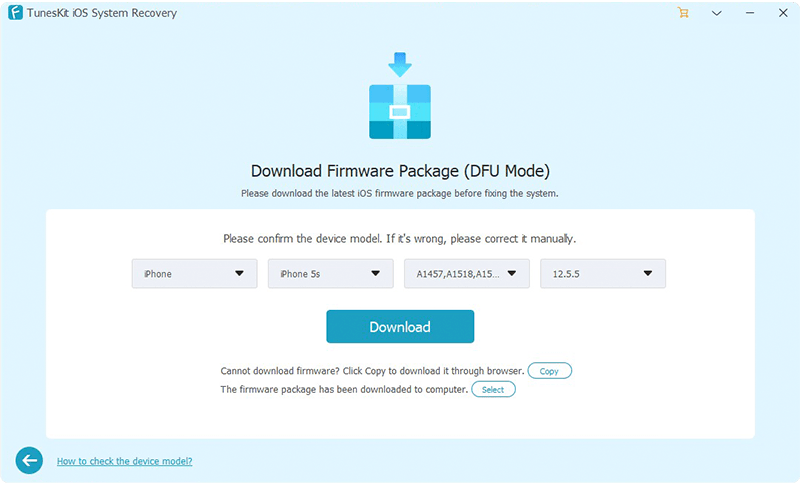
 Step 2: Download Firmware Package 

What you should do now is to confirm that the information on your iPhone presented here is correct. If all is correct, click the "Download" button. If not, you must first edit them and then click the "Download" button to download the firmware package.

download firmware

 Step 3: Fix iOS 18 Battery Drain Issue 

fix ios

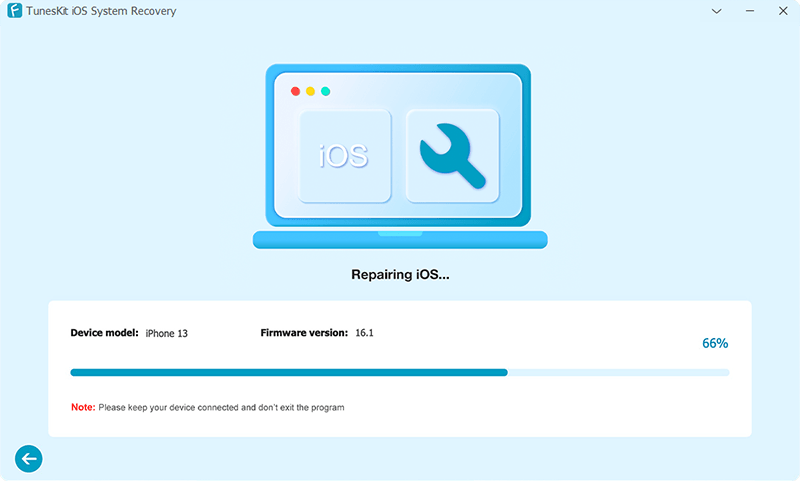
When the firmware is downloaded, just click the "Repair" button, which is the last step. Wait for a while until the process comes to an end.

Method 2. Restart iPhone

In many situations, restarting your device is the easiest solution when we need to fix the iOS 18 battery drain issue. You can follow the quick steps below to restart your iOS device.

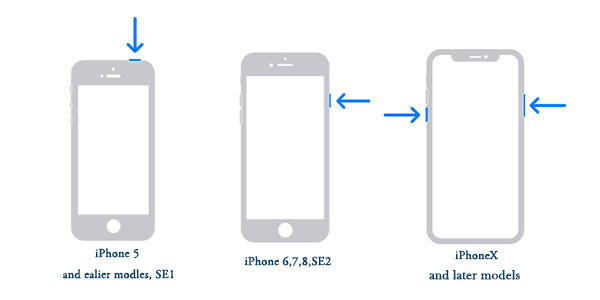
For iPhone X, 11, 12, 13, or Later: Press and hold either the Volume button or the Side button until the power-off slider appears. Drag the slider and wait 30 seconds for your iPhone to turn off. If unresponsive, force restart. To turn it back on, press and hold the Side button until the Apple logo appears.

For iPhone 6, 7, 8, or SE2 or SE3: Press and hold the Side button until the power-off slider appears. Drag the slider and wait 30 seconds for your iPhone to turn off. If unresponsive, force restart. To turn it back on, press and hold the Side button until the Apple logo appears.

For iPhone SE1, 5, or Earlier: Press and hold the Top button until the power-off slider appears. Drag the slider and wait 30 seconds for your iPhone to turn off. If unresponsive, force restart. To turn it back on, press and hold the Top button until the Apple logo appears.

restart iphone

Method 3. Find out the APPs that Drains Battery

If you think the root of iOS 18 battery draining fast is some APPs, you really need to know what they are. Go for Settings > Battery > Battery Percentage. Then you will find some APPs that need a lot of power. If they are not so important, just delete them to extend iPhone battery life.

iphone battery usage

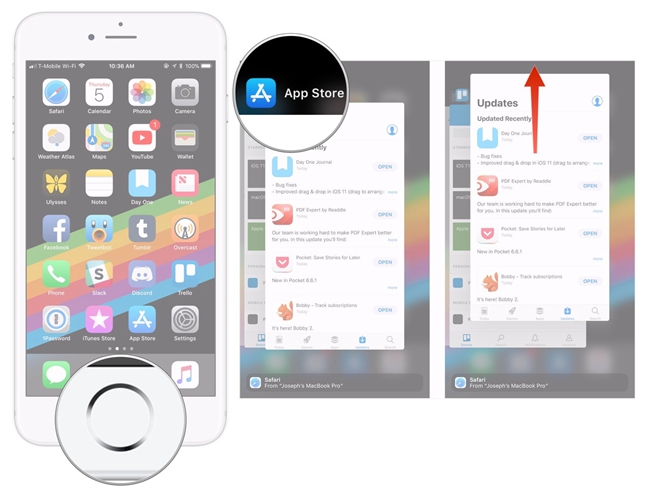
Method 4. Close Apps in Background

When you leave apps on your iPhone, they stay loaded in the background. They'll be available immediately if you wish to utilize them again. However, when applications run in the background of your iPhone, they continue to transmit and receive data, which might cause the iPhone battery to drain fast. There's also a potential they'll crash, causing your iPhone battery to drain rapidly.

Step 1: To access the iPhone app switcher, slide up from the bottom to the middle of the screen.

Step 2: To dismiss an app, swipe up on it and slide it off the top of the screen with your finger.

close background apps

Method 5. Limit Background App Refresh Feature

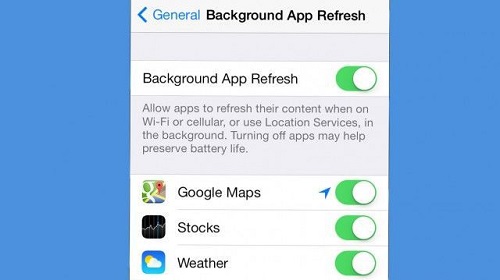
Leaving Background App Refresh enabled for many applications may dramatically deplete your iPhone's battery life since the apps will continually download new data or information using your Wi-Fi or data network connection. We suggest looking through your applications and deciding which ones you want to enable to download fresh material even when you aren't using them.

Step 1: Tap General in the Settings app.

Step 2: Then, choose Background App Refresh.

Step 3: Turn off Background App Refresh by tapping the switch next to the applications you wish to disable.

turn off background app refresh

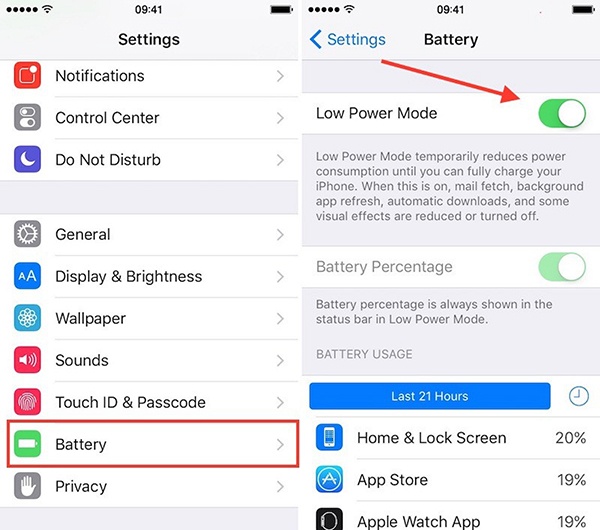
Method 6. Turn on the Low Power Mode

When the iPhone battery drains fast after the iOS 18 update, you are suggested to do something to save more power on the iPhone. Apple offers a Low Poer Mode that can help you. Enabling this feature will reduce the amount of power that your iPhone uses when the battery gets low. Now follow the simple steps to turn Low Power Mode on: go to Settings Battery > Low Power Mode. When the Low Power Mode is on, the battery in the status bar will turn yellow.

turn low power mode on

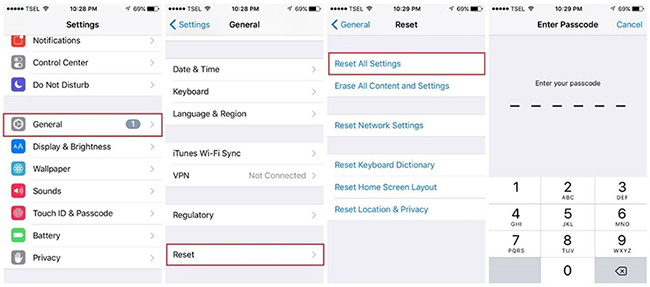
Method 7. Reset All Settings

A useful way to solve the problem of iPhone battery drain fast is to reset all settings of your iPhone. This can also be used in many other problems with the iOS system. But the disadvantage is that you have to reset every setting, which is a little troublesome. Worse still, in this way, you will lose all data on your iPhone. So before resetting, you are suggested to make a backup of your iPhone data. Then just go to Settings > General > Reset > Reset All Settings to fix the iOS 18 battery drain issue.

reset all settings

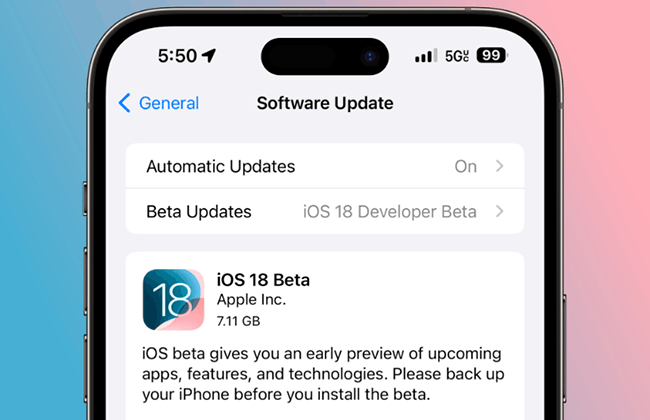
Method 8. Update to the Latest iOS Version

Another thing you should try to fix the iPhone battery drain fast issue is updating your iOS version. If you're using an older iOS 18 beta 1 version, then you can try to update to the latest iOS 18 beta 3. To update your iOS version, follow these steps:

Step 1: Go to Settings and navigate to General.

Step 2: Now, click on Software Update to proceed.

Step 3: If the update is available, click on Beta Updates > Update Now to upgrade your iOS version.

If the problem still exists after updating, you can reinstall the iOS 18 beta, or wait for the next iOS update.

update ios system version

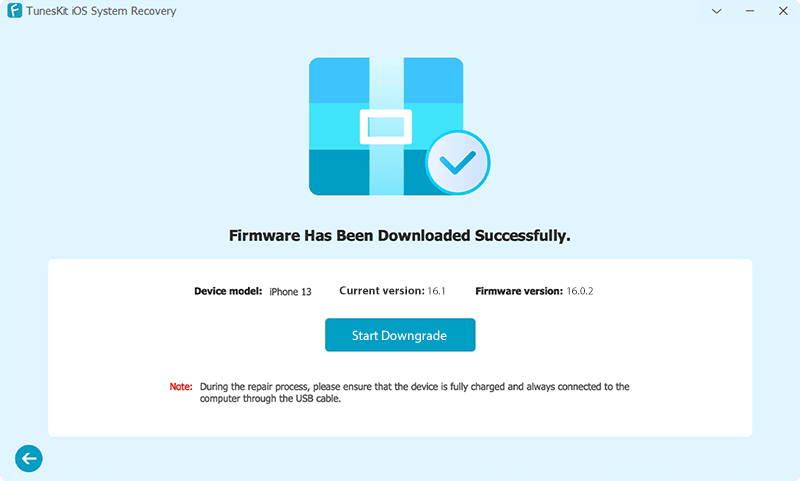
Method 9. Downgrade iOS 18 Beta to 17

Since the battery in iOS 18 beta is not the most optimized, you can try to downgrade from iOS 18 to the previous stable iOS 17 version. TunesKit iOS System Recovery also works as a powerful iOS downgrade tool. It can help you downgrade from the iOS 18 beta to the previous version you want. The process is quite simple, and all can be done in a few clicks.

Step 1: Launch TunesKit iOS System Recovery and connect your iPhone to the computer with a USB cable.

Step 2: After your device is detected by TunesKit, choose the Upgrade/Downgrade iOS option.

Step 3: Next, choose iOS downgrade > Download > Start Downgrade and wait for the process to end. Your iPhone will be downgraded to iOS 17 successfully.

downgrade ios 18 to ios 17

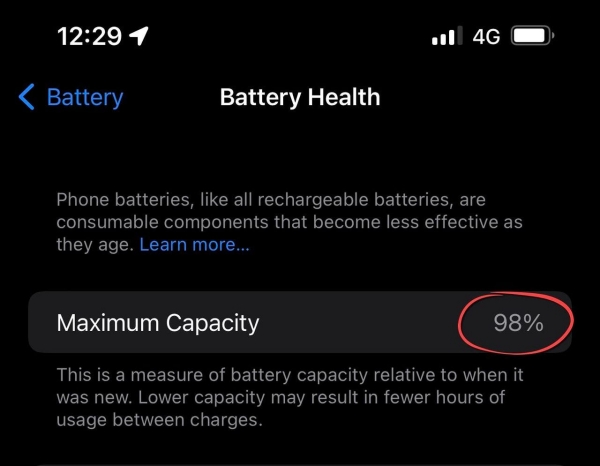
Method 10. Check Battery Health or Change the Battery

When you find that your battery is not healthy anymore, you just need to change it for a new one. To figure out whether your battery is healthy or not, you can check the Settings of your iPhone. It is so easy to find the Battery button, and then choose the Battery Health button. Your battery is unhealthy if you find the Maximum Capability is below 80% and the Peak Performance Capability does not show "Your battery is currently supporting normal peak performance".

check iphone battery health

Wrapping Up

Addressing battery drain issues in the iOS 18 beta can significantly enhance your overall experience with Apple's latest software update. By following the tips outlined in this guide, you can fix the iOS 18 Beta battery drain issue quickly and easily. If you encounter any other iOS error, do not hesitate to choose TunesKit iOS System Recovery. It offers a seamless way to fix system glitches without data loss, ensuring your device runs smoothly.

This article was first published on the TunesKit websitehttps://www.tuneskit.com/ios-18/ios-18-battery-drain-fix.html

May 31, 2024

iRepair Review: Does It Repair My iOS Devices Safely?

 Apple devices are a salient part of our daily lives. These devices are used for various purposes, from communication to entertainment, from work to personal management. However, it's not uncommon for devices to malfunction or break. This is where the iRepair service comes into play, it provides vital repair solutions for iPhone, iPad, and iPod Touch devices. In this article, we'll review iRepair to help you determine if it's the best choice for device repair. We'll explore the pros and cons of using iRepair and consider important factors such as data security during the repair process. By the end of this iRepair review, you'll have all the information you need to decide if iRepair is the right solution for you.


Part 1: What is iRepair?

iRepair is a service that offers repair solutions for Apple devices, including iPhones, iPads, and iPod Touch. It addresses a wide range of issues such as screen damage, battery problems, water damage, hardware malfunctions, and software glitches.

iRepair can find out everything that's wrong with your device, including testing all the buttons, WIFI, Bluetooth, and speakers. But you'll need to back up your device as much as possible, and while repairs with iRepair don't require clearing your device, they're not liable if any data is lost. You can drop your device off at your nearest store or post it to iRepair, who will diagnose all faults and agree with you on what needs to be repaired and how much it will cost. Most repairs are completed within 60 minutes. All repairs come with a 6-month warranty.

Part 2: Pros and Cons of iRepair

In this section, We will do a comprehensive iRepair review by analyzing its pros and cons.

Pros

1. Convenience:

iRepair services offer the ease of fixing your device without having to visit a store physically, with many providers offering mail-in or on-site repair options.

2. Wide Range of Services:

iRepair covers a variety of issues, including screen replacements, battery replacements, water damage repairs, hardware fixes, and software troubleshooting.

3. Quick Turnaround:

Many common repairs, like screen or battery replacements, can be completed within a few hours or the same day, minimizing downtime for the user.

4. Professional Expertise:

Certified technicians with experience in handling Apple devices ensure that repairs are done correctly and efficiently.

5. Cost-Effective:

Compared to replacing a damaged device, repairing it is often much cheaper. Third-party repair services also offer competitive pricing compared to authorized Apple service centers.

6. Data Preservation Options:

Many iRepair services take steps to protect your data during the repair process, though backing up your data is always recommended.

7. Warranty on Repairs:

Reputable iRepair providers offer warranties on parts and labor, providing peace of mind regarding the quality and durability of the repairs.

Cons

1. Potential for Data Loss:

Despite precautions, there is always a risk of data loss during the repair process. It’s crucial to back up your data before any repair.

2. Variable Quality:

The quality of repairs can vary widely between different service providers. Using non-genuine parts can affect the longevity and performance of your device.

3. Higher Costs at Authorized Centers:

While authorized Apple service centers provide high-quality repairs using genuine parts, they tend to be more expensive than third-party providers.

4. Warranty Issues:

Getting your device repaired at an unauthorized service provider can void your Apple warranty, which might be a significant concern for newer devices still under warranty.

5. Availability of Parts:

For older models, finding the right parts can be challenging, and in some cases, third-party providers might use refurbished or lower-quality parts.

6. Security Concerns:

Handing over your device to a third-party repair service might raise concerns about data privacy and security, especially if the provider is not well-known or reputable.

7. Potential Delays:

For more complex repairs or if specific parts need to be ordered, the repair process can take longer than expected, leading to inconvenience.

 Part 3: Top alternative to repair iOS Devices by yourself and keep data intact

If you’re concerned about losing your data during the repair process, TunesKit iOS System Recovery offers a risk-free alternative to traditional iRepair services. This tool ensures that your data remains intact while fixing a wide range of iOS issues. Moreover, it has a user-friendly interface that is quick to get started even for novices. It can fix iOS issues such as the iPhone stuck in the boot loop, a blue line on the iPhone screen, and AirDrop not working on the iPhone, etc. One of the highlights of this software is that you can perform the repairs from the comfort of your home, and it saves the time and effort of bringing your iDevices to a brick-and-mortar store for restoration.

Now let's cut the crap. Follow these 4 steps to fix your iOS Device without any hassle.

Step 1. Connect your device to PC

Download and install TunesKit iOS System Recovery on your Windows or Mac computer, and open this program. Connect your iPhone or iPad to your computer with a data cable. Choose iOS System Repair on the main screen. Hit the Start button to move to the next step.


Step 2. Opt for Standard Repair

Two repair modes are available for you. Choose Standard Repair and you can repair your iOS device in one click without losing data, choose Deep Repair and it will erase all the data of your device after the repair is completed. It is recommended that you select Standard Repair first and then Deep Repair if it doesn't work.


Step 3. Acquire the right firmware package

This program will automatically recognize your device model and system version, and you can select the appropriate firmware version from the drop-down menu and click the Download button to start the download of the latest firmware package.


Step 4. Fix your iDevice without data loss

Once done downloading the firmware package, click on the Repair button and this program will start fixing all the problems on your iOS device automatically. Wait patiently for the progress bar to finish and when it is done, click on the Finish button on the software screen, which means your iOS device has been successfully repaired.


Part 4: FAQs about iRepair

1. Is my data safe during the iRepair process?

While iRepair services strive to protect your data, there is always a risk of data loss during the repair process. Before you send your device for repair, it is recommended to make a backup of your data.

2. Are iRepair services available for older Apple devices?     

Yes, iRepair services are available for a wide range of Apple devices, including older models. However, the availability of parts for very old models may be limited, so it’s best to check with the service provider.

3. How much does an iRepair service cost?

The cost of iRepair services varies based on the type of repair, the parts used, and whether the service is provided by an authorized Apple repair center or a third-party provider. It’s best to get a quote from the service provider before proceeding.

4. How long does an iRepair typically take?

Repair times can vary depending on the issue and the provider. Common repairs like screen or battery replacements can often be done within a few hours or the same day. More complex repairs may take longer.

Conclusion

Thats all about the iRepair review. Although iRepair offers a convenient way to fix common issues with iPhone, iPad, and iPod touch, the potential risks, such as data loss, need to be considered. TunesKit iOS System Recovery is an ideal solution with its Standard Repair feature for those seeking the safest repair method without losing the device's data. It takes less than 10 minutes to fix your iOS device in one click and get your device back to normal. It also allows you to maintain complete control over the repair process, ensuring a worry-free experience. Download it now to enjoy the ultimate experience it brings you.


May 29, 2024

How to Fix Allow Apps to Request to Track Greyed Out?

If you’ve noticed that the option to "Allow Apps to Request to Track" is greyed out on your iPhone, you’re not alone. This feature, introduced in iOS 14.5, allows users to control whether apps can request permission to track their activity across other companies' apps and websites. However, there are several reasons why this option might be inaccessible. But fret not, in this post, you will learn full reasons and solutions for allow apps to request to track greyed out issue. Keep reading to discover more!


 Part 1: Why does it allow apps to request to track greyed out?

There are some reasons why the 'Allow Apps to Request to Track' option was greyed out, such as:

1. You have a child account or are under 18 years old based on your birth year, and you're signed in with your Apple ID.

2. Your Apple ID is managed by an educational or business organization.

3. Your device is managed and uses a configuration profile that restricts tracking.

4. Your Apple ID was created within the last 3 days.

5. If your device is running iOS 14.5 or earlier, this setting may not be available or may be grayed out. This is because this feature is exclusive to iOS 14.5 and later.

6. Sometimes, internal iOS glitches or errors can also cause this option to be grayed out.

Part 2: How to Fix allow apps to request to track greyed out?

Now let's explore the following 6 ways to fix this issue with ease.

Solution 1: Fix iOS system glitches and bugs via TunesKit iOS System Recovery

As analyzed in the reasons above, software glitches or bugs within iOS may make allow apps to request to track grayed out. In this case, you should address the iOS system error first. How can I fix the iOS system in one click and keep my device’s data intact? It is recommended to utilize TunesKit iOS System Recovery, an all-in-one tool that can help you fix 150+ iOS issues on iPhone/iPad/iPod touch. For instance, it can fix an iPhone stuck in a boot loop, an iPhone black screen but still on, and apps that keep crashing after the iOS 17 update, etc. No matter what the iOS error is, it's got you covered!

Step 1: First of all, you are required to download and install this program on your Windows or Mac computer. When it is done, run this program and attach your iPhone/iPad to your PC using a USB data cable. Choose iOS System Repair on the main screen, and then on the next page, various device system problems will be listed. It doesn't matter if your iOS error isn't on the list, just click Start to continue.

connect iphone to PC

Step 2: Here are two repair modes for you to choose from. Standard Repair will fix your iOS device without losing data and Deep Repair will erase all the data after repairing. It is recommended that you choose Standard Repair first and if it doesn't work, then choose another repair mode.

select standard mode

Step 3: TunesKit will automatically detect your device information such as device model, and iOS version. Select the appropriate firmware package and click the Download button to download and verify the firmware package.

download firmware package

Step 4: Once you have finished downloading the firmware package, click on the Repair button. This software will automatically start fixing all the problems on your iOS device. After the fix is done, your device will reboot and you can check if this issue has been resolved.

start to fix allows apps to request to track greyed out

Solution 2: Use a different Apple ID

You can try to use a different Apple ID to fix and allow apps to request to track greyed-out issues. This method is effective when your Apple ID is managed by a school, switching to an Apple ID not managed by an educational institution can make the "allow apps to request to track" feature work well, and you can enable or disable it again.

If this approach does not resolve the issue, feel free to explore other solutions provided below.

use a different apple id

Solution 3: Reset Privacy Settings

You can try resetting your device's privacy settings to allow apps to request to track greyed-out issues.

Step 1: Go to Settings > General > Transfer or Reset iPhone > Reset > Reset Location & Privacy Settings. Enter your lock screen passcode and Screen Time passcode to confirm, then in the pop-up box prompt, click Reset Settings to confirm your action.

Step 2: This will reset your device's location privacy settings to their default state, which may help resolve the issue.

reset location and privacy settings

Solution 4: Disable restrictions

If the "Allow Apps to Request to Track" setting is greyed out, it's likely that your device's Restrictions are enabled and preventing you from changing this setting.

To disable Restrictions, go to Settings > Screen Time > Content & Privacy Restrictions and turn off the "Content & Privacy Restrictions" toggle. You will need to enter the screen time password to affirm this operation.

disable restrictions

Solution 5: Delete configuration profiles

If you have a configuration profile installed on your device, it may be responsible for the "Allow Apps to Request to Track" setting being greyed out.

Go to Settings > General > VPN & Device Management and check if there are any installed profiles. If so, remove the profile and see if that resolves the issue.

delete configuration profiles

Solution 6: Contact Apple Support for assistance

If none of the above ways work, there may be a more complex issue with your device's settings or configuration. In such cases, you may need to contact Apple Support for further assistance.

contact apple support for assistance

Conclusion:

In conclusion, encountering the "Allow Apps to Request to Track" greyed out on your iPhone can be frustrating, but in this post, you can try these 6 ways to resolve this issue. If you don't want to try a complicated solution, choose TunesKit iOS System Recovery, which has a user-friendly interface and can help you solve this problem in just four simple steps.

This article was first published on the TunesKit website: https://www.tuneskit.com/ios-repair/allow-apps-to-request-to-track-greyed-out.html


May 23, 2024

[Windows & Mac] How to Custom IPSW Bypass iCloud Download?

 IPSW files are commonly utilized for upgrading iPhones, iPads, and iPods to a newer version. These files with IPSW extensions contain Apple Software Update files that can be used for upgrading iDevices. Although an unlocked iOS device is required to install an update using the IPSW file, many individuals are interested in whether it's feasible to install IPSW without iCloud activation. In this guide, we will guide you on how to custom IPSW bypass iCloud download, even if you are unable to proceed past the iCloud activation screen.


Part 1. Is It Possible to Custom IPSW Bypass iCloud Download?

Yes, bypassing the iCloud activation lock and downloading an IPSW file without going through the standard process is possible. While Apple is known for its robust security measures, there are certain workarounds that users can leverage. However, it's important to note that this method is highly complex and carries significant risks. Therefore, it's crucial to proceed cautiously and carefully follow the necessary steps.

Part 2. How to Custom IPSW Bypass iCloud Download?

The process of creating a custom IPSW varies between Windows and MacOS. Below, we will guide you on creating a custom IPSW to bypass iCloud activation on your iPhone. See the below detailed guide.

For Windows users:

Step 1: Obtain the corresponding IPSW file on your computer and change the file extension to .zip.

Step 2: Extract the contents of the zip file. You will find files with a .dmg extension that need to be decrypted.

Step 3: The decryption process requires a key, which you can find on the " The iPhone Wiki" website.

Step 4: Locate the largest .dmg file and copy it to your desktop.

Step 5: Use decryption software and the "Root Filesystem" key from The iPhone Wiki to decrypt the .dmg file.

Step 6: Once decrypted, the file will be saved on your desktop. Open the decrypted folder and navigate to the "Applications" folder.

Step 7: Find the "setup.app" file and delete it.

Step 8: Save the decrypted file.

Step 9: Use the same key to encrypt the file.

Step 10: Rename the encrypted file to match the original .dmg file name, then replace the original.

After following the previous steps, you have now successfully created a custom IPSW file on your Windows computer. The final step is to compress the file and change the file extension to ".ipsw" to create the final custom IPSW file.

For Mac users:

This process is only compatible with 32-bit systems, and it differs significantly from the steps you would follow for Windows.

Step 1: To begin, download the IPSW file from the official website.

Step 2: Next, change the file extension to .zip and extract the contents.

Step 3: Upon extraction, you will find 3 .dmg files.

Step 4: Identify the largest file and move it to the desktop. This file is encrypted and cannot be opened as is.

Step 5: To decrypt it, you will need the firmware key, which can be found on "The iPhone Wiki" website.

Step 6: Once you have the key, use the decrypt application on your Mac to decrypt the .dmg file.

Step 7: After decryption, a warning message will appear; click OK and select the output folder, then paste the key for "RootFilesystem."

Step 8: Click "Decrypt DMG" and wait for the process to complete.

Step 9: A success message will indicate that the decryption is finished.

Step 10: Open the IPSW file after decryption and locate the application folder. Delete the "Setup" file from this folder.

Step 11: After completing these steps, exit the current folder, right-click on the decrypted file, and select "Eject."

Step 12: Once the file is saved, delete the original and rename the new decrypted file to match the original.

Step 13: Return this file to the previously extracted folder.

Step 14: Finally, compress the file back to IPSW in this last step.

Part 3. How to Bypass iCloud Activation Lock without IPSW?

After reading the above steps on how to customize IPSW bypass iCloud download, do you think there are too many steps and difficult to follow? No worries, here's an easier solution for you. Utilize TunesKit Activation Unlocker, a professional and efficient tool that can help you quickly bypass the activation lock in one click. It comes with a user-friendly interface, even if you are a novice, you can easily use this software. It works on a wide range of systems including iOS 12.0 - iOS 16.7. It is compatible with iPhone/iPad/iPod touch, you can bypass an iDevice that’s stuck at the activation lock screen within 15 minutes.

Step 1: First and foremost, you need to download and install TunesKit Activation Unlocker on your computer, and then launch it. Connect your iPhone to your PC using a USB cable. Select Remove iCloud Activation Lock on the main interface, and on the next page, you ought to read the note and disclaimer, after confirming, just click the Start button to continue.

tuneskit activation unlocker interface

Step 2: To successfully remove the iCloud Activation Lock, you need to jailbreak your iOS Device first. For different iOS/iPadOS versions, and the different brands of computers (Windows & Mac), the jailbreak process differs. You can follow the on-screen tutorials and the reference links below to complete your device jailbreak.

jailbreak your device to bypass activation lock

Step 3: After completing the jailbreak, you need to restart this software to confirm your device information such as system version, IMEI, Serial Number, UDID, etc. Now you can click the Start to Remove button. This program will automatically start the process of removing the activation locks. Wait patiently and click the Done button on the screen. This time your iPhone will reboot and you can reset your iPhone just like setting up a new device. And there are no limitations on functionality.

bypass ativation lock via tuneskit

Final Word

It is feasible to obtain a custom IPSW for bypassing iCloud download. We have explored the methods for creating a custom IPSW on Windows and Mac computers. However, these approaches have numerous limitations. Therefore, we suggest using TunesKit Activation Unlocker, a reliable and professional software with a high success rate.

This article was first published on the TunesKit websitehttps://www.tuneskit.com/unlock-icloud/ipsw-without-icloud-activation.html

May 17, 2024

A Full Review of LockedToOwner Com

If users encounter difficulties accessing their existing Apple ID for any reason, bypassing the iCloud activation lock becomes a pressing issue. As a result, many users look for ways to bypass iCloud locks, and one potential solution is LockedToOwner.com. However, it's important to be careful when considering this service. To help you decide whether to use LockedToOwner.com, this article will explore its features, answer common questions, and offer a recommendation for the top alternative tool.

lockedtoowner com reviewPart 1. What Is LockedToOwner.com?

LockedToOwner.com is a website that offers services to help users unlock their iPhones, iPads, or Apple Watches that have the iCloud Activation Lock enabled. The website claims that their service is compatible with various models of Apple devices, including the latest models and versions. To use this service to bypass the Activation Lock without the password or the previous owner, you need to enter the phone IMEI number.

The LockedToOwner.com service, like any other online service, should be approached with caution. You should only provide your device and sensitive information after thoroughly researching the company, reading reviews, and understanding the potential risks involved. It's important to conduct in-depth research before entrusting your personal information to such a service. Now let's look at the pros and cons of this service.

Part 2. Does LockedToOwner.com Work?

To use this service, you will need the IMEI or Serial Number of your Apple device. Here are the steps to bypass the Activation Lock using LockedToOwner.com:

Step 1: Visit LockedToOwner.com and select the Apple device you want to unlock (iPhone, iPad, or Apple Watch).
Step 2: Enter the IMEI or Serial Number of the device.
Step 3: Provide your name and email address, agreeing to the privacy policy.
Step 4: Obtain your Unlock ID and follow the instructions provided, such as watching a video or downloading content, to remove the iCloud lock.

how to use lockedtoowner com

Based on users' feedback, there is a possibility that the success of using LockedToOwner.com to bypass the Activation Lock may not be guaranteed. Many users have reported that their devices remained locked and no effective solution was provided.

Part 3. Is LockedToOwner.com Legit?

LockedToOwner.com is considered questionable in terms of safety and legitimacy. The website has been reported as a scam due to fake domain registration information and a lack of operational details. The payment portal is unreliable, and there are suspicions of deceptive practices supported by false TrustPilot reviews. The contact email ID and phone number provided are fake, indicating a lack of transparency. Users have reported being misled by positive reviews, many of which are suspected to be from fake accounts. Subscribing or enrolling for their services may result in unauthorized charges, even after termination. It is recommended to exercise caution and avoid this website to protect your safety and avoid potential risks.

lockedtoowner com reviews

Part 4. Best Alternative: TunesKit Activation Unlocker

LockedToOwner.com may not deliver the desired results as expected. If you are seeking an iCloud unlocking tool with a high success rate, TunesKit Activation Unlocker is strongly recommended. This tool has garnered immense popularity among users for its remarkable efficiency.

TunesKit Activation Unlocker is a professional computer-based program that could bypass iCloud Activation Lock on iPhones running from iOS 12 to iOS 16.5 without requiring the Apple ID and password. It is compatible with both Mac and Windows operating systems. Additionally, it allows you to remove the Apple ID without a password, disable Find My, and unlock the iPhone in Lost Mode. With its user-friendly interface, you can easily resolve these issues even without advanced technical skills.

Step 1: Download and run the TunesKit Activation Unlocker on a computer, then connect your device to it using an original cable. Once connected, simply click on the Start button to proceed.

tuneskit activation unlocker interface

Step 2: Follow the provided jailbreak tutorial. After the jailbreak process has been finished, click on the restart button to reboot your computer.

jailbreak ios device

Step 3: After restarting your computer, launch TunesKit Activation Unlocker again. It will initiate the iCloud unlock process and efficiently bypass the Activation Lock on your device.

remove activation lock without previous owner

Conclusion

Well, now you should know everything about LockedToOwner.com. Since its limitations, the iCloud online unlock tool from LockedToOwner.com is not the best choice for bypassing the iCloud activation lock. Therefore, instead of wasting time on an uncertain solution, I suggest using TunesKit Activation Unlocker. It offers a reliable and effective solution to bypass the Activation Lock and regain access to your device with ease. Download it now to enjoy its great features.

This article was first published on TunesKit websitehttps://www.tuneskit.com/unlock-icloud/lockedtoowner-com-review.html