In a time-lapse video, you can watch the sunrise to sunset in a matter of minutes or even seconds. If you are new to the video editing field, you may think it is a difficult job to make it. In fact, you can make a time-lapse video easily with this tutorial. Let’s see how to make it step by step.
Capture
a time-lapse video
In
2021, most of us can capture a time-lapse video easily. But if you need to
capture some wonderful or great time-lapse videos, there is something essential
for us to know.
Confirm your device
If
you are going to capture a video as the moment you see or events happen, you
need a device that has the built-in time-lapse feature. Nowadays, the phone you
are using or a professional DSLR camera can capture a wonderful time-lapse
video. You can use them to capture a time-lapse video easily.
Confirm the subject
Confirm that your device comes with a time-lapse capture
feature. Then capture the subject under time-lapse mode.
Stars movement is one of the classic time-lapse
recordings. Besides, sunrise and sunset, cloud movement, flower blossoming,
city lights are also popular among time-lapse recordings. Capture a time-lapse
video will cost a lot of time, before capturing it, get familiar with the area.
If you are heading for the best quality, you should
prepare a tripod to stabilize your camera or phone. Don’t forget to record it
in nice weather, this is crucial.
Use TunesKit AceMovi Video Editor to make a time-lapse
video
What should we do that we are trying to convert a normal
video to a time-lapse video? This method for you to make a time-lapse video
without the requirement of professional devices but just a computer, video
editing software, and the video file you would like to edit. I think that
TunesKit AceMovi Video Editor can be the best choice for you, it is a
comprehensive video editing tool that comes with several features for you. You
can use it not only to make a time-lapse video but also can add transitions to videos,
bleep a video, add captions to video, etc. TunesKit develops both Mac and
Windows versions. And it can deal with videos with different formats, including
MP4, M4V, MOV, MKV, MPG, etc.
Let’s see the step-by-step guide to make a time-lapse
video.
Step
1. Import video file
Hit the File button, you can import your video media by
clicking the Import media tab or drag and drop the video file to the TunesKit
AceMovi media library.
Step
2. Add video to the track
Then, drag the video you added and drop it to the track.
Find the speed button, which looks like a lightning bolt. With this feature,
you can change the speed of the video.
Step
3. Speed up your video
To make a time-lapse video, speed up the video can finish
it. Tap the Speed icon and then select Fast. There are 2X, 4X, 8X, 20X, 50X,
and 100X you can choose from. Or you could click the Speed Custom to change the
speed to what you want. What’s more, if you are trying to speed down your
video, you can use click the Slow tap and slow down your video.
Step
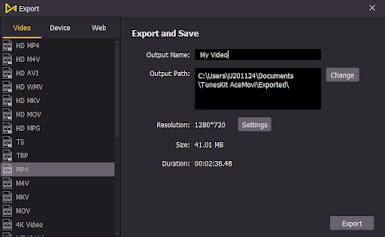
4. Export your video
When the editing is finished, it’s time to enjoy your
time-lapse video. Click the Export button to export your video. TunesKit
supports you to export the video in most formats. You can choose formats, file
name, location, and resolution in this pop-up window.
Final word
TunesKit AceMovi Video Editor is a better choice for
normal users. As computer software, you can make a time-lapse video at home
easily. Not only to make a time-lapse video, but TunesKit can also add a filter
to the video, add animation to video, merge video files. You can edit your
video files in several steps without expertise requirement.
Read more: How to Make a Cinematic Video?


No comments:
Post a Comment