Showing posts with label TunesKit iOS System Recovery. Show all posts

Dec 30, 2021

Fix Safari Keeps Crashing on iPad: Try These Effective Solutions

Apple devices ship with the Safari browser by default. Safari is a powerful browser that integrates the newest features and security protocols. However, you may still experience quite a few scenarios when Safari keeps crashing on your iPad.

Using the Safari browser for quite a while, I've noticed that random crashing of the browser on my iPad stutters the web browsing experience. I was surprised to find that some of my friends were experiencing the same problem. Our research led to a few reasons behind this safari crashing issue as well as a few solutions that can help fix it.

Way 1: Force Quit Safari App

To fix the Safari crashing issue, the first yet usual thing you can do is to force quit the Safari app on your iPad. This action will not cause bad results to the app. To do this, you need to open the app switcher on the iPad screen first. For detailed steps, refer to the information below,

Step 1: Double-press the Home button, or swipe up from the bottom edge of the Home screen (for iPad with Face ID). Then, you will see all app cards on the screen.

Step 2: Find the card showing Safari, and then swipe up on the card. To re-open the app, just tap the app on the Home screen.

Way 2: Clear Safari History and Data

In most cases, a simple close of the app may not fix the iPad safari keeps crashing error. If this is true for you, do not worry and there are other solutions. In this part, you can learn how to erase Safari history to fix the issue.

To clear Safari caches, you need to tap the Settings app → Clear History and Website Data. Next, the iPad will ask you to confirm the option, and you need to tap Clear History and Data. After this, check if the iPad Safari keeps crashing and turns normal.

Way 3: Close Safari Tabs

Some settings about Safari will be an obstacle to the sound operation. Trying to close the Safari tabs is also proper. To close all tabs, open the Safari app on the iPad. Second, tap the two square icons on the Safari interface. Last, choose Close All [number] Tabs.

Way 4: Force Restart iPad

A hard restart of your iPad is also a well-known way to fix iPad or app glitches. If you decide to force restart the device, do not worry that your iPad data will be erased. As for how to force restart iPad, visit the following steps

For iPad with Face ID: You should quickly press and release the volume up button, and then the volume down button. Next, press and hold the Power button until the Apple logo occurs. Last, wait for the iPad to restart by itself.

For iPad with Home button: Press and hold the Power and the Home buttons together until the Apple logo appears.

Way 5: Repair iPad via iOS Repair Tool

In this part, we are going to introduce a more advanced way. That is to say, using iOS system recovery software always works. If you think the Safari crashing on iPad issue is severe, you need such a tool. Both iOS bugs or app crashing errors can be solved by this kind of tool. Here, TunesKit iOS System Recovery is a reliable option.

TunesKit iOS System Recovery, a desktop program, is a toolkit for repairing over 150 iOS-related issues, like Spotify crashing, iPad boot loop, screen blurry, etc. With a few steps and no data loss, you can fix the Safari that keeps crashing on iPad. In addition, you can also use the program to enter/exit recovery mode with one click or downgrade iOS. Almost all Apple devices including iPad, iPad, iPod, and Apple TV are the target of repair.

Characteristics of TunesKit iOS System Recovery:

• Fix iPad Safari keeps crashing without data loss

• Repair different tvOS/iOS issues by yourself

• Provide Standard Mode and Advanced Mode

• Easy to use with a friendly interface

Here, we are going to show you how to use TunesKit to fix the app crashing issue.

Step 1: First, open and launch TunesKit on your computer. Then, take out a USB to connect the device to the cable port of the computer. After seconds, TunesKit can detect the device. After this, click the Start button.


Step 2: Second, you need to decide on a repair mode between the Standard and the Advanced modes. We highly recommend the Standard Mode. But if you'd like to choose the Advanced, make sure that you have backed up the data.

Step 3: The final step is to download a firmware package by clicking Download on the next interface. After the firmware is complete, click the Repair button to fix the iPad Safari keeps crashing error.

Way 6: Disable Safari Suggestions

Turning off the Safari Suggestions is also feasible. If you want to take this measure, just go to Settings → Safari → Safari Suggestions. Turn off the toggle beside the options to turn it grey. After completion, this should fix the iPad Safari keeps crashing issue.

Way 7: Turn off Safari JavaScript

JavaScript is a programming language. And if it is not written well, it may make trouble. So you can try to disable the option. Go to Settings → Safari → Advanced → JavaScript. After this, the Safari keeps crashing on iPad issue should be resolved.

Way 8: Disable Syncing Between iCloud and Safari

Normally, iCloud can store all your Safari data if you make the sync. Sometimes, this may be a factor in the crashing issue. To do this, please follow the steps to be described. But you should know that if you turn off the sync, the iCloud will not back up the Safari data.

Step 1: Open the Settings app. Then, you will see the Apple ID name and just tap the options.

Step 2: Next, tap the iCloud option, scroll down to find the Safari button. You need to disable the button to disable iCloud sync.


The Bottom Line: Safari Crashing on iPad

With that said, we round off this guide on fixing Safari keeps crashing on iPad. These solutions helped me and my friends to fix the annoying Safari crashed error on iPad and I’m sure one of these will surely fix your problem. Most of the problems caused by software errors can rely on the TunesKit iOS System Recovery. That’s all for this guide. Hope it helps you resolve your Safari crashes problem. And let us know your thoughts and also share your experience.

Its source comes from: https://www.tuneskit.com/fix-ios/ipad-safari-keeps-crashing.html

Dec 29, 2021

How to Easily Fix iPad Screen Flickering [Ultimate Guide]

Although today's iPad is considered to be one of the best digital devices in the world, it comes with a number of technical issues as well. Several users have complained that their iPad screen flicker on and off after prolonged use. There can be no doubt that it is very inconvenient for users. The following are practical solutions that will assist users in finding a solution as quickly as possible.

How to Fix iPad Screen Flickering


Video Tutorial: 

First of all, we'd like to give you a short video to learn how to fix the issue easily. In the next section, more detailed information will be shown.

Method 1: Force Restart iPad

Rebooting is one of the most common fixes for a variety of iPad problems as well as any other computer. Restarting helps one override the software glitches that may be inhibiting normal software functioning which may be the core of your iPad screen flickering issues.

For iPad with Home button

Simply press and hold the Home button and Top button simultaneously until an Apple logo appears then release both buttons.

Other models

Press and quickly release the Volume Up button, repeat the same for the Volume Down button and then press and hold the Top button until an Apple logo appears then release the button.

Method 2: Force Quit Apps

If your iPad mini screen flickering problem is not fixed by restarting, then you should proceed to check if the iPad flickers when running a particular application. The flickering could be a result of a 'misbehaving' application. If you find such an application, force quitting the application is highly recommended. So, how do you force quit?

For iPads with Home button, you only need to press the Home button to open the app switcher then swipe away from the particular application.

For iPads without Home button, slide your finger from the bottom to open the app switcher then swipe away to force quit the application.

Try re-launching the application and if the flickering persists you can proceed to uninstall the application and install it later on.

Method 3: Check Auto-Brightness Feature

Usually, iPads have an auto-brightness feature that facilitates screen light adjustment according to light in your environment. If enabled the screen could appear to flicker depending on the change of the surrounding light. However, this may not be the issue. To be sure, you need to disable the feature. To disable follow the following steps;

Step 1. From the main screen click on 'Settings'.

Step 2. Scroll down to 'Accessibility' and click it.

Step 3. Select 'Display Accommodations' from the options.

Step 4. You will find the auto-brightness feature, move the slider to disable it. After disabling the screen light will remain constant.

Method 4: Reduce Motion and Transparency

In any case, the iPad Pro screen flickering problem is not solved by disabling the auto-brightness feature, you should proceed to disable the motion and transparency feature. It goes a long way in improving the performance of the iPad. To disable follow the following steps.

Step 1. From the main screen click on 'Settings'.

Step 2. Select 'General' and then 'Accessibility'.

Step 3. Select 'Increase Contrast' and then move the slider forward to enable 'Reduce Transparency'.

Step 4. Go back to the 'Accessibility' and move the slider in front to enable 'Reduce Motion'. This way, the iPad screen flickering lines may stop.

Method 5: Repair iPad with TunesKit [Highest Success Rate]

If all the above-stated solutions do not work to resolve your iPad screen flickering won't turn on, then TunesKit iOS System Recovery tool is your best chance to resolve the issue once and for all. It is designed to help you resolve both common and serious iOS errors without losing any data from your iPad. The screen flickering issue at this point maybe as a result of iOS failures, like iPad black screen, frozen screen, blue screen, etc. The software provides you with two repair modes namely Standard Mode and Advanced Mode. It is also compatible with all iOS and iDevices including iPads, iPhones among others.

All you need is to download TunesKit iOS System Recovery and then follow the following steps to fix the problem.

Characteristics of TunesKit iOS System Recovery:

• Fix iPad screen flickering, iPad white screen of death, and more iOS issues without data loss

• Repair different tvOS/iOS issues at home

• Provide Standard Mode and Advanced Mode

• Easy to use with friendly interface

Step 1. Connect Device and Select Repair Mode

Launch the application on Mac and then proceed to connect your iPad to the computer. Once it is detected, click on the 'start' tab to proceed to the next window. Select 'Standard Mode' as your repair mode and click 'next'. You will be requested to put your iPad on DFU or recovery mode. Follow the instruction and click 'Next'.

Step 2. Download the Firmware Package

Here, the program will proceed to download the latest firmware package to recover the iOS back to normal. It is crucial that you confirm the device info to make sure it is correct. If not, you can manually correct it. Proceed to hit 'Download'.

Step 3. Recover and Fix iOS System

Once the download is complete, click on the 'Repair' button on your screen to initiate the repair process. Make sure your iPad is connected during this time. The repair will only take a few minutes. If the Standard Mode does not work you can proceed to use the Advanced Mode using the same procedure.

Method 6: Replace iPad Screen

If at this juncture, your iPad is still flickering then there must be a hardware problem. It is possible that the gadget was dropped on a hard surface or fallen into the water. iPad screen repair is quite a complicated process and hence it is highly recommendable that you seek a professional assistant. Equally, you can visit the nearest Apple service shop for assistance. They will definitely help you out.

Conclusion

The above-listed solutions have been proven to be effective at solving the iPad screen flickering problem, especially when it is caused by a software bug. If you are experiencing this issue, ensure you do not make things worse by trying to do the repairs yourself just to save money on a professional. TunesKit iOS System Recovery tool is trustworthy and ensures that your data is completely secure. It, however, can only fix software issues. To get your iPad repaired if it is having hardware problems, you should definitely take it to a local Apple store.

Its source from: https://www.tuneskit.com/fix-ios/fix-ipad-screen-flickering.html

Fix iPad White Screen with 5 Simple Tricks

 It's quite common for your iPad stuck on the white screen. It can be found in many iPhone models even if the new versions. So, here, we gathered the causes that could lead to iPad screen problematic errors. Give a short glimpse: Your iPad is dropped from your hand, an error occurs during the update of iOS system, or there are software restrictions, etc. This matter stops people from normally using their iPhone, which can be indeed annoying. Well, just take it easy, you can continue reading to get more easy methods in this post about this problem.

Video Tutorial: How to Fix iPad White Screen

First, we'd like to present a short video, through which users can learn the tips roughly. In the next part, we will describe the five solutions one by one.


Method 1. Force Restart Your iPad

Generally speaking, hard-reset your device is a simple yet effective method to solve iOS stuck problems. iPad stuck on white screen is no exception. You can simply hold the Power button and Home button simultaneously for about a few seconds until the Apple logo shows up. It will restart again and you can check whether the problem is solved.

Note: For iPad without the Home button, you need to press and quickly release the Volume Up button and then the Volume Down button. Then press and hold the Power button until the device restarts.


Method 2. Try the Three-Button Trick

This method is not always working, according to the reports from many iOS users. But it is still worth a try, what if you succeed? The steps are very simple. Just press and hold the Home button, Volume Up button, and then Power button for a while and wait until the white screen on your iPad disappeared. 10 seconds later, the Apple logo will appear and your iPad will reboot again.

Method 3. Use Third-Party Software to Fix iPad White Screen [No Data Loss]

After trying to hard reset your device by using the two methods above, if the white screen problem still exists, you can consider using a professional iOS system recovery tool to fix it. TunesKit iOS System Recovery is such a comprehensive and efficient iOS repair program that is specially developed to fix up to 150 iOS-related issues. These problems include iPhone stuck on white Apple logo, iPhone black screen of death, blue screen, red screen, etc. The most powerful characteristic of this tool is that you will never worry about data loss when using it to fix iOS system problems. What's more, it supports all iOS including the latest iOS 15 and almost all models of iPhone, iPad, iPod touch.

Now just download this program and install it on your Mac or PC, and then follow the simple step-by-step guide to get your device out of this trouble right now. 

Characteristics of TunesKit iOS System Recovery:

• Fix iPad white screen without data loss

• Repair different tvOS/iOS issues at home

• Provide Standard Mode and Advanced Mode

• Easy to use with a friendly interface 

Step 1. Launch TunesKit and Connect iPad to Computer

Launch TunesKit iOS System Recovery program and use a USB cord to connect your iPad to the computer. Then click the Start button and choose the Standard Mode which will not cause any data loss. Press the Next button to continue.


Step 2. Choose a Repair Mode and Download Firmware Package

Now your need to choose a repair mode. Then click Next to check your device info such as model name, iOS version, etc. If nothing is wrong, you can simply hit the Download button to ask TunesKit to download the firmware package you need.


Step 3. Fix iPad White Screen

Once the download and verification of the firmware package are completed, you can start fixing the white screen problem by clicking the Repair button. Wait until the process bar ends. Remember not to plug your device during the process, or your device may get bricked.

Method 4. Restore Your iPad in Recovery Mode

Another solution to fix iPad stuck on white screen is to try restoring your iPad with iTunes. It will reinstall iOS on the iPad, so all the data on your device will be effaced. If you don't mind, you can follow the quick steps below.

Step 1. Open iTunes and update it to the latest version. Connect iPad to your computer via a USB cable.

Step 2. Since your iPad is in a white screen state, it can't be detected by iTunes. You need to put it into recovery mode. You can first hold the Power and Home buttons at the same time for about 10 seconds, and release the Power button and only hold the Home button until you see the Apple logo. Keep holding it until the Connect to iTunes icon appears;

Note: You can also use TunesKit iOS System Recovery to enter the recovery mode in one click with no cost;

Step 3. Once your device entered the recovery mode successfully, choose Restore iPad and wait until the process is finished. You can now set up your iPad as a new device.

Method 5. Restore Your iPad in DFU Mode

Step 1. Connect iPad to the computer and then launch iTunes;

Step 2. Switch off the iPad and hold the Power button and Home button simultaneously for 10 seconds. Then release the Power button and keep holding the Home button. If you see the "Plug into iTunes" message, you need to repeat the process; if the screen turns black, your iPad has entered the DFU mode now;

Step 3. iTunes will ask you to Restore the iPad and confirm the action. After it's done, your problem should be solved.


The Bottom Line

In conclusion, we are very glad to help you to fix your iPad white screen issue. The solutions introduced above are needed to be done by yourself. And if you are not much willing to mess up with too many tedious steps, directly choose TunesKit. It will certainly help you with any iOS system issues. Hope you have a wonderful experience.

Its source comes from: https://www.tuneskit.com/fix-ios/fix-ipad-white-screen.html

Dec 28, 2021

How to Fix iPhone Can't Hear Caller: The Quick & Easy Guide!

iPhone no sound on calls stops people from normally contacting their friends or family members, which can be indeed annoying. This issue can be found in many iPhone models such as iPhone 12/11/XR/XS and other earlier versions. And it attributed to a wide range of factors. Well, just take it easy. There are several quick methods to identify common problems when you can't hear someone or the other party can't hear you.


Part 1. Reasons About iPhone Can't Hear Callers

At first, let's look at the reasons behind it. The problem of the iPhone can't hear calls is actually quite common, which can result in various causes. The following scenarios are some common ones.

1. iOS system glitches and errors.

2. Some wrong settings.

3. iPhone's hardware issues.

Part 2. The Best Way to Fix iPhone Can't Hear Calls — Using TunesKit

Now let's move on to the fixes to no sounds on iPhone calls. Firstly, we would like to introduce the greatest method and it can definitely deal with your problem with a 100% success rate.

To resolve iPhone can't hear caller issue, the most effective way is to use related professional iOS system recovery applications, for example, TunesKitiOS System Recovery. This third-party tool can bring your iPhone back to normal no matter whether it has no sound when dialing, not working issues such as its power button and the like, or other intricate problems. Moreover, it can also fix other errors on iPad, iPod, and more iOS devices. What's more, there is no need to worry about data loss as the software has 2 repairing modes including the Standard and Advanced modes.

Video Guide: How to Fix iPhone No Sound on Calls


The 3 easy steps to solve iPhone has no sound on calls are as presented here through this program with a simple interface and customer-friendly feature.

Step 1: Open TunesKit iOS System Repair for Windows and connect your iPhone with your personal computer by a USB cable. Then tap on the "Start" option and choose the "Standard Mode" that appears on the following screen. Finally follow the instruction to put your iPhone into DFU mode.

Step 2: Confirm the device model, iOS version, and other related information. After checking the information is right, click the "Download" button to let the program download and verify the firmware package matched with your iPhone.

Step 3: When the firmware package download is completed, press the "Repair" button to fix the iOS system. after the process is finished, your iPhone has no sounds on calls will be fixed without data loss.


Part 3. Other Possible Fixes to iPhone No Sound on Calls Issue

You may wonder about more potential solutions to fix iPhone can't hear caller problem, so we listed some below. But it should be noted that they may not help.

3.1 Remove iPhone's Case

The case on iPhone may be responsible for the no sounds on calls, as the protector might accumulate some dust and debris that clog the iPhone receiver and microphone. If it is this case, you need to take off the case and clear out the particles, then try out calling to check whether you can hear the sound on calls.

3.2 Unplug Your Headphone

Also, you can see if your iPhone is in the headphone mode because the device sometimes still gets stuck in the headphone although you removed the jack. You can plug in and out headphones of iPhone several times until it is recognized disconnected to disable the headphone mode. And if necessary, clean out the particles and debris in the headphone jack.

3.3 Adjust Volume Level

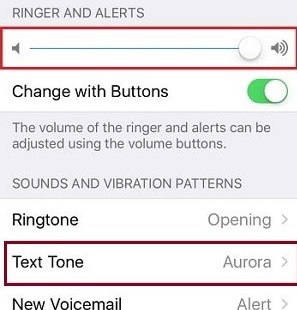
If your device volume is at its lower level or the ringer is mute, your iPhone can't hear callers will happen. Check your volume settings and adjust the volume to a higher level by going to your Home screen. To fix it, opening your Settings app → navigates to Sounds →  Ringer and Alerts.  


3.4 Turn off Bluetooth

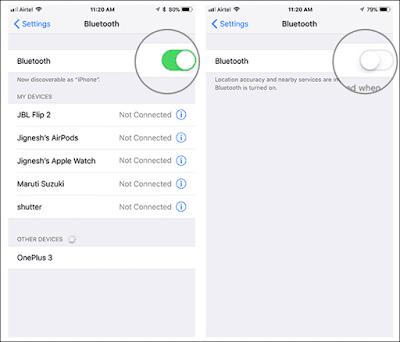
The Bluetooth being abled could also give rise to the iPhone can't hear callers and blocking the sound. So make sure you have turned off the Bluetooth by heading to the Settings of the device and finding the Bluetooth to toggle it off.

3.5 Check Audio/Network Settings

When you did some wrong settings, such as turning on the Silent Mode and Do Not Disturb, The iPhone can't hear caller is a sure thing. Thus, to avoid this situation, it is suggested that you should disable the Silent mode and locate the Do Not Disturb button in the Settings of iPhone, then switch the option off. Besides, you could also switch the Airplane mode on and off to see if the Wi-Fi network or cellular data works well.

3.6 Hard Reset Your iPhone

If there is still no sound on calls of your iPhone, then you possibly have to hard reset the device to resolve this problem. You can try the following procedures according to your iPhone models.

For iPhone 6 series, simultaneously hold the Home and Sleep buttons until the Apple logo appears on the screen.

For iPhone 7 series, press the Sleep and Volume Down buttons in the meantime until the Apple logo is shown on the interface.

For iPhone 8 and later, firstly, swiftly hold the Volume Up and Down buttons, then press down the Power button until the Apple logo pops up.


3.7 Update iOS Version

The final solution to solve iPhone can't hear calls problem is to update your iOS system to the latest version. This might fix your issue. Before updating, make sure you've backed up your data in case of any data loss. After that, you can navigate to the Settings → General → Software Update. If there is a pending update, just tap the Download and Install.


Part 4. Conclusion

Hopefully, having read the post, you realize that you need not be concerned if your iPhone doesn't work well and you are unable to hear during calls. Follow the steps outlined above to resolve the issue of 'iPhone no sound on calls' in most cases. Especially note that TunesKit iOS System Recovery is one of the best in fixing ios system problems. Hope that helps.

Its source comes from: https://www.tuneskit.com/fix-ios/iphone-no-sound-on-calls.html


Nov 22, 2021

TunesKit Black Friday Sale 2021: Free Software & Amazon Gift Cards Giveaway

 Hong Kong, November 18, 2021 – TunesKit Software released special sales and giveaways of Thanksgiving & Black Friday on all its products of multimedia and iOS programs, showing their gratitude to all its users. This great promotion starts from November 18 to December 3, with lots of free gifts and huge discounts.

A Quick Look at Thanksgiving & Black Friday Deals

Starting on November 18, every user gets a chance to win gifts and get TunesKit flagship products at great discounts of up to 85%. Visitors coming to TunesKit are able to spin the lucky wheel to win a $50 Amazon Gift Card, a $10 storewide Coupon, and other free licenses from the company. Besides, users can share and get TunesKit AceMovi, a powerful video editing program for free, or purchase its lifetime license at a 50% discount, which costs only $29.95. What’s more, all customers can buy 1 get 5 multimedia products free with a super discount of 85% off. Not only that, its popular iOS tools and multimedia software are on sale up to 57% off.

This Thanksgiving & Black Friday Deals will last for 2 weeks until December 3, 2021. To get more discount and giveaways information, please visit TunesKit’s promotion page here: https://www.tuneskit.com/special/thanksgiving-sales/.

Get Free Giveaways and Attractive Discounts of TunesKit Products

The first event of the TunesKit Thanksgiving & Black Friday promotion is Spin-N-Win. Every user gets two chances to spin the lucky wheel and win free gifts, including a free license of its popular multimedia solutions like AceMovi Video Editor, Video Cutter, and Screen Recorder, a $5 or $10 storewide product coupon, even a $50 Amazon Gift Card. Don’t worry if the spinning chances run out. Users can still get one more chance per day by sharing the webpage to Twitter, Facebook, or Pinterest.

The second part is a promotion of the staple product of TunesKit Studio – TunesKit AceMovi., It gives away a 3-month license to everyone, and sharing this information with your friends on Twitter or Facebook is the only condition for obtaining the key. Besides, users can purchase an AceMovi one-year license at $9.95 and a lifetime license at $29.95, the lowest price ever.

Moreover, to save $319.75, the 6 in 1 multimedia tools bundle is a popular buy this November. The bundle is discounted at 85%, including AceMovi Video Editor, Video Cutter, Video Converter, Video Repair, Screen recorder, and Audio Capture. It only sells at $59.95, which means that you can get 6 professional editing products for the price of 1.

In addition, the popular and one-stop iOS software iOS System Recovery and iPhone Data Recovery are also at amazing discounts up to 57%. iOS System Recovery is the best assistant for iOS users to fix more than 150 software issues without causing data loss. And the iPhone Data Recovery is specialized in recovering lost data on iOS devices in 3 steps.

“TunesKit can always do a good job in offering users the best experience in media editing and iOS devices.” Said William, the chief product officer of TunesKit. “Glad to see that TunesKit Studio gives users the best products and supports. It is the biggest surprise for Thanksgiving and Black Friday of this year.”

About TunesKit

TunesKit Studio is an innovative multimedia and iOS tool developer that aims at offering the best multimedia and iOS supports, including AceMovi Video Editor, Video Converter, Video Cutter, and Video Repair for Windows and Mac platforms to customers all around the world. As a professional digital tools developer, all the users can get free and prompt online supports from TunesKit Studio. At present millions of users are editing their videos with TunesKit’s and leaving a good rating.

Media Contact

William Garcia

Chief Product Officer

Email: support@tuneskit.com

Oct 26, 2021

[Top 5 Ways] Fix iPhone Cannot connect to iTunes Because of An Invalid Response

 While using iTunes to restore, backup, or update our iPhone, sometimes it will report a strange error that says "iPhone cannot connect to iTunes because an invalid response was received from the device." This inexplicable issue stops our iPhone from connecting to iTunes. In this post, I will show you the workable methods that aim at solving this problem.

Why does this error appear?

To solve the issues that happen on iPhone, finding out why is important. Though Apple has not offered an official explanation, we can still sort out some reasonable reasons - broken lightning cable, outdated iTunes, interrupted computer system files, antivirus working mistakenly, or other iPhone or computer software issues. It is not a serious glitch and we can fix this "iTunes cannot connect to iPhone because of an invalid response" by ourselves at home using a computer.

Top 5 ways to fix iPhone Cannot connect to iTunes Because of An Invalid Response

Method 1. Use a new cable and port


Usually, iTunes cannot connect to the iPhone because an invalid response occurs can be due to a broken lightning cable or a not working port. What calls for special attention is that an unauthorized third-party lighting cord will also cause this issue. Using an MFi, which stands for Made For iPhone/iPad/iPod - cable can be an effective way to overcome this issue.

Method 2. Fix iPhone cannot connect to iTunes because of an invalid response using TunesKit iOS System Recovery

If your iPhone suffered an unknown software issue that cause your iPhone cannot connect to iTunes because of an invalid response. And you don't know the corresponding resolutions, trying to use an iOS fixing program like TunesKit iOS System Recovery. TunesKit iOS System Recovery is dedicated and one-stop software that is designed to fix your iPhone issues - Twitter notifications not working, Download and install is grayed out in iPhone, iTunes error 0xe8000065, and so on - without data loss.

Let's see the step-by-step guide using TunesKit iOS System Recovery.

Step 1 Connect your iPhone to computer


Connect your iPhone to TunesKit iOS System Recovery with a workable lightning cable. When TunesKit iOS System Recovery detects your iPhone, click the Start button to the next step. Furthermore, the Enter/Exit Recovery Mode button enables you to enter Recovery Mode within one click.

Step 2 Select a mode


Selecting the Standard Mode to fix "iPhone cannot connect to iTunes because an invalid response was received from the device" is a suitable choice here. The Standard mode can fix most iOS issues and will not cause any data loss. Though the Advanced mode is much more powerful, it should be applied in the premise of Standard mode not working.

Step 3 Download firmware package


Then TunesKit iOS System Recovery will start to download the firmware package that can fix the iPhone cannot connect to iTunes because of an invalid response. The given information should be confirmed or corrected manually before downloading.

Step 4 Fix iTunes cannot connect to the iPhone because an invalid response occurs


Finally, TunesKit iOS System Recovery will start to fix your iPhone when the downloading is finished. The process will take several minutes and your iPhone will get back to its normal state soon.

Method 3. Reboot your iPhone and computer


Reboot your iPhone and computer can fix the issue that "iPhone cannot connect to iTunes because of an invalid response" quickly and safely.

Restart iPhone: Hold the Power button and slide the slider to turn off your iPhone. Then turn it on again.

Restart Mac: Go to the Apple Menu and click the Restart option.

Restart Win: Click the Start, find the Power option, then click the Restart option.

Method 4. Update your iTunes to the latest version

If you are using an outdated iTunes version, you may face this unexpected problem because of the incompatibility between iTunes and your computer operating system. You can update your iTunes from the Help tab, and there is a Check for Updates option for you to update your iTunes version. The alternative way is to download a new installation package from the Apple website.

Method 5. Update your iPhone to the latest version


As iTunes updates and requires an iOS version that is not too outdated, updating your iPhone to the latest version seems like an effective way for solving the error "iPhone cannot connect to iTunes because an invalid response was received from the device" as well. You can update your iPhone via Settings > General > Software update.

Summary

I believe that iTunes cannot connect to iPhone because of an invalid response will not be a troublesome issue using the above 5 solutions. I think an iOS fixing tool like TunesKit iOS System Recovery can be the best choice for iOS users, with its powerful features and one-stop service.