Sep 30, 2019

5 Best Alternatives to iMyFone Fixppo

Posted by Brian Davis on September 30, 2019 6:22 PM

If you are an Apple fan, then you should know that occasionally the iOS system malfunctions. This may occur many forms including a white screen, a blue screen, or an iTunes error. All these annoying problems can be easily solved by iOS repair tools, among which iMyFone Fixppo is one of the best. Powerful, as it is, iMyfone has its own limitations, and here you will see 5 top iMyFone Fixppo alternatives that you probably would consider switching to.

1. TunesKit iOS System Recovery

joyoshare-ultfix-ios-system-recovery
TunesKit iOS System Recovery comes with a free trial where you can conveniently enter and exit recovery mode. Compatible with most iDevices, it can repair numerous iOS problems. It is a reliable iOS recovery tool that can fix issues without endangering your precious data. In addition to high efficiency, this tool is easy to use, taking you only 3 steps to repair the iOS system.
The major downside with this program is that it is not free, but so are most iOS repair programs in the market.
Down TunesKit iOS System Recovery here

2. Tenorshare Reiboot

tenorshare-reiboot
This is an all-round iOS management tool. The program stands out due to its access to up to 5 devices for life. It is also able to easily and quickly fix iOS-related issues.It is also relatively easy to use even when you have no technical skills.
The only flaw is that the program, according to users’ feedback, crashes sometimes when in use. This program is also not free. If you want to resolve other issues other entering and exiting recovery mode, you have to pay for the premium.

3. Dr.Fone - Repair

drfone-repair
This program is used to fix phones that will not start or reboot. Many people like it because it offers a safe method to repair an iPhone since it is specifically designed with such devices in mind.
Just like most premium recovery programs, the Dr.Fone - Repair program comes at a price. It also can not offer much help in case of a jailbroken iPhone.

4. FonePaw iOS System Recovery

fonepaw-ios-system-recovery
FonePaw iOS System Recovery is another great iMyFone Fixppo alternative that you should try. In addition to the simple usage, it is an intelligent program that can resolve almost all your iPhone issues, but with a number of clicks.
The main shortcoming of FonePaw iOS System recovery software is that it does not support the latest iOS yet. But an update may show up any time soon.

5. Joyoshare UltFix iOS System Recovery

joyoshare-ultfix
This is an awesome iPhone iOS repair tool that is compatible with iOS 13. It can repair more than 30 iOS problems such as iPhone keeps turning off. In addition, it has a free recovery mode which makes it easy to use.
With very limited shortcomings, this is one of the most popular iOS system recovery software in the market. The only major shortcoming is that the trial version has very limited features which makes it impossible for potential users to test the program before buying it.

Conclusion

All these 5 alternatives mentioned above are amazing tools, each of which has its own strengths and drawbacks. Which one to use still depends on you.

Sep 20, 2019

How to Fix iPhone X Keeps Restarting

Boasting of an astonishing OLED screen without the home button, iPhone X distinguishes itself from its predecessors. Nevertheless, it is still not immune to various iPhone issues, for example, iPhone X keeps restarting (also known as boot loop). We’ve mapped out in the subsequent context the reason why iPhone X stucks in a boot loop and some solutions to it


1. Why iPhone X Bump into Boot Loop?

Unsuccessful Update: An unsuccessful update can easily result in a boot loop
Malfunctioning Hardware: malfunctioning hardware needs to get repaired or replaced as soon as possible, or boot loop is a possible outcome.
Jailbroken iPhone: Jailbreaking will make iPhone X more vulnerable to malware or virus attack, which can lead to a boot loop as well.

2. How to Fix iPhone X Keeps Restarting?

Here are 3 universal ways for you to troubleshoot the boot loop regardless of the cause.

2.1 Force Reboot

If your iPhone X stuck in a boot loop, the first and the easiest solution you should try is to force reboot it. Guide of force rebooting iPhone X is listed below:

1) Fast press and release the volume up button.
2) Fast press and release the volume down button.
3) Hold the side button until the screen shuts off and then turns back on. Release the side button when the Apple logo appears. After that, your iPhone X will restart automatically.

2.2 Restore iPhone X with iTunes


1) Connect your iPhone X to the computer and launch iTunes.
2) A window will pop up not long after iTunes completes detecting the problem of your iPhone X. Just hit the Restore button to get rid of the iPhone X reboot loop.

3) In case the pop-up window doesn’t show up, you can click on the Summary button and then the Restore iPhone button to restore your iPhone X.


2.3 Powerful Tool to Fix Boot Loop Without Data Loss

Convenient as it is, iTunes restore will result in data loss. Therefore, we have another option for you— TunesKit iOS System Recovery. This program focuses on rescuing your iPhone from various problems including iPhone X boot loop. Most importantly, it is able to repair iPhone without data loss.
TunesKit iOS System Trial Free Download
Guide for using TunesKit iOS System Recovery

Step 1. Download and launch the program and click the Start button to move forward.

Step 2. In the next window, choose the Standard Mode and press the Next button on the right bottom.

Step 3. Download the firm package matched to your iPhone X. Once the correct package is downloaded, begin to fix iPhone X boot loop.

3. Bottomline

We sincerely hope that these 3 suggestions are helpful to you.

Sep 18, 2019

TunesKit Screen Recorder Officially Launched to Record Screen

TunesKit Studio, a professional multimedia software provider, has recently released a new member named TunesKit Screen Recorder to its multimedia product lines, aiming to help users grab any video and audio activity on the desktop of PC or Mac computer with ease.
tuneskit screen recorder
To be specific, users can use it to record video tutorials, online lectures, Skype conversations, webinars, streaming music, computer games, and many other videos or sounds playing within a program with almost 100% original quality preserved. This easy recording program can not only record video, but also capture sound from either system audio or microphone or both simultaneously. After that, users can also edit the recording to make it look better.
Besides, users are allowed to customize the recording options according to their needs. For instance, schedule the recording while staying away, set the keyboard shortcuts, add special effects to cursors and clicks and change the output folder, etc. Moreover, the application supports plenty of output media formats and devices, including MP4, M4V, AVI, MOV, WMV, MP3, FLAC, iPhones, Android phones, smart TVs, game consoles, etc., so users can save the recordings as any format or export to any device freely.
"We plan to offer users a quick easy solution to record videos and audios on computer, and here comes this software," said Andres, the R&D director of TunesKit. "The biggest distinction of our program is that it can capture your screen in a quite simple way due to its clear interface and neat button design, compared with those complicated similar products in the market," added he.

Key Features of TunesKit Screen Recorder for Windows and Mac

  • Grab various videos and audios through web browser, media player, or program, etc. on desktop with high quality retained
  • Capture video/audio with system sound and microphone simultaneously or individually
  • Support plenty of output media formats and portable devices
  • Trim the recordings and edit the ID3 tags
  • Make scheduled recordings and customize other parameters
  • Easy to operate with friendly user interface

Price and Availability


TunesKit Screen Recorder offers a trial version for users to use the program for free, but the recordings will be added with watermarks. To unlock the limit, users need to upgrade it to the full version, ranging from $29.95 for a single license, $59.95 for 2-5 PCs to $79.95 for unlimited use. All the packages are provided with free lifelong software update and tech support. As for the availability, it works well on all Windows and Mac platforms, including the latest Win 10 and macOS 10.13 High Sierra and 10.14 Mojave.

Source: https://www.tuneskit.com/releases/tuneskit-screen-recorder-newly-released.html

You may also like:

Aug 22, 2019

Backup and Export iTunes Library before It Disappeared


Apple is going to shut down iTunes, a useful media content management software, and use three separate apps to take the place of it. So, what about the the iTunes files you’ve bought or rented? It may not be gone, but who knows. Why not get them backed up for safe keeping or export iTunes library for enjoying at any time on any device. In this article, I will show you two ways to do it.

Part 1. How to Backup iTunes Library and Media Files

The first way to backup iTunes library is introduced by Apple Support, which is safe but complicated. Now I will give a quick step-by-step guide for you. You can also go to its official documents to get more details.

Step 1Consolidate iTunes library

Before making a backup, you need to consolidate your iTunes media files by going to the File > Library > Organize Library, and then click the OK button to close the popup.
consolidate itunes library

Step 2Move iTunes library to external drive

Now quit iTunes app and find your iTunes folder where your media files exist. Usually, you can find it in the default location:
For Windows 7 or later: \Users\username\My Music\.
For Windows XP: \Documents and Settings\username\My Documents\My Music\.
For Mac: Open Finder windows and press Go > Home > Music > iTunes.
Then simply drag your iTunes folder from here to an external hard drive. Now your iTunes library and all media files are backed up to the drive. When you want to enjoy these media files again, you need to restore the library from the drive to the iTunes library.
Note: If you can't find your iTunes folder in the default location, you can go to the advanced settings and check its real location. To find it, just go to the Edit > Preferences > Advanced if you're a Windows user; if you're using a Mac, you can choose iTunes > Preferences > Advanced.

Part 2. How to Remove DRM and Export iTunes Library

As you see, the method above can help you backup iTunes library to the external hard disk, but it will not allow you to play them with other players expect iTunes. This is because all iTunes media contents are protected by Apple's digital right management (DRM) copyright. Thus here we'd like introduce some powerful DRM removal tools such as TunesKit DRM M4V Converter or TunesKit DRM Audio Converter, which allow you to get rid of the DRM encryption and then export all media content from iTunes to your computer in a common format such as MP4 or MP3, etc.
TunesKit M4V Converter is an all-in-one solution to help users losslessly remove DRM protection of iTunes movies and TV shows whether they're rented or purchased, so that users can watch them on many other common devices expect iDevices such as iPhone, iPad or Apple TV, etc.

TunesKit DRM Audio Converter is otherwise capable of removing DRM and converting all iTunes M4P songs and audiobooks to DRM-free formats like MP3, AAC, etc., without causing any quality damage, and then exporting them to any media device for playback with no limitation.

Steps to Backup and Export iTunes Movies and TV Shows with TunesKit M4V Converter

Step 1Launch TunesKit and add iTunes videos

add itunes m4v videos
First, please download and install TunesKit DRM M4V Converter on your PC or Mac and then simply open it. After that, click the "Add Files" button to import the iTunes movies or TV episodes to the program or just drag the files to the program.

Step 2Set output format and parameters

choose mp4 output format
Next click the Preferences option from the Menu icon on the top right corner and choose an output format such as Lossless MP4 or Lossless M4V. Change the other parameters like bit rate, codec after clicking the Gear icon when necessary.

Step 3Convert iTunes files and export them

convert itunes m4v to mp4
Now click the "Convert" button to start the conversion. When it finished, all your iTunes movies and TV shows are saved and exported to the local folder of your computer.

Steps to Backup and Export iTunes Music and Audiobooks with TunesKit Audio Converter

Step 1Import iTunes M4P songs or audiobooks

add apple music songs
Click the iTunes icon on the top menu bar and add the iTunes music and audiobooks you want to back up, after completed the installation of TunesKit DRM Audio Converter.

Step 2Choose an output format

set mp3 output format
Now press the "Format" button and select an audio format for your iTunes audio files like MP3, FLAC, etc. You're also allowed to customize the channel, sample rate, etc. as you like.

Step 3Start conversion and save them

convert apple music to mp3

When all settings are ready, you can click the "Convert" button. Then the program will begin to remove the DRM and convert all iTunes audio files to DRM-free ones. You can find that all files are backed up and saved on your computer.

Source: https://www.tuneskit.com/reviews/export-itunes-library.html

Aug 6, 2019

[Fixed] Apple TV Won't Update

Many users have reported that some problems always occur when they're trying to update their Apple TV, which lead to Apple TV update not successful. To solve such problem, I've done some research and test and find out some possible solution to fix Apple TV won't update issues efficiently.


Tip 1. Try to Update Manually Again

If the Apple TV update couldn't be downloaded at this time, you can simply try to update the software again manually. The methods may be a little different depending on the device you have.
For Apple TV 4K and HD, you can go to the Settings > System > Software Updates and choose Update Software. Select the Download and Install option if there is an update. Wait until the update ends.
For Apple TV 3rd generation and earlier, you can go to the Settings > General > Software Updates and pick Update Software option and download and install it if an update is available. Wait for the update to complete.
update again
Note: If you are willing to enjoy the new features of new tvOS, you can simply turn on the automatic update, so that it will help you update your Apple TV automatically to the newest version once there is an update. The method is also simple. Just go to the Settings > System (Apple TV 4K and HD) or General (Apple TV 3rd generation) > Software Updates and turn on the Automatically Update option.

Tip 2. Restart Your Apple TV for Several Times

If it's still not working after manually update again, you can try to reboot your Apple TV for several times since it has become one of the simplest yet effective ways to fix some common iOS or tvOS problems. To restart your Apple TV, there are some quick methods.

Option 1. Restart Apple TV via Settings.

For Apple TV 4K and HD, just go to the Settings > System > Restart. For Apple TV 3rd generation and former, go to the Settings > General > Restart.

Option 2. Restart Apple TV via Remote.

If your remote control are Siri Remote or Apple TV Remote, you can keep pressing the remote home icon Home and Menu buttons. Let them go when you see the light on the box flash. If it is Apple Remote, whether it's white or aluminum, you need to keep pressing the Menu and Down buttons. Don't release them until you see the light on your Apple TV start flashing.

Option 3. Restart Apple TV via Unplugging.

If the two methods above cannot help you restart the Apple TV, you can simply unplug your device from power and then plug it back in after 6 seconds.

Tip 3. Fix Apple TV Won't Update Problem without Data Loss

If you can't update your Apple TV successfully, another easy yet efficient solution is to try a professional tvOS repair tool such as TunesKit iOS System Recovery. This program has a capability of fixing any system problems on Apple TVs, such as Apple TV 2nd generation won't update, Apple TV 3rd generation screen becomes black, Apple TV HD won't charge, no sound, and many others. The most important part of this tool is that it will not causing any data loss while repairing your tvOS system.
What is more, TunesKit iOS System Recovery can also repair all the common or serious iOS issues on iPhone, iPad and iPod touch like stuck in DFU mode, won't turn on, white screen of death, etc. You can also use it to enter or exit the recovery mode in one click, factory reset iOS devices, bypass iTunes errors, downgrade iOS version to previous one, etc.
video cutter      

Highlights of TunesKit iOS System Recovery:

  • Fix Apple TV won't update issue with no data loss
  • Fix other various tvOS problems easily
  • Rapair all tvOS/iOS systems in 3 simple steps
  • Compatible with Apple TV HD/3rd/2nd generation
  • Available for both Windows and Mac platforms

Quick Steps to Fix Apple TV Not Update Problem with TunesKit

To utilize TunesKit iOS System Recovery to fix Apple TV update not successful problem, you can first download and install the program on the computer and then follow the step-by-step guide below to get started.

Step 1 Launch TunesKit and connect your Apple TV

Open TunesKit iOS System Recovery on the desktop after finished installation and then use an original cable to connect your Apple TV to the computer. Plug it with power cable if necessary.
connect iphone

Step 2 Choose repair mode and download firmware package

When your Apple TV is detected by TunesKit, you can simply click the Start button to begin and then choose a recovery mode for repairing. Standard Mode allows you to fix the tvOS problem without data loss while Advanced Mode will erase all the data. Select the Standard one to avoid data loss and press the Next button to proceed.
download firmware
Then confirm your device model info and then click the Download button on the lower right corner to start downloading and verifying the correct firmware package that matched to your Apple TV.

Step 3 Start to fix Apple TV won't update without data loss


Once the firmware package is downloaded successfully, you can now click the Repair button to ask TunesKit to fixing the problem immediately. Wait a while until the process completes. Do not unplug your device during the whole process to ensure the problem can be solved.

Source article: https://www.tuneskit.com/apple-tv-repair/apple-tv-wont-update.html

Jul 29, 2019

TunesKit iOS System Recovery Now Supports to Fix Apple TV Problems

As a well-know multimedia software provider, TunesKit Software recently make a great upgrade to its iOS utility - TunesKit iOS System Recovery, which is now capable of fixing all different Apple TV system issues such as the screen stuck in reboot loop, won't update, keep crashing, blue or black screen of death, etc. without causing any damage to the data.

No matter the Apple TV is stuck in the recovery mode, Airplay mode or stuck on the white Apple logo, no sound, black screen, won't update, keeps crashing, etc., users can easily take advantage of TunesKit iOS System Recovery to repair them with no need to ask help from technical personnel. To ensure a high success rate, it offers two recovery modes (Standard Mode and Advanced Mode) to either fix some common tvOS problems with no data loss or factory reset Apple TV to deep repair the system without saving endeavors.

With its assistance, users are permitted to fix all kinds of tvOS problems in 3 simple steps, namely, connect the Apple TV, download and verify the firmware package, start to repair tvOS issues. Its clear interface and neat buttons make it easily to be operated by anyone, even if he or she has never used such kinds of program before.

"We start to develop this feature in support of Apple TV is mainly because that many users have encountered such tvOS problems, and they might not want to take it to the offline store for help," said Andres, the R&D director of TunesKit. "With the help of TunesKit iOS System Recovery, they can now easily handle and solve some common tvOS related issues on their Apple TVs easily at home by themselves," added him.

Actually, TunesKit iOS System Recovery is a versatile utility which works more than just a tvOS repair tool. Besides repairing Apple TV, it is capable of fixing dozens of iOS issues on iPhone, iPad and iPod touch, including iPhone stuck in boot loop, headphone mode, blue screen or white screen, iPad is locked or disabled, etc. Furthermore, users can one click to get their Apple TVs or iOS devices into or out of the recovery mode for free.

What's New in TunesKit iOS System Recovery 2.0.0

[Version Number: 2.0.0]
* Support to fix any tvOS problem on Apple TVs
* Compatible with Apple TV HD/3rd generation/2nd generation
* Fix some other small bugs

Price and Availability

TunesKit iOS System Recovery provides a free trial version for users to enter/exit the recovery mode for free or test the iOS system recovery performance before buying it. However, the trial version doesn't allow users to repair the problem and they need to upgrade to the full version in order to really solve the issue. As for the prices, it ranges from $39.95 to $299.95, depending on the type of license from one device to unlimited ones.

This program is available for all common Windows and Mac platforms, including the latest Windows 10 system, macOS 10.13 High Sierra and 10.14 Mojave. Besides, it is compatible with almost all models of Apple TV, iPhone, iPad and iPod touch.

About TunesKit

TunesKit Studio is the world's leading multimedia software developer, specializing in developing and providing the best media editing and converting software. Their quick and easy solutions help more than 5,000,000 customers worldwide restore iOS/tvOS system, recover lost iOS data, edit and convert iTunes movies, Apple Music, Spotify songs, Audible audiobooks for years.

Source: https://www.tuneskit.com/releases/tuneskit-ios-system-recovery-supports-apple-tv.html

Jul 23, 2019

Apple Today Releases tvOS 12.4 for 4th/5th Gen Apple TV


Apple today released tvOS 12.4, the eighth update to the tvOS 12 operating system that runs on the fourth and fifth-generation Apple TV models. tvOS 12.4 comes more than a month after the release of tvOS 12.3, which brought an updated TV app.

tvOS 12.4 is a free update that can be downloaded over the air through the Settings app on the Apple TV by going to System > Software Update. Apple TV owners who have automatic software updates turned on will be upgraded to tvOS 12.4 automatically.


There were no new features discovered during the beta testing period for tvOS 12.4, making it unclear what's included in the update.

Apple does not provide release notes for tvOS updates, making it difficult to determine what might be new or improved in the operating system.

The update likely focuses on introducing performance improvements and bug fixes, and there could be some refinements to the TV app that was introduced in tvOS 12.3.

Apple has also released new 7.3.1 Apple TV software that's designed for the third-generation Apple TV.

Note: If you have any problems while using Apple TV, you can ask TunesKit iOS System Recovery for help since this powerful utility is able to fix lots of Apple tvOS issues such as  restart loop, no sound, crashing, black screen, etc. by yourself within a few minutes.

Source: https://www.macrumors.com/2019/07/22/apple-releases-tvos-12-4-update/

Jul 21, 2019

3 Possible Ways to Recover Data from Locked/Disabled iPhone


Have you ever encoutered that the iPhone is disabled after entered the wrong password for many times? For many people who're experiencing it, the data on the phone may means more than the device itself. No worries, you can now read this article and learn 3 possible ways to get your back from a locked iPhone.

Part 1 Recover Data from Locked iPhone without Backup

If you don't have the habit of backing up your iPhone data, it doesn't matter, just use TunesKit iPhone Data Recovery, which will help you recover data from your locked iPhone in the shortest amount of time in the case of no backup. This iPhone Data Recovery tool is truly the most efficient and convenient one for you to choose. The reason why it is recommended is listed below.
TunesKit iPhone Data Recovery Key Features
  • Restore Multiple Data on Your Device - TunesKit iPhone Data Recovery is able to retrieve about 20 kinds of lost data including call history, SMS, iMessages, photos, videos, notes, calls, WhatApp/Kik/Viber messages, voice memos, Safari bookmarks, reminders, calendars, etc.
  • 3 Smart Data Recovery Modes - You can easily find back all deleted data in three smart recovery modes basing on different loss situation thanks to the advanced data recovery technology applied in TunesKit, that is, recover from iPhone directly, recover from iTunes Backup and from iCloud Backup.
  • Fully compatible with all iOS devices - TunesKit iPhone Data Recovery for Windows is highly regarded for its full compatibility with the latest iOS devices running iOS 12, including iPhone X , iPhone 8, iPad 4, iPad Pro, iPad Air, iPod touch 5 and more.
  • Easy-to-use interface - This software is totally user-friendly, which embodied in the simplification of the file restoring process. What you need to take are 3 steps. Firstly, connect your iPhone to the computer with USB cable. Secondly, scan and preview loss data. Thirdly, select and recover deleted files.
You can download a free trial version of TunesKit iPhone Data Recovery for Mac or Windows on your computer in advance, and then follow the tutorial below to learn the methods of recovering data from locked iPhone in 3 easy steps.

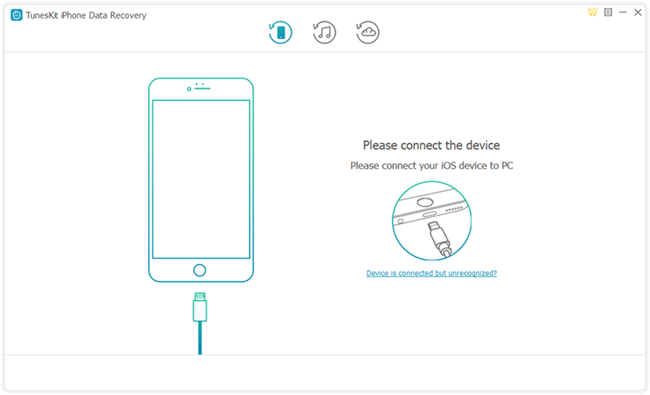
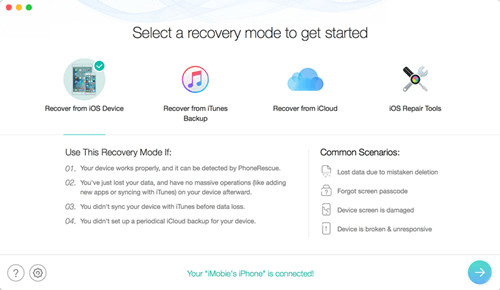
Step 1 Connect iPhone to Computer

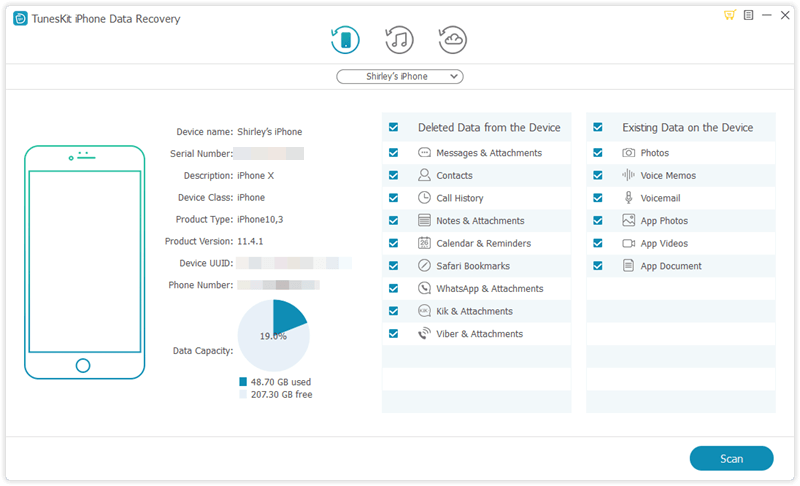
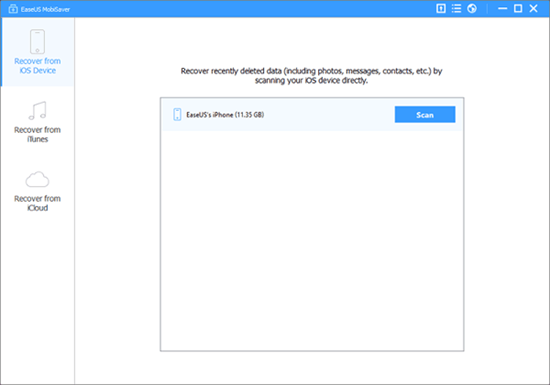
Launch TunesKit iPhone Data Recovery on your computer and connect your locked iPhone to the computer via a USB cable. After that, select "Recover from iOS" option on the top menu bar.
connect iphone
Note: Please use the computer that you've once connected your iPhone to and trusted before, so it won't ask you to Turst This Computer on your device and thus bypass the passcode.

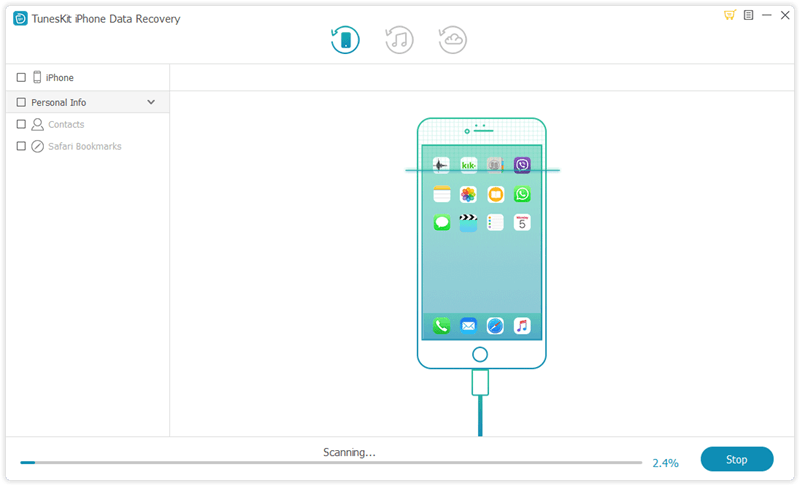
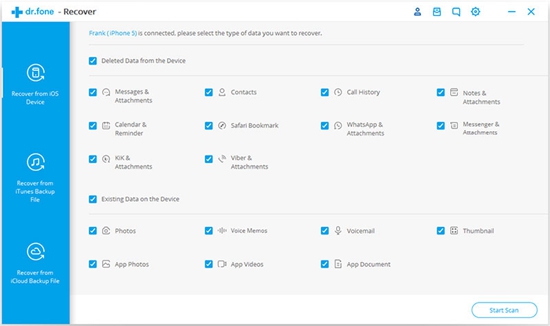
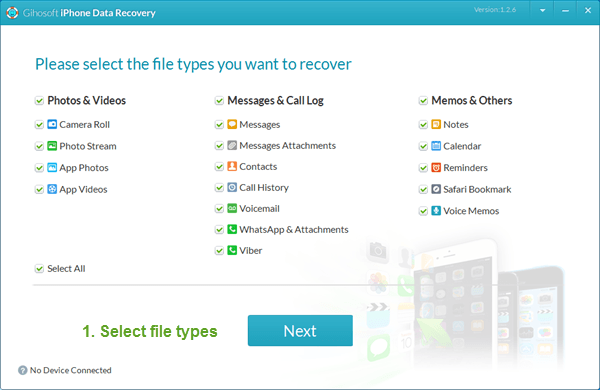
Step 2 Scan and Preview

Select the categories you would like to recover on the interface. Then Click the "Scan" button and wait the scanning process for just a few minutes.
scan iphone

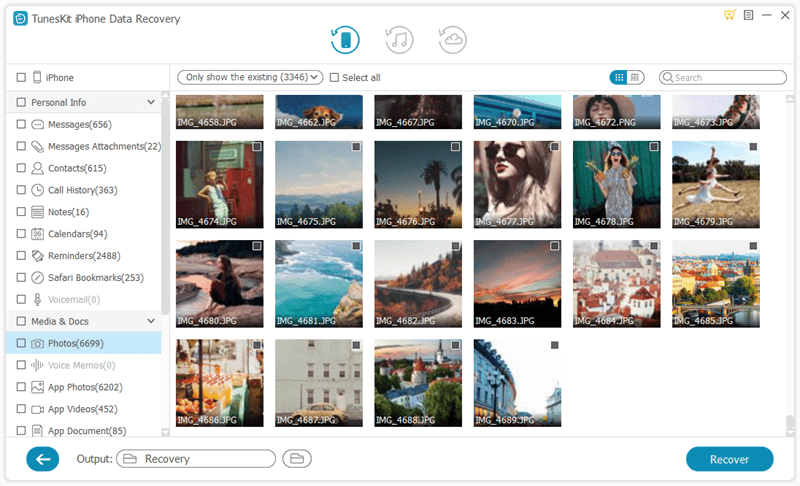
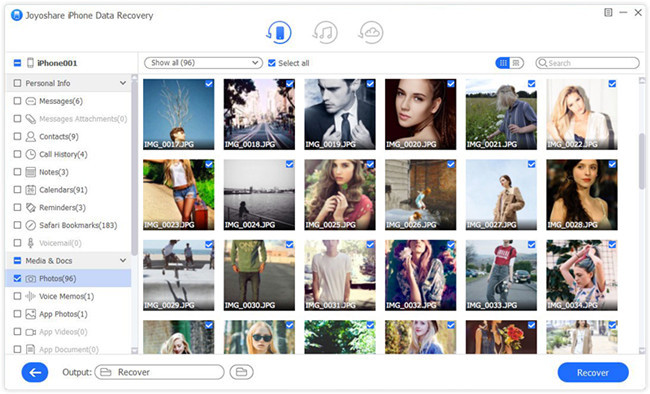
Step 3 Select and Recover

You can preview all recoverable files as shown above. Next select the files you intend to retrieve and click "Recover" button. Soon after that you will find those data back on your computer.
recover data on iphone

Part 2 Recover Data from Locked iPhone with iTunes Backup

Option 1. Recover Locked iPhone Data from iTunes

Moreover, it is more convenient if you have a backup on your locked iPhone as you can restore data from it directly. If not, you are also able to make it following 3 steps below.
restore backup from itunes

Step 1 Backup your locked iPhone using iTunes

There is no need to enter password to backup if you made a backup previously and did not restart your iPhone after connecting it to iTunes last time. Therefore, things become easy to solve, what you need to do is back up your locked iPhone as always. Just connect your iPhone to the computer and Launch iTunes.

Step 2 Efface your iPhone

Then you can start erasing your iPhone after you finish backing up the data on the locked iPhone.

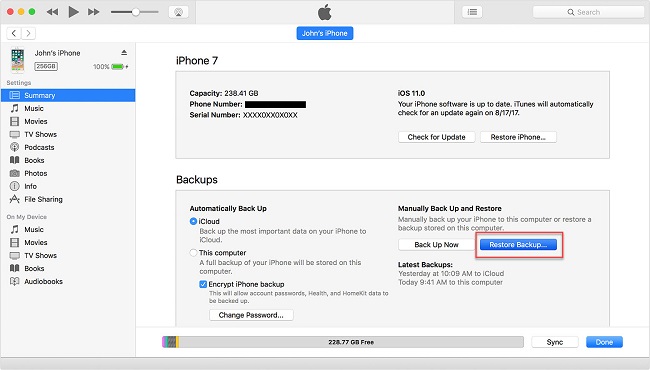
Step 3 Recover the backup files to iPhone

Now that your iPhone is unlocked, however, there is completely no data on the device. To restore data to the iPhone, click the "Summary" option on navigation pane on the left side, and choose "Restore Backup..." option.

Option 2. Recover Locked iPhone Data via TunesKit iTunes Recovery Mode

Of course, you can try TunesKit iPhone Data Recovery, which is recommended because it is able to recover data from the backup to your iPhone efficiently and selectively. The specific steps are as follows.

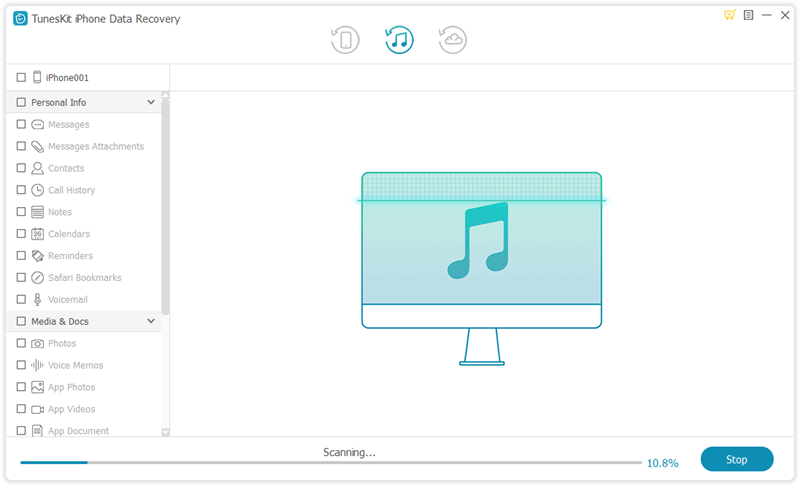
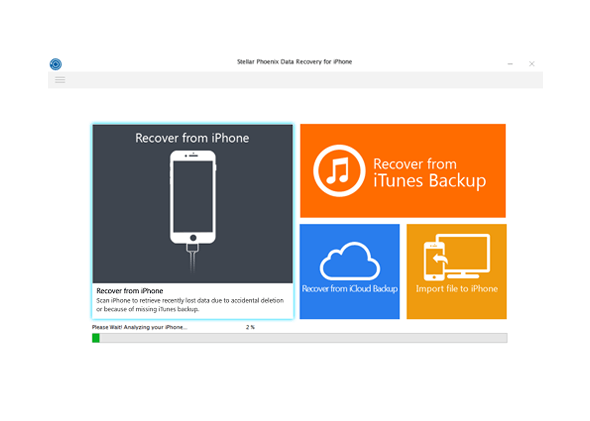
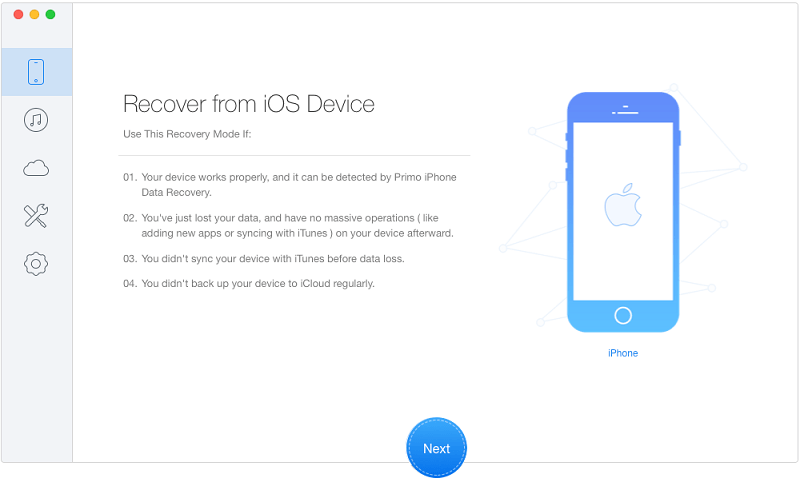
Step 1Select iTunes backup file

Begin by launching TunesKit iPhone Data Recovery and select 'Recover from iTunes Backup' from the main menu, then the application will start detecting all the available iTunes backup files on your computer.
select itunes backup

Step 2Start scanning lost files

Select the type of data you want to restore and click 'Scan'. Then you need to wait until the extracting process finished.
recover iphone data from itunes

Step 3Preview and recover

Now you can view all recoverable files since all available data display on the interface. Select the data you want to restore and click "Recover" to retrieve it to your computer.
recover iphone data from itunes

Part 3 Recover Data from Locked iPhone with iCloud Backup

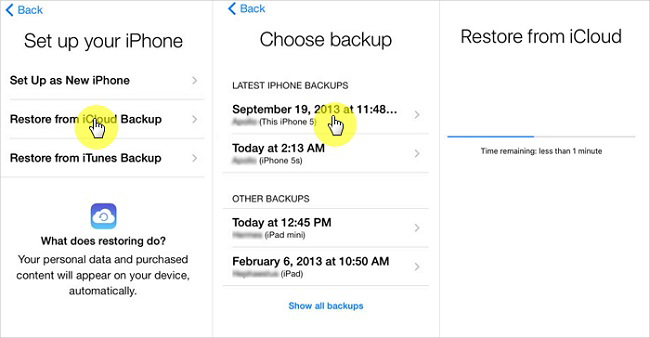
Option 1. Reset Locked iPhone and Recover Data from iCloud

As long as you have iCloud backup, you can first remove your locked passcode through iCloud remotely and then restore it from the iCloud backup file. The following is the quick guide.
Step 1. Go to visit the official website (www.iCloud.com) on the browser of your computer or iPad and then enter the Apple ID and password to sign into your iCloud account.
Step 2. Click on 'All Devices' button and then choose the locked iPhone you want to erase.
Step 3. Press on the 'Erase iPhone' option and all the data will be gone, as do the screen password. Next restore your iPhone from iCloud backup as instruction on the screen.
recover data from icloud backup

Option 2. Recover Locked iPhone Data via TunesKit iCloud Recovery Mode

Since you've backed up your data to iCloud, you can also use TunesKit iPhone Data Recovery to recover data from locked iPhone effectively. You don't even have to use your locked/disabled iPhone during the recovery process. Now just follow the simple step-by-step tutorial below to learn how to do it.

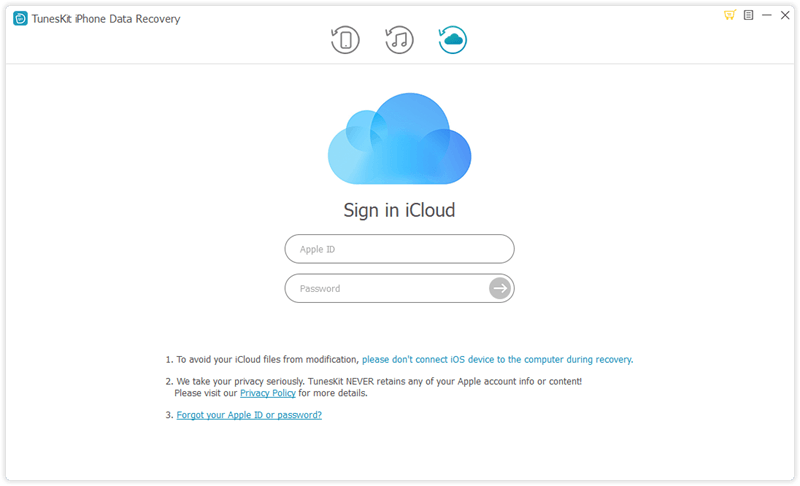
Step 1Sign into iCloud account

Launch TunesKit iPhone Data Recovery on the PC and pick the "Recover from iCloud Backup" mode this time. Log into your iCloud account with correct Apple ID and passcode.
sign in icloud

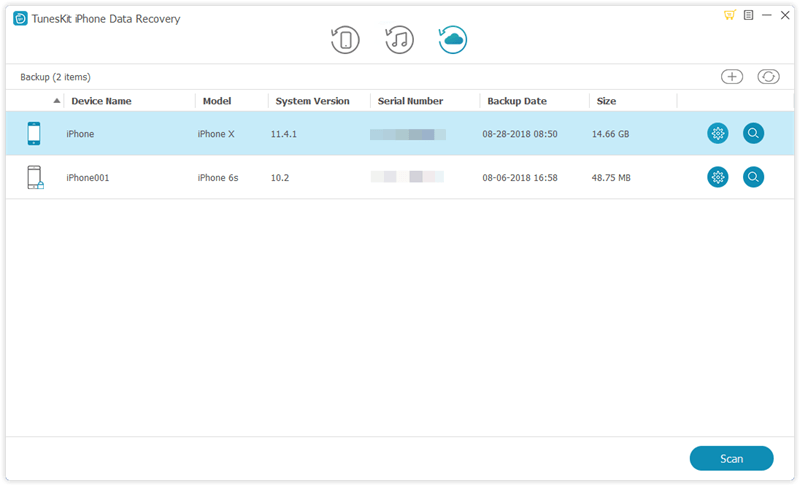
Step 2Extract iCloud backup file

Once you entered the iCloud account successfully, you'll see all your iCloud backup files in a list. Choose the right one that may contain your lost data and then click the 'Download' button.
download icloud backup

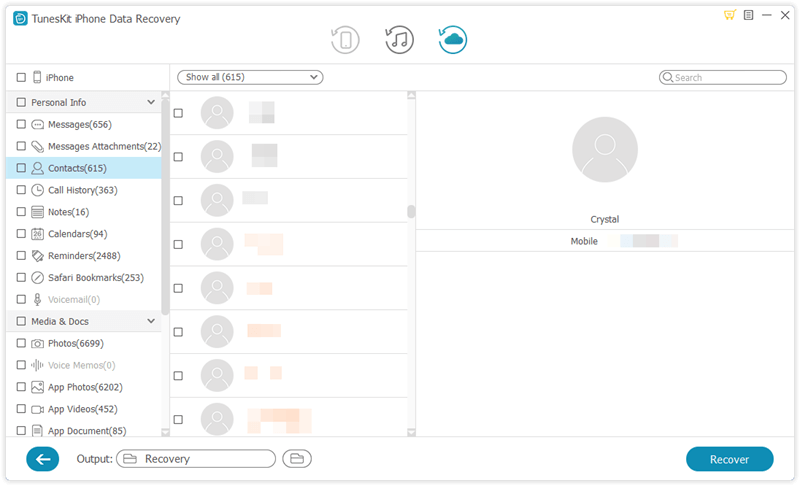
Step 3Retrieve data from iCloud backup

After the download ends, all files will be shown in categories on the left. You can now preview them one by one and tick the ones you want to restore. Afterwards, click the 'Recover' button to get them back immediately.
recover iphone data from icloud backup

Conclusion


As it is shown from the above, you can use TunesKit iPhone Data Recovery to restore data from your locked iPhone whether you have a backup on it or not. In fact, TunesKit is capable of rescuing your data no matter how you lost it, for example, iOS upgrade failure, jailbreak error, improper operation, device damage or lost, factory reset, virus attack, screen broken, system crash, etc. Try this software when you are in the need of recovering lost data.

Source: https://www.tuneskit.com/iphone-recovery/recover-data-from-locked-iphone.html

You may also like:


Jul 12, 2019

[2019 Review] Top 10 iOS Data Recovery Tools


Q: "I've tried to update my iPhone software to iOS 13 but it failed during the process, and I lost all my data! I heard some iOS data recovery programs can help you get my photos, contacts and other data back, but there are so many such software in the Internet. How can i pick a useful one?" - Jack from Apple Discussion

Like Jack, most of us may encouter such data loss in our life. Actually it's not an easy thing to get a suitable iOS data recovery software from hundreds of similar programs. After done some survey and tests, we have collected top 10 best iOS data recovery tools in 2019, with pros and cons provided for your reference. Next let's start.

1. TunesKit iPhone Data Recovery

TunesKit iPhone Data Recovery is very credible data recovery software that will recover a vast range of lost data files and will carry out this operation very fast. It has a preview function and will allow you to select the file types that you want to be recovered. It is prided as the best iPhone data recovery software 2019 in terms of efficiency and speeds in executing the recovery process. It also recovers files of large sizes. It recovers lost data in three ways, namely, recover from the device, recover from iTunes backup and recover from iCloud backup.
tuneskit ios data recovery
Pros
  • Fast data recovery speed.
  • Supports various data loss cases.
  • Recovers over 20 file types of different formats.
Cons
  • Trial version does not allow saving of the recovered files

2. iSkysoft Toolbox for iOS

This is among the best iOS data recovery software that will recover your lost files very quickly. It executes its recovery protocol in three ways, which are recovery from iOS device, recovery from iCloud backup storage and recovery from iTunes backup files. Its operation format makes it possible to recover over 20 file types from calendars, notes, and images among many others.
iskysoft iphone data recovery
Pros
  • Recovers a vast range of file types.
  • Easy to use software.
  • Compatible with older iOS devices.
Cons
  • It is very expensive on purchase.

3. Dr.fone - Recover

This is top-ranked software in iOS data recovery and it prides itself in the aspects of speed, efficiency, and proficiency. Dr.fone - Recover has a high rate in recovery of lost files and operates in three intricate steps in the path to recover your data. These three steps are the connection of your device, scanning, and preview of data and finally the recovery of your data. This simplicity in operation has earned it lots of applauses on clients who have used its services.
drfone ios recovery software
Pros
  • Very fast in data recovery.
  • Simplicity in operation.
  • Easy to understand its operation module.
Cons
  • Relatively expensive on purchase.

4. Stellar Data Recovery for iPhone

It is awesome software that will recover lost data for all iOS devices including the earlier versions such as iPhone 4 and iPhone 4s. It does not require technical expertise to operate and is very efficient in its data recovery process. Another superb feature of this iOS recovery software is the selective recovery feature that will let you have a preview of the lost data and select the files which you want to be recovered.
stellar iphone data recovery
Pros
  • Gives a preview of files to be recovered.
  • It is able to recover large files.
  • Compatible with older iOS devices.
Cons
  • Slow and time-consuming scanning process.

5. iMobie PhoneRescue for iOS

This is another notable recovery application for iOS devices that is rated highly by its previous users on the parameters of efficiency and speeds in operation. Its recovery process is straightforward and you can select to either recover from the device, the iTunes backup or the iCloud backup.
phonerescue for ios data recovery
Pros
  • Supports over 31 file types.
  • Safe recovery mode that will prevent the recovery of malicious files.
  • Offers three modes of recovery that are efficient to restore your data.
Cons
  • The free edition is limited when it comes to features.

6. Gihosoft iPhone Data Recovery

This software can be considered as the best free iOS data recovery software in 2019. This software will recover up to 16 types of data from iPhone in a very quick and effective way. It will recover your lost data courtesy of incidences like a locked phone, accidental deletion of data or even damage to your device. It sums up all its great features with its cost free aspect that is a deal not to be overlooked.
gihosoft iphone data recovery
Pros
  • Recovers up to 16+ types of data files.
  • Supports al iOS devices both new and old versions.
  • Recovers from the device, the iCloud backup, and the iTunes backup.
Cons
  • Its pro version with more lucrative features is not free on download.

7. Primo iPhone Data Recovery

This is superb software that will recover your lost data from your device with an easy to navigate interface. Its operation does not require any technical skills and will execute your recovery relatively fast. Apart from the recovery of your files, this software will also fix issues such an upgrade error on your device.
primo iphone data recovery
Pros
  • User-friendly interface that is very easy to comprehend and use.
  • Provides selective recovery of your lost data.
  • Has a feature that will fix issues such as upgrade errors or hanging device.
Cons
  • Its trial version does not allow for the saving of the recovered data.

8. iMyFone D-Back

This is a very superb recovery partner for your iPad and comes with awesome features such as quick recovery speeds and selective recovery. With the easy to navigate user-interface that does not need any technical background, this is the to-go software for your recovery needs.
imyfone d-back ios data recovery
Pros
  • Recovers large files.
  • Prevents the recovery of malicious data that may contain viruses.
  • Has a preview that will let you choose the files that you want to be recovered.
Cons
  • The trial version has limited features.

9. EaseUS MobiSaver

EaseUS MobiSaver is very efficient iOS data recovery software that will let you recover your lost files very fast. It has an easy to use interface that promotes easy navigation. It also provides a clear step by step guide on the execution of this process.
easeus iphone data recovery
Pros
  • An easy to understand interface that also provides a guide for your best experience.
  • Fast data scanning and recovery process.
  • Recovers data from the device, the iCloud backup, and the iTunes backup.
Cons
  • Bound to have some connectivity issues.

10. Joyoshare iPhone Data Recovery

Joyoshare iPhone Data Recovery is a very smart and easy to use iOS data recovery software for both Mac and Windows users. You can use it to easily recover data via iTunes backup, icloud and iOS. By adopting some special unknown technologies, Joyoshare works much faster than other similar iphone data recovery tools.
joyoshare ios data recovery
Pros
  • Incredible fast working speed.
  • Easy to use interface make you handle easily.
  • Support a vast range of data type for recovery.

Cons
  • Lack of some iOS version support to use iCloud recovery mode.

Hope this review is helpful to you. Any more solutions or suggestions, please feel free to leave your voice below.

Source: https://www.tuneskit.com/iphone-recovery/2019-best-ios-recovery-software.html

Jul 4, 2019

Microsoft Ebook Is Closing: What about the Books You Bought?

Microsoft is going to shut off its ebook services in this July after trying hard to enter the electronic book market since 2000. So what about the ebooks that you purchased at Microsoft's online store? Are they still available? Now read this news and learn more about it.

Customers were warned in April that their ebooks would disappear from the Microsoft Store and that they would no longer be able to buy, rent or pre-order them. They were also told that they would continue to receive access to purchases until July, when refunds would begin to roll out.

Any ebooks that were downloaded for free have subsequently been removed from users’ libraries and customers who purchased titles through the Microsoft Store are being offered refunds.

£20/$25 in credit is also being handed out to users that scrawled highlights or notes in their copies, as these cannot be recovered either.

Microsoft actually teamed up with US retailer Barnes & Noble to launch its first ebook reader – Microsoft Reader – and the LIT file format in 2000, about seven years before Amazon released the Kindle and pretty much took over the industry.

The original Microsoft Reader and LIT format lasted until 2012 when it closed and was re-released a year later as an application to read PDF, XPS and TIFF documents in.

Microsoft also entered into a second partnership with Barnes & Noble in 2012, investing $300 million in the company’s Nook e-readers. The deal lasted only two years before Barnes & Noble bought out Microsoft in 2014 for less than half of Nook’s original value.

This latest service launched on web browsers in 2017 in an effort to make Microsoft’s Surface computers a popular choice for consuming ebooks on the go but, ultimately, the reader could not drum up the audience the company needed to keep it going.

Digital rights management tools mean that when you purchase most ebooks you don’t actually own them. What you are buying is a license that can expire at any moment, keeping Microsoft and other ebook retailers in control of your digital library.

Though DRM tools do help to protect copyrighted works from being stolen, Microsoft’s closure certainly serves as a reminder of what you are paying for when you open your favourite ebook retailer’s website.

Note: If you're a ebook lover and you once read a lot of books from Microsoft store, but now you don't know where to find interesting ebook to read, you may turn to Aubile.com by Amazon. It provides users every audiobooks from every passion from entertainment, education, fiction to inspiration. If you want to download all your audible audiobook and listen to them on any device on the go, you can then try TunesKit Audible Converter, which can remove the DRM protection of every audible audiobook you've bought.

From: https://www.trustedreviews.com/news/ebooks-purchased-microsofts-online-store-vanishing-peoples-libraries-3894074