Showing posts with label free iOS system repair tool. Show all posts

Nov 5, 2020

Effectively Fixed: iOS 14 Update Failure on iPhone/iPad

When I updated my iPhone to the iOS 14 version a few days ago, a message that reads Software Update Failed appeared. Though fortunately this issue has been fixed, yet I find that there are many other individuals beset with this problem. So, to help them and you who are facing the iOS 14 update failure, 6 effective methods are concluded below.

Why does your iPhone/iPad have the iOS 14 update failure?

To begin with, let us figure out why your iPhone/iPad says the iOS 14 update failed. The reasons are nothing but the ones presented here.

1. Insufficient available storage memory on your iPhone/iPad.

2. Failure to reach the update server.

3. Incomplete update process.

4. Long time of downloading the iOS 14 update.

How to fix failed iOS 14 update failure on iPhone/iPad?

Now let's get to the solutions to the iOS 14 update failure on your iPhone or iPad problem.

1. Close and update later

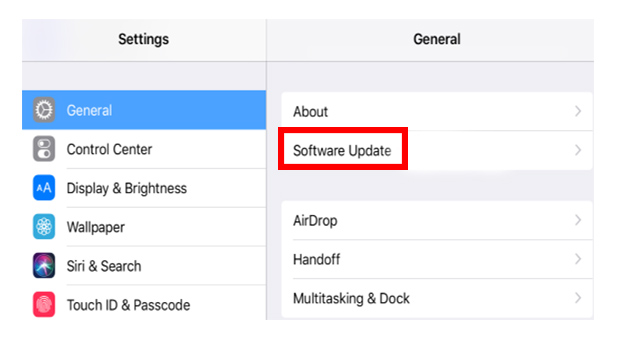
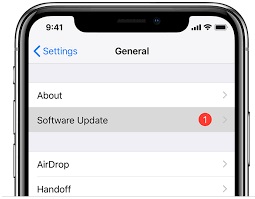
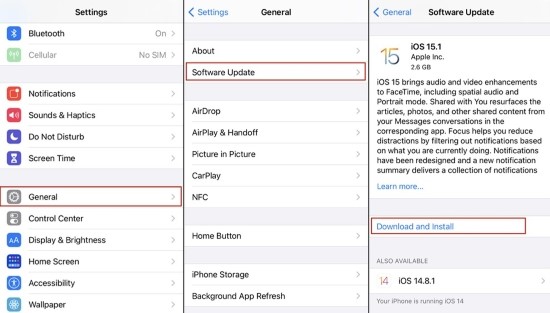
It is generally accepted that this way is the simplest one to get rid of the predicament. There are two options on the "Software Update Failed" message is shown: "Close" and "Settings". Press on the "Close" button to exit the update process, then wait for a while to go to the Settings > General > Software Update, and click on the "Download and Install" to update again.

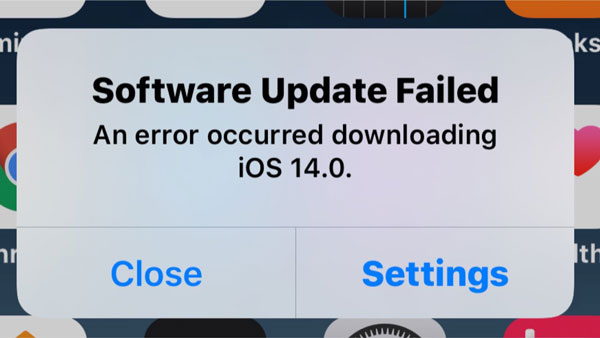
2. Check network connection

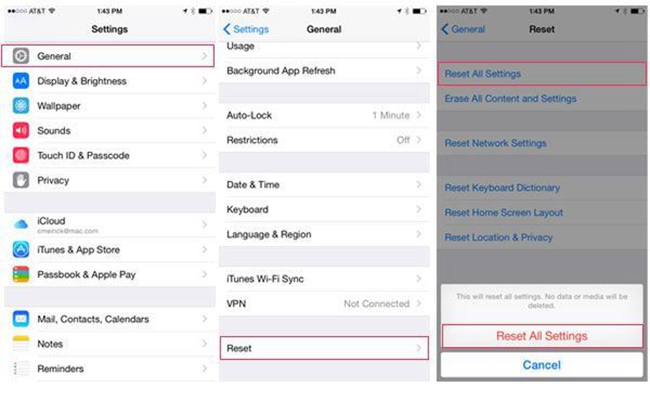
Whenever you update the iOS version on your iPhone or iPad, a stable Wi-Fi network connection is necessary. So, if the iOS 14 update failed after a long time of downloading, then you might have to check the network connection. Or you can directly boost it by resetting the network settings. To do this, just head to Settings > General > Reset > Reset Network Settings.

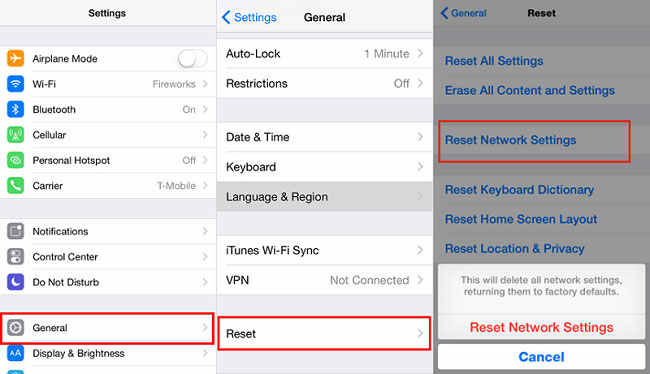
3. Clear space storage

Actually, if there is not enough storage space on your iPhone or iPad, the iOS 14 update failure can also happen. In this case, you are suggested to clear up some space by deleting not needed photos or apps. Or you can remove caches through navigating to Settings > General > iPhone Storage, and manage the space.

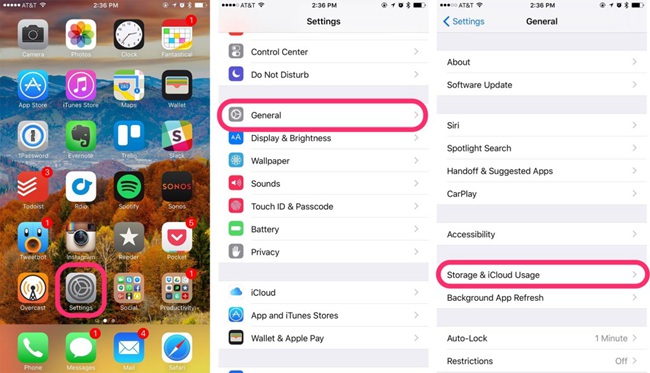
4. Update through iTunes

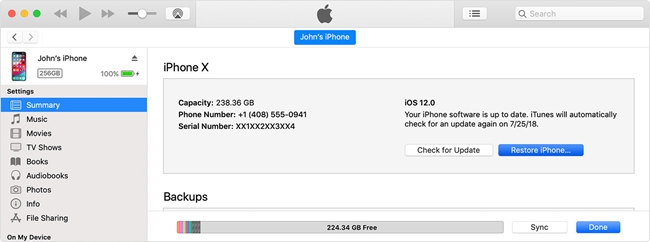
Also, you can try to update your device via iTunes. The operating procedures are rather easy and you can do it by yourself.

Step 1: Launch the latest iTunes on your computer and connect your iPhone/iPad with the computer through a USB cable.

Step 2: Tap on the iPhone/iPad icon on the right-left corner.

Step 3: Click on Check for Update option on the right column and get to the "Download and Update".

5. Manual update

If the above fixes don't work out, then you could update the iOS 14 manually. But this process can be a little complicated and it will delete all of your data on the device. If it doesn’t bother you, here are the related steps to guide you.

Step 1: Download the correct iOS 14 IPSW file on the ipsw.me website.

Step 2: Open iTunes and connect your iPhone/iPad with the computer.

Step 3: On the Summary tab, press the Shift button for Windows (Alt/Option key for Mac) and hit the Restore iPhone/iPad button.

Step 4: Choose the downloaded IPSW file and iTunes will begin to install the latest iOS 14.

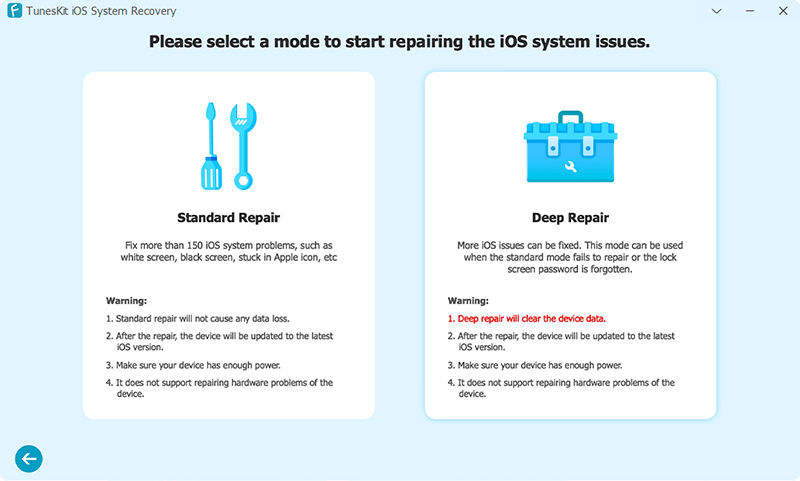
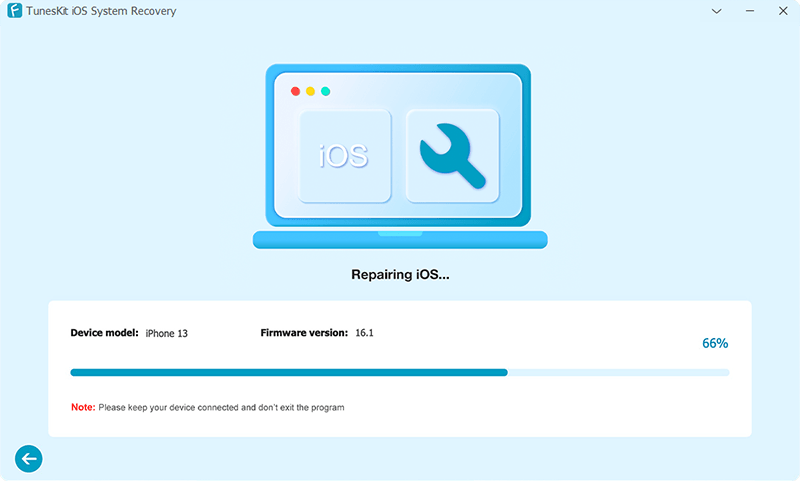
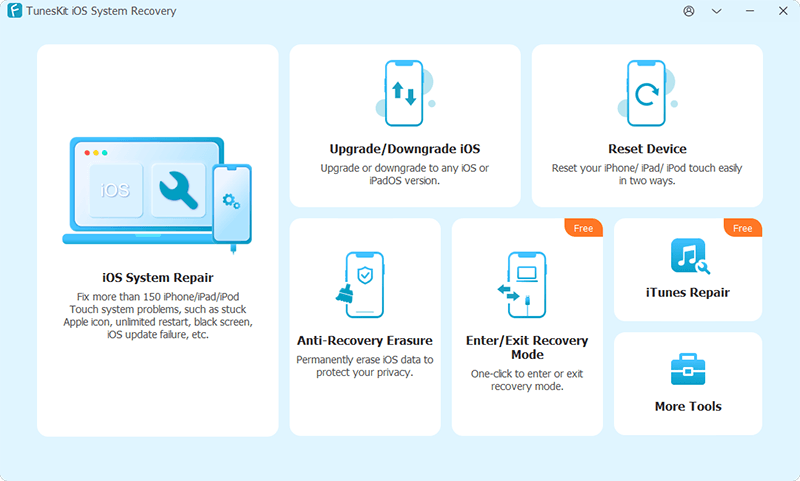
6. Use TunesKit to restore your iPhone/iPad (no data loss)

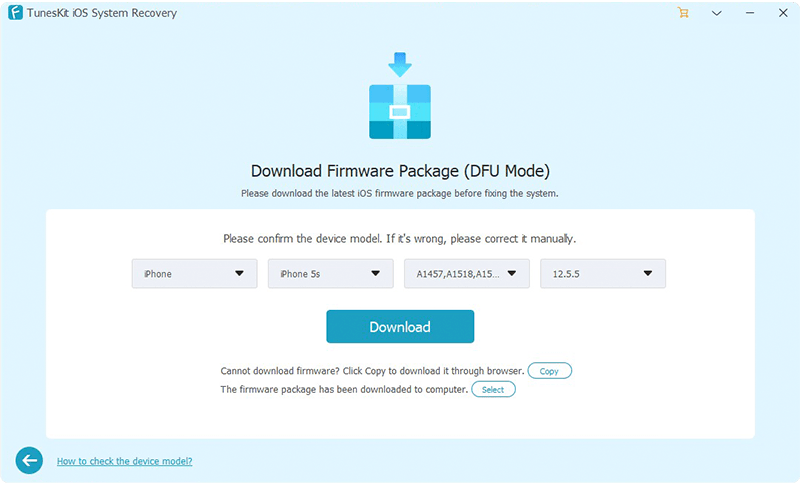
Finally, the ultimate yet most useful fix is to use related iOS system recovery tools such as TunesKit iOS System Recovery. Besides resolving your iPhone/iPad iO 14 update failure, TunesKit can solve all iOS and tvOS system problems, including iTunes errors, a series of screen problems, and so on. If your iPhone, iPad, iPod touch, or Apple TV, etc. other iOS devices have any system issues, just use it and you will be happy to see the satisfying results. Moreover, it offers two modes, Standard Mode and Advanced Mode to settle common and difficult troubles respectively. Of course, easy operations and a customer-friendly interface make it more appealing.

The followings are the three simple operating steps of TunesKit iOS System Repair.

Step 1: Launch TunesKit. Connect the iPhone with your computer and launch TunesKit iOS System Recovery. Then click on the Start button.


Step 2:
Choose Mode. Press on the Standard Mode and then the Next button to go to the next step.
(No data loss will be brought under this mode.)

Step 3: Download Firmware. Check the information which belongs to your iPhone and tap on the Download button. You are now downloading the firmware package matched with your device. When it ends, click on the blue Repair button to fix your device.

Wrapping up

All in all, the above ways given are going to do you a favor to fix the iOS 14 update failure or error. If you have succeeded in dealing with this matter through them, please share it with your friends who encounter the issue. Finally, welcome to leave your thought below.

Oct 19, 2020

How to Quickly Fix iPad Volume Button Stuck


Did you experience or are you encountering the problem of iPad volume button stuck? Well, that's why you are reading this article, which I can make sure that you won't be disappointed? Now let's get to the point. Actually, when the iPad gets volume button stuck, you must feel irritated as this circumstance could be one of the worst ones that iPad users face. But don't worry, to fix this issue is what we are going to talk about next, and you can try out the following 7 simple yet effective methods.

1. Press it for a few times

If your iPad has no hardware damage, for example, being dropped or water damaged, then the situation can be that the iPad may be just temporarily landed into the volume button stuck. In this case, what you can do firstly is to put some pressure on the iPad volume buttons. Namely, constantly press and hold the volume up or the volume down button until the volume icon appears on the iPad home screen, finally check out whether the volume button is still stuck on the iPad.

2. Clean the volume button

At most times, the iPad volume button stuck can be attributed to the dust and debris accumulated in the groove. If it is the case, you need to carefully clean the volume button. To do that, make a cotton and some water prepared, drip several drops of water on the cotton, then gently wipe it, finally use a dry cloth to tub it again.

3. Force restart iPad

If the above ways fail to do the trick, then this matter could result from software errors or MacOS system glitches. In this way, you can solve iPad volume button stuck by force restarting the device. The specific steps of rebooting iPad are presented below.

For iPad with Home button users, press the Home and Power buttons down at the same time until the Apple logo is shown on the interface.

For other iPad versions customers, swiftly hold and release volume up and down buttons respectively, then keep the top button until the Apple logo appears on the screen.

4. Update the iPadOS system

Besides, updating the iPad to the latest iOS system may be helpful in dealing with the iPad volume button stuck issue. Please give it a shot with the procedures below.

Step 1: Tap on the General option in Settings of your iPad.

Step 2: Hit on Software Update and Download & Install buttons.

Step 3: Affirm the request.

5. Reset all settings

Moreover, resetting iPad's all settings is also worth trying to resolve the problem here. However, this solution, though effective sometimes, will bring the device back to the factory settings which erases all of the data and files on the device.

Step 1: Head to Settings > General > Reset of iPad.

Step 2: Enter your apple ID and according passcode.

Step 3: Click on the Reset All Settings option.

6. Use a third-party tool

In order not to make you feel regretful later, here I will introduce you another fix to get rid of the iPad volume button stuck trouble. That is employing iOS system repair applications such as TunesKit iOS System Repair. Compared with other methods, what make this one stands out is that this program can settle the problem with almost 100% working efficiency and won’t cause you any data loss on the iPad.

Spotlights of TunesKit iPad System Recovery

1. Solve all iOS system matters.
2. Supports other iOS devices like iPhone, iPod touch.
3. Supports all iOS versions.
4. With standard mode and advanced mode in hand.
5. Resolve problems with the fastest speed and highest success rate.
6. A simply understand interface and not complicated operations.

Let's go along the following steps to fix iPad volume button stuck.

Step 1: Choose repair mode. Firstly, launch TunesKit iPOS System Recovery for Mac on your computer. Then you need to connect your iPad with the computer. After the device has been detected, tap on the "Start" button. Next, choose the "Standard Mode". You have to select which device you've connected. Then follow the steps and put your device into DFU mode. After that, click on the "Next" button.


Step 2: Download iOS firmware package. Check if the related info of your iPad including the model version, iOS version, etc.is right, correct it if there's anything wrong. If all information is right, hit on the "Download" button and the firmware package matched with your device will be downloaded. Then verify the package quickly.


Step 3: Fix the iPad volume button stuck. When the firmware has been downloaded and verified successfully, you just press the "Repair" button and the program will automatically start to fix your iPad. Don't disconnect your device until the whole process is finished.


Verdict

When your iPad volume button gets stuck, don't be fretted and stressful, just use the tips mentioned above to fix the issue. Finally, please give your feedback to us and leave your comment below to let us know if this article is workable for you.

Oct 9, 2020

Best Guides to Fix Instagram Not Working/Crashing on iPhone

People all love Instagram to share their pictures and photos, but sometimes this welcomed application stops working or becomes crashing. At this time, how to fix this issue? First, let me tell you why does your Instagram on the iPhone keeps crashing?

As far as I first encounter this problem, I was wondering why does my iPhone Instagram app keeps down or crashing? And the reasons are nothing but these points, which range from the app itself to the iOS system including insufficient storage, software bugs, iOS system glitches, and more. In the following passage, 8 fixes are offered to work out the problem of Instagram not working on iPhone.

1. Re-connect Wi-Fi

Based on my experience, the top priority when Instagram on iPhone stays crashing is to check out whether the internet connection performs slow or limited. You can simply disconnect the Wi-Fi to turn off and switching it on to connect again after waiting a few seconds, finally see if the problem is solved.

2. Log in account again

I also attempted a simple way, that is logging out my Instagram account on my iPhone 11 and logging in again. The step-by-step instructions are as presented below.

Step 1: Launch the Instagram app on iPhone.

Step 2: Click on the Profile icon.

Step 3: In the Gear or the three dots button, hit the Log Out option.

Step 4: Open the app and log in the account.

3. Update Instagram

Usually, the main culprit of the Instagram on your iPhone XR not loading can be attributed to the outdated version of the app. At this time, you need to update it to the latest.

Step 1: Go to the App store on the iPhone's Home screen.

Step 2: Click the Update button at the bottom right.

Step 3: Update the Instagram among the apps shown on the interface.

4. Reinstall the app

The process of deleting the Instagram on iPhone and reinstalling it can help to clear the temporary caches that may cause this issue. Follow the procedures here to complete it.

Step 1: Long press the Instagram on iPhone until the "X" signal appears.

Step 2: tap on the cross to remove the app.

Step 3: Navigate to App store and get the app again.

5. Free up storage

Besides removing the data on the Instagram app to spare storage, you can also free up the space on your iPhone XR. To do the deeper clearing, head to Settings > General > Storage on the device, then delete the unwanted files.

6. iPhone software update

If the Instagram on iPhone keeping crashing still persist, then it is advised that you should update the iOS to the latest. This method can improve the device's performance and remove glitches such as app compatibility issue. You can do according to the below steps.

Step 1: Hit on the General option on the Settings of iPhone.

Step 2: Press the Check for update button.

Step 3: Tap the Download and Install button.

7. Restart iPhone

After finishing the iPhone's software update, you could restart your iPhone XR to troubleshoot the problem of Instagram not working or crashing. To do that, you just have to hold the Power button for a while and when the slider pops up, drag on the slide to the right to turn off your iPhone. Finally see whether there is any sign of anomality Instagram after the device reboots.

8. Use iOS system repair programs

Actually, after I tried one or two solutions above, which don't work evidently, I directly turn to the professional iOS system recovery applications. Because people online think that the iOS repair tools can deal with Instagram staying crashing on iPhone with 100% working and results show that these people hold the correct viewpoint. I used the program called TunesKit iOS System Recovery that they recommend and I consider what differentiate this software with other similar products is that it can fix more than 50 types of iOS and tvOS system issues, for example,the overheating iPhone, without any data loss. Moreover, with the help of TunesKit iOS System Repair, managing the iOS system is really preferrable.

Here are the specific tutorials to employ TunesKit iOS System Repair to fix the crashing Instagram on iPhone.

Step 1: Open the software on the computer and hook up your iPhone with the PC. After the device is connected and detected, press the "Start" button. Then choose the Standard Mode and click on the "Next" button. Later, tap the "Enter Recovery Mode" option in the app’s main screen to let your device into the recovery mode.


Step 2: At this step, the program will begin to download and verify the firmware package corresponding with your device. Before that, you had better to check the device info for sure. If everything is correct, simply click the Download button.


Step 3: On successfully downloading the firmware package, press the "Repair" button to fix your iOS system. Remind not to disconnect your iPhone during the process in case other unexpected problems happen.

Verdict

Hope this how-to article is helpful for you. Finally, if your Instagram keeps crashing or not working on the iPhone, try out the above ways and you will be surprised.

Sep 26, 2020

Best Ways to Fix iPhone Email Push Notification Not Working

Do you find that the email push notification is not working when you are performing another application? If you did, the following 6 tips can help you to make the email push notification work again. Please continue reading on this post.

Tip 1: Enable Allow Notification

First of all, when Mail push notification stopped working on iOS 11/13 issue happens, you have to see whether you turn on the "Allow Notifications" button. As the option disabled is mostly responsible for this problem and you can get the workaround by the steps below.

Step 1: Go to the "Settings" of iPhone and click on the "Notifications" button.

Step 2: Hit the "Mail" option on the "Notifications" menu.

Step 3: Turn on the switch named "Allow Notifications".

Tip 2: Log in Email account again

Then you could look at the matter of Mail app itself. One possible way to get out of the trouble is logging out email account and logging in again. You just do as follow.

Step 1: Open "Settings" on iPhone and hit on the "Accounts & Passwords".

Step 2: Choose the Mail account and press the "Delete Account" button to log out the account.

Step 3: To log in the account again, repeat the step 1.

Step 4: Tap the "Add Account" option and select the Mail to input account and password.

Tip 3: Reinstall the app

Another potential solution you can find about the Mail application is deleting and reinstalling it, because this could temporarily remove the bugs on the app. To do this, hold the Mail icon on the main screen for a few seconds, then gently tap the cross signal on the app’s left top corner, finally head to the App store to download and install the latest version of Mail app.

Tip 4: Set Fetch New Data

If it is not the problem of the Mail app itself, then you need to check whether you enabled the Fetch New Data feature. This can be able to get rid of the trouble of iOS stuck with email push notification and relates steps are listed here.

Step 1: Launch "Settings" on your iPhone and tap on the "Accounts & Passwords" option.

Step 2: Click "Fetch New Data" and turn on the "Push" switch.

Step 3: Return to the Mail account and enable the "Push" button too.

Tip 5: Disable Low Power mode

Also, you might resolve iPhone email not pushing notification by turning off the Low Power Mode. To fix this, head to "Settings" on your iOS device and press the “Battery” button, then disable the Low Power Mode through sliding the switch to the left.

Tip 6: Fix iOS system (The optimal choice)

If you have read here, then it is evident that the above methods are not effective as the email on iPhone still fails to notify you. In this case, the issue could result from iOS glitches. In this way, using professional iOS system recovery programs, for instance, TunesKit iOS System Recovery is your optimal choice. Besides solving the Mail push notification not working on iOS devices without any data loss, this tool can also deal with other different kinds of iOS issues such as iPhone stuck problems and errors, etc. What's more, it has two reparation modes called Standard Mode and Advanced Mode to work out simple and complex problems. Last but not least, with Windows and Mac versions, it supports iPhone, iPad, iPod, etc. iDevices and is completely compatible with diverse iOS versions including the latest iOS 14.

How to use TunesKit iOS System Repair to fix iPhone email push notification not working?

Step 1: Double or right click to launch TunesKit iOS System Recovery for Windows on the computer and connect your iPhone with the PC through a USB cable. When your device is successfully connected and detected, click the "Start" button.


Step 2: Follow the instructions on the main interface to put your device into the recovery mode, then pick up the Standard mode to solve the email not notifying problem without causing you data loss.


Step 3: Be sure the common information of your iPhone displayed on the screen is correct. If all is right, tap on the "Download" option to make the application download and verify the firmware package matched with your iPhone.


Step 4: When the firmware package is downloaded and verified, press the "Repair" button to fix your device's iOS system. Keep your iPhone connected during the process. After that, the email push notification on your iPhone not working is resolved.

Final words

The above 6 solutions to fix email push notification on iPhone not working are effective and useful. You can choose the one you favor and if you have anything you do not understand, be free to leave your comment below.

Sep 23, 2020

How to Fix Messages App Crashing on iPhone

The default application on iPhone -- Messages is used to communicate with people by sending and receiving messages. However, it may become crashing sometimes due to  corrupted data and caches, wrong settings, iOS system bugs and more. To solve the Messages app bugs on iPhone, 6 ways can be referred to and they are listed as presented below.

1. Use iOS system recovery programs

The most effective and direct solution to resolve Messages app freezing on iPhone is employing professional iOS system recovery software, taking TunesKit iOS System Recovery as an example. Why should you need TunesKit iOS System Repair? It is a powerful and reliable program which is fully compatible with all iOS versions including iOS 13/14. Apart from this, it has two reparation modes – Standard and Advance modes, and there is no data loss under the former mode to fix the problem. With the help of this tool, no matter what kinds of iOS system issues, for example, stuck problems and the like, you can bring your different iOS devices such as iPhone, iPad and iPod back to normal with ease.

The followings are the specific steps to teach you how to solve iPhone Messages app crashing with this easy-to-operate program.

Step 1: Download TunesKit iOS System Recovery for Windows and launch it on the computer. Then connect your iPhone with the PC and when the device is detected, click on the "Start" option.


Step 2: On the main screen, select the "Standard mode" and tap on the "Next" button. Then your device information will be shown on the interface, check if they are all correct. After that, hit the "Download" button and the software will start to download and verify the firmware package matched with your iPhone.


Step 3: After the firmware package is completely downloaded, press the "Repair" button to let the application automatically fix your device's iOS system. When everything is done, your Messages app on iPhone will work efficiently.

2. Reboot Messages app

If the Messages keeps freezing on your iPhone, try force quitting and then relaunch it. To do this, you can double press the Home button twice to make the app switcher appear. Then swipe the Messages app up off the top screen to close it. After a few seconds, re-open the app to see whether it becomes normal.

3. Restart your iPhone

Then you can also try out removing some software errors by restarting your iPhone, which may have the possibility to work out the problem of the Messages bugs. Just give it a shot according to the diverse models of iPhone.

#For iPhone X/11 consumers# hold the Side and the Volume buttons at the same time until the Slider is shown, then pull on the slider to turn off the iPhone, finally press the Side button to turn your device on.

#For iPhone SE (2nd) /8 /7/6 users# hold the Side button until the Slider is displayed and pull the slider to close the iPhone, finally press the Side button to open the device.

#For iPhone SE (1st) / 5 and former customers# press the Top until the Slider appears, then drag on the slider to switch off the iPhone, finally switch on your device again by holding the Top button.

4. Clear app caches

The Messages app becomes frozen on the iPhone may be due to the caches problem. In this case, it is advised that you should clear up the Messages caches to free up the space and improve the performance of the Messages. To achieve this, head to the Settings of iPhone and find out the Messages, then locate Keep Messages option and delete them.

5. Use 3D Touch

If the above methods fail to do the trick when you are in a conversation, then you could use 3D touch to access Messages. First, open the application by virtue of 3D touch, press the icon until the recent contacts show up, select the content and click the Reply button to send messages. Yet this way just temporarily helps you to use the function of Messages and it doesn’t thoroughly let you get out of the trouble.

6. Reset all settings

In case the Messages app on iPhone is still crashing, the final option you can attempt is to reset all settings on your iOS device. But before you proceed in the following steps, it should be noted that this method will remove all the data and settings on your iPhone.

Step 1: Launch Settings option on your iPhone and go to the General button.

Step 2: Tap on the Reset tab and the Reset All Settings button.

Step 3: Enter the passcode and confirm the reset order.

Verdict

These 6 useful methods can help you deal with the Messages app staing crashing on iPhone. But still, the first way, that is using the iOS System Recovery tool is your top choice.

Sep 16, 2020

Top 6 Ways to Fix iPhone Camera Blurry

 When you open your camera on the iPhone take photos, you find that it is unable to stay focus. Why does this situation happen? How to get rid of this issue? Then in the subsequent context, we will introduce the 6 best methods to solve the iPhone camera won't focus.


Part 1: Why does the iPhone camera become blurry?

A new model of iPhone released every year almost stand out because of its camera compared to other older versions. However, it still sometimes goes wrong, for instance, it gets out of the focus or turns blurry. So why does this problem appear? This common issue can often be attributed to iOS update failure, loosen lens and the like. But no matter what the specific reason is, you can try the following fixes to resolve it.

Part 2: The basic troubleshooting fixes to iPhone with out-of-focus camera

I am sure that you must have tried pressing the Camera button, removing the iPhone's case and etc to make it focus before reading this article. In this case, other alternatives below are worth trying.

1. Switch Autofocus Lock option

There are many features on the iPhone camera that make it easy to use. One of the prominent features is the Autofocus Lock, which allows users to lock the focus when taking a creative picture. But it may be unfavorable when taking selfies or other photos, so you can toggle this option to fix your iPhone camera blurry. To do that, you just open it and click the screen till the AE/AF lock banner is shown.

2. Force close the Camera app

If toggling Autofocus Lock doesn't help you, then you could try another simple way, which is force closing the Camera app. You just need to click twice the Home button or swipe up from the bottom, then swipe the camera app off the top screen among a host of apps running in the background.

3. Restart your iPhone

Rebooting your iPhone can also seem possible to resolve the problem of iPhone with the out-of-focus camera. Just give it a try according to the different models of iPhone.

#iPhone X/11# press the Side and the Volume buttons in the meantime until the Slider pops up, then drag on the slider to switch off the iPhone, finally hold the Side button to open your device.

#iPhone SE (2nd) /8 /7/6# press the Side button until the Slider appears and drag the slider to turn off the iPhone, finally hold the Side button to start the device.

#iPhone SE (1st) / 5 and former# hold the Top until the Slider shows up, then pull the slider to close the iPhone, finally turn on your device again by pressing the Top button.

4. Reset all settings of your iPhone

If you are wondering that whether some wrong settings on iPhone lead to the camera won't focus, then you should attempt to reset all settings of your iPhone. But this will remove all of your data and you are suggested to back up them before the steps here.

Step 1: Launch the Settings of your iPhone and go to the General button.

Step 2: Tap on the Reset button and choose the Reset All Settings option.

Step 3: Confirm the order by inputting your passcode.

5. Update the iOS system

If the iPhone camera won't stay stable is due to the software bugs, then updating the iOS system to the latest version is needed to remove these errors. The followings are related steps.

Step 1: Make sure your iPhone is in charge and connected to Wi-Fi.

Step 2: Hit on Settings > General > Software Update.

Step 3: Select and hit Install Now option to update.

Part 3: The most recommended way to solve iPhone camera won't focus

There is another method to remove software issues and fix your iOS system while getting your iPhone camera blurry problem solved. It is using professional iOS system repair tools such as TunesKit iOS System Recovery. Unlike resetting all settings and software updates, employing TunesKit iOS System Repair won’t give rise to any data loss and get rid of the issue with a 100% success rate.

Step 1: Double-click to open TunesKit iOS System Recovery for Windows on your computer and connect your iPhone with the computer. Click on the "Start" button and select the "Standard Mode" when your device has been successfully connected and detected. Then follow the steps from the screen and make your device go into the DFU mode. Finally, tap the "Next" button.


Step 2: After the first step, examine your device information, for example, the model version, iOS version, etc. Then you just hit the "Download" button and the application will start to download and verify the firmware package matched with your device.


Step 3: When the firmware has been downloaded successfully, click on the "Repair" button and your device will be fixed. After iOS is fixed, your iPhone camera will perform well without any problem.

Bottom line

We sincerely hope these troubleshooting guides can be of great help to you. If you have any other questions, welcome to leave your comment below.