Nov 19, 2021

Easy Ways to Add Amazon Music to Rekordbox

These years, DJ has become a trendy word among young people. More and more DJ nice software help more and more music lovers to become professional music practitioners. Rekordbox, a professional DJ software, has become a go-to tool for editing music. It has multiple audio effects and a friendly UI. Centralised management for various sources of music is one of the highlights of it. You can add the streaming music from SoundCloud and Beatport easily. And make your music fantasy. Amazon Music is also a piece of excellent music streaming platform that has developed for many years. Have you ever tried to add Amazon Music to Rekordbox? It may be a little difficult for you if you don't know how. We will show you some great solutions as below.


Part 1. Convert Amazon Music for Rekordbox by TunesKit Audio Capture

You may fail to move Amazon Music to Rekordbox before. Let's figure out the reasons. One of the most important reasons is that Amazon Music cannot be played on other applications because of the encrypted feature. If you want to play Amazon Music on the other apps, you need to convert Amazon Music to a common format. Then you need to convert the Amazon Music to the supported formats of Rekordbox.

Here you will need a powerful third-party tool called TunesKit Audio Capture. TunesKit Audio Capture includes two primary features. The first consideration is the download quality and formats. Instead of recording the audio, it directly rips the information from the participating audio files, meaning that the captured music is of identical quality as the original audio because the captured information is lossless. Songs downloaded with different Amazon Music audio downloaders or recorders, on the other hand, may suffer more and less quality loss. TunesKit also supports several formats, including MP3, WAV, FLAC, ACC, M4B, and M4A, allowing users to listen to music on a wide range of devices and platforms.

The other important possibilities are multi-tasking operations. Most of the time, we only wish to copy one song from Amazon Music. TunesKit is prepared to record and transmit several tracks at the same time to satisfy current demand, and each track focuses on only one song, ensuring that recordings do not contain misleading impressions or unsuitable noises. You may do other things on your computer while downloading music from Amazon Music without worrying about unwanted sounds.


Tutorial: Using TunesKit to Download Amazon Music

To download Amazon Music to CD, first convert Amazon Music to MP3. You may also save your Amazon Music on a USB disk after the conversion.


Step 1: Install and launch TunesKit Audio Capture.

TunesKit Audio Capture offers a free trial version for customers to sample before purchasing the full version. When you launch the downloader, the first window displays a list of target programs. Check the list to check if the browser you want to use to listen to Amazon Music is listed; if it isn't, tap the "+" sign to add it. To make things easier, drag and drop the browser into the list.


Step 2: Change the Output Settings and Parameters

Don't forget to change the output settings. The settings menu displays when you click the "Trumpet-shaped" icon in the main window, as seen in the image above. Change the output format, codec, channel, and other settings in this section.


Step 3: Make a Music Recording from Amazon Music

When you tap the browser icon, a browser and a capturing window will emerge on their own. Listen to the music in the browser. After a few seconds of pause, the downloading should continue, and the songs' names and ID3 tags should be automatically matched after around 25-30 seconds. When the download is finished, click the "Stop" button in the bottom right corner.


Step 4: Trim and fine-tune the audio

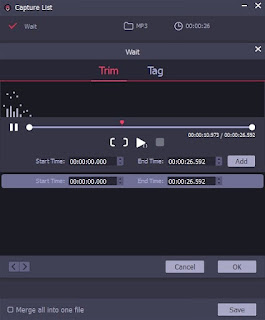
After recording, there may be some unwanted bits or adverts in the downloaded music. If this is the case, you may access the editing window by clicking the "Edit" button at the bottom of each track in the ripping result window. Using this editing tool, you may chop the music to your liking. You may utilize editing to make ringtones, eliminate unnecessary parts, and so forth. You can also modify the ID3 tags.


Step 5: Save the Record Files

Click the Save option to export the records to the output folder. You can also locate the audio files from the icon at the bottom of the window.


Part 2. A Shortcut to Convert Amazon Music for Rekordbox

Tunelf Amatune Music Converter is a shortcut for you to download Amazon Music. It provides one-stop shopping for Amazon Music downloads and conversions. With our excellent Amazon Music downloader, you can quickly copy your favourite tunes from Amazon in lossless quality. Then, with lightning speed, you'll download Amazon Music to MP3, AAC, M4A, M4B, FLAC, and WAV. ID3 tags will also be kept. You will be able to move them to any device at that point. Tunelf Amatune Music Converter makes it simple to receive high-quality Amazon Music.


Part 3. How to Transfer Amazon Music to Rekordbox

After converting Amazon Prime Music to MP3 or obtaining Amazon Music Unlimited to MP3, you may easily and quickly access Amazon Music on Rekordbox. You may import Amazon Music music into Rekordbox in two ways: by dragging Amazon Music files from your hard drive or by using iTunes.


Option 1: Sync Amazon Music from your iTunes library to Rekordbox.

Before you may use iTunes to transfer Amazon Music tracks to Rekordbox, you must first sync Amazon Music to your iTunes library. Then, proceed as follows:

1. Go to the iTunes icon and expand the tree by clicking on the arrow.

2. You may check for Amazon Music tracks in your whole track collection (All Tracks) or in iTunes playlists that you've created.

3. After you've located the Amazon Music tracks and playlists you desire, Rekordbox will import them into its collection and add the track data and waveforms.


Option 2: Copy Amazon Music from your hard drive to Rekordbox.

Because TunesKit program has stored the converted Amazon Music files to the folder you chose, you may obtain Amazon Music music on Rekordbox from the hard drive by following the instructions below:

1. Navigate to the Amazon Music folders or files that you wish to import into Rekordbox.

2. Highlight the "Collection" icon to the left of the playlist tree, then drag Amazon Music tracks to the track windows at the bottom of the Rekordbox screen.

3. Rekordbox analyzes these Amazon Music files and adds track data such as waveforms, song keys, and BPM, after which these Amazon Music files are ready to be loaded onto a playlist.


Conclusions

Rekordbox is a powerful DJ editing tool for all kinds of musicians. You can create some surprising music with this software and your great ideas. Now you may know how to move Amazon Music to Rekordbox in easy ways. TunesKit and Tunelf can help you download and convert Amazon Music to be compatible with Rekordbox without much effort.

For more: https://www.tuneskit.com/record-audio/amazon-music-to-rekordbox.html


Best 5 Alternatives to WeVideo in 2021

WeVideo, a user-friendly online video editor, was widely loved by users from all around the world. It helps users create amazing video content by providing Stock Media, Text, Audio, Transition, and Background. WeVideo has a fast uploading speed and rendering speed.

Therefore, are there any alternatives to WeVideo that can enable users to edit their video clips online or using the software? Sure. If you are attempting to use another online video editor or video editing software, here is where you should be.

Top 1. The best WeVideo alternative - TunesKit AceMovi

TunesKit AceMovi is a kind of dedicated and multifunctional video editing software that is available on Mac and Windows. If you are a video editing novice, TunesKit AceMovi is the ideal choice for you to begin your video editing. It comes with the features like Backgrounds, Sound Effects, Subtitle, Overlays, Filters, Transitions, Animations, and so on. With the non-linear timeline, the video editing is now a simple job with TunesKit AceMovi.

In addition, TunesKit AceMovi has a built-in screen recorder and voice recorder, which can help you capture the highlight that happen on your computer. In TunesKit AceMovi, you can find a huge stock of video editing resources that users can add to your videos for free. It supports the mainstream video formats that users can export their video to any format if they want.

Top 2. Clipchamp

As an online alternative to WeVideo, Clipcham offers most of the basic video editing features like templates, music stock, video resources, free images, titles, transitions, filters, and so on. You can edit your video on computers, mobile phones, and tablets. Users are able to import their videos from dropbox, Google Drive, OneDrive, Zoom, Box, Google Photos, or mobile phones. Drag your videos to the Clipchamp timeline, and you can edit the layout, transform, colors, fade, and speed. If you are a premium user, the video media can be backed up in cloud storage.

Pros:

Has a text to speech feature

Fast rendering and export speed

Can speed up your video up to 16x speed

Cons:

The free account is limited to 480p resolution

Top 3. Kdenlive

Kdenlive is an open-resource and multi-track video editor that is available on Mac, Windows, and Linux. As one of the free alternatives to WeVideo, Kdenlive offers a wonderful editing experience as other paid video editors do. It works well in video editing preview and offers a multi-camera editing feature. When you add video editing effects like transitions, animations, text, etc., you can customize each parameter if you want. What's more, though you are using a low-end pc, Kdenlive can still work smoothly without lag.

Pros:

Contains basic video editing features to meet standard needs

It has a preview window and multi-camera editing is wonderful

An appropriate choice for video editing beginners

Cons:

It crashes sometimes that may corrupt your project


Top 4. Avidemux

Avidemux is a recommended WeVideo alternative for those who just need to simple trim or merge their MP4, AVI, and MOV video. It is a free program that works on both Windows and Mac. Though video editing features are limited in Avidemux, it can edit your video without reencoding and convert your video to other formats without quality loss. It supports many video container formats including AVI, DVD compatible MPEG files, MP4, and ASF with codecs. It also allows users to edit the audio tracks.

Pros:

Professional in video cutting and trimming

Allows users to export their videos in various formats

Supports users to edit a green screen video

Cons:

Has bad compatibility with Windows

Top 5. Davinci Resolve

Davinci Resolve can be deemed as the world's most popular video editor that combines a professional color palette, music equalizer, chroma-key, 8K video editing supports, hardware acceleration, and advanced preview windows. Davinci Resolve has designed a particular editing toolbar that helps users to enhance their video without meeting hassle. It has a perfect choice for audio editing, color adjusting, and filmmakers. Nevertheless, Davinci Resolve is not a beginner-friendly program and requires a high-end PC.

Pros:

Professional color palette and grading tool

Has a variety of audio editing features like denoise, remove noise, and equalize

Supports for VST plugins

Cons:

Runs lag on low-end PC

The bottom line

In this post, I have had recommended five alternatives to WeVideo that are available on Windows and Mac, which can meet your needs in video editing. As for me, I prefer TunesKit AceMovi the most. It is a lightweight and all-in-one video editing program that outranks most competitors. No matter whether you want to do basic and advanced editing, TunesKit AceMovi can meet all your needs.

Its source comes from: https://acemovi.tuneskit.com/alternative/best-wevideo-alternatives.html

Nov 12, 2021

Easy Methods to Burn Amazon Music to CD

CDs were the most common medium we use to save audio files in the past. With the development of internet technology, streaming music has gradually become the mainstream way to listen to music. While it's easy to listen to music on streaming platforms, it's not so easy to keep it forever. Amazon Music is one of the largest streaming platforms today, with over 70 million songs, so you can easily find your favorite music on it. But it takes some effort to save these songs. This post will cover how to burn Amazon Prime Music to CD.


Part 1. Best Tool to Download Amazon Music to MP3

TunesKit Amazon Music Downloader has two main functionalities. The first is the download quality and formats. Rather than capturing the audio, it directly rips the information of the participating audio files, implying that the captured music is of equal quality as the original audio because the captured information is lossless. In comparison, songs downloaded with alternative Amazon Music audio downloaders or recorders may incur further and fewer quality losses. TunesKit further provides several formats, including MP3, WAV, FLAC, ACC, M4B, and M4A, allowing users to play music on a variety of devices and platforms.

The multi-task operates are the other key alternatives. In most situations, we just want to transfer one song from Amazon Music. TunesKit is ready to record and transfer many tracks at the same time to meet current demand, and each track concentrates on only one song, which means tracks will not have false impressions with one another or inappropriate sounds. While downloading music from Amazon Music, you are free to do other things on your computer without worrying about unexpected noises.


Part 2. How to Download Amazon Music with TunesKit

To download Amazon Music to CD, you need to convert Amazon Music to MP3 first. After the conversion, you can also save your Amazon Music on USBdrive.

Step 1: Download and Run TunesKit Audio Capture

TunesKit Audio Capture provides a free trial for consumers to try before purchasing the full version. The list of target programs appears as the first window once you run the downloader. Check the list to see if the browser you wish to use to listen to Amazon Music is included; if not, touch the "+" symbol to add the player. Drag & drop the browser into the list for a simpler way.


Step 2: Change the Output Settings and Parameters

Don't forget to customize the output options. When you click the "Trumpet-shaped" icon in the main window, the options menu appears, as seen in the picture above. Change the output format, codec, channel, and other options here.


Step 3: Make a Recording of Music from Amazon Music

Tap the browser icon, the browser, and a capturing window will appear on its own. In the browser, listen to the music. After a few seconds of pause, the downloading should begin, and the titles and ID3 tags of the songs should be automatically matched after around 25-30 seconds. When the downloading is complete, click the "Stop" button in the bottom right.


Step 4: Trim and Fine-tune the Audio

There may be some undesired portions or advertisements in the downloaded songs after recording. If this is the case, you may enter the editing window by pressing the "Edit" icon at the bottom of each track in the ripping result window. You may cut the music as you like using this editing tool. You may use editing to create ringtones, remove unneeded pieces, and so forth. You may also change the ID3 tags.


Step 5: Save the Record Files

Click the Save option to export the records to the output folder. You can also locate the audio files from the icon at the bottom of the window.


Part 3. How to Burn Amazon Music to CD

Please check the requirement before the process of burning Amazon Music to CD

1. Make sure that your computer has a disc drive for burning discs;

2. Prepare a blank CD for copying Amazon Music to CD multiple times;

3. The CD burner like iTunes or Windows Media Player is available on your computer.


All of the music you wish to transfer on CD from Amazon Music has now been converted to plain audio formats, and you may copy them to your CD for listening in the car or at home. You have two options for adding Amazon Music on a CD: iTunes or Windows Media Player. To begin, follow these steps.

1) Copy Amazon Music to CD with Windows Media Player

1. Insert a blank CD into the disc drive of your computer.

2. Open Windows Media Player on your computer.

3. Press the 'Burn' button on the right and drag and drop Amazon Music you want to add to CD into the burn list.

4. Click the menu in the Burn panel and press the 'Start Burn' button.


2) Burn Amazon Music to CD with iTunes

1. Fire up iTunes on your computer.

2. Create a playlist for saving Amazon Music you want to burn to CD by going to 'File > New > Playlist'.

3. Insert a blank CD into the disc drive and open the 'File' menu to choose the 'Burn Playlist to Disc' option.

4. Select the 'Audio CD' option from the format list and press the 'Burn' button to begin to burn Amazon playlist to CD.


Part 4. Bonus Tip

Tunelf Amatune Music Converter is another fantastic utility. It is a one-stop-shop for Amazon Music downloads and conversions. You may easily copy your favorite tracks from Amazon with lossless quality with our fantastic Amazon Music downloader. Then, with rapid speed, you'll download Amazon Music to MP3, AAC, M4A, M4B, FLAC, and WAV with no restrictions. ID3 tags will also be maintained. You will then be able to transfer them to any device. You may easily obtain high-quality Amazon Music by using Tunelf Amatune Music Converter.


Conclusions

I have explored 2 easy ways for you to download and convert Amazon to MP3. Then you can burn the converted Amazon Music to CD without much effort. If you are interested in the tools, click the links above to try them now!

For more: https://www.tuneskit.com/record-audio/burn-amazon-music-to-cd.html

How to Upload a Video to Instagram from Win/Mac

Instagram is a globally popular social media platform that allows users to upload pictures and videos to it. And it is one of the most fashionable entertainments among the youths. It will not be a tough job uploading videos from your smartphone. In today's post, I would like to show you how to upload a picture or video to Instagram from your computer. Here are the Instagram video uploader recommendations.

How to upload video to Instagram from computers

Actually, Instagram has a web-based version that users can use online. Please access Instagram.com and then login in with your email or phone number. On the Instagram homepage, you can view the wonderful content that others post and leave a like to them. If you want to post a video to Instagram, you can find a plus icon on the top menu, hit it to create new content. Here is the step-by-step tutorial on how to upload video to Instagram from computers.

Step 1: You can select the photos and videos from your local files. Dragging and dropping them to the website is also an alternative way.

Step 2: Then, you will be required to crop your video, and you can choose the video ratio by clicking the bottom-left icon. There are original, 1:1, 9:16, and 16:9 for you to crop. If you need to add more video clips, click the bottom-right icon, and then hit on the plus icon to add additional video clips to Instagram.

Step 3: Select a cover photo from the video clips or local picture files. And you can trim your video if you want. Besides, there is a built-in switcher for users to mute the video.

Step 4: Finally, you can write a caption for this post. Adding location and alt text is an optional choice if you need it. Click the Share button to post your videos and images to Instagram.

How to upload a video to Instagram using other tools

BlueStack

Though BlueStack is often used for playing Android games, it is alternatively a wonderful Instagram video uploader. It is an Android emulator that allows you to run Android applications and games on a computer.

Step 1: Download and Install BlueStacks from the official website.

Step 2: Sign in to your Google account, and then download Instagram from Google Play.

Step 3: When the installation is finished, open Instagram and sign in to your Instagram account. Click the plus icon to upload your video to Instagram.

INSSIST

INSSIST is a Chrome extension that helps you to use the Instagram mobile interface and change your browser to an Instagram video uploader. You can use it as you are using the mobile Instagram version.

Step 1: Launch Chrome browser on your computer, and visit the chrome extension store.

Step 2: Type INSSIST in the search box and press enter. Then, click on the INSSIST | Web Client for Instagram. Add it to chrome and click it on the top-right toolbar to open Instagram.

Step 3: Sign in to your Instagram account, click the Plus button to create a new post by uploading videos and images from your computer.

The Best Instagram Video Editor - TunesKit AceMovi

How to upload a video to Instagram is now not a difficult question after learning the above methods. As for many Instagram users, editing a video on a mobile phone is not as convenient as on a computer. Here, I recommend TunesKit AceMovi to you. TunesKit AceMovi is an all-in-one and professional video editing tool that helps you make your Instagram videos better. It comes with video editing features like Stickers, Audio, Text, Filter, Transitions, Animations, and Split-screen. It is available on Win and Mac and supports mainstream video formats. .

Import the Instagram videos to TunesKit AceMovi

To begin with, click the Import button to add video files to the TunesKit AceMovi library. Or you can drag and drop the video files to TunesKit AceMovi directly.

Edit your Instagram video

Drag and drop the videos to the AceMovi timeline. You are able to customize the video on the top-right panel. If you want, dragging video effects to the timeline can make your video looks better.

Export your video

When you finish the editing, click the Export button to export your video. TunesKit AceMovi allows you to export your video to any video format you want.

Summary

Using an Instagram video uploader is the best choice for Instagram users to upload their local videos from a computer. Also, TunesKit AceMovi is the best-selected video editor for Instagram content creators. Because of its powerful editing features, concise interface, and best user experience. 

Nov 5, 2021

How to Combine YouTube Videos

For many YouTubers, updating the uploaded video by combining other video clips is a common video editing skill. Too often, a video uploaded doesn't mean its editing stops. The creators will merge, trim, rotate, add filters, add audio, or do other edits to make their videos better. Merging videos is the most effective way to increase the content and length of the video. 

TunesKit AceMovi - The best YouTube video merger on Win/Mac

TunesKit AceMovi is a one-stop video editing tool that can merge YouTube videos within several steps. With the non-linear timeline of TunesKit AceMovi, users can combine YouTube videos in any sequence as users want. Besides, it allows users to add animations and transitions between each two video clips to make the switch looks more smoothly. It also enables users to add audio, subtitles, stickers, background, watermark, and split-screen to the YouTube videos.

Now, let's see the step-by-step guide for how to combine YouTube videos using TunesKit AceMovi.

Import media to TunesKit AceMovi

First, download and launch TunesKit AceMovi on your computer. TunesKit AceMovi is available on Windows and Mac with low system requirements. You can drag and drop the YouTube video files to the TunesKit AceMovi library directly. Or click the Import button to import videos to TunesKit AceMovi.

Add the YouTube videos to timeline

Drag and drop the media files to the timeline from the AceMovi library. The video file and the audio file should be placed in different tracks. If you need to sync the audio with video, hold and drag the box edge to make it.

Add video effects to your YouTube videos

To get better video switching, adding video effects like transitions or animations should not be a bad idea. Click the Transition icon and Animations icon on TunesKit AceMovi, then drag and drop the favored projects to the timeline. You can see the effects in the preview window. In addition, you can customize the effect on the top-right properties panel.

Combine YouTube videos into one and export it

Click the Export button to get your effort with the final step. You can rename, change location and select the format of your video in the pop-up window. When everything is satisfied, click the Export button to enter the export process. It is all the procedures to combine YouTube Videos using TunesKit AceMovi.

How to combine YouTube videos online

Though video editing software like TunesKit AceMovi provides powerful editing features, what is the better choice for those who just need to combine video instead of various video post-creating? A YouTube video merger online undoubtedly will stand out. Next up, I will recommend some dedicated online tools to you, which combines your YouTube videos without downloading any extra content, and only requires a browser.

WeVideo

WeVideo is an online tool for beginners to combine YouTube videos for free. Before combining, you should sign up with Google, Facebook, or Email. Then you can start the video editing. WeVideo enables users to upload their YouTube videos by URL or upload from local files. Put your video files together to combine them easily. You can also record your screen, audio, and voiceover with the built-in feature of WeVideo, and join them in your video. Once you are satisfied with your video, click the Export button to get it as MP4 or other video formats.

Kapwing

Kapwing is absolutely a competitive product that is designed to combine YouTube videos online. One of the convenience of using Kapwing is that users are allowed to upload videos by dragging and dropping. Combine the videos with the following steps:

Step 1: Add the video files to Kapwing;

Step 2: Place them in the order you want;

Step 3: Export the combined video.

FlexClip

As a simple and free YouTube video merger online, FlexClip is appropriate among video editing novices. Before editing, you will be required to sign up for FlexClip. You can upload the videos from your computer. It is worth noting that, FlexClips limits each video up to 1 minute. Drag the videos to the timeline, and change the position by moving them. If you possess a premium account, you can access the videos from cloud storage that you have uploaded from other devices.

The bottom line

No matter whether you are a video editing novice or master, the above four tools are suitable. Compared to online tools, I personally prefer TunesKit AceMovi - a professional and all-in-one video editor, and it is also highly recommended by users all around the world.

Nov 4, 2021

3 Ways to Download Amazon Music for Galaxy Watch to Play

Smartwatches nowadays have grape many young people's hearts. When we talk about the smartwatch, most people will think of Apple Watch. However, there are still many brilliant Android smartwatches. Samsung Galaxy Watch has an eye-catching performance in 2021. Compare to the old series, the latest one has some new features like a faster processor, a higher-resolution display, expanded memory, a sensor that can measure your body fat, and the ability to track your snoring. These made the Galaxy Watch receive more attention. However, several third-party apps already support the Galaxy Watch, except for Amazon Music. Before Amazon Music announced its support for Galaxy Watch, what are the ways to control Amazon Music with Galaxy Watch? We will give 3 good solutions for you.


Part 1. Amazon Music and Galaxy Watch

MP3, M4A, AAC, OGG, and WMA audio files are supported by the Galaxy Wearable and Music apps. As a result, because these files are encrypted, you cannot directly export downloaded music from streaming services such as Amazon Prime Music and others. Meanwhile, Amazon Music does not provide its service to the Galaxy Watch, so you will be unable to access Amazon Music on the Samsung Galaxy Watch regardless of whether you have an Internet connection or not. But you can use some third-party tools to solve it.


Part 2. Record Amazon Music to MP3 with TunesKit

TunesKit Audio Capture is a good idea to download songs from Amazon Music. It is a professional and sophisticated streaming audio recorder that can collect music from streaming services and convert it to simple audio formats. It supports multi-track recording and audio file conversion to MP3, AAC, WAV, FLAC, M4A, and other formats for playing on any device. To record Amazon Music tracks to MP3, follow the procedures below.


Step 1: Download and run TunesKit Audio Capture.

TunesKit Audio Capture provides a free trial version for customers to sample before purchasing the complete product. When you launch the audio recorder, the first window you see is a list of target applications. Check the list to see if the browser you want to use to listen to Amazon Music is there; if not, tap the + sign to add it. For a faster solution, drag and drop the browser into the list.


Step 2: Change the Output Settings and Parameters.

It is also necessary to change the output choices. When you click the Trumpet-shaped icon in the main window, the options menu will open. Change the output format, codec, channel, and other options in this section.


Step 3: Make a recording of music from Amazon Music.

A capture window will emerge on its own when you hit the browser's icon. Listen to the music in the browser. The download should begin after a few seconds of pause, and the title and ID3 tags of the music should be matched after around 25-30 seconds. When the downloading is finished, go to the bottom right and click the Stop button.


Step 4: Editing Amazon Music Download

After recording, there may be some unwanted bits or adverts in the downloaded music. In this scenario, you may access the editing window by clicking the Edit icon at the bottom of each track in the ripping result window. Using this editing tool, you may chop the music to your liking. You may utilize editing to make ringtones, remove unwanted parts, and so forth. Changes can also be made to the ID3 tags.


Step 5: Back up the Record Files

To export the records to the output folder, select the Save option. The audio files may also be found by using the icon at the bottom of the window.


Part 3. Download Amazon Music to MP3 with Tunelf

There’s another good choice for you. Tunelf Amatune Music Converter is a professional Amazon Music converter to help you download and convert Amazon Music with high quality at a faster speed. It can download Amazon Music from MP3, AAC, FLAC, WAV, M4A, to M4B. While the conversion, the ID3 tags and the metadata of the songs will be preserved intact. Tunelf program can convert Amazon Music to numerous common audio formats for listening, regardless of whether you want to stream Amazon Prime Music or Music Unlimited from Galaxy Watch.


Part 4. How to play Amazon Music on the Galaxy Watch

Once you've converted all of the music tracks from Amazon Music to audio formats compatible with the Galaxy Watch, you're ready to add all of the converted music songs to your Galaxy Watch for listening. There are two ways to transfer Amazon Music to your watch, depending on whether you're an Android or iOS user.

Method 1: For Android users

Make sure that all of the Amazon Music that you wish to add is already on your phone because it cannot be exported directly from your computer when your watch is linked to your phone. Here's how to do it.

1. After you've added your converted Amazon Music to your phone, open the Galaxy Wearable app.

2. From the Home tab, scroll to and tap Add content to your watch, and then tap Add tracks.

3. Select your converted Amazon Music individually, or tap All in the upper left corner to select your converted Amazon Music all.

4. Tap Done once you have the songs you want.

5. Open the Music app on your watch and begin to play Amazon Music on your Galaxy Watch.

Method 2: For iOS users

Gear Music Manager is available for those users who have at least an iPhone 6 with iOS 12 so that you can move Amazon Music to your Galaxy Watch. Your computer and watch should be connected to the same Wi-Fi network before you and then you can start. Here's how to.

1.     Press the Power key on your watch, and then swipe to and tap the Music app.

2. If you see a phone icon, tap it to the watch as the music source.

3. Swipe up on the Now playing screen, tap Music Manager at the bottom of the Library, and then tap START.

4. Open a web browser on your computer and enter the IP address displayed on your watch in the address bar for the connection.

5. Once your watch connects, select Add new tracks in the web browser, choose the converted Amazon Music you want to add to your watch, and then select Open button.

6. When all is finished, tap OK on the web page, and then tap DISCONNECT on your watch.


Summary

We have explored 3 ways to convert Amazon Music for Galaxy Watches. To play Amazon Music on Galaxy Watch, you need to convert Amazon Music to MP3 with an Amazon Music downloader like TunesKit Audio Capture. It can help you record all the sounds from a computer at ease. 

For more: How to Download Amazon Music for Galaxy Watch to Play

TunesKit AceMovi V4.5 Is Finally Released: What's New & Free Gift

Hong Kong, November 5, 2021 – The best video editor for beginners - TunesKit AceMovi has recently upgraded to a new version 4.5.0. This makes it more intelligent, intuitive, and prolific. As one of the flagship products from TunesKit Software, AceMovi Video Editor is proficient in inspiring your imagination and inspiration to create and edit high-quality videos with practical, basic, and advanced editing features.

Now, with the release of the AceMovi Video Editor 4.5.0 version, it could be the icing on the cake of making wonderful and highly viewed videos more effective and easier. It comes with a wide variety of charming and easy-to-use effects, templates, and features, including animation effects; toning, noise reduction, and sharpening for videos and pictures; file addition option optimization; dynamic text, video intros, and subtitles templates; and other product performance optimization.


There is a rapid shift to people's lifestyles and entertainment during the COVID-19 crisis. More and more persons tend to watch videos and produce videos for fun and making a living. There is no doubt that videos become an indispensable part of our daily life.

No matter for which intention to DIY a video, a professional yet straightforward video editing software is necessary, especially for new beginners. Therefore, we developed and created the simple yet functional video editing app, TunesKit AceMovi.

"The new update of this video editor, users are given the options to discover and get exciting templates, effects to use in their videos directly, which could be a blessing for beginners. If necessary, users can also do personalized modification of these models to unleash creative potential," said Henry Ramon, the Product Manager of AceMovi. "More advanced and optimized performances you can also find in this AceMovi upgrade to create your exclusive videos.

What's New in TunesKit AceMovi Video Editor V4.5.0?

1. Support dynamic text templates and custom editing;

2. Ordinary static text supports keyframing;

3. Video and pictures support toning, noise reduction, and sharpening;

4. Adjust the layout of the split-screen videos;

5. Add the '+' button to quickly add media resources to the timeline;

6. Support shortcut keys and mouse wheel to control the displacement and zoom of the timeline;

7. Add 70+ small animation effects;

8. Add 90+ text titles, video intros, subtitles, and other templates;

9. Fixed the problem that the quick deletion crashed while dragging media files on the timeline;

10. Solved the problem that the split-screen media cannot be displayed normally after the resolution is changed;

11. Optimized product performance and fixed some small bugs.

Take a Quick Look at AceMovi's Key Features

Basic Editing Features: Recording, cutting, splitting, merging, rotating, flipping, cropping, zooming, and editing videos, adding texts and audios, etc.

Advanced Editing Features: Filters, overlays, transitions, split-screen, keyframing, picture in picture, speed adjustment, elements, effects, freeze frame, detach audio, snapshot, and more.

Other Useful Features: It supports exporting and saving created videos to any output format, device so that you can share videos on all platforms, like Facebook, YouTube, and so on.

Video: Highlights of TunesKit AceMovi Update V.4.5 & Key Features


Pricing and Compatibility

TunesKit AceMovi V4.5.0 is compatible with both Mac and Windows computers running from OS X 10.8 to macOS 11 Big Sur, and from Windows XP to Windows 10. And there are three tiers provided by AceMovi to utilize the full version of this video editor. It includes a Monthly License for $19.95, a Yearly License for $39.95, and a Lifetime License for $59.95.

It's worth mentioning that it also provides a free trial version for all users to test its performance before purchasing. The only difference between them is free version comes with an AceMovi watermark.

Bonus Time: Get 3-month TunesKit AceMovi for Free

Now everyone has a chance to get a  3-month free license of TunesKit AceMovi, as long as you share this news with your friends on Facebook, Twitter, or Pinterest. Click the following link to know how to get it free. Only 100 free licenses per day, hurry up!

GET ACEMOVI FREE

About TunesKit

Founded in 2014, TunesKit Studio is a leading multimedia solution provider. It offers extraordinary multimedia software and iOS utilities to make digital life better and easier. TunesKit products have been trusted by millions of users in 150+ countries around the world. We will always focus on improving technology and providing better services, and creating a unique digital world with our customers.

Media Contact

Andres Green

Marketing Manager

Email: support@tuneskit.com