Dec 10, 2020

4 Best Ways to Fix iPhone Won't Reset

Sometimes, it is necessary to reset an iPhone so as to remove some bugs and errors. But many iPhone users find that they cannot hard set the phone. If you are one of them, then on seeing this guide, you can stop searching for the solutions to the problem. We offer you the 4 best solutions to solve the iPhone won't reset issue.

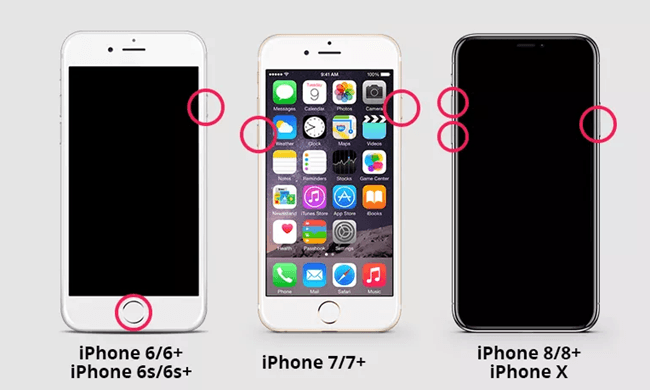
1. Ensure That You Hard Reset in the Correct Way

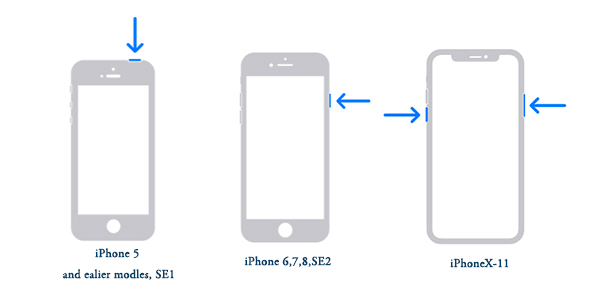
This usually happens to the users of old iPhones since they might take the old hard reset way for granted. Since the ways of hard reset vary among various models of iPhone, the method to hard reset iPhone 7 naturally won't work on iPhone 8 for instance. Therefore, when iPhone won't hard reset or turn off, the first thing you need to do is to follow the hard reset tutorial strictly.

iPhone 6 or older models: Press the Home button and the Sleep/Wake button at the same time until the Apple logo shows up on the screen.

iPhone 7 or 7 Plus: Press and hold down the Volume Down button and the Sleep/Wake button until you see the Apple logo on the screen.

iPhone 8 or newer models: Press the Volume Up button first, and then the Volume Down button. Hold the Side button and release it as soon as you see the Apple logo on the screen.

2. Fix the iOS System with TunesKit iOS System Recovery

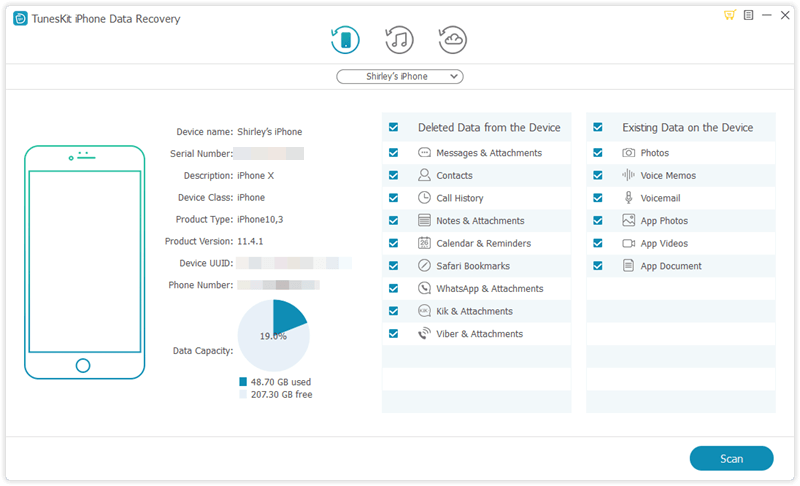
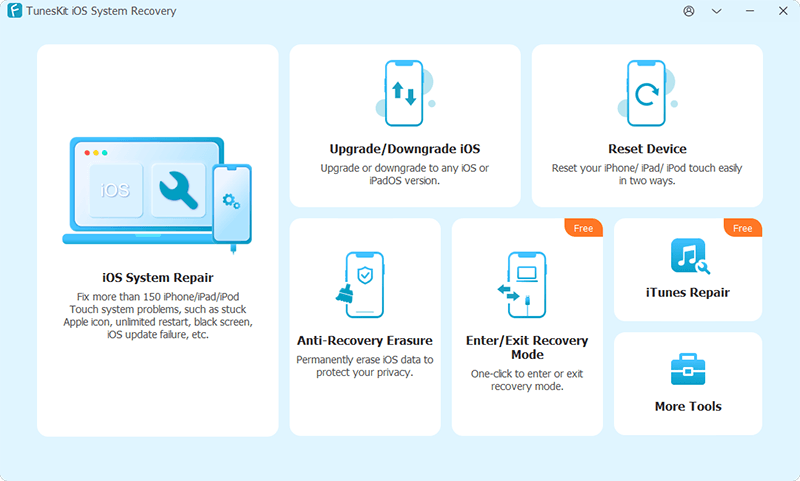
If the last solution fails to work, then you should definitely try this amazing iOS repairing program -- TunesKit iOS System Recovery.  TunesKit iOS System Recovery is one of the best tools to fix the iPhone won't reset problem and other iOS issues such as iPad won't charge, etc. With this program, even amateur users of the iPhone can get rid of the problem in no time at all. The best feature of it is that the repairing process will cause no data damage to your device.

Step-to-step Tutorial to Use TunesKit iOS System Recovery

Step 1: Download and install TunesKit iOS System Recovery from the links above. Launch the software, and connect your iPhone to the computer as instructed on the screen. By the time your device is recognized, press the Enter the Recovery Mode to put your iPhone into the recovery mode. Press the Start button to continue.


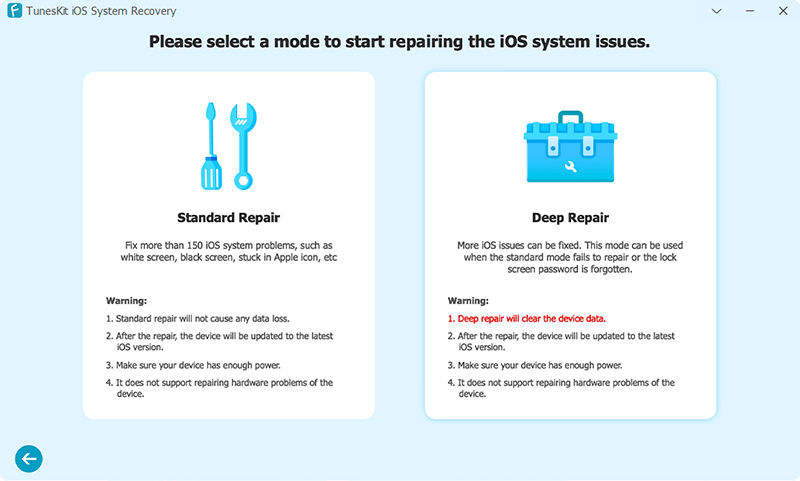
Step 2: In the next window, you will see the two boxes of choices, which are the Standard Mode and the Advanced Mode. This time, choose the Standard Mode and press the Next button at the bottom right of the window.


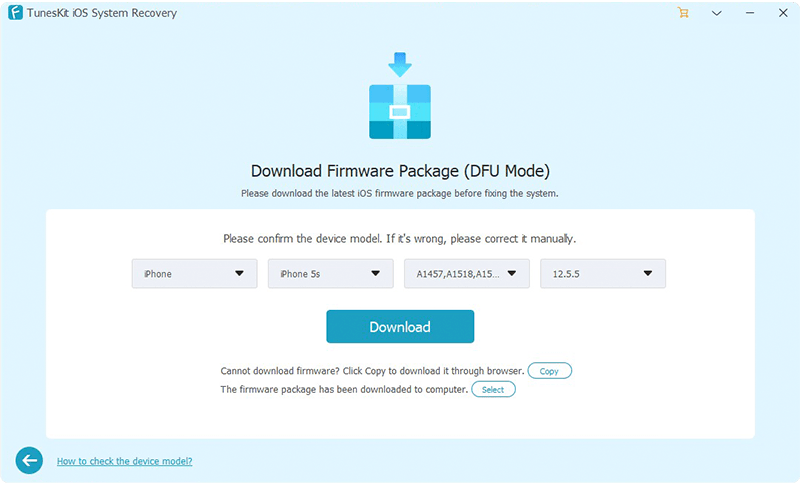
Step 3: Check whether the info of your device displayed on the screen is correct. If so, press the Download button to download the firmware.


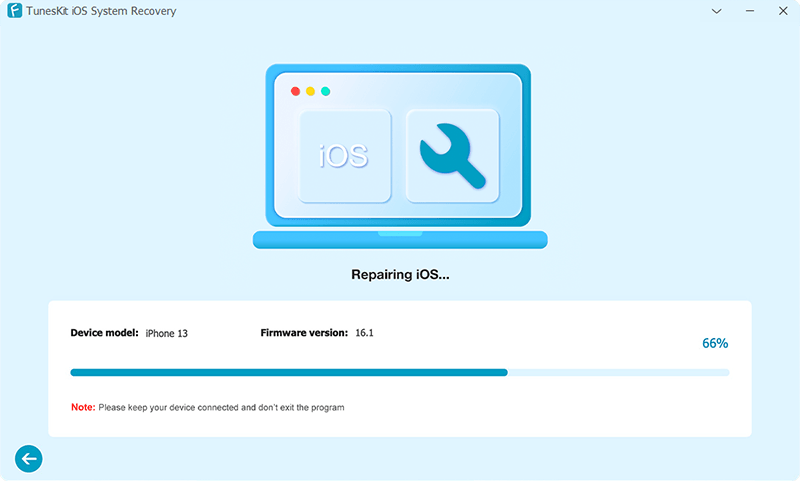
Step 4: After the firmware is downloaded, press the Repair button to unpack the firmware package and repair your iOS. By the time the repairing finishes, your device should be back to normal.

3. Restore iPhone with iTunesor Finder

In case you don't want to use third-party software, you might as well use iTunes, which is a toolkit made by Apple. It will help you update the iOS, backup the phone data, restore the iOS system to get rid of various problems. iTunes' counterpart on Mac is Finder. Although restoring your iPhone will erase all the data on your device and update its iOS to the latest version, it will resolve most of the problems, including iPhone won't reset problem. Just make sure you back up the data on your iPhone.

To Restore iPhone with iTunes:

Step 1: Connect your iPhone to the computer. If you are asked to input your passcode or to trust the computer, follow the instructions on the screen to complete the process.

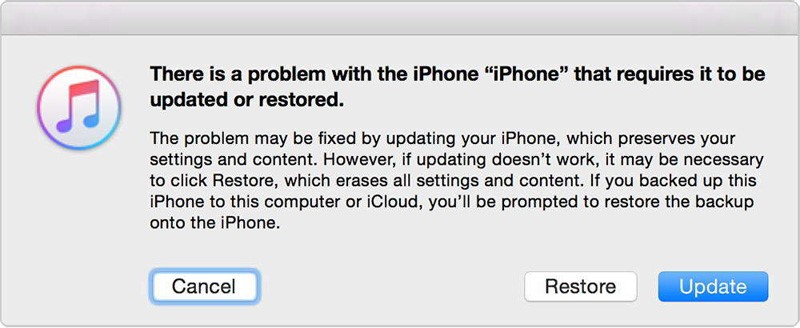
Step 2: iTunes should automatically prompt up on the screen. If not, open it manually and find your iPhone in the top menu bar of iTunes.

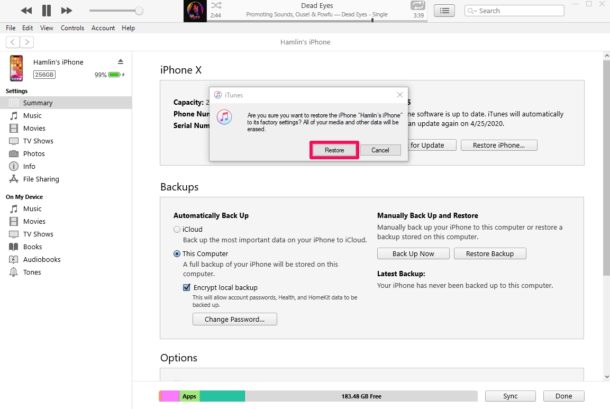
Step 3: Click the Restore [device] button to restore your iPhone and click the Restore button again to confirm the action.Now you just need to wait until the restoring process finishes.


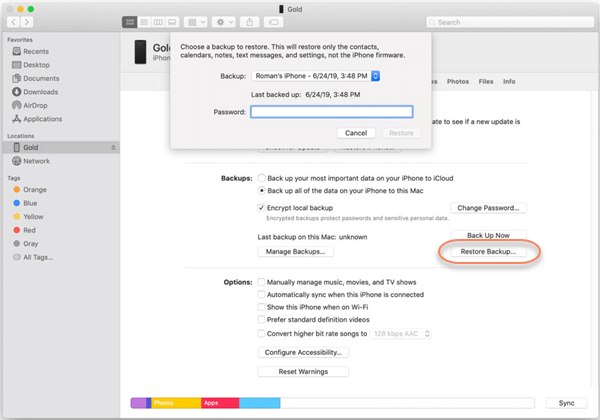
To Restore iPhone with Finder:

Step 1: Similarly, plug your iPhone into the Mac, and launch Finder in the Mac dock.

Step 2: Under the location tab on the left side of Finder, you will see the iPhone connected. Tap on it, then click on the Restore Backup button.

Step 3: A window will pop out. In the window, select the backup you want to restore to your iPhone. Enter your passcode and press the Restore button to initiate the restoring process.

4. Resort to Apple Support

If the problem persists after you've tried all the solutions listed above, it's time for you to ask help from Apple Support. The technicians will help you fix the phone, even if it's suffering from hardware issues.

Summary

The iPhone won't reset problem has been thoroughly illustrated in this article. We hope that this guide helps you fix your phone successfully.

Dec 9, 2020

Everything about Audible

 Do you like to use Audible to listen to audiobooks? Maybe you have used it for a long time. But are you sure that you know everything about it? See more about this app in this passage. You will know the Audible format, how to play Audible audiobooks, Audible player, and more from it.


What Are the Formats of Audible Audiobooks?

In general, there are 2 formats of Audible audiobooks with the extension of AA or AAX. AA is the standard Audible audio format and it is divided into three subsidiary formats (2, 3, 4) according to different audio quality. AAX is a new enhanced format which has the best audio quality like CD. If you want to get the best audio quality in your downloaded Audible files, it is recommended to change the format to AAX before you download. Though AAX has the best quality, it is the largest in size which takes up bigger space and a longer time to download. For the customers who have low internet speed, it is better to choose the AA format.

How to Play Amazon Audible Audiobooks

Currently, Audible files support a lot of devices including Windows PC and Mac computer and mobile devices like phones, tablets, MP3 Player, etc. But you need to follow the specific Audible official instruction to use the right Audible App and player.

1. For a Mac computer, you can use iTunes to download and play the audiobooks you purchased directly.

2. For Windows PC, you can use the Audible Download Manager to download the audiobooks first, then you can play them on Windows Media Player, Audible Manager, or iTunes.

3. For mobile devices like phones and tablets, normally you can install the Android or IOS Audible Manager first, then you will be able to download and play Audible books with it.

4. For MP3 players, you can refer to instruction 2 above to download Audible files to your Windows PC first, then you can use the Audible Manager to transfer the Audible book to your MP3 player.

Though it seems Audible books can be played on lots of devices, however, due to the limitation of Audible audiobooks, you can only play them on only 4 computers and 3 mobile devices at most. What is more, every time you are requested to download the audiobooks and input your Audible user name and the Audible password to authorize the device? Last but not least, you need to download Audible App or iTunes all the time for your new devices which is a waste of time. It is really depressing because sometimes we do need to play Audible on Samsung TV, PS4, and more devices without the restrictions.

Want to Play Audible Files on More Players?

Good news that this problem is solved today with the powerful TunesKit Audible AA/AAX Converter which integrates the feature to convert Audible AA/AAX audiobooks and keep 100% quality. Just download the trial version to have a try and you will understand how well it performs. Almost all the tasks are done automatically at the fastest speed. There are two versions, TunesKit Audible Audiobook Converter for Windows and TunesKit Audible Audiobook Converter for Mac. I will take the Windows version for example to show you how to convert Audible files. Please make sure you have already downloaded the Audible AA or AAX files to your computer first.

Step 1. Load Audible audiobooks

You can drag the AA or AAX files to the software easily after launching it.

Step 2. Choose format

Generally, you can choose the Format button and the MP3 which is the most popular audio format.

Step 3. Start converting

Click the Convert button. When it finished, you can transfer the converted files anywhere without any limitations and you will be able to play them on most players easily.


Conclusion

Now I think you have known almost all the important things about Audible. If you want to know more, just go to Audible or check this: What is Audible?


Source: 

https://www.tuneskit.com/audiobook-tips/top-3-things-about-amazon-audible.html


Dec 7, 2020

Top 4 Ways to Solve iPhone/iPad Flashing Apple Logo

Do you encounter issue of your iPhone/iPad flashing the Apple logo? When the trouble appears, many people including you have no idea about what happened and how to fix it. Or you might have seen several solutions elsewhere, yet you are still faced with it after some time. Well, now we are gonna introduce 4 best methods to thoroughly resolve the iPhone/iPad keeps flashing Apple logo. Here we go.

1. Hard reset your iPhone/iPad

At first, hard resetting your iPhone/iPad is a favorable way to deal with the iOS devices flashing the Apple logo on and off. Because the operation would refresh your device’s operating system by removing some errors while causing you no data loss.

To hard reset iPhone

iPhone 8 and later, respectively press down and release the Volume Up and Down buttons, then hold the Side button.

iPhone 7 and iPhone 7 Plus, simultaneously hold down and let go of the Volume Down and Sleep buttons until the Apple logo appears.

iPhone 6, iPhone SE or former, simultaneously hold down and release the Home and Power buttons till Apple logo pops up.


To hard reset iPad, please press the Home button and On/Off button in the meantime until the screen goes black and the Apple logo is shown on the interface.

2. Use TunesKit iOS System Repair (No data loss)

Of course, there is another more effective and workable fix to iPhone/iPad flashing Apple logo, and it won't give rise to any data loss, too. If you would like to try, the professional iOS system repair tool named TunesKit iOS System Recovery is recommended here.

Besides resolving a flashing Apple logo on your iPhone/iPad with an almost 100% success rate, this third-party software can help you solve other 50+ kinds of iOS problems such as iTunes errors and more. In addition, it supports almost all iOS devices including iPhone, iPad, iPod and Apple TV as well as is fully compatible with all iOS versions like the latest iOS 14. Finally, it also supports one-click to enter or exit recovery mode and downgrading iOS versions.

How to use this powerful program with user-friendly interface to fix iPhone/iPad keeping flashing Apple logo? Here are the 4 simple steps.

Step 1: Launch TunesKit. Download and open TunesKit iOS System Recovery. Connect your iPhone/iPad to a computer through a USB cable. Then tap on the "Start" button to proceed.


Step 2: Select mode. Choose the Standard Mode to fix your iPhone/iPad flashing Apple logo on and off without data loss. After that, just click the "Next" button.


Step 3: Download firmware package. Before hitting on the "Download" button to download the firmware package matched with your iPhone/iPad, please check your device's information displayed on the screen.


Step 4: Fix iPhone/iPad keeping flashing Apple logo. After finishing downloading the firmware package, click on the "Repair" button to fix the iOS. When the whole process is completed, your iPhone/iPad will come back to normal and the Apple logo will not flash.

3. Restore iPhone/iPad with iTunes (Data loss)

You might have heard about restoring iOS devices via iTunes when some system issues occur. But this is usually not recommendable as it will erase all data on your device if you don't have a backup. However, if you have backed up data before, let us see how it works in fixing iPhone/iPad flashing Apple logo.

Step 1: Connect your iPhone/iPad to PC with an original USB cable and open the latest iTunes.

Step 2: Let your device enter recovery mode.

Step 3: On the message shown on the screen, click “Restore” to start the reparation.

4. Resort to Apple Store

Lastly, to fix iPhone or iPad flashing Apple logo on and off, you could also attempt the last resort – go to Apple Store. The professional technicians there will give you a hand to get out of trouble, but you will cost many bucks and much time at the same time.

Verdict

There are do-it-yourself methods and the one that seek other people's help to settle your iPhone or iPad flashing Apple logo. The decision is on yours about choosing which way. In conclusion, we sincerely hope that your problem could be solved completely and please contact us if any questions.

Dec 3, 2020

How to Fix Apple Music Freezing/Crashing on iPhone/iPad

Your Apple music app on the iPhone/iPad becomes freezing/crashing?  Are you scratching your head and have no idea about what to do when it stops suddenly and gets unresponsive? Well, this article is posted here to help you to fix the Apple music freezing/crashing on iOS 14/13.

Method 1: Force quit all background apps

Once the Apple music turns frozen on your iPhone/iPad, what first comes to your mind is to quit all apps running in the background. Because there might be a faulty program that cause the problem. To force quit all apps background, you could double press down the Home button or launch the control center, then swipe them up off the top screen. After a while, re-open the Apple music app to see if the issue still exists.

Method 2: Use Apple music de-freeze software

Next, if you would like a faster and more effective way to solve Apple music app crashing or freezing on iOS 14/13, then you are highly recommended to use professional iOS system repair tools to fix the iOS, thus de-freezing the app on your iPhone/iPad. Here you could use the widely popular software named TunesKit iOS System Recovery. This mighty program can definitely settle the unresponsive Apple music while keeping all data on your device.

Key Features of TunesKit iOS System Recovery:

1. Resolve 50+ kinds of iOS problems like app crashing and so on.
2. Support almost all iOS devices and iOS versions.
3. With Standard and Advanced Modes to fix common and complicated issues.
4. One-click to enter or exit recovery mode.
5. Support downgrading iOS versions.
6. Easy steps and user-friendly screen.


Step 1: Install TunesKit iOS System Recovery and open it. Then connect your iPhone to a PC. Click on the "Start" button to start fixing the unresponsive Apple music app and choose the "Standard mode".


Step 2: Check the information of your device. Then tap on the "Download" button to download and verify the firmware package matched with your device.


Step 3: After the firmware package is successfully download and verified, press down the "Repair" button to fix the iOS system. Finally, when the process finishes, close the software and plug out youe deice. At this time, the Apple music freezing or crashing on iPhone/iPad is resolved..

Method 3: Restart your iPhone/iPad

Of course, there are also other fixes that are worth trying. Firstly, restart your iPhone or iPad, which is publicly recognized as the common tip to work out most problems.

To restart iPhone X/11, simultaneously hold the Side and the Volume buttons until the Slider is shown, then pull on the slider to turn off the iPhone, finally press the Side button to turn on your device.

To reboot iPhone SE (2nd) /8 /7/6, hold the Side button until the Slider is dispalyed and pull on the slider to switch off the iPhone, finally press down the Side button to switch on the device.

To restart iPhone SE (1st) / 5 and former, hold the Top until the Slider is presented, then pull on the slider to power off the iPhone, finally press the top button to power on your device.


To restart iPad with Home button, press down the Home and Power buttons at the same time until the Apple logo appears on the interface.

To reboot other iPad versions, each quickly press and let go of volume up and down buttons, then hold the top button until the Apple logo appears on the screen.

Method 4: Reinstall the app

Usually, when an app goes wrong, directly deleting and installing again is possible in dealing with the issue. Similarly, uninstall the Apple music app and download it later to resolve the its crashing problem.

Procedures: Long press the Apple music app icon on the Home interface till the "X" signal pops up, then click the cross and head to the App store to install it again.

Method 5: Re-sign in the app

After re-installing the Apple music app, you must have to re-log in the account. If not, try to exit it and re-sign it to get out of this trouble. Here's how to do it.

Step 1: Open Settings of iPhone/iPad and tap the iTunes & App store option.

Step 2: Click Apple ID to sign it out, then sign in again by entering your account and passcode.

Verdict

The apple music app on iPhone/iPad turning freezing or crashing after an iOS update could result from several situations. To name a few, an improper installation of iOS update, an incompatible app version and some software bugs. Whatever, what is significant is that you are able to resolve the matter with the help of the above 5 useful methods.

Dec 2, 2020

Best 5 Websites for Free Audiobooks Download

Do you like to listen to audiobooks? What website do you use to listen to them? Here we will introduce 5 websites providing free audiobooks download. If you still like Audible, you also can get your tip.


Top 1. Open Culture - Free Educational Course Audiobook


Open culture mainly provides the educational audiobook course for the worldwide lifelong learning community. It will centralize course content, curate it, and provide us the highest quality audio and video content. Something should be noted that all the content downloaded from Open Culture is not created by themselves. The content you see on Open Culture is made by other educational ventures. Customers can also suggest course audiobook materials to the Open Culture editors.

Top 2. Lit2Go - Free Story and Poem Audiobook Provider


Lit2Go is a free online collection of stories and poems in Mp3 (audiobook) format. An abstract, citation, playing time, and the word count is given for each of the passages. Many of the passages also have a related reading strategy identified. Each reading passage can also be downloaded as a PDF and printed for use as a read-along or as supplemental reading material for your classroom.

Top 3. Learn Out Loud - Educational Audiobook Provider


Learn Out Loud provides both paid and free audiobook resources for its users. The free audiobook directory offers a selection of over 10,000 free educational audio and video titles. Our directory features free audiobooks, courses, documentaries, talks, interviews, speeches, and many other great free audio and video resources.

Top 4. Loyal Books - Free Public Domain Audiobooks and eBooks Download

Loyal Books is advertised to provide the best collection of completely free public domain audiobooks as well as eBooks to users. All audiobooks on LoyalBooks.com are in the public domain. This means that no one holds a copyright on these books and therefore anyone including LoyalBooks.com is free to distribute them. Enjoy these free audiobooks and use the share button on LoyalBooks.com to tell your friends about all these great public domain audiobooks.

Top 5. Librophile - Legal Free Audiobook Provider

Librophile provides loads of free audiobooks and eBooks online for its users. You can scroll the page and review the audiobook list to choose what you like best. When you put your mouse on the book title, you will get a summary of what the story about.

What's more, you can also search the audiobook or eBook by input the keywords, book title, or through categories like Popular or Genre. Librophile provides you the easiest way to listen to the audiobook without installing an extra app.

Bonus Tips: How to Convert Audible AAX/AA Audiobooks to MP3?

Although we know many websites for free audiobooks, Audible owns many great audiobooks that worth trying. However, Audible audiobooks are protected. So, you cannot play them on any device you want or share with friends. But with TunesKit Audiobook Audible Converter, we can easily convert Audible AAX/AA file to common MP3/AAC/WMA/FLAC formats without encryption.


For more: https://www.tuneskit.com/audiobook-tips/best-sites-to-download-free-audiobook.html


Nov 29, 2020

How to Fix iMessage Waiting for Activation on iPhone/iPad

The iMessage waiting for activation error or the service not activating sometimes happens on iPhone/iPad. Maybe you are encountering this problem right now and looking for according solutions to solve it. Well, if so, then you are on the right page as this article covers the full methods to fix iMessage waiting for activation issue on iPhone/iPad.

Part 1: Why does iMessage won't activate on iPhone/iPad?

iMessage won't activate on iPhone/iPad is a common glitch that occurred at present. Before getting to the fixes, it is significant for you to know the possible reasons behind this issue, and they are listed below.

1. Poor Wi-Fi signal strength or unstable network connectivity.

2. Older iOS version on iPhone/iPad.

3. Wrong Date &Time settings and other system settings.

4. Software bug and iOS system errors.

Part 2: How to fix iMessage waiting for activation on iPhone/iPad?

Solution 1: Check network connection

As mentioned above, unreliable or unstable network connection frequently result in iMessage waiting for activation error. In this way, you are supposed to check the network connectivity and the signal strength.

To do that, just head to Settings on iPhone/iPad > Wi-Fi, then see if the signal strength is full. If it isn't, you could switch off it and re-connect it again.

Solution 2: Toggle on and off Airplane Mode

Also, turning Airplane Mode on and off on your iPhone/iPad could be a good way to fix iMessage won't activate on the iOS devices. Because the operation can remove some technical bugs that prevent the device's incapability to connect network. To achieve that, navigate to iPhone/iPad's Settings > Airplane Mode, then toggle it off and toggle it on after a while. Or you can directly open the control center and find the Airplane Mode icon to proceed.

Solution 3: Set Date & Time correctly

If the Date& Time is set incorrectly, iMessage possibly won't activate on iPhone/iPad. In this case, you need to check it and do as follows.

Follow this: launch Settings on iPhone/iPad and tap on the General option, then choose the "Date & Time" and set it correctly, or just enable the "Set Automatically" button.

Solution 4: Reset iMessage settings

There are also other tips that are worth trying like re-sign in your Apple ID and re-enable the iMessage button. This tip is actually very simple yet efficient to resolve the problem discussed here.

Step 1: Open Settings and choose Messages.

Step 2: Click "Send and Receive" and select your Apple ID to log out.


Step 3: Then turn iMessage button off and on under the Messages option.


Step 4: Sign your Apple account again.

Solution 5: Software update

Have you done the software update on your iPhone or iPad? If not, then you are suggested to check this and update your device to the latest iOS version, thus settling iMessage won’t activate matter. To begin with, go to Settings > General > Software Update, then tap on the Download and Install button.

Solution 6: Fix iMessage bugs

If the iMessage waiting for activation error still appears, then you may have to fix iMessage activation bugs. Here the best iMessage waiting for activation fix called TunesKit iOS System Recovery is recommended. Why? Because this powerful software, without causing any data loss, can resolve more than 50 kinds of iOS issues such as diverse iTunes errors and so on. Besides, this tool is fully compatible with all iOS devices and iOS versions including iPhone 12 running iOS 14. Finally, with an easy-to-operate and user-friendly interface, TunesKit iOS System Recovery can easily fix the iMessage waiting for activation issue on iPhone/iPad.

Steps to fix iMessage waiting for activation error on iPhone/iPad.

Step 1: Connect the iPhone to PC and launch TunesKit.

Connect the iPhone with computer. Open TunesKit iOS System Recovery. Click on the blue Start button. Then choose the Standard Mode.


Step 2: Download the Firmware package.

See the information about your device is correct or not. Next, tap on the Download button to let the program download the firmware package matched with your device.


Step 3: Fix iMessage waiting for activation

When you have downloaded and verified the firmware package, hit on the Repair button to fix the iOS. After the fixing is completed, the iMessage won't activate gest solved.

Part 3: How to activate iMessage app on iPhone/iPad?

In conclusion, your device may have turned normal and the iMessage waiting for activation error has been resolved after the above methods. Lastly, other people might want to know how to activate iMessage service on iPhone/iPad. In fact, this will not take too much time and what you have to do is logging in your Apple account and password when setting up your device, then inputting the contact information.

Nov 26, 2020

Optimal Ways to Recover Data from Bricked iPhone/iPad

Many of you might know how to recover these data from iPhone/iPad in a common circumstance, yet when the iOS devices get bricked, then what you can do to bring them back? Well, take it easy, that's what we are going to talk about in the next parts.

Part 1: Basic knowledge about bricked iPhone/iPad

Firstly, when the title catches your eyes, you may be wondering that what bricked iPhone/iPad is. Electronically, the "brick" means a device not functioning or not working. While when it comes to the bricked iPhone/iPad, it refers to that the device not turning on, not responding, not making calls, stuck in a loop and so on.

Part 2: Bricked iPhone/iPad data recovery tool you need

If one of above similar situation happens on your iPhone or iPad and you are eager to get the lost or deleted data back, then this is what you are seeking. To recover data from bricked iPhone/iPad, professional iOS data recovery tools such as TunesKit iOS Data Recovery is necessary. This data recovery software provides three recovery modes to retrieve your lost or deleted data no matter whether you have backup or not. And its other key functions are as presented below.

Key features of TunesKit iPhone Data Recovery

1. Recover data from different iOS device like iPhone,iPad and iPod.
2. Retrieve data under various scenarios including mistaken deletion and software update failure.
3. Restore diverse types of data like videos, photos, etc.
4. Fully compatible with all iOS versions including the latest iOS 14.
5. Rescue encrypted files.
6. Support Previewing and selecting required data before recovery.

Part 3: Ways to retrieve data from bricked iPhone/iPad

Now it's time for us to start to recover data from bricked iPhone or iPad with three different means.

1. Recover without backup

Step 1: Launch TunesKit iPhone Data Recovery and connect your iPhone or iPad with the computer through a USB cable. Then choose the recovery mode as "Recover from iOS" from the program's main interface.


Step 2: After the device and different files are shown on the screen, choose the categories on the right column that need to be scanned. Then click the "Scan" button and the program will begin scanning.


Step 3: Then all data scanned will appear on the left. Before you click the "Recover" button, you can preview the iPhone data you want to retrieve from different columns. After that the application will start to bring your data back.

2. Restore from iTunes backup

Step 1: Open TunesKit iOS Data Recovery on the computer and connect your iPhone/iPad with the PC. Then select the recovery mode named as "Recover from iTunes backup" on the main screen of the app.


Step 2: Press on the "Scan" button to examine your iPhone or iPad data and choose the data on the left column.


Step 3: Find out the deleted or lost data on your iTunes you are willing to recover and lastly hit the "Recover" button to restore them to the computer.

3. Retrieve via iCloud backup

Step 1: Launch TunesKit iPhone Data Recovery on the computer and make your iPhone connected with the PC. Then choose the third icon called as "Recover from iCloud Backup" from the main interface.


Step 2: Log in your iCloud by entering your Apple ID and password. Next select your own device among many different iPhones or iPads.


Step 3: Choose the data under the left columns and click on the "Recover" button to retrieve your lost data from bricked iPhone/iPad to the computer.

Part 4: Wrapping up

With the above professional iOS data recovery program in hand, when your iPhone or iPad becomes bricked suddenly or after a software update, it is helpful in restoring the data on the device. Hope this simple how-to guide, which requires no skills, can do you a favor.