Showing posts with label TunesKit iPhone Data Recovery. Show all posts

Nov 26, 2020

Optimal Ways to Recover Data from Bricked iPhone/iPad

Many of you might know how to recover these data from iPhone/iPad in a common circumstance, yet when the iOS devices get bricked, then what you can do to bring them back? Well, take it easy, that's what we are going to talk about in the next parts.

Part 1: Basic knowledge about bricked iPhone/iPad

Firstly, when the title catches your eyes, you may be wondering that what bricked iPhone/iPad is. Electronically, the "brick" means a device not functioning or not working. While when it comes to the bricked iPhone/iPad, it refers to that the device not turning on, not responding, not making calls, stuck in a loop and so on.

Part 2: Bricked iPhone/iPad data recovery tool you need

If one of above similar situation happens on your iPhone or iPad and you are eager to get the lost or deleted data back, then this is what you are seeking. To recover data from bricked iPhone/iPad, professional iOS data recovery tools such as TunesKit iOS Data Recovery is necessary. This data recovery software provides three recovery modes to retrieve your lost or deleted data no matter whether you have backup or not. And its other key functions are as presented below.

Key features of TunesKit iPhone Data Recovery

1. Recover data from different iOS device like iPhone,iPad and iPod.
2. Retrieve data under various scenarios including mistaken deletion and software update failure.
3. Restore diverse types of data like videos, photos, etc.
4. Fully compatible with all iOS versions including the latest iOS 14.
5. Rescue encrypted files.
6. Support Previewing and selecting required data before recovery.

Part 3: Ways to retrieve data from bricked iPhone/iPad

Now it's time for us to start to recover data from bricked iPhone or iPad with three different means.

1. Recover without backup

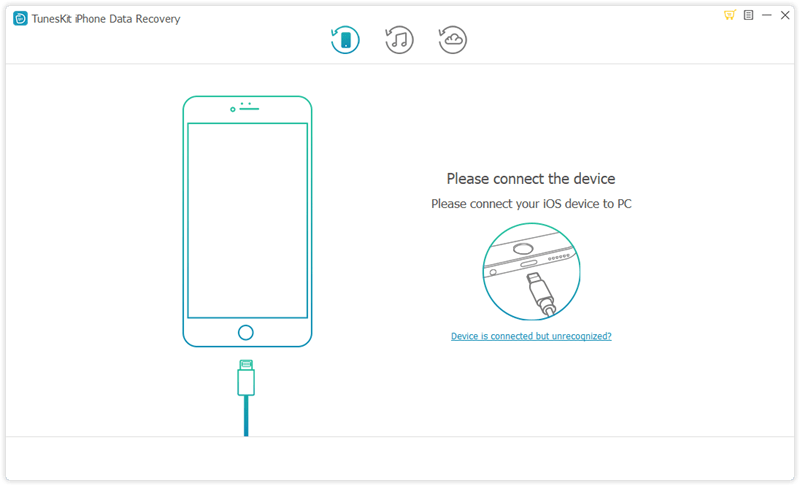
Step 1: Launch TunesKit iPhone Data Recovery and connect your iPhone or iPad with the computer through a USB cable. Then choose the recovery mode as "Recover from iOS" from the program's main interface.
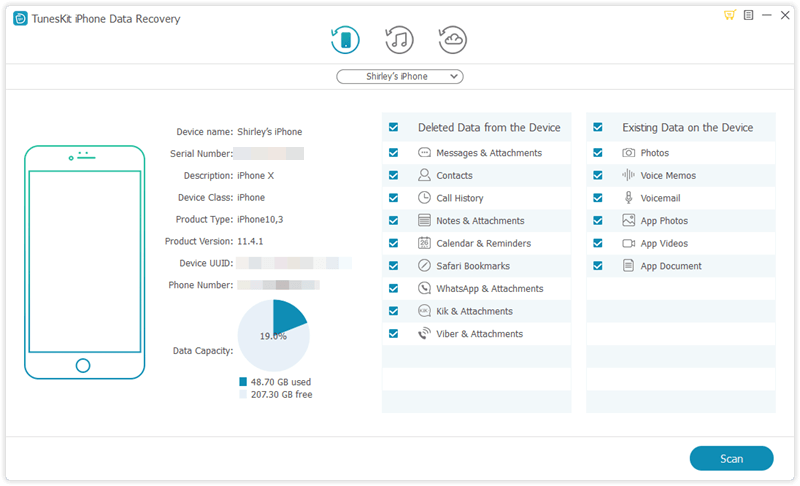

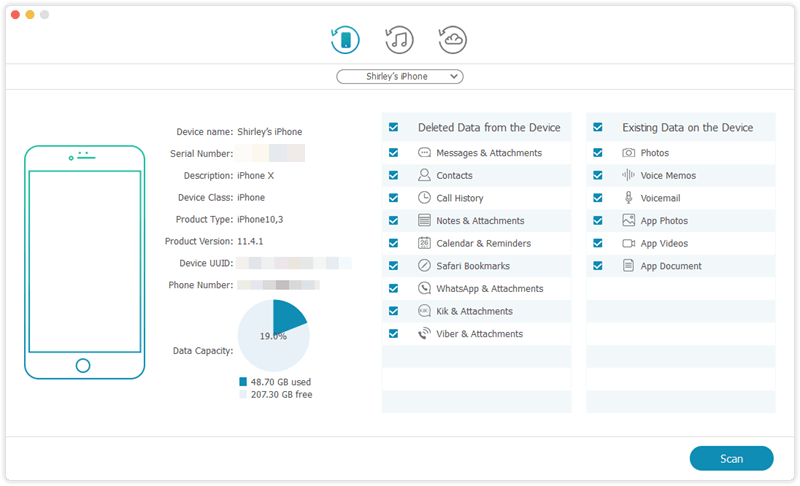
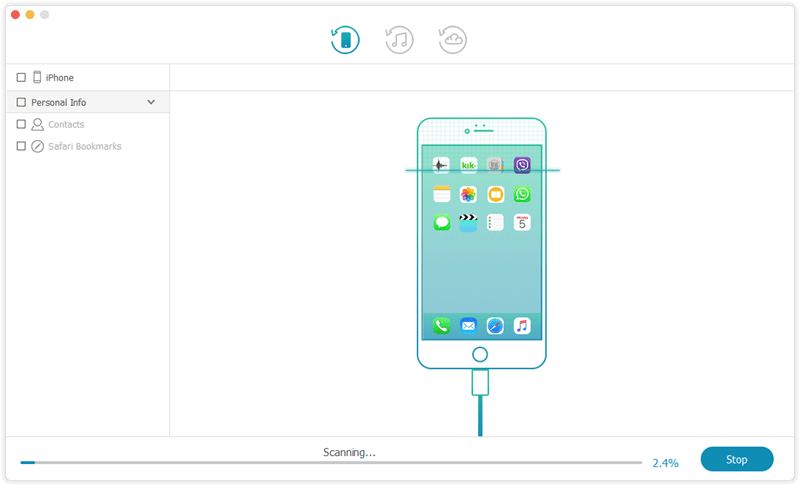
Step 2: After the device and different files are shown on the screen, choose the categories on the right column that need to be scanned. Then click the "Scan" button and the program will begin scanning.
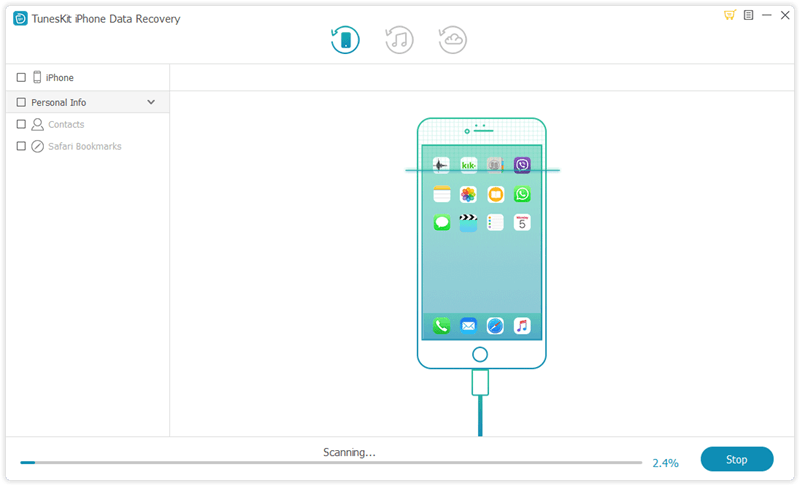

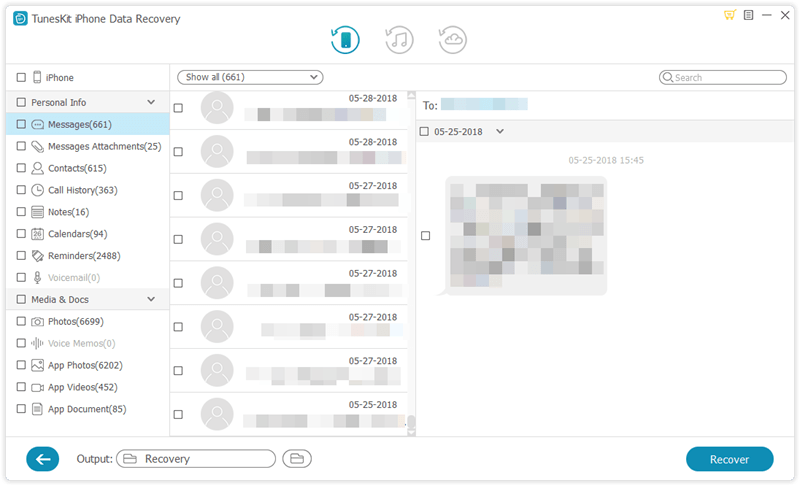
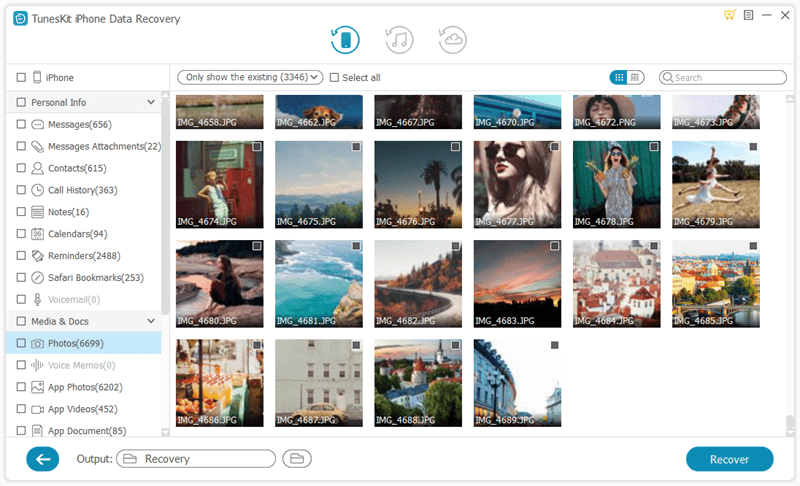
Step 3: Then all data scanned will appear on the left. Before you click the "Recover" button, you can preview the iPhone data you want to retrieve from different columns. After that the application will start to bring your data back.
2. Restore from iTunes backup

Step 1: Open TunesKit iOS Data Recovery on the computer and connect your iPhone/iPad with the PC. Then select the recovery mode named as "Recover from iTunes backup" on the main screen of the app.
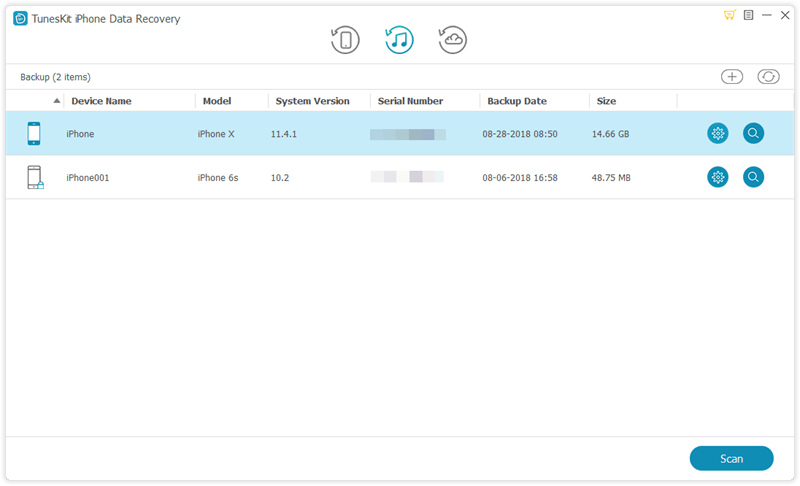

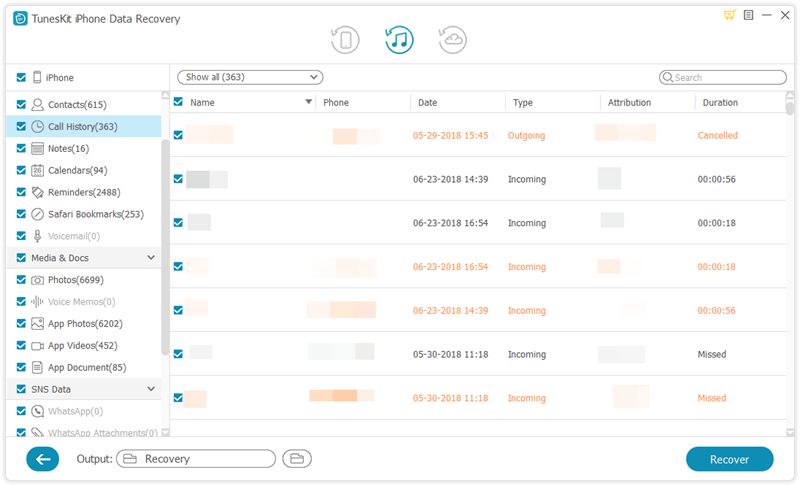
Step 2: Press on the "Scan" button to examine your iPhone or iPad data and choose the data on the left column.
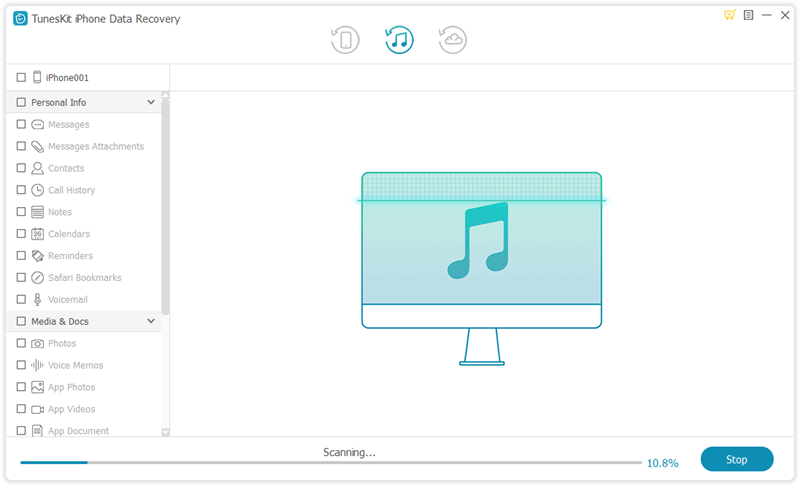

Step 3: Find out the deleted or lost data on your iTunes you are willing to recover and lastly hit the "Recover" button to restore them to the computer.
3. Retrieve via iCloud backup

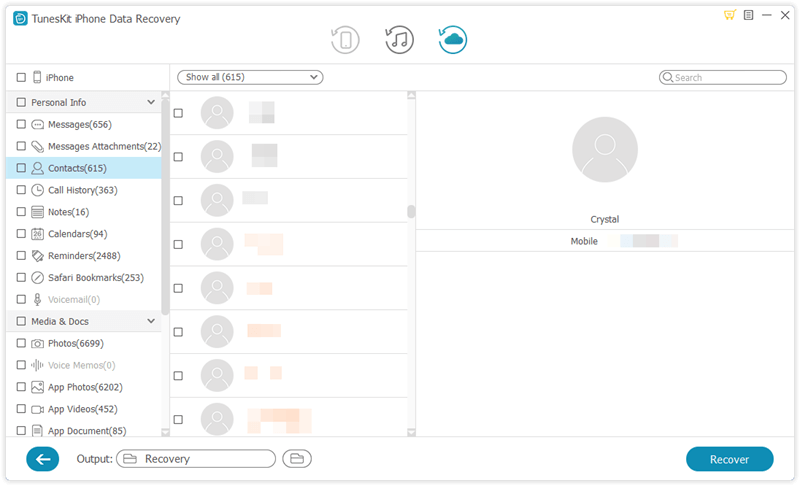
Step 1: Launch TunesKit iPhone Data Recovery on the computer and make your iPhone connected with the PC. Then choose the third icon called as "Recover from iCloud Backup" from the main interface.
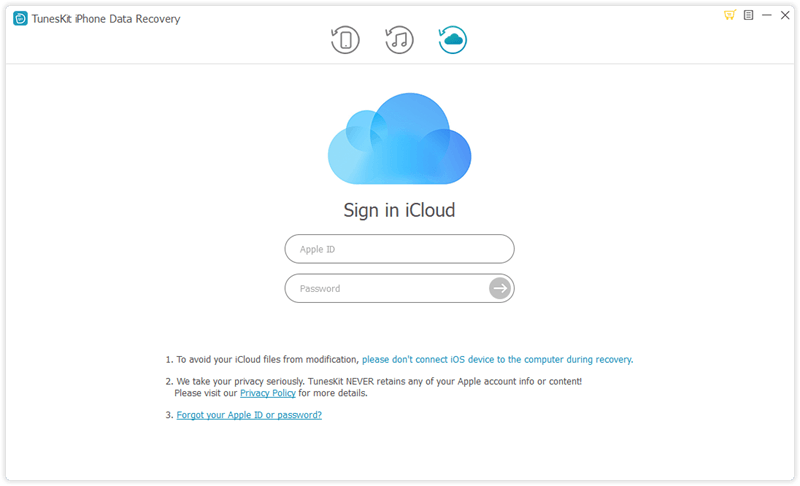

Step 2: Log in your iCloud by entering your Apple ID and password. Next select your own device among many different iPhones or iPads.
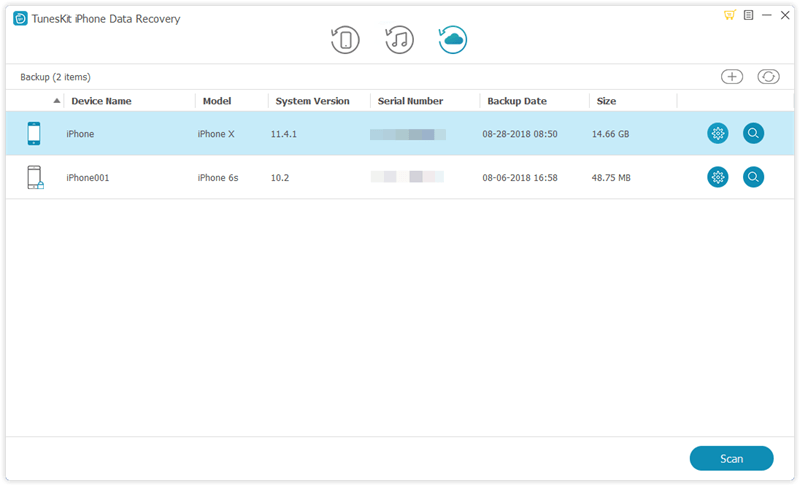

Step 3: Choose the data under the left columns and click on the "Recover" button to retrieve your lost data from bricked iPhone/iPad to the computer.
Part 4: Wrapping up

With the above professional iOS data recovery program in hand, when your iPhone or iPad becomes bricked suddenly or after a software update, it is helpful in restoring the data on the device. Hope this simple how-to guide, which requires no skills, can do you a favor.

Oct 30, 2020

The Best Way to Recover Music from iPod Touch

 To be honest, losing music files and songs on the iPod touch can get people frustrated and irritated especially when they are unique to you. But don't worry, keep reading and you will get the best way to retrieve them.

Part 1: Common causes of iPod touch music being lost

Diverse kinds of reasons could result in the music lost or deletion from iPod touch, and the followings are some common scenarios.

1. Insufficient capacity in iPod touch.

2. Battery reset or removal.

3. Unknown iPod touch volume format.

4. iPod touch being frozen.

5. The device is brought to factory settings.

6. Mistaken deletion during using iTunes and so on.

Part 2. Is it possible to restore deleted music from iPod touch?

Q: "All of the music files on my iPod touch were gone suddenly, I want to know if I can get them back and if there is a way to do that."

A: Of course, you can restore the lost songs from iPod touch. It may first occur to you that you can't enjoy the old songs anymore when this problem happened. But don't worry, it is highly possible to retrieve them from iPod touch and you must make your device has enough free space.

Part 3: The free and best music recovery software you'll need

To bring lost and deleted music files or songs from iPod touch, you are strongly recommended to use professional iPhone data recovery tools such as TunesKit iPhone Data Recovery. This application definitely can help you to recover iPod touch music no matter which model you are employing. Besides, it supports restoring various formats of music like MP3, AAC, etc. And you can check out its more spotlights below.

Key features of TunesKit iOS Data Recovery:

1. Recovering lost data like SMS with fastest speed and 100% of security.

2. Rescuing iOS files deleted due to various scenarios including mistaken deletion and virus attack.

3. Restoring diverse kinds of data like contacts, SMS, photos, etc.

4. Full compatibility to different iOS devices such as iPhone, iPad, iPod touch.

5. Supporting Recovering encrypted files.

6. With three smart recovery modes: iDevices, iTunes and iCloud backup.

7. Previewing and selecting required data before recovery.

8. Fully supports all iOS versions including the latest iOS 14.

Part 4: How to recover songs from iPod touch?

Download and install the TunesKit Music Recovery program on your computer. TunesKit is available on both Windows and Mac computers. In the following tutorial, we will show you recovering music from the iPod touch with the Mac version.

Step 1: Select the recovery mode.

Launch TunesKit iPhone Data Recovery and connect your iPod touch with the computer through a USB cable. Then choose the recovery mode as "Recover from iOS" from the program's main interface, because this mode doesn’t require you to have the music backup.


Step 2: Scan and preview data.

After the device and different files are shown on the screen, select the categories on the right column that need to be scanned. Then click the "Scan" button and the program will begin scanning.


Step 3: Recover and save lost data.

Then all data scanned will appear on the left. Before you click the "Recover" button, you can preview the music files you want to retrieve from the "Media & Documents" column. After that, the application will start to get your lost and delete songs on the iPod touch back.

Summary

By now, you must have recovered the music from your iPod touch based on the above simple and secure procedures. In addition, if you have backed up the music files and songs on your iPod touch, you can also retrieve them from iTunes backup mode and iCloud backup mode of this powerful tool. The relevant steps are similar to the mode of recovering from iOS device. Finally, contact us if you have any problems.

Sep 22, 2020

How to Recover Lost or Deleted Facebook Messages on iPhone

 People use Facebook to send and receive messages, but they may delete or lose them by mistake. However, they generally cannot bring them back as there is no recovery mode on this application. Yet still, there are other possible workarounds to retrieve iPhone Facebook messages.

1. Retrieve from Contacts

The first simplest way is that you can attempt to communicate with the person who obtained the messages you sent and ask for her or him to send the previous messages back. You can directly text him or her a piece of message or launch a voice call to get the messages or conversation you mistakenly deleted.

2. Get back from Search

If you think contacting other people is a little disturbing, another easy way to recover lost messages from Facebook messenger on iPhone would be the built-in function on the Messenger app. But the condition is that you must have archived the messages in advance before you try the following steps.

Step 1: Open the Messenger app and head to the recent conversations.

Step 2: Find the search bar which is situated in the top of the interface.

Step 3: Search the conversation you are looking for.

3. Restore from Facebook Settings

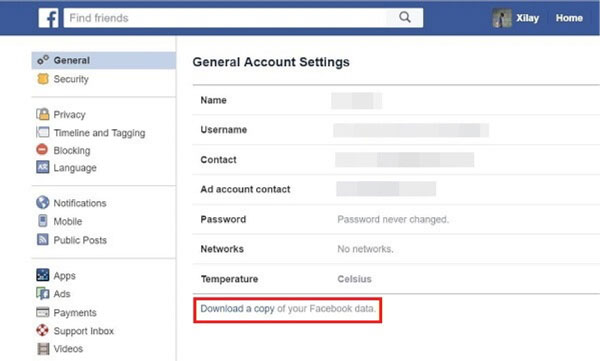
If you have archived the Facebook messages, then you could employ the Download Settings function on the Facebook profile to get back lost Facebook data. But it should be noted that it only allows you to retrieve temporarily deleted messages on Facebook.

Step 1: Launch a browser on your computer and click on your Facebook profile. Next, choose the "General Account Settings" and the "Download Copy of Facebook Data" buttons.

Step 2: Head to the "Start My Archive" and "And More" options. Next, complete the orders and you will receive an email soon.

Step 3: Open your email and tap on the "Download Archive". At this time, a zip file containing your Facebook messages will be on your computer.

Step 4: Select the file named "Messages" among several Html-format files in the zip file and you will restore your corresponding messages.

4. Recover from Facebook Messenger

Viewing archived messages on the iPhone Facebook messenger can also help you to retrieve deleted and lost related messages. But you have to know the position of hidden messages in the Facebook account and you should make sure that they are not removed from the account.

Step 1: Click the "Messages" option, and Choose a friend you started the conversation before.

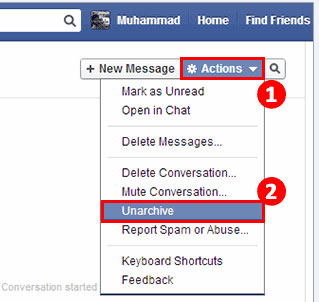
Step 2: Find out the archived messages and hit the "Action" button.

Step 3: Finally tap the "Unarchive" tab.

5. The hottest method

No matter to recover permanently deleted Facebook messages or the ones you erased from your Facebook account, a kind of iOS data recovery tool --TunesKit iPhone Data Recovery can achieve your end safe and secure. Besides, with this program in hand, you can also restore other different types of data on the iPhone and various applications like Viber pictures, messages and etc. And this software supports all versions of iOS systems including the latest and all iOS devices such as iPhone, iPad, and iPod. Finally, despite the reasons, for instance, accidental deletion and system bugs, TunesKit iOS Data Recovery can bring the lost data back.

To employ the hottest third-party data restoring the program to recover deleted iPhone Facebook messenger messages, you just need the 3 simple steps below.

Step 1: Launch TunesKit iPhone Data Recovery and hook up your iPhone with the computer through a USB cable. Then choose the recovery mode called "Recover from iOS" from the app's main interface.


Step 2: After the device and different files are shown on the screen, select the data on the right column that needed to be scanned. Then hit on the "Scan" button and it will start scanning.


Step 3: Then all files scanned will appear on the left column. Before you tap on the "Recover" button, you are allowed to preview the iPhone Facebook messages you want to restore from the "Message" column. After that, the lost messages from Facebook messenger on iPhone will come back.

FAQs

1. How to archive Facebook messages on iPhone?

Archiving Facebook messages you may temporarily don't desire right now can be really workable when you want to recover these messages in the future.

Step 1: Launch the Facebook Messenger application, and choose the "Messages" option.

Step 2: Find the message or conversation you need to archive and select them.

Step 3: Click "Archive" to put the messages into the archives. Then you can delete them.

2. How to differentiate between "Delete" and "Archive"?

Two common methods to remove the Facebook messages are "Delete" and "Archive". The former often cause some accidents most time. To avoid a similar situation, here's the distinction between "Delete" and "Archive". "Delete" means you remove the Facebook messages forever. While "Archive" merely makes messages into different folders, which is not erasure yet can be available one day.

Sep 17, 2020

Top 10 Methods to Recover iPhone Photos Disappeared from Camera Roll

 Want to know why your photos suddenly disappear from the camera roll in iPhone? And are you wondering how to retrieve these lost pictures? Well, don't worry, as next we will offer you the top 10 methods to get back these lost iPhone photos from camera roll.

Part 1: Why do iPhone photos disappear from camera roll?

Now you might be wondering that why these iPhone photos disappear from camera roll? The storage indeed says that the iPhone saves a lot of pictures yet the camera roll is empty. Actually, there are many causes that explaining why this problem happening and several potential circumstances are as follows.

1. Photos accidentally deleted by other people.

2. Photos from iPhone camera roll are hidden.

3. iOS update failure.

4. Wrong Apple ID.

5. Different accounts were logged in iCloud.

6. Restoring from an incorrect backup.

Part 2: Simple tips to restore iPhone photos lost from camera roll

In order to make sure your iPhone photos are not really lost from camera roll, here are some tricks you can check on your iPhone.

Tip 1: Restart your iPhone

Firstly, you can attempt to reboot your iPhone to make the device refresh quickly. After restarting the iPhone, check whether the disappeared photos on the camera roll are back.

Tip 2: Examine the recently deleted folder

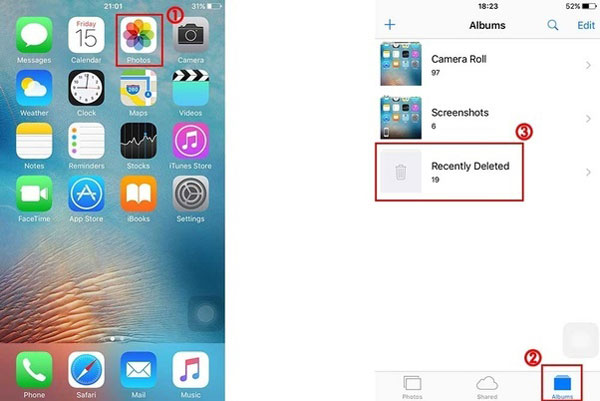
If the photos on iPhone camera roll are mistakenly deleted by yourself or someone else, you can go to the Recently Deleted album in the iPhone Photos, which allows users to recover lost photos within 30 days. Then choose the ones you want and click Recover button.

Tip 3: Turn on iCloud photo library

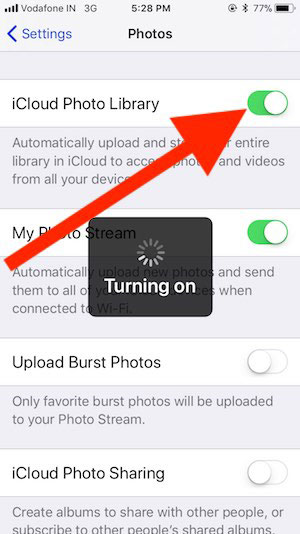
If these lost iPhone photos aren't found in the Recently Deleted folder, then you could see whether you turn on the iCloud Photos Library, which will sync all of the camera roll photos in iCloud. If you disable this function, follow below steps to enable it.

Step 1: Head to Settings app on iPhone.

Step 2: Click your name or Apple ID and then hit iCloud.

Step 3: Find Photos tab and turn on the iCloud Photo.

Tip 4: Sign in with the same Apple ID

In order not to cause confusion, you had better input the same iCloud account or Apple ID. Otherwise, everything on your iPhone will become disorganized and thus make your photos lost from camera roll.

Tip 5: Unhide your iPhone photos

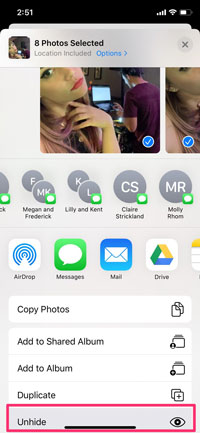
While if it is the case of photos being hidden in Moments, Years, or Collections view, then you are suggested to unhide them on the Photos app. To do that, open Photos on iPhone and hit the Hidden album under the Albums tab, finally choose the photos and click on Unhide.

Tip 6: Set Date and Time

A wrong date and time setting may lead to the miscommunication with the Apple server, thus resulting in the issue mentioned in this article. Although this situation is random, yet you can avoid it by reverting the Set Automatically to Time zone in the iPhone date and time settings.

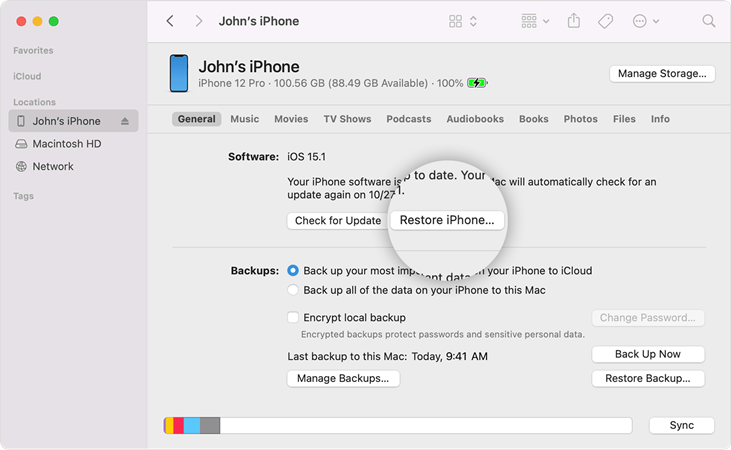
Tip 7: Recover from iTunes

Besides the above 6 easy tricks, you can also think about recovering lost iPhone photos in the camera roll from iTunes if you have a backup. Related steps are as presented here.

Step 1: Hook up your iPhone with computer and open the latest iTunes.

Step 2: Under the Summary tab, tap on the Restore Backup.

Step 3: Select the backups you desire and hit Restore button.

Part 3: The top-rated ways to retrieve iPhone photos deleted from camera roll

However, restoring deleted iPhone photos from iTunes will erase all your current iPhone data. If you are unwilling to go through the data loss and you don't know the reasons why these photos go away from iPhone camera roll, you'd better try the third-party iOS data recovery tools such as TunesKit iPhone Data Recovery. If you want to bring back lost camera roll photos from backups, TunesKit iOS Data Recovery allows you to restore from iTunes and iCloud backups, and it won't delete the data on your iPhone. While if there is no backup, this program can also help you to retrieve the photos from the iPhone itself. Moreover, it can recover various types of data including photos, videos and more. In the subsequent context, we will introduce you the specific guides of this application.

1. Retrieve without backup

Step 1: Launch this software and make your iPhone connected with the computer through a USB cable. Then select the recovery mode called as "Recover from iOS" from the app's main screen.


Step 2: After the device and different files appears on the screen, choose the files on the right column that require to be scanned. Then tap the "Scan" button and it will begin scanning.


Step 3: Then all data scanned will be shown on the left column. Before you hit the “Recover” button, you can preview the iPhone photos in the camera roll you want to recover from "Photos" column. After that the photos in the camera roll will come back.

2. Restore from iTunes backup

Step 1: Launch TunesKit iPhone Data Recovery for Windows and connect your iPhone with the computer. Then choose the recovery mode named as "Recover from iTunes backup" on the main interface of the app.


Step 2: Click the "Scan" button to detect your iPhone data and select the "Photos" option on the left column.


Step 3: Find the disappeared or deleted camera roll photos on your iTunes you desire to restore and finally tap on the "Recover" button to restore them to the computer.

3. Recover from iCloud backup

Step 1: Open this application on the computer and connect your iPhone to the PC. Then choose the third icon as "Recover from iCloud Backup" from the main screen.


Step 2: Log in your iCloud by using your Apple ID and password. Next choose your own device among diverse iPhones.


Step 3: Select your lost iPhone photos in the camera roll under the column of "Photos" and hit on the "Recover" button to retrieve them to the computer.


As you can see, using professional iPhone data restoring applications like TunesKit iPhone Data Recovery to get back disappeared iPhone photos in the camera roll after iOS update is really efficient and safe. And as the feedback people left online, they would rather employ this kind of software by costing a few bucks than try out other possible ways one by one.

Sep 14, 2020

4 Simple Ways to Recover Lost Contacts on iPad

Contacts kept on the iPad is really convenient for us for some time. But we may delete or lose them by mistake. In this case, how do we get them back completely? Well, the followings are the methods to retrieve lost contacts on the iPad.

Way 1: Sync contacts from other iOS devices via iCloud

If you didn't delete too many contacts while you have other iOS devices like iPhone, then you can check on these devices and restore your deleted contacts to iPad. Why does this way may work? Because most people will turn on the iCloud and it will automatically sync some data including the contact among all iOS devices. This does not take too much time and you can give it a try.

Step 1: Click the Settings button.

Step 2: Tap iCloud.

Step 3: Input your iCloud username and password respectively.

Step 4: Hit sign in. (ensure your contacts is switched on)

Step 5: Click the Merge button.

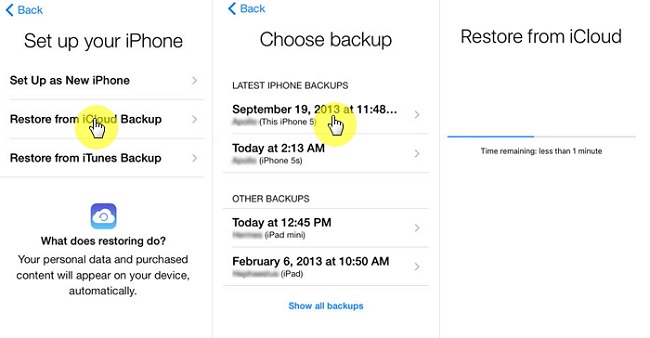
Way 2: Restore from iCloud backup

Besides, if you have a backup on iCloud, then directly restoring lost contacts from iCloud backup can also be a good choice, which doesn't need other devices, You can try following steps.

Step 1: Tap the general in settings of the iPad.

Step 2: Hit Erase All Content and Settings in the Reset tab.

Step 3: Click Erase again and your iPad will get restarted.

Step 4: Go through the Apps and Data.

Step 5: Choose Restore from iCloud backup and log in your account.

Step 6: Select the contact to recover.

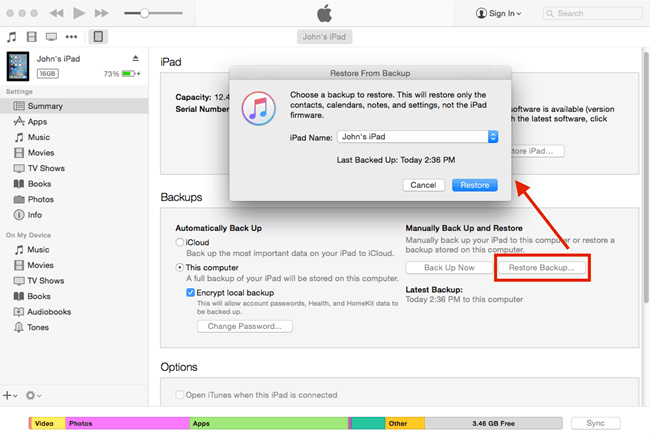
Way 3: Restore from iTunes Backup

Similarly, restoring from iTunes backup almost works the same as retrieving with iCloud backup. If you already have backup on iTunes, this method can also help you to get your deleted contact back. Related procedures are as presented below.

Step 1: Open iTunes and connect your iPad and to the computer with a USB cable. (input the password to trust computer if there is a need.)

Step 2: Tap the iPad icon and choose your device.

Step 3: Hit Restore Backup and select the contact lost on iPad you want to recover.

Step 4: Click Restore button to get the process started.

Way 4: Use iOS data recovery programs

However, many people don't tend to back up their files including contact on iPad. But it doesn't matter, as there is another perfect attempt to retrieve your lost iPad contacts. That is using professional iOS data recovery software likeTunesKit iOS Data Recovery. It can recover lost or deleted data and even encrypted files as soon as possible, and supports many kinds of iOS devices including iPad Air/Pro, iPhone, iPod, and Apple TV, etc.

Try procedures below to restore deleted contacts on iPad with this smart iPad data recovery tool.

Step 1: Connect iPad to the computer. Open TunesKit iOS Data Recovery program on your computer and make your iPad with the computer connected. Then choose "Recover from iDevice" from the top column. Click trust to the computer and enter the needed password, if it is the first time for you to use the program to recover data

Step 2: Scan and preview. After the device and different files appear on the interface, scan the categories on the right column. Then click the Scan button below and the program will begin scanning. At this time, you will see the percentage it is scanning.

Step 3: Select and recover. Then all files scanned will be shown on the left. Before you click the Recover button, you can preview the deleted contacts on your iPad from "Contacts" column. After that the software will start to bring your data back. Besides, you can set the formats of output files on the left corner.


Other related iPad contacts issues

1. iPad contacts missing names

iOS users also complain online that their iPad contacts don’t show the names or displays the names incompletely. This may result from a syncing problem with iCloud. To solve this, open your iCloud settings and switch off the contacts syncing option. Then choose to delete the existing iCloud contacts. Finally, restart your iPad and turn on the syncing option again.

2. iPad contacts missing

Moreover, customers don’t often see the contacts that are related to their iCloud accounts on their iPad. As for this problem, there might be various causes including a syncing issue and wrong settings. However, this is fixable through restarting your iPad or making some small adjustments.

Sep 9, 2020

How to Recover Deleted Snapchat Photos/Messages on iPhone

 When you want to see or use Snapchat photos and other data again, but you find that they are all gone. In this situation, what would you do? Want to know the methods to retrieve lost Snapchat photos and messages on the iPhone? Well, read to get more information.


The tool you'll need: TunesKit Snapchat Data Recovery

Before getting to the specific steps to bring the Snapchat data including messages, photos, and videos on your iPhoneX/11 and other models, we would like to introduce an efficient application to you. The name of it is TunesKit iPhone Data Recovery. Using this program to retrieve the data is easier and it can restore the data even without a backup.
This application can quickly recover lost data on iPhone, iPad, iPod touch, and rescue iOS files deleted due to various scenarios including mistaken deletion and virus attack.
Moreover, it restores diverse kinds of data like contacts, SMS, photos, etc. and is fully compatible with the latest iOS 13.

Part 1: How to retrieve Snapchat photos without backup

Just as many people don't back up the Snapchat data on iPhone before, so don't worry, TunesKit iPhone Data Recovery can still get the lost photos and videos back by restoring from the device. The following are the specific procedures.

Step 1: Launch TunesKit iPhone Data Recovery and connect your iPhone 11/X to the computer with a USB cable. Then choose the recovery mode as "Recover from iOS" from the program's main interface.


Step 2: After the device and different files are shown on the screen, choose the categories on the right column that need to be scanned. Then click the "Scan" button and the program will begin scanning.


Step 3: Then all data scanned will appear on the left. Before you click the "Recover" button, you can preview the iPhone data you want to retrieve from "App Documents" column. After that the application will start to bring your data back.

Part 2: How to recover Snapchat messages with backup

If you have the backup on iPhone already, you can use the below two recovery modes to bring back lost or deleted Snapchats data including messages, photos, videos and more on iPhone. The step-by-step guides are as presented here.

Recovery mode 1: Restore from iTunes backup

Step 1: Open TunesKit iPhone Data Recovery on the computer and connect your iPhone with the PC. Then select the recovery mode called as "Recover from iTunes backup" on the main screen of the app.


Step 2: Tap on the "Scan" button to examine your iPhone x data and choose the "App documents" option on the left column.


Step 3: Find out the deleted or lost Snapchat photos or videos on your iTunes you are willing to recover and lastly hit the "Recover" button to restore them to the computer.

Recovery mode 2: Retrieve from iCloud backup

Step 1: Launch TunesKit iPhone Data Recovery on the computer and make your iPhone connected with the PC. Then choose the third icon named as "Recover from iCloud Backup" from the main interface.


Step 2: Log in your iCloud by inputting your Apple ID and password. Next select your own device among many different iPhones.


Step 3: Choose your deleted Snapchat messages under the column of "App documents" and click the "Recover" button to retrieve your lost Snapchat data to the computer.

Other possible ways

Way 1: Restore Snapchat videos from iPhone manually

There is a "Recently Deleted Photos" function on iPhone, which may work in recovering Snapchat photos and videos on iPhone. Head to the Photos app on your iPhone, click Albums, and Recently deleted. Finally, find the data you want to restore.

Way 2: Bring old Snapchats back from the temporary folder

If you tend to retrieve Snapchat photos, videos and messages on iPhone without using the third-party software, then you can follow the below steps to get them back from the iPhone with the temp folder by yourself.

Step 1: Install the file manager application you favor such as iExplorer, then hook up your iPhone with the PC and open the file manager.

Step 2: Scroll down the folders on iPhone and find out the Snapchat folder.

Step 3: Restore the shared Snapchat photos and other data, and keep them to your computer.