Jul 22, 2020

Instagram Stories Not Working on Your iPhone? Fixed!


Q: Hi everybody, I'm having trouble with the Instagram stories not giving me all the features people seem to have gotten a lot of time ago(polls, gifs, etc). I have an iPhone and my app and iOS have been updated to the latest version. I mailed the Instagramsupport twice but got no reply.. someone have this problem also? How can I fix it? Thank you all.From Reddit

Some Apple users recently have reported that their Instagram stories not working and they don't know how to fix their problem successfully. If you also encounter the same problem with the question above, don't worry, here we will provide you 8 best solutions to fix your problem.

Solution 1. Uninstall and Reinstall Instagram

There is a chance that the Instagram stories not working is because of the bugs on the Instagram software, so you can try to uninstall and reinstall the software to fix your problem.

Step 1. Tap and hold the Instagram app icon on the home screen until it wobbles

Step 2. Tap the X on the application to delete it. Instagram will save your photos and profile information.

Step 3. Go to the App Store and reinstall Instagram, then log in with your account and password.

Solution 2. Update Instagram to the Latest Version

And you should also make sure that Instagram has been updated to the latest version. Here are the steps on updating this software on the iPhone.

Step 1. Go to the 'App Store' and then tap on the 'Update' at the bottom of the page.

Step 2. You can choose the 'Update All' button or scroll down to find the Instagram below and update it individually.


Solution 3. Reset Your iPhone

You can recover your iPhone back to normal by restarting your iPhone temporarily. Here are the detailed steps on restarting.

Step 1. Press the button to which the blue arrow points according to the picture below until your phone's interface appears a slider.

Step 2. Drag the slider and wait for 30 seconds to turn off your phone.

Step 3. Press the button shown in the picture again to turn on your phone.

Solution 4. Check the Network Connection

If rebooting the device fails to fix the problem, try using Instagram over Wi-Fi and a mobile data connection to check if the problem is caused by a weak signal. If the network connection is very poor on your iPhone. You can go and change another Wi-Fi or try to reboot your data connection when it is not working properly.

Solution 5. Check the Date & Time Settings

It is also necessary for you to make sure that the time and date on your iPhone/ iPad are set correctly. Here are the detailed steps to correcting them.

Step 1. Go to 'Settings' > 'General' > 'Date & Time'

Step 2. Select your time zone

Step 3. Change the correct date and time

Solution 6. Check the Storage Space and Clear the App Cache

If the space of your iPhone is insufficient, there will also cause some problems with the apps. Clearing the Instagram app cache shouldn't make any difference to loading Stories so it is worth trying.

Step 1. Go to 'Settings' > 'General'

Step 2. Click on 'iPhone Storage' to check how much space is left.

Step 3. Once all the storage and data has loaded, scroll down to find "Instagram." You should see the apps' total size.


Solution 7. Update iOS System on Your Phone


You should also update the iOS System in your phone by doing the following steps. Go to 'Settings' > Find 'General' > Tap 'Software Update' > Choose 'Install Now'.


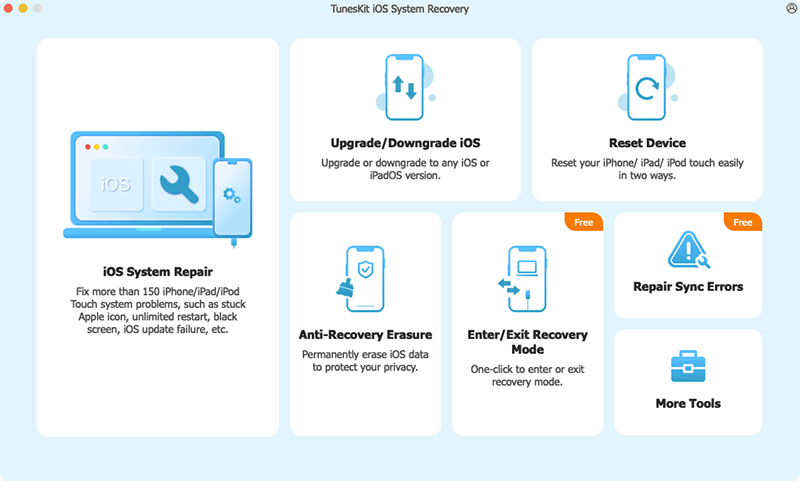
Solution 8. [The Optimal Choice] Use iOS System Repair Tool

If you have gone through all the above steps and still can't fix Instagram stories won't work, here I will recommend you to use the TunesKit iOS System Recovery software which can help you effectively fix more than 50+ iOS issues without any data loss and the complicated operation of backing up. It can fix many iOS issues like iPhone echo problems, iPhone safari not working, stuck on the white Apple logo, 'iPhone is disabled. Connect to iTunes' error, etc.

In the next part, we will show you how to fix Instagram stories with TunesKit iOS System Recovery steps by steps.

Step 1. Open TunesKit and Connect your iPhone with Computer

First, you need to open TunesKit on your computer. Then connect your phone with computer via a USB cable. After your phone has been detected by your computer, press 'Start'.

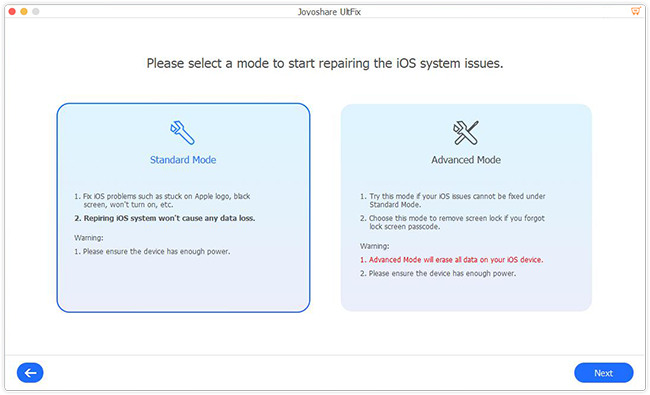
Step 2. Choose a repairing mode and Download firmware package

Here are two modes you can select. Standard Mode can solve the common iOS issues and repair the iOS system without data loss. And the Advanced Mode can fix more serious issues but it will erase all data on your phone. To fix Instagram stories issues, you should select Standard Mode first.
Then you need to confirm your device info is correct and press "Download" to download the firmware package.

Step 3. Recover the iOS system

When recovering, make sure your iPhone keep connecting with your computer.
TunesKit can fix all the iOS issues without any data loss. It also provides you the function one-click to enter/exit for free. It will also help you downgrade iOS and fix iTunes error like iTunes error 54, iTunes error 39.

Conclusion

Here are all the 8 best solutions to fix iPhone Instagram Stories not working. You can follow the steps above one by one to fix your problem. If you still have any questions on fixing this issue with the tips above, you can leave your comment below, we will try our best to help you.

If you want to learn more about all these tools, you can refer to the source page here: https://www.tuneskit.com/ios-repair/fix-instagram-stories-not-working.html 


Jul 13, 2020

Top 8 Tips to Fix iPhone Won't Restore Issue


Usually, when we have a system problem with our iPhone, the experts advise us to put the phone in recovery mode and reinstall the phone. There are two ways to reinstall your phone. The first one is to restore the iPhone from an iCloud backup, and the second one is to restore from iTunes' backup.
However, some people will find that their iPhone won't restore in recovery mode. When they try to restore with iTunes, they might also see these messages on their computer: 'The iPhone [device name] could not be restored', 'An unknown error 9/ 4005/ 4013/ 4014 occurred'.
So if you also have the same problem, don't worry, this tutorial will help you analyze the reasons why this situation will occur and give you the full guide to fix your problem. Let's get started.

Why My iPhone Won't Restore? 

Have you ever had an iPhone won't charge? This situation mainly appears when your iPhone disconnects with the computer during the update or restore or your computer couldn't tell your device to restore. Here are some of the factors contributing to this problem.
1. You haven't updated the iTunes to the latest version
2. Some bugs on your computer
3. The iOS system hasn't been updated
4. The iOS system issues on your iPhone
5. The USB cable has been damaged
6. The poor network connection
7. The blocking of the third-party security software
These are the common triggers of your iPhone won't restore. In the next steps, we will provide you some effective tips to fix it completely.

How to Fix iPhone Won't Restore Successfully?

We have listed the 6 most effective tips to fix the iPhone cannot restore the issue right here. Read on and learn how to fix iPhone won't the restore by doing the following steps one by one.

Tip 1. Check your USB cable

If you want to restore your iPhone with iTunes, you need to connect your phone via a USB cable. So if the USB cable has been damaged, you will not connect your iPhone to the computer successfully. You have better check your USB cable or replace it with another one to have a try.

Tip 2. Check your network connection

If you restore your iPhone with iCloud, you should make sure that your phone has been connected with Wi-Fi or cellular data. Therefore, you need to go and check the network settings on your iPhone. Or you can try to change another Wi-Fi or use the cellular data. If you find your network doesn't work, you can try to fix this problem by resetting the network settings.
To reset network settings, you should go to 'Settings'> 'General'> 'Reset'> 'Reset Network Settings'.


Tip 3. Update iTunes to the latest version

Make sure that your iTunes has been updated to the latest version by clicking the 'Help' button on the top of the menu. Then click 'Check for Update'.


Tip 4. Reboot your computer

Then you can try to reboot your computer to fix the bugs in your computer after updating iTunes to the latest version. If you are using a Mac, you should click the 'Apple' button at the upper-left-hand corner of the screen, and click the 'Restart' button from the menu. If you are using a PC, you should click the Start Menu, and click Restart.

Tip 5. Update the iOS system to the latest version

If your iOS system has not been updated to the latest version, some system issues on your iPhone will not be recoverable. Here are the steps to update your system.

Step 1. Got to 'Setting'> Find 'General'
Step 2. Tap 'Software Update'
Step 3. Choose 'Install Now'


Tip 6. Reset your iPhone

Before resetting your iPhone to factory settings, you must back up your data first for this action will erase all the data on your phone.
To reset your phone, you should do the following steps.
Step 1. Go to 'Settings'> Find 'General'.
Step 2. Press 'Reset' at the bottom
Step 3. Tap 'Erase All Content and Settings'.


Tip 7. Remove the third-party security software

If you have installed some security software that runs in the background of the computer, you must have a check whether this kind of anti-virus software stops you from syncing.
You'd better quit this software before starting syncing. You can also change your security software's setup and see whether the iPhone could not be restored issue has been fixed.

Tip 8. [The optimal choice] Fix iPhone won't restore with TunesKit

If your problem still can't be fixed after doing the 9 tips above, there is likely something wrong with your iOS system. Here I will recommend you to use a powerful system recovery software named TunesKit to help you fix it. With TunesKit, all the iTunes errors like error 9, 4005, 4013, 4014 you meet can be easily fixed without any data loss. 
Regarded as the best iOS repair tool in 2020, TunesKit iOS System Recovery can fix more than 50 iOS system issues like iPhone won't restore, iPad won't charge, iPhone won't download the app with easy three steps. It is more than an iOS repair tool. It can also help you downgrade the iOS system and provides the function 1-click to enter/exit recovery mode for free. So you don't have to do the complicated process of backing up and can fix your problem easily.

Here are the detailed steps on fixing your problem with TunesKit.

Step 1. Open TunesKit and Connect Your iPhone to PC
Open TunesKit on your computer. Then connect your phone with computer via a USB cable. After the computer has detected your phone, press 'Start'.


Step 2. Select a repairing mode and Download firmware package
To fix iPhone won't restore, you should choose Standard Mode first.


Note: Standard Mode can solve the common iOS issues and repair the iOS system without any data loss. Advanced Mode can fix more serious iOS issues but it will erase all data on your phone.
Then, confirm your device info is correct and press 'Download' to download the firmware package.


Step 3. Recover the iOS system
After your firmware package has been downloaded, click the 'Repair' button and wait for the recovering process finished.


As you can see in the 3 steps above, TunesKit iOS System Recovery is a multi-functional and professional iOS repair tool. It's very easy to operate, so you can fix the problem by yourself without asking help from any technical specialist. More functions are waiting for you to explore, why not download it and have a try?

Conclusion

Here are all the top 8 tips to fix iPhone won't restore issue. We really hope you can make a clearer understanding on how to fix this issue with TunesKit after reading these instructions. If you still have any trouble, please don't hesitate to leave your voice below.

Jul 9, 2020

Quick Guides to Convert or Rip DVD to MKV

As DVDs equipped with high fax sound quality and can meet people's needs for large storage capacity and high-performance storage media, they are still popular among people and have been widely used in the audio/ video field. 
However, we can't directly convert or rip DVD to MKV. Because all the DVDs have the data protection system which will encrypt the DVDs and prevent people from copying it. And there are many also other copyright protection techniques commonly used in DVDs such as  CSS Scrambling System, Anti-analog device ripping, Region Goding. As a result, even we download it from our DVDs, we still can not play it on our computer, let alone converting DVD to MKV format with high quality. 
That's why TunesKit Video Converter comes here. No matter what kind of format you want to convert or rip from a DVD, TunesKit Video Converter can easily meet your needs, thus you are capable of play it the DVD on any portable and mobile device or share it to other platforms. While ensuring the quality of the converted video, TVC can also convert your videos to over 250 formats at 60X faster speed without data loss.  Regarded as the best video converter in 2020, TunesKit can also provide you other functions like merge videos into one, trim, adjust, plus effect, add watermark and subtitle, and so on.

The Detailed Steps on Convert DVD  to MKV

Next, I will teach how to use TunesKit Video Converter to convert DVD to Mkv steps by steps.
Step 1. Launch TunesKit and Press the button to add Target DVDs


Connect your DVD with your computer via a DVD driver. Then add your target DVD into the interface by clicking the button in the red frame.

Step 2. Customize Output Settings and Choose the format


Click "Format" > "Encoding mode"> "General Video" > "WKV"
Note: There are 2 converting modes you can choose. High-Speed mode allows you to convert videos to any format fast and lossless. Encoding mode gives you a chance to choose any format you want like MP4, M4V, MKV, MOV, and device like iPad, iPhone, Samsung.

Step 3. Start to Convert or Rip DVDs to Any Format


Press the "Convert" button


Note: You can find all your converted video in the third button on the top of the interface. And you can have a check there.
 

Key Features of TunesKit DVD Ripper:

  • Rip a DVD to in any format like MKV easily
  • Convert DVD or videos without quality loss
  • Edit DVDs with a built-in video editor
  • Convert over 250+ videos and audios
  • Easy of use with clear navigations
As it is a very professional and multifunctional software which can meet your diverse need easily, so what not download it and have a try?

Conclusion: 


Here are all the instructions on converting DVD to MKV format. If you still have trouble in doing the steps above, you can leave your voice below. Now, go and enjoy your favorite DVD videos or audios on your phone.

If you want to learn more about all these tools, you can refer to the source page here: 

Jul 2, 2020

Quick Guide to Rip a DVD and Upload it to YouTube


YouTube is one of the most famous and popular video-sharing platforms in the world. So If you're a YouTuber who loves to collect DVDs, you may want to upload and share some wonderful fragments of the videos in DVDs to your audiences. 

Sometimes, you will also need to clip some videos on DVDs and then edit or merge them into the effect you want, and upload them to your channel.
So here comes to a problem, how to rip a DVD and upload it to my YouTube channel? Don't worry, we will analyze the restriction on YouTube when uploading a DVD file and provide you the full guide steps by steps.

Something You Should Know

Before introducing how to rip DVDs to YouTube, there are some restrictions on YouTube you should know.
  • Intellectual property: Not matter what kind of forms of commercial videos, they can't be your commercial use. So you can't upload a commercial DVD completely without permission to YouTube for it's illegal to do.
  • YouTube supported formats: MPEG4, MPEG-PS, MP4, AVI, MOV, WMV, FLV, DNxHR, WebM, 3GPP, CineForm, ProRes, HEVC (h265). As a result, you can convert your DVD file into these 13 types of video formats and then upload it to your channels.

The Best Tool to Rip a DVD

What you need most is a professional DVD Ripper that can rip your DVDs into the formats that can be supported by YouTube.

If you are not familiar with the various video formats and don't know which one to choose, TunesKit Video Converter can be your optimal choice. It provides you the option that can automatically convert your video to the YouTube format, thus you don't need to set all the parameters like size and length suitable for YouTube by yourself, which is very convenient and easy to operate.

Regarded as one of the best video converter in 2020, TunesKit supports more than 250 output formats like MP4, MKV, MOV, AVI, etc, and 68+ output devices like iPhone, iPad, Apple TV. Meanwhile, it is more than a DVD to YouTube converter. TunesKit also lets you edit your video files like trimming, cutting, add special effects, and watermark to make your videos more wonderful.

Key Features of TunesKit DVD Ripper:

  • Rip a DVD to in any format supported by YouTube
  • Convert DVD or videos without quality loss
  • Edit DVDs with a built-in video editor
  • Convert over 250+ videos and audios
  • Support more than 68 output devices
  • Easy of use with clear navigations

The Full Steps to Rip and Upload a DVD to YouTube Channel

The following section is the step-by-step guide for converting and uploading DVD to YouTube by using TunesKit.

Step 1. Open TunesKit and Add Your Target DVD files
You should connect your DVD with a computer via a DVD driver. Then after your DVD files have been detected, add your target files by clicking the first button in the red frame or dragging the files into the interface.

Step 2. Customize Output Settings and Choose the format
Click 'Format'> 'Encoding mode'> 'Web video'> 'YouTube'

Note: High-Speed mode can convert videos to any format fast and lossless. Encoding mode gives you a chance to select any format you want like YouTube, Facebook, Vimeo, etc.
Step 3. Start to Convert or Rip DVDs
Press the 'Convert' button to rip your DVDs files to the format you set.

And you can find all your converted video by clicking the third button on the top of the interface. So you can have a check after finishing converting.

Step 4.  Upload DVD Video to YouTube
Then your last job is to upload the converted videos into YouTube sites and let people enjoy them.
  1. Upload your YouTube
  2. Define your video is 'Public' or 'Private'
  3.  Click on the arrow to upload your DVD video and wait for it to finish
 

Video Demo: How to Rip a DVD and Upload it to YouTube Site?


Conclusion

Here are all the steps on how to rip and upload a DVD to your YouTube channel. If you want to be a famous YouTuber, you will need a multi-functional tool to help you. And TunesKit can provide you wonderful experience and improve the quality of your videos. So why not download it and have a try?


If you want to learn more about all these tools, you can refer to the source page here: https://www.tuneskit.com/video-converting-tips/convert-dvd-to-youtube.html

Jun 18, 2020

Quick Guide to Convert DVD to WMV


If you are a film lover, you must have collected many DVDs at your home. As we all know, DVD has a large storage capacity, high-performance storage, high fax sound quality that can provide us the highest enjoyment. But its low portability will border you when you want to enjoy it outside. 
DVD formats are not supported by some popular digital devices like iPad, iPhone, Apple TV.  To enjoy the high-definition videos on DVDs anywhere, you may need to rip DVD and convert it to other formats like WMV. So how to convert DVD without any quality loss? This article will provide you the full guides to fix your problem.


What's WMV format?

WMV is short for Windows Media Video. It's a general term for a series of Video codec and related Video codec formats developed by Microsoft. It's part of the Microsoft Windows Media framework. The Softwares that can play WMV files includes Windows Media Player, Media Player Classic, VLC Media Player, and KMP (K-Multimedia Player). There are also many third-party players such as Linux, play using FF MPEG implementations in WMV format.

Why we can't directly convert DVD to WMV?

All the DVDs have a data protection system. It is used to protect commercial DVDs from being copy. As a result, some commercial DVDs will be encrypted, and even though we download it, they still cannot be played without the authentication of the digital program without authentication. And there are also some copyright protection techniques commonly used on DVD including CSS Scrambling System, Anti-analog device ripping, Region Coding.
This data protection system will make it hard for us to convert DVD to WMV or other formats you want.

How to convert DVD to WMV?

Here I will recommend you a powerful software called TunesKit Video Converter which is also regarded as one of the best DVD ripper in 2020. By using TunesKit, all the encrypted or unencrypted commercial DVDs can freely rip and convert to any format you want with high quality, so you don't need to worry about the data protection system in DVDs.
Supporting more than 250 output video and audio formats and 68+ output devices, TunesKit Video Converter can easily meet your diverse converting needs, such as, convert DVD to MKV, AVI, MPEG, MOV. It can also provide some other useful functions like trim, plus effect, add watermark and subtitle, merge videos into ones, and so on.

Here are the full guides on converting DVD to WMV with TunesKit.

Step 1.  Open TunesKit and Add Target DVDs
Connect your DVD with your computer via a DVD driver. Then add your target DVD into the interface by clicking the button in the red frame.

Step 2. Customize Output Settings and Choose the format
Click "Format" > "Encoding mode"> "General Video" > "WMV"


Note: There are 2 converting modes you can choose. High-Speed mode allows you to convert videos to any format fast and lossless. Encoding mode gives you a chance to choose any format you want like MP4, M4V, MKV, MOV, and device like iPad, iPhone, Samsung.

Step 3. Start to Convert or Rip DVDs
Press the "Convert" button


Note: You can find all your converted video in the third button on the top of the interface. And you can have a check there.


You can click here to download TunesKit iOS System Recovery for windows.

Conclusion:

Here are all the guides on converting DVD to WMV. No matter what kind of video formats you want to convert, TunesKit can meet your all diverse need. So why download it and have a try?

If you want to learn more about all these tools, you can refer to the source page here:
https://www.tuneskit.com/video-converting-tips/convert-dvd-to-mkv.html

Jun 9, 2020

‘iPhone is Disabled. Connect to iTunes' Error appears? Here are the solutions.


If you press the wrong passwords on your iPhone for many times, your iPhone will be set automatically into the state that 'iPhone is disabled' to protect itself. More times you press the wrong passcodes, the more serious situation you will encounter. After entering in the wrong passwords for 10 times, your iPhone will show you a warning that 'Connect to iTunes'.
And you may ask why my iPhone will be disabled and how can I fix this problem? Don't worry, Here I will give you some useful tips to fix it.

Why My iPhone Disabled?

Here are the reasons why your iPhone will be set into the disabled state. 
Any iPhone has the function of protecting themselves if anyone tries to unlock your phone by guessing your passwords. 
So if anyone input the incorrect passcodes 5 times on your iPhone, your phone will be set into the disabled state "iPhone is disabled, try again in 1 minute." If people press the incorrect password for 7 times, you will need to wait 5 minutes. Pressing the wrong password for 8 times will cost you to wait 15 minutes. 9 incorrect passwords will cost you to wait 60 minutes. And your phone will show "iPhone is disabled, connect to iTunes" or your phone will erase the data if self-destruct mode is turned on when you press the wrong password 10 times.
Under normal circumstances, your phone will not enter to this situation unless there are some artificial or unconscious operations. 
  • Unconscious operations: The phone which is put in your pocket will inadvertently press the password button when you are walking or doing some movements. 
  • Artificial operations: Your phone was taken away by your child or other people, they want to guess your password but they failed. Or your phone is disabled because your Touch ID not working and you forget your password so you have to guess for many times.

How to Fix "iPhone is Disabled. Connect to iTunes " Error?

Tip 1. Fix iPad Is Disabled Connect to iTunes with iTunes

If you have backed it up recently and you know your iPhone password, you can simply unlock the device.
  • Step 1. Connect your iPhone with a computer that has synced before via a USB cable.
  • Step 2. Launch iTunes and click "Summary" > "Sync" in iTunes and enter your correct password to unlock the device.
  • Step 3. Choose "Restore iPhone" to recover data from the most recent back.
Restore iPhone on iTunes

Tip 2. Resetting Your Phone to Recovery Mode

If you don't remember your iPhone password, you have to erase all the data on your phone by using recovery mode. But you can still restore the data if you have a backup in iTunes or iCloud.
Here are the instructions on how to enter Recovery Mode.
  • Step 1. Connect your phone with the computer via a USB cable.
  • Step 2. Open iTunes.
  • Step 3. Press and release the button according to your iPhone models.
(1) iPhone 8, 8 Plus, X, XS, 11, 11 Pro: Press and release the "Volume Up" button and the "Volume Down" button simultaneously, press and hold the "Side" button until you see the recovery-mode screen.
(2) iPhone 7 or later: Press and hold down the "Volume down" button and then release the "Volume down" button when you see your phone connect to iTunes.
(3) iPhone 6s or earlier: Press and hold the "Home button" on your phone. And release the Home button when you see the iTunes icon on your phone.

Note: Make sure you have backed up your data, or all the information on the iPhone will be erased and missing forever.

Tip 3. [The Optimal Choice] Using an iOS System Recovery Software

If you want to fix a disabled iPhone, using an iOS system recovery software is the most effective way and the most optimal choice. TunesKit iOS System Recovery is a professional iOS repair software that can not only help you fix a disabled iPhone without any data loss or backing up with iTunes but also can provide you the service of one-click to enter/ exit recovery mode. It is very easy to operate and professional.
Here are the detailed steps to fixing this problem by using TunesKit.

Step 1. Open TunesKit and Connect Your iPhone to Computer
First, you need to download TunesKit on your computer and then connect your phone to the computer via a USB cable. After your phone has been detected, press "Start".

Step 2. Select a Repairing Mode and Download Firmware Package
To fix a disabled phone, you should first try the Standard Mode, which can solve the common iOS issues and repair it without any data loss. But if you are facing more serious iOS system issues, you can choose the Advanced Mode which can recover more serious problems, but I will erase all data on your phone

 Next, confirm your device information and press the "Download" button.

Step 3. Recover the iOS system
After the download process has finished, click the "Repair" button and wait for your phone being recovered.

What's more, this software can fix more than 50 iOS problems on iPhone/ iPad/ iPod touch/ Apple TV such as iPhone Call Failed Error, iPad won't chargeiTunes Error -39, and so on. It is so powerful that it can get your device back to normal without data loss. So why not download it and have a try?

Video Demo: How to Fix 'iPhone is Disabled. Connect to iTunes' Error?

You can also watch the following short video to learn how to fix the 'iPhone is disabled. Connect to iTunes' Error with the assistance of TunesKit iOS System recovery.

How to avoid the iPhone from being disabled by pressing incorrect passwords?

There are also some tips for you to avoid your phone is disabled connect to iTunes.

The simplest thing you can do is not to repeatedly press the wrong password into your phone when you forgot your password. If you forget your password, you can follow the steps in the article Forgot Lock Screen Passcode on iPhone? How to Reset to solve this problem.

The next one is to put a protective film and case on your phone, this measure can effectively prevent the password button mistakenly being pressed.


And the last one is to back up our data frequently just in case the situation like this and avoiding all the data on your phone is erased.

The Bottom Line

Here are all the 3 best tips I can provide you to fix a disabled iPhone.  You can quickly fix this issue by using TunesKit without asking any technical specialists for help and without data loss. We sincerely hope that these solutions can fix your problem. And if you still have any questions about fixing iOS system issues, you can leave your voice below.

If you want to learn more about all these tools, you can refer to the source page here:


Apr 29, 2020

Can I Watch iTunes Movies on Firestick?


In the current streaming media player market, Amazon's Fire TV Stick is another one besides Apple TV, Roku, and Chromecast, etc. It can be used to stream multiple online media content such as Amazon Instant Video, Netflix, etc. to TV for playing. But when you start to stream iTunes movies, you may be disappointed.
This is because all iTunes movies and TV shows are encoded in an M4V format, a special format developed by Apple and protected by DRM, which is not supported by the Fire Stick device. To watch iTunes movies on Firestick, you need to remove Apple's DRM protection while converting iTunes movies to MP4 or other DRM-free video formats. You can then transfer these common iTunes movies to an external storage device for playback on the TV via Fire Stick.
That's why TunesKit M4V Converter comes here. With this smart program, you can easily remove the DRM restrictions of iTunes videos (including movies, TV episodes, music videos, etc.). It also enables users to convert DRM-protected iTunes movies to MP4, AVI, WebM, or other common video formats while maintaining lossless quality. In this way, you can get a 1080p HD iTunes video in MP4 format and then project it to the Amazon Fire Stick.

Part 1. How to Remove DRM and Convert iTunes Movies with TunesKit

Step 1 Import iTunes movies to TunesKit
add itunes movie files
After launched TunesKit M4V Converter on your computer, you can simply click the "Library" button to add all iTunes movies that you want to get rid of the DRM from. If your downloaded iTunes movies are stored on other directory or external driver, you can just drag and drop them to TunesKit program.
Step 2 Choose output format
select output format
Next press the "Format" panel adn you will see a lot of output formats for you. Amazon Fire TV Stick supports multiple video formats with the codec such as H.264, H.265, VP 9, etc. Here you're suggested to select "MP4 (Lossless)" under HD Video as the output format, which is supported by Firestick and will not cause any quality loss.
Step 3 Remove DRM and convert iTunes to MP4
convert itunes movies to firestick
After everything is set, now click the "Convert" button and TunesKit will start to strip off the DRM protection and convert iTunes movies to MP4 format as wish. Wait a while until the process completes. You can then find all DRM-free iTunes movies on the "Converted" folder.

Part 2. How to Stream iTunes Movies to TV via Amazon Fire Stick

Now you can freely enjoy your iTunes movies on any TV as you like. Just follow the steps below to stream these converted iTunes videos to TV via Firestick. There are several methods and here we pick an easy one to cast videos to Firestick from PC.
Before starting to stream, please make sure you've done the following things:
* Amazon Firestick is plugged into your TV's HDMI port
* Your Firestick and computer are connected to the same Wi-Fi
* You have got your Firestick Remote with you
* You have logged in your Amazon account on the device

Step 1. Press and hold the "Home" button on your Remote for several seconds. Then select the "Mirroring" option on the menu.
mirror itunes movies to tv via firestick
Step 2. On your computer (Windows 10 or 8), find the Notifications icon at the lower right corner of the screen and select it, and then click "Connect" to proceed.

Step 3. Now you should see your Firestick on the screen. Click on your Firestick device icon to connect your computer to the Firestick device. When the casting process is done, you can then watch your iTunes movies on the big screen TV amazingly.
For more details, please visit the source page: 
https://www.tuneskit.com/drm-m4v-to-media-players/watch-itunes-movies-on-firestick.html

Apr 24, 2020

[Review] 4 Best iOS System Repair Tools

Our iPhones may get stuck in the white Apple logo, keep restarting or stop charging, etc. from time to time. At this time, a quick solution is to reset the device but you may lose your data. Now you're suggested to try a professional iOS system repair tool which will help solve the issue without causing any data loss. Here I'd like to pick 4 top-notch ones for your reference.

1. TunesKit iOS System Recovery

tuneskit ios system recovery
TunesKit iOS System Recovery for Mac/Windows ranks the top of the best iPhone repair software list. This tool is well designed to reach into the iOS/iPadOS/tvOS systems and fix various issues caused by it, which includes iOS software update failure, iPhone stuck in recovery mode, camera not working on iOS 13, iPad black screen, etc.
It offers two repair modes - Standard Mode and Advanced Mode. The former allows you to fix all kinds of common iPhone problems without erasing any data on the device, while the latter can help you repair some severe iOS system problems like the iPhone is disabled or locked, etc.

2. Dr.fone - Repair

drfone-repair
Wondershare has introduced a powerful iOS toolkit to help mobile users better enjoy their device and Dr.fone - Repair (iOS System Recovery) is one of them. It enables users to repair types of iOS problems without any technical skills when you meet the iPhone white screen of death, Siri not working on iPhone, iPad won't turn on, iPhone recovery mode not working, etc. Similarly, this smart program works well with all iPhone, iPad, iPod models.

3. Joyoshare UltFix

joyoshare ultfix
Now let's come to the next useful iPhone repair software whose name is Joyoshare UltFix. This is a safe and trustworthy iOS system recovery tool that has the ability to fix over 30 different common or serious iOS issues such as iPhone stuck on a black screen with spinning wheel, GIFs not working on iPhone, iPhone gets bricked, etc. More importantly, Joyoshare UltFix is able to repair the problem without causing any data loss.

4. Tenorshare ReiBoot

tenorshare reiboot
The last one for the best free iPhone repair software is Tenorshare ReiBoot. Actually, it only gives you a free option to enter or exit the recovery mode. When you start to repair your iOS issues such as iPhone stuck on Apple logo, recovery mode loop, screen is locked and won't turn on, you need to pay for it. Anyway, this iOS repair program can help you repair your iOS to normal without losing the data.
If you want to learn more about all these tools, you can refer to the source page here:
https://www.tuneskit.com/ios-repair/top-iphone-repair-software.html

Apr 17, 2020

3 Free iTunes Removal Software You May Like


As it is known, Apple has created a FairPlay DRM (digital rights management ) technology to particularly control the use of its digital content sold in the iTunes Store, including movies, TV shows, music, audiobooks, etc. Generally, all these media files downloaded from iTunes are encoded with FairPlay. As a result, all protected iTunes videos and audios, even if you’ve purchased them, are restricted to be played only on Apple’s device such as iPhone, iPad, iPod touch, Mac, or on up to five authorized Windows computers with iTunes.

Are you annoyed by the FairPlay DRM? Do you want to remove DRM from iTunes movies, TV episodes, songs or audiobooks? You should try some dedicated iTunes DRM removal software. If you have a little budget, you’re in the right place. Here we have tested 3 free iTunes DRM removal apps for you to bypass DRM protection from all iTunes media, thus you can play all iTunes videos and audios on any media devices you want.

#1 Requiem (Windows & Mac)

Requiem (out of development since 2012) is a powerful free solution that can remove DRM from iTunes movies free, as well as songs and iBooks. It decrypts the audio and video data of iTunes files by authenticating with the DRM library using the secret credentials used by iTunes itself. Therefore, it's able to keep the 100% lossless quality of original iTunes movies and other media without decoding and re-encoding the content. The converted movies and music are allowed to be played on non-Apple-approved devices like Samsung, HTC, Nokia, LG, Xbox 360, PSP, Zune, and so on.

However, due to the copyright issue, Requiem was stopped upgrading since iTunes 11. In other words, if you are using higher iTunes versions, Requiem won't work anymore.

Extra tips: If you have the higher version iTunes and you have a large number of iTunes movie purchases and rentals, you are recommended to try TunesKit DRM M4V Converter - the best Requiem alternative. It's one of the best iTunes DRM removal tools, which is able to remove DRM from all purchased and rented iTunes movies and TV episodes with 100% original quality.

#2 myFairTunes (Windows)

myFairTunes is a free iTunes DRM removal tool that empowers you to unlock iTunes FairPlay-encrypted songs and albums on Windows OS. It comes with a user-friendly interface and converts the iTunes songs from DRM-ed M4P to DRM-free MP3 format easily.

#3 FairGame (Mac)

FairGame is an iTunes music DRM remover freeware designed to run on Mac OS X. It adopts the same conversion technique as Apple iMovie does to convert the DRM-encrypted iTunes AAC audio tracks to un-protected AAC with original audio quality and all ID tags preserved.

The Final Thought

These are 3 free tools to help you get rid of DRM encryption from iTunes movies, TV shows, songs etc. If you don't mind the output quality, you can get any of them to remove iTunes DRM for free. But if you are serious about the audio or video quality after conversion, you can take TunesKit into account, which won't let you down.

Apr 8, 2020

Easy Way to Watch iTunes Movies on Android Smart TV


When you plan to play iTunes movies or TV shows on your Android smart TV, you may find that you can't do that. This is because all the iTunes videos you purchased or rented from the iTunes store can only be played on a computer via iTunes, on an iOS device such as iPhone, iPad, or Apple TV, etc. Do you want to watch iTunes movies on your Android TV such as Samsung, LG smart TVs? Here I'd like to share an easy solution for you.

TunesKit M4V Converter is a professional iTunes DRM removal application that enables users to remove the DRM and convert iTunes TV shows from special M4V format to common video format such as MP4, AVI, WMV, MPEG, etc. It works at a 30X conversion speed while keeping 100% original quality including AC3 5.1 Dolby audios, CC subtitles, etc.

Key Features of TunesKit iTunes M4V Converter:

  • Remove DRM from iTunes movies and TV shows losslessly
  • Convert iTunes videos at up to 30X conversion speed
  • Convert iTunes M4V to MP4, AVI, MOV, WMV, 3GP, MKV,  etc.
  • Keep all original subtitles and AC3 5.1 audio tracks
  • Friendly UI and simple to operate

Simple Guide to Convert iTunes Movies with TunesKit:

Step 1: Launch TunesKit and add iTunes TV shows

Download and install the TunesKit M4V Converter first, and then launch it on your Mac or PC computer. Next, click the "Library" icon on the top menu bar to import iTunes videos to TunesKit.

add itunes movies
Step 2: Select output audio tracks and subtitles

When all the iTunes movies are loaded into TunesKit, you can now choose the audio tracks and subtitles for each file. If some movies have different languages, you can manually select the language you want for the output videos, so you'll get the right language when you play the iTunes TV shows on your Android TV.

Usually, the default output format is Lossless MP4, which has great compatibility while keeping lossless quality. If you want to customize the output settings, you can click the "Format" button on the lower-left corner of the interface to select the one you want.

set output audio tracks, subtitles
Step 3: Remove DRM and transfer to Android TV

After all the settings are done, you can click the "Convert" button on the bottom right corner to let TunesKit start removing the DRM and converting iTunes videos to MP4 without quality loss. Wait a few minutes and you can then find all converted iTunes movies in MP4 format.

Then you can simply transfer them to your Android TV by copying and pasting to the USB drive. Afterwards, you can enjoy the iTunes movies on Android TV freely.

You may also like: