Sep 23, 2020

5 Best DVD Converter Review

 I know that there are still many of you love DVD and have a great DVD collection. But saving DVDs at your cloud or computer is a good way to protect them. If you want to do that you need a DVD ripper. Today, I want to introduce some great DVD rippers to you.

1.  TunesKit Video Converter

It is by far one of the best DVD converter software on the internet today. TunesKit Video Converter software is a versatile program with abilities ranging from video conversion, video editing, to DVD ripping.


With the application, it is possible to rip or convert DVDs into over 250+ formats including; AVI, MOV, MKV, MP4, AAC, MP4 to mention a few. TunesKit has a 60X conversion speed which is incomparable to other programs. It also has a DVD DRM removal plugin tool that makes it easy for users to rip and convert any protected or commercial DVD to any desired video format without compromising video quality. In addition, the software has a built-in smart video editor that allows you to fine-tune video parameters such as frame rate, bit rate, codecs among others. The output videos are also supported by most devices.

 Pros:

 • It's superfast.

• Convert DVD videos in batch.

• Intuitive interface and easy to use.

• 100% original high video quality.

• Supports lots of output formats.

 Cons:

 • Free trial version doesn't convert the whole files.


2. Wondershare UniConverter

Originally referred to as Wondershare Video Converter Ultimate, Wondershare UniConverter is an excellent DVD converter and burner software. The software has immense capabilities including, DVD to Video Converter, VR Converter, DVD/CD Burner among others. Wondershare supports around 35 Video output options including MP4, MPEG, and MOV. It also supports a whole lot of portable video transfer to make sure that the particular videos are compatible with the device. Most notably, the software can also convert 4K videos. It is premium software that requires an annual subscription of $39.95 and is available for both Windows and Mac OS users.

Pros:

 • Its ads free.

• Easy to use.

• Burn to disc abilities.

• Relatively Fast conversion speed.

 Cons:

 • It is expensive.


3. Leawo Video Converter Ultimate

Leawo DVD converter software is famously known for its incredibly easy to use interface. The program serves to convert DVD to video/audio in 180+ formats including MP4, MPEG, AVI, AAC, AMR, M4A, RMVB, etc. With the software, users can also select subtitles from source DVDs for output videos. Leawo has also an in-built video editor feature that allows you to tune videos to your own desired taste. It is also possible to burn videos into DVD/ Blue-ray disks. The software is only available for Mac and Windows OS users. It has a free trial that allows conversion of the video up to 5 minutes as well as a lifetime subscription version of around $ 69.95.

 Pros:

 • Supported to output 4K videos.

• Multi-language support.

• Easy to use and stable.

 Cons:

 • Busy website and software layout.

• Slow conversion speed.


4. Any Video Converter Free

Popularly known as 'AVC', Any Video The converter is free DVD converter software designed to convert DVDs to more digital video formats for free. The program support range of encrypted DVD types including Blue-ray discs. Using the software puts you in a position to convert DVDs to popular video output formats such as WMV, MOV, MP4, M4V, etc. Besides, it also supports output formats for devices including iPod, Apple TV, Android phones, and iPhones. In addition to this, AVC has DVD burning, video editing, and video downloader abilities.

 Pros:

• 4K resolution support.

• Supports popular formats.

 Cons:

 • Relatively slow.


5. HandBrake

It is certainly the best free DVD converter software there is in the market today. It is now available for Mac, Linux and Windows users. Handbrake literally gets the job done with an account that it is a free tool. In any case, the program supports a dozen of popular video outputs such as MP4, M4V, and MOV. Its resolution however is limited to up to 2160p. Moreover, the software has plenty of video editing features.

 Pros:

 • Good quality output.

 • Ads free.

 Cons:

 • Slow conversion speed.


Conclusion

These 5 DVD rippers are all great software for you to rip DVDs. Among them, TunesKit stands out for its great output video quality and its multiple functions. It is my favorite.

 What’s your favorite DVD ripper. Share with us in the Comment!


How to Rip DVD to Facebook

Facebook is an app that is used by a large number of people. It has many useful functions including uploading videos. Some may want to upload their DVD to Facebook. If we want to upload them to Facebook, we must rip them first. But how to rip them?

Rip DVD to Facebook

Rip DVD with TunesKit

The first DVD to Facebook ripper we would like to recommend is TunesKit Video Converter. TunesKit Video Converter is able to convert DVD or other videos to 250 + formats, which certainly contains the formats Facebook needs like MP4, WMV, AVI, MOV, ASF. It can support 68+ devices such as iPhone, Samsung TV, iPad, and others. Its conversion speed is 60 times faster than other ordinary converters. And there is no quality loss from the conversion. Another function you need to put DVD on Facebook is to split videos into small pieces, and TunesKit can do it, too.

Main features:

  1. Rip DVD to play on Facebook and other apps with 60X faster speed
  2. Decode DVD without quality loss
  3. Convert DVD or other videos to 250+formats
  4. Edit videos or DVD
  5. Clear interface and easy operation

Don't know how easy it is? You can rip DVD to Facebook by only 4 steps.

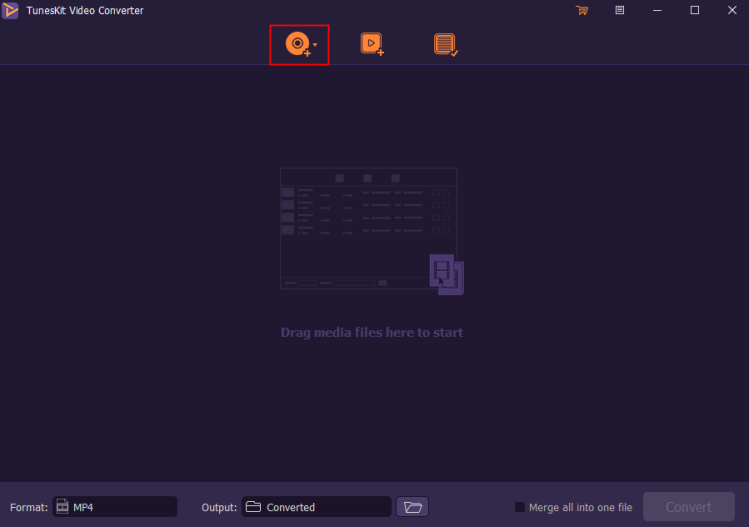
Step 1. Open TunesKit Video Converter and Add DVD

Input your DVD into the computer with the DVD drive and wait until your computer recognizes it. When you are waiting you can use the double-click to open TunesKit. When it is open, you will find three icons on the first page. Now your computer must find a DVD. So just select the first icon to load DVD into this software from your computer.

Add DVD

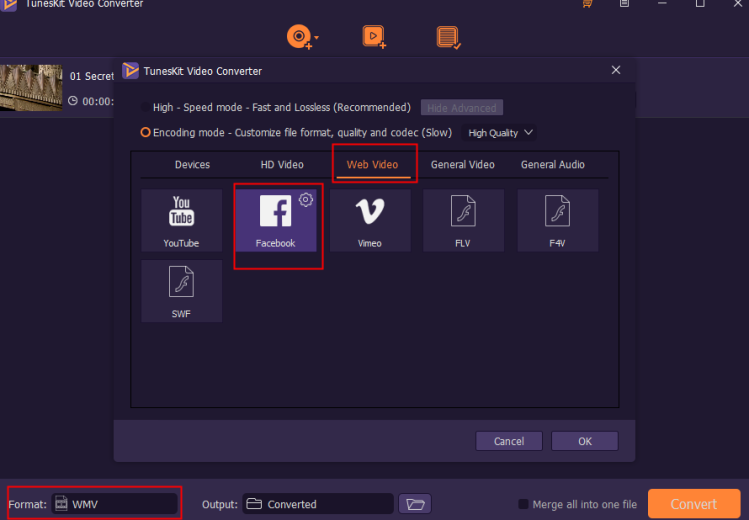
Step 2. Choose the Target Format

Tap the Format button and you will see all the formats are divided into different groups, like Devices, HD Video, Web Video, General Video, and General Audio. You need to choose the Web Video button and click Facebook. At last, tap the OK button to confirm.

Choose the Target Format

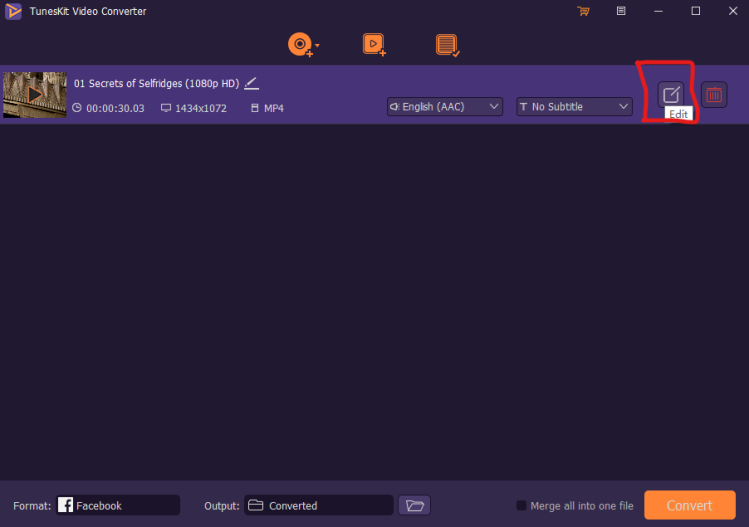
Step 3. Edit the DVD

Since Facebook cannot support large videos, you need to split your DVD to small pieces that meet Facebook's requirements. Click the Edit button to enter the Edit Mode.

Click the Edit Button

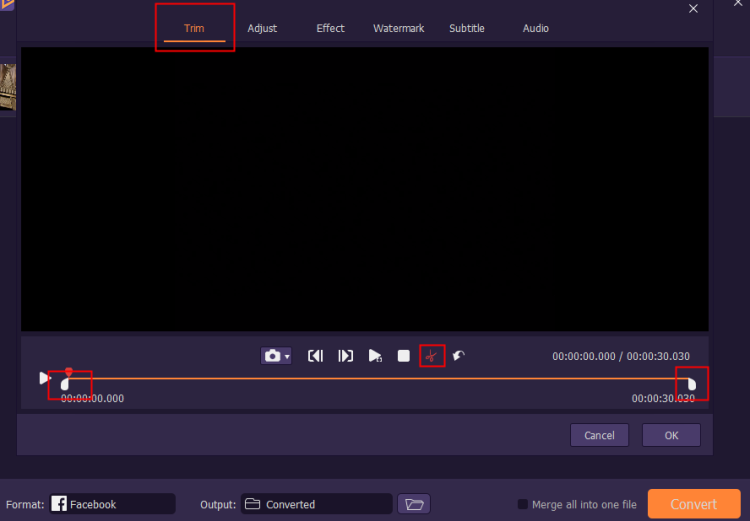
Choose the first page, Trim, to cut the DVD. You can drag the two white icons that marked by the red rectangle and make the part between them is what you want. Click the red scissors. Then you can get what you want. The other 5 functions are useful and you can try them. Do not forget the OK button when you want to get to the next step.

Edit DVD

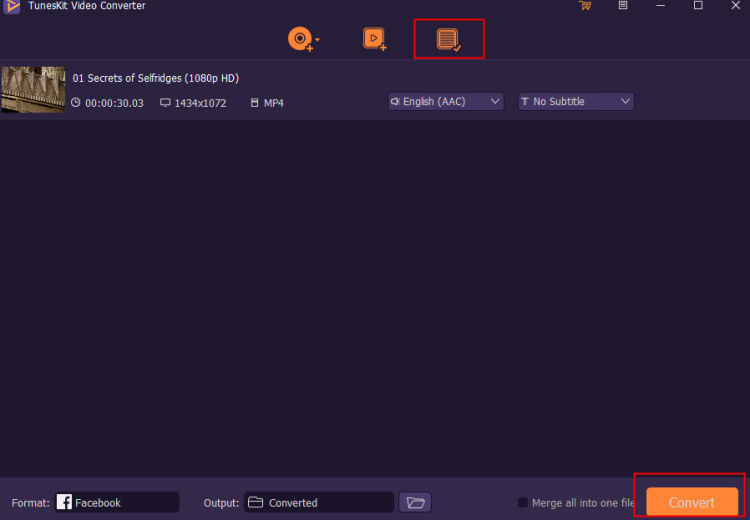
Step 4. Click the Convert Button

Click the Convert button. Wait for a while, use the Converted button which is the third button of top of this interface and find out your converted DVD videos. Now you get the converted DVD videos and you can upload your DVD to Facebook directly.

Click the Convert Button

Conclusion

This article tells you how to upload DVD to Facebook if you want to enjoy them on Facebook and share them with your friends and family. You have to rip them first and you can use some DVD rippers like TunesKit to rip them without any quality loss and you can use it to convert DVD or videos to other formats if you want.

For more: https://www.tuneskit.com/video-converting-tips/convert-dvd-to-facebook.html

Sep 22, 2020

How to Recover Lost or Deleted Facebook Messages on iPhone

 People use Facebook to send and receive messages, but they may delete or lose them by mistake. However, they generally cannot bring them back as there is no recovery mode on this application. Yet still, there are other possible workarounds to retrieve iPhone Facebook messages.

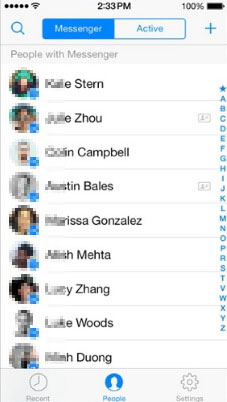
1. Retrieve from Contacts

The first simplest way is that you can attempt to communicate with the person who obtained the messages you sent and ask for her or him to send the previous messages back. You can directly text him or her a piece of message or launch a voice call to get the messages or conversation you mistakenly deleted.

2. Get back from Search

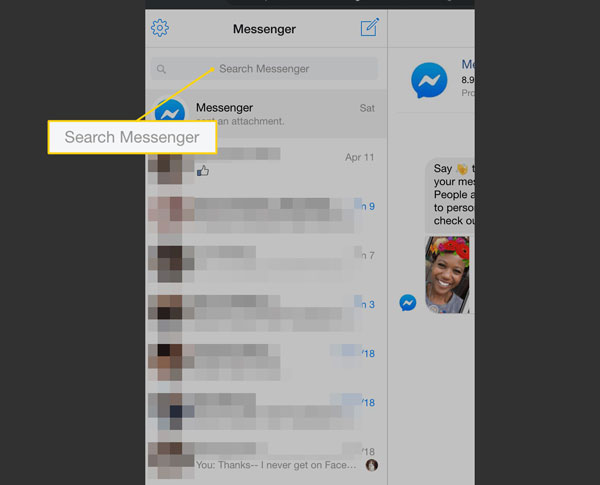
If you think contacting other people is a little disturbing, another easy way to recover lost messages from Facebook messenger on iPhone would be the built-in function on the Messenger app. But the condition is that you must have archived the messages in advance before you try the following steps.

Step 1: Open the Messenger app and head to the recent conversations.

Step 2: Find the search bar which is situated in the top of the interface.

Step 3: Search the conversation you are looking for.

3. Restore from Facebook Settings

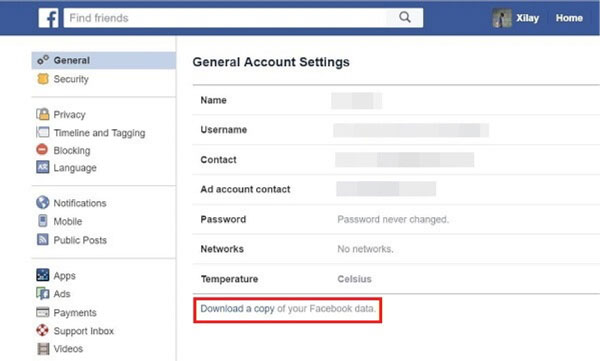
If you have archived the Facebook messages, then you could employ the Download Settings function on the Facebook profile to get back lost Facebook data. But it should be noted that it only allows you to retrieve temporarily deleted messages on Facebook.

Step 1: Launch a browser on your computer and click on your Facebook profile. Next, choose the "General Account Settings" and the "Download Copy of Facebook Data" buttons.

Step 2: Head to the "Start My Archive" and "And More" options. Next, complete the orders and you will receive an email soon.

Step 3: Open your email and tap on the "Download Archive". At this time, a zip file containing your Facebook messages will be on your computer.

Step 4: Select the file named "Messages" among several Html-format files in the zip file and you will restore your corresponding messages.

4. Recover from Facebook Messenger

Viewing archived messages on the iPhone Facebook messenger can also help you to retrieve deleted and lost related messages. But you have to know the position of hidden messages in the Facebook account and you should make sure that they are not removed from the account.

Step 1: Click the "Messages" option, and Choose a friend you started the conversation before.

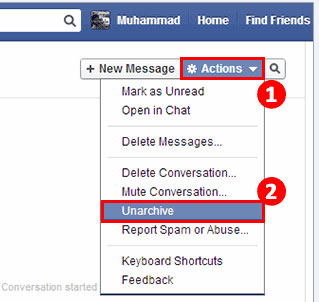
Step 2: Find out the archived messages and hit the "Action" button.

Step 3: Finally tap the "Unarchive" tab.

5. The hottest method

No matter to recover permanently deleted Facebook messages or the ones you erased from your Facebook account, a kind of iOS data recovery tool --TunesKit iPhone Data Recovery can achieve your end safe and secure. Besides, with this program in hand, you can also restore other different types of data on the iPhone and various applications like Viber pictures, messages and etc. And this software supports all versions of iOS systems including the latest and all iOS devices such as iPhone, iPad, and iPod. Finally, despite the reasons, for instance, accidental deletion and system bugs, TunesKit iOS Data Recovery can bring the lost data back.

To employ the hottest third-party data restoring the program to recover deleted iPhone Facebook messenger messages, you just need the 3 simple steps below.

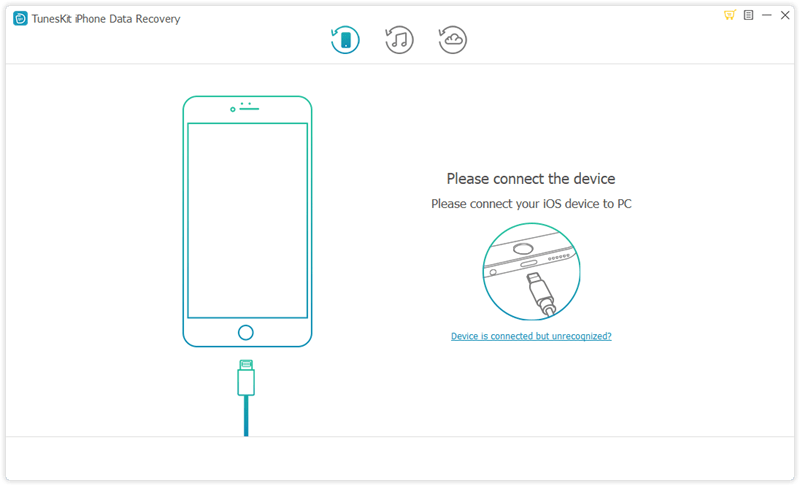
Step 1: Launch TunesKit iPhone Data Recovery and hook up your iPhone with the computer through a USB cable. Then choose the recovery mode called "Recover from iOS" from the app's main interface.


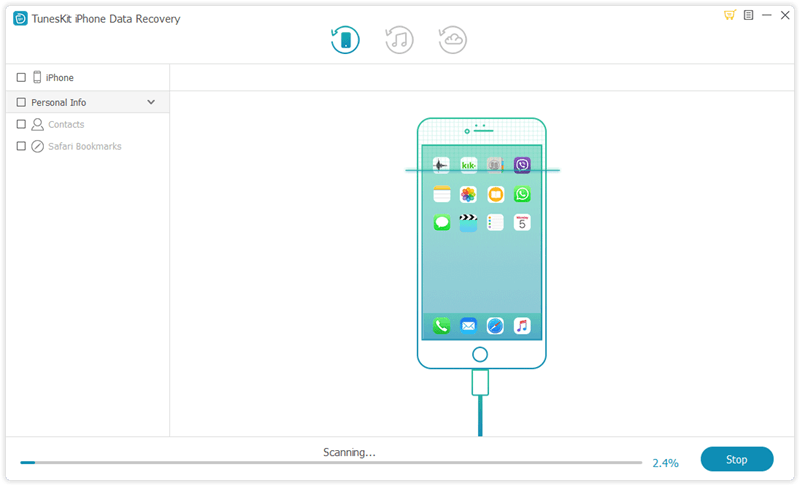
Step 2: After the device and different files are shown on the screen, select the data on the right column that needed to be scanned. Then hit on the "Scan" button and it will start scanning.


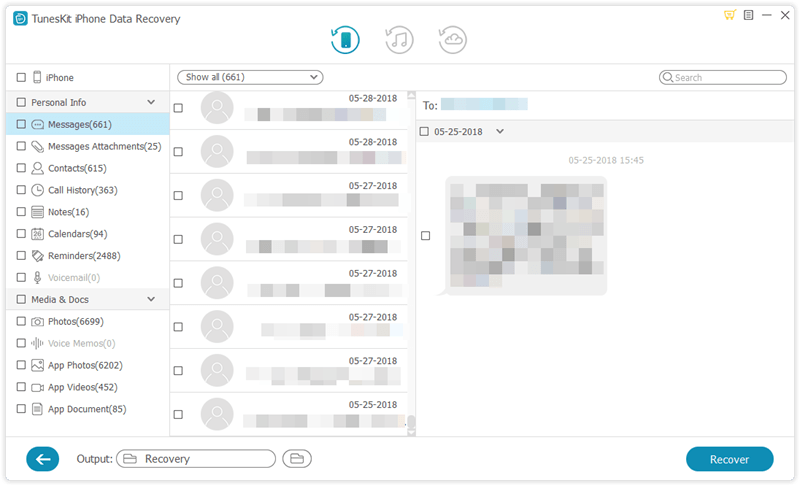
Step 3: Then all files scanned will appear on the left column. Before you tap on the "Recover" button, you are allowed to preview the iPhone Facebook messages you want to restore from the "Message" column. After that, the lost messages from Facebook messenger on iPhone will come back.

FAQs

1. How to archive Facebook messages on iPhone?

Archiving Facebook messages you may temporarily don't desire right now can be really workable when you want to recover these messages in the future.

Step 1: Launch the Facebook Messenger application, and choose the "Messages" option.

Step 2: Find the message or conversation you need to archive and select them.

Step 3: Click "Archive" to put the messages into the archives. Then you can delete them.

2. How to differentiate between "Delete" and "Archive"?

Two common methods to remove the Facebook messages are "Delete" and "Archive". The former often cause some accidents most time. To avoid a similar situation, here's the distinction between "Delete" and "Archive". "Delete" means you remove the Facebook messages forever. While "Archive" merely makes messages into different folders, which is not erasure yet can be available one day.

How to Cut MP4 Video Losslessly? Perfect MP4 Cutter Recommended!

Q: “I need to cut off some scenes from an MP4 file for a project. Do you know a simple tool to cut MP4 videos without any quality loss? I tried some online solutions but all led to degradation in quality. So it would be highly appreciated if you could recommend some lossless MP4 video cutters. Thanks in advance.”

Many people want to trim videos (usually in the MP4 format) due to different kinds of purposes. Some may want to reduce the file size; Others might wonder to remove unpleasant footages for a specific reason. No matter what your purpose is, it is necessary to get professional MP4 video cutting software, which can be a great assistant to trim the video for you with ease.

However, most video cutters in the market will re-encode your mp4 video files. Some people may be unwilling to use the cutting tool causing quality loss. Then how to find a lossless mp4 video cutter? What you are looking for is in this article. For lossless trimming, you are suggested to get TunesKit MP4 Video Cutter, the best MP4 video splitter. It can keep 100% original video quality while cutting the MP4 videos into small segments. Continue to read to get more details.


TunesKit MP4 Cutter - Best Tool to Trim MP4 Videos Losslessly

TunesKit MP4 Cutter is an amazing tool to cut mp4 video files with zero quality loss. It is available in both Mac and Windows systems. TunesKit embraces two trimming modes: High-Speed mode & Encoding mode. The first allows you to trim and merge mp4 in a lossless way. The second supports you to edit mp4 videos and personalize the media settings.

With TunesKit MP4 Cutter, you are allowed to freely trim off unwanted footage from any video/audio files (not just mp4) before backing them up or sharing them with your friends or publish them on social media platforms.

Apart from being a lossless mp4 video cutter, TunesKit can also merge and convert the segments into other popular formats at up to 60X faster speed. In addition to video files, it can be used as a smart audio trimmer to cut and convert any audio files.

Now simply download the free trial versions of this powerful software on your Mac or PC. Don’t worry about the price. Before registering, every user has 5 free chances to use this program. Then you can follow the steps to see how it works in cutting MP4 videos while keeping the original quality.


How to Easily Cut MP4 Video without Any Quality Loss

Step 1 Add your MP4 video into TunesKit

First of all, you should download and install TunesKit MP4 Cutter. After launching it, click the "Open" button to add mp4 to this software or directly drag and drop the MP4 file to the trimmer. You should note that you can only import one media file each time.

Step 2 Choose the sections you want to cut

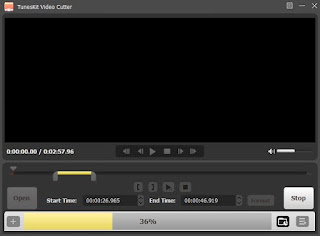
Once the MP4 video is imported successfully, you can preview this video via its built-in video player. When TunesKit automatically plays it, you can start to trim it. This software offers two ways to set the duration of the segment from the source video. First, you can move the yellow sliders by the Mouse. Second, you can input the Start Time and End Time manually.

Tips: With TunesKit, you can trim head and footages in two ways above. But if you want to cut multiple segments from the same mp4 video file, simply click the "+" icon beneath the "Open" button to do that.

Step 3 Edit the MP4 if needed

Press on the Edit button on the main interface to open TunesKit’s own media editor. Here you can customize your mp4 videos according to your needs. For example, you can rotate and crop mp4 videos, insert watermarks, subtitles, and background music, apply video and audio effects and frames, etc.

Step 4 Set output format

Hit the "Format" icon and select the output format or device as you want. TunesKit provides 2 trimming modes: High-Speed mode & Encoding mode. Every mode offers various output formats. If you pursue a lossless way to trim mp4 files, the former is your best choice. If you are professional enough and want to customize the video and audio settings, like codec, resolution, frame rate, bit rate, channel and sample rate, you should choose the latter. This software supports a wide range of output formats, including HD MP4, MKV, MOV, 4K, WMV, DivX, MP3, OGG, WMA, Apple iPhone X, Samsung Galaxy S8, Xbox One, and more.


Step 5 Start to trim MP4 video file

Click the "Start" button on the main screen and TunesKit MP4 Cutter will begin trimming the MP4 video file into small clips at 60X faster speed if you choose High-Speed mode. Once completed, you'll get the desired segments by clicking the history folder button.

Tips: If you have cut multiple segments from the same source file, you can choose to merge all the video clips into a new file by checking the option of "Merge Segments" before starting the cutting process.

Suggestion & Conclusion

TunesKit MP4 Cutter is the best video software I used. It has an intuitive interface, so even beginners can trim videos without hassle. And it supports to customize video and audio settings, which can satisfy the requirements of professionals. Besides, TunesKit has multiple editing functions.


You may also like:

Top 5 HD Video Cutters in 2020

6 Best Free Video Cutter No Watermark

How to Trim MP3 on Windows 10

How to Cut and Join Videos Losslessly


Sep 21, 2020

[Full List] 5 Best 1080p HD Video Cutters for Mac/PC

HD is a common high-definition video mode. It is popular due to its amazing resolution and quality (better than the quality SD versions). But simultaneously, it will occupy a large storage capacity of your devices. Therefore, if you want to split HD videos into smaller sections, like trimming off the needless clips, you will save some space. To do that, you need to rely on some professional HD video cutters. In this review, we list 5 HD video cutters for Mac and Windows. Some of them support to trim HD movie without damaging any quality. Let’s check them out.


#1. TunesKit HD Video Cutter

To begin with, I recommend one HD video cutter I use frequently - TunesKit Video Cutter. It is favored by many people due to its lossless feature. Under the help of TunesKit, you can trim any HD video as well as SD into various parts. Before exporting the HD files, you can preview them. After that, you can save the HD video clips into any popular formats, such as HD MP4, MOV, AVI, MKV, FLV, WMV, and so on.

In addition to the trimming feature you can also join the multiple HD cuttings into a new media file in original quality. Besides, TunesKit is also a professional media editor and extractor. So you can edit your HD videos or extract audio tracks from the HD videos if necessary.

Most important of all, TunesKit Video Cutter embraces two trimming modes: High-Speed mode (lossless) & Encoding mode. You can make your choice according to your needs.

Pros

  • Full-featured HD video cutter, merger, editor, extractor and converter
  • Trim HD videos without degrading any quality
  • The trial version without any functional limitations
  • Offer 3 cutting modes

Cons

  • Only provide 5 free opportunities to cut


Tips: TunesKit offers a free version of this HD video cutter too. Unlike the paid version, TunesKit Free Video Cutter will automatically insert the company logo to your trimmed HD videos once exported. That's the only difference between the paid and free versions. You can download it now to cut the HD videos for free with 100% original quality preserved.


#2. Free Video Cutter Joiner - Free HD Trimmer

Free Video Cutter Joiner is the second HD video cutter on my list. As its name shows, Free Video Cutter Joiner is a free video tool, which can not only trim HD videos without payment, but also merge several video clips into a large one with ease. You can save the trimmed HD videos in multiple media formats, such as WMV, MOV, VOB, AVI, MP4, FLV and 3GP. Of course, when you remove some unpleasant parts of your HD videos, you still can merge the rest. You can save the combined videos like MP4, AVI, FLV, WMV, MOV, VOB, MPG and other formats.

Like TunesKit HD Video Cutter, Free Video Cutter Joiner provides two modes: Direct Cut and Indirect Cut. The former means a non-re-encoding mode and the latter may cause quality loss. Direct Cut works faster but supports limited video formats, while Indirect Cut is slower but is compatible with almost all video formats.

Pros

  • Free of cost
  • Offer two cutting modes

Cons

  • Limited functions (trimming and merging)


#3. Weeny Free Video Cutter


Weeny Free Video Cutter is another free HD video trimmer. This handy video trimming software can help you cut large HD videos into small segments without hassle. It supports a wide range of media formats, including popular and uncommon ones. That means you can export your HD video cuttings to WMV, VOB, AVI, ASF, 3GP, FLV, MPG, MP4, etc. At the same time, if necessary, you can personalize the video quality according to your needs. You can adjust the parameters to achieve that, like changing video size, bit rate, frame rate, etc.

This easy-to-use HD trimer has an intuitive interface, which is suitable for someone without any video editing experience.

Pros

  • Free of charge
  • Simple to operate

Cons

  • Compatible with only Windows computers


#4. Moo0 Video Cutter

As another simple-to-use free video trimmer is Moo0 Video Cutter. If you pick this video trimmer software, you will save some time to remove unwanted parts of your HD videos. The reason is that you can set the start time and end time by increasing the time in a regular period, including 1 sec, 5 sec, 30 sec or 3 mins, but you don’t need to change the time frame second by second. But if you want to save your HD videos to other formats, this software cannot help you. You are only allowed to save the trimmed HD videos in the same formats as the source.

Pros

  • Trim HD videos with smart time settings

Cons

  • Cannot save the HD video to other formats


#5. Free Video Cutter

The last HD video cutter I want to introduce is Free Video Cutter. You just need to take several clicks, then you can trim any HD video file to many pieces in small size. Different from Moo0 Video Cutter but as the former third HD video cutters recommended above, Free Video Cutter allows you to save the HD video trimmings into a great variety of formats, like MPEG4, DivX, WMV, MOV, FLV as well as MP3. But it has an unneglectable shortcoming – its slow reaction when importing HD videos.


Pros

  • With a clear interface
  • Don’t need to be paid
  • Supports many output formats

Cons

  • The importing process is relatively slow

Solved: iPhone Can't Hear Calls

 People now complain that there is no sound on calls from their iPhone 11/XR/XS etc. This is very frustrating as it means they have trouble communicating with people through the calls. To help them get out of trouble, we write this blog to explain the related reasons and ways.


Part 1: Reasons about iPhone can't hear the caller

At first, let's look at the reasons behind it. The problem of the iPhone cannot hear caller is actually quite common, which can result in various causes. The following scenarios are some common ones.

1. iOS system glitches and errors.

2. Some wrong settings.

3. iPhone’s hardware issues.

Part 2: Full solutions to resolve iPhone no sound on calls

Now let's move on to the fixes to no sounds on iPhone calls. Firstly, we would like to introduce the greatest method and it can definitely deal with your problem with a 100% success rate.

The Best way

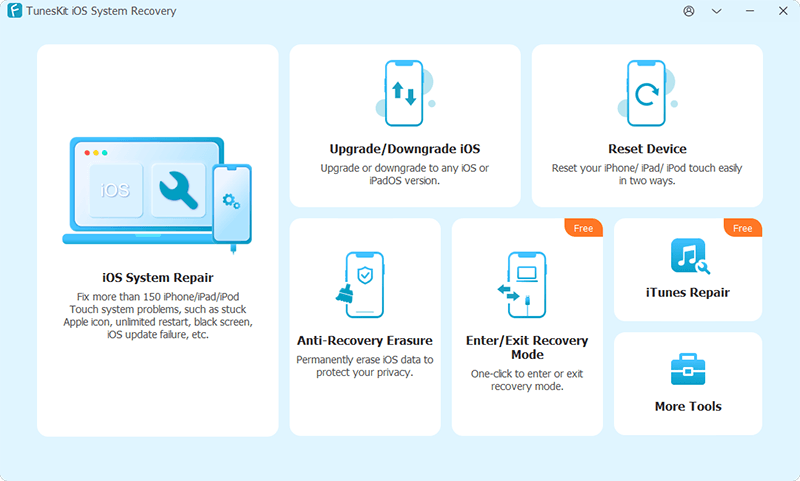
To resolve iPhone can't hear caller issue, the most effective way is to use related professional iOS system recovery applications, for example, TunesKit iOS System Recovery. This third-party tool can bring your iPhone back to normal no matter whether it has no sound when dialing, not working issues such as its power button and the like, or other intricate problems. Moreover, it can also fix other errors on iPad, iPod, and more iOS devices. What’s more, there is no need to worry about data loss as the software has 2 repairing modes including the Standard and Advanced modes.

The 3 easy steps to solve iPhone have no sound on calls are as presented here through this program with a simple interface and customer-friendly feature.

Step 1: Open TunesKit iOS System Repair for Windows and connect your iPhone with your personal computer by virtue of a USB cable. Then tap on the "Start" option and choose the "Standard mode" appears on the following screen. Finally follow the instruction to put your iPhone into DFU mode.


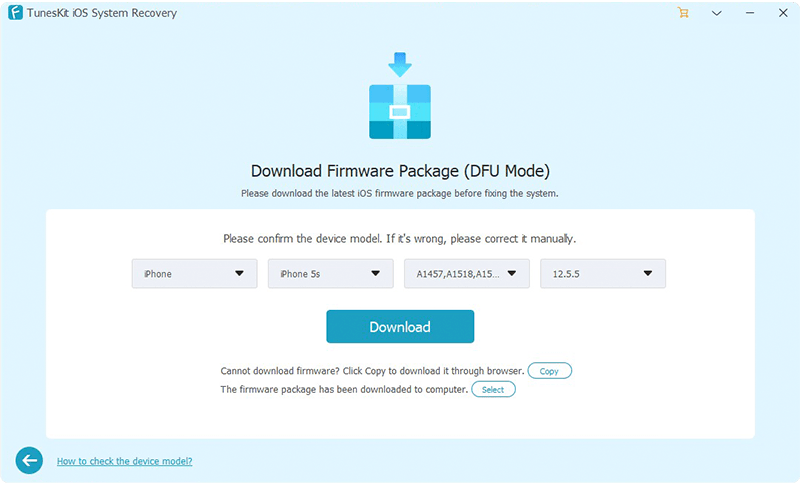
Step 2: Confirm the device model, iOS version, and other related information. After checking the information is right, click the "Download" button to let the program download and verify the firmware package matched with your iPhone.


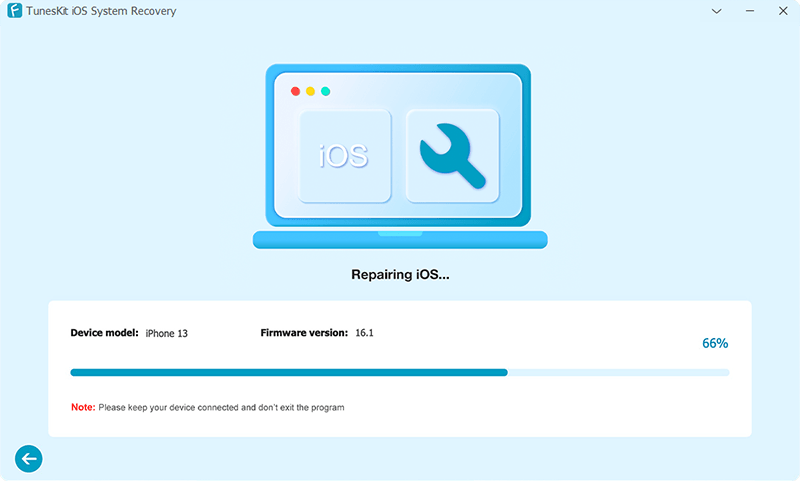
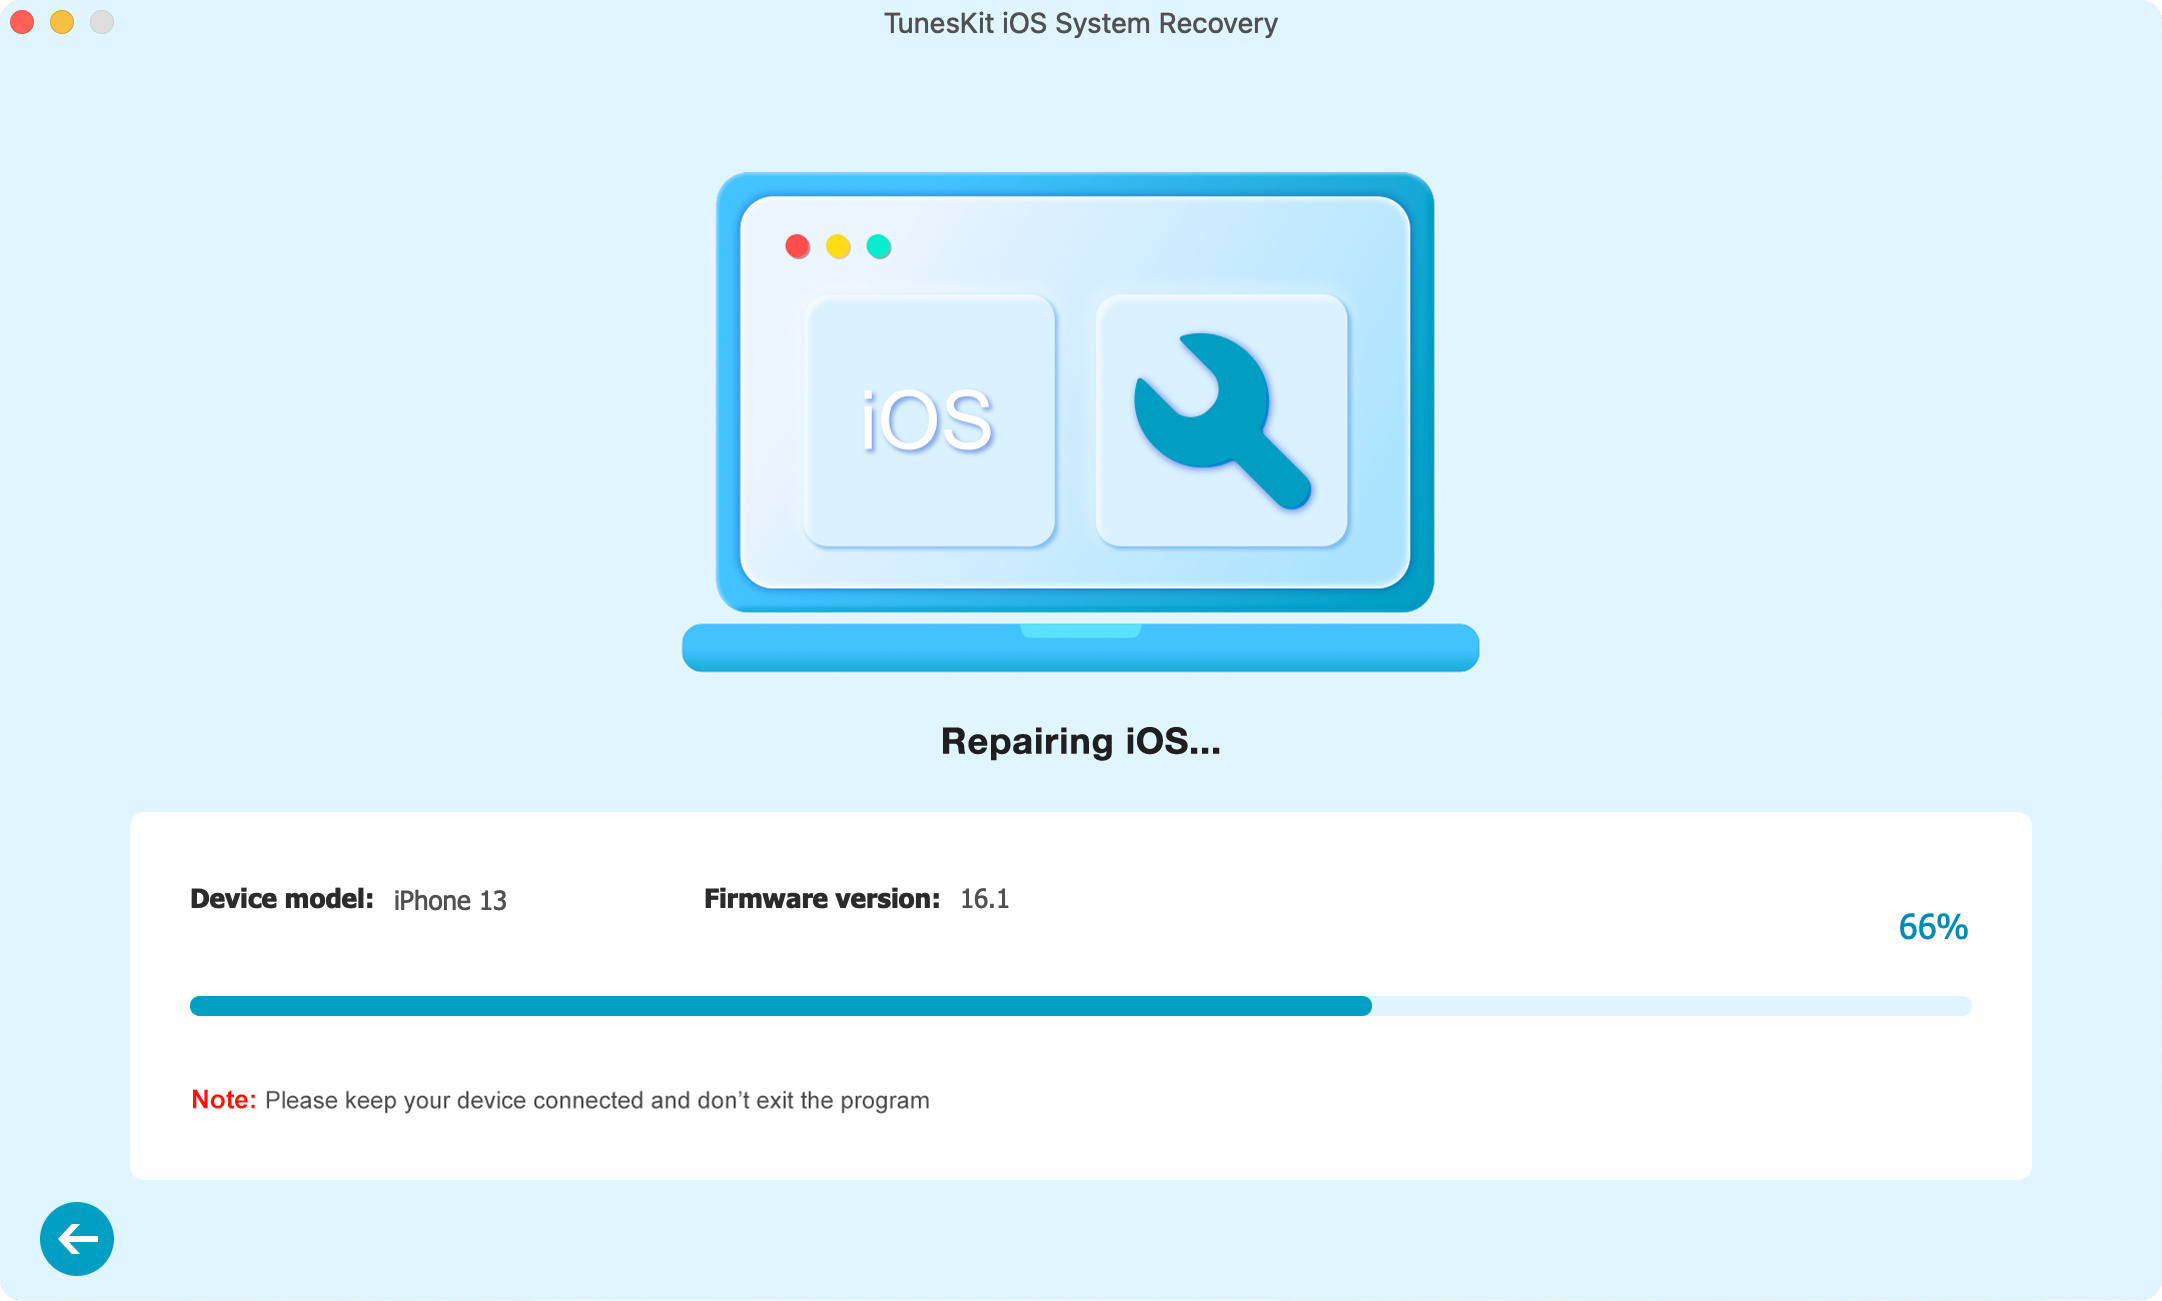
Step 3: When the firmware package download is completed, press the "Repair" button to fix the iOS system. after the process is finished, your iPhone has no sounds on calls will be fixed without data loss.

Possible fixes

You may wonder more potential solutions to fix iPhone can't hear caller problem, so we listed some below. But it should be noted that they may not help.

1. Remove iPhone's case

The case on the iPhone may be responsible for the no sounds on calls, as the protector might accumulate some dust and debris that clog the iPhone receiver and microphone. If it is this case, you need to take off the case and clear out the particles, then trying out calling to check whether you can hear the sound on calls.

remove iphone's case

2. Unplug your headphone

Also, you can see if your iPhone is in the headphone mode because the device sometimes still gets stuck in headphones although you removed the jack. You can plug in and out the headphone of the iPhone several times until it is recognized disconnected to disable the headphone mode. And if necessary, clean out the particles and debris in the headphone jack.

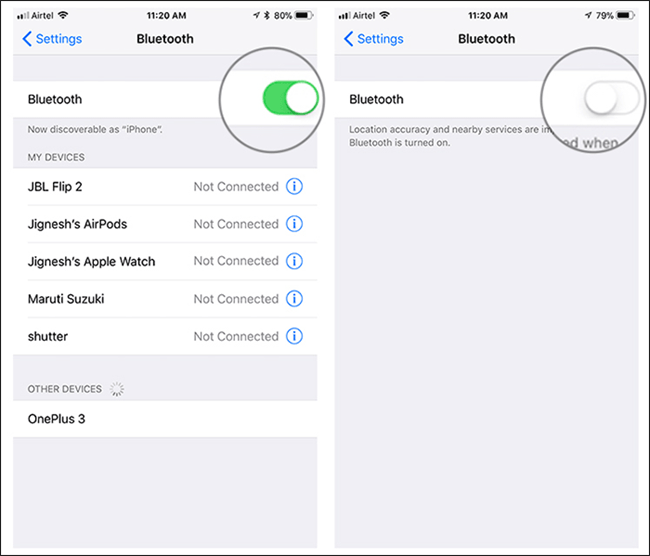
3. Turn off Bluetooth

The Bluetooth being abled could also give rise to the iPhone cannot hear the caller and block the sound. So make sure you have turned off the Bluetooth by heading to the Settings of the device and find the Bluetooth to toggle it off.

4. Check some settings

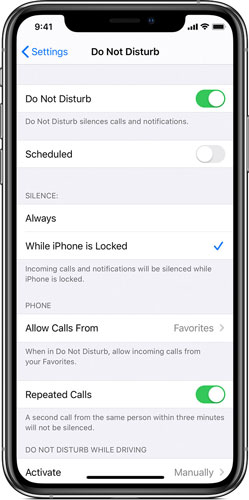
When you did some wrong settings such as turning on the Silent mode and Do Not Disturb, The iPhone can't hear caller is a sure thing. Thus to avoid this situation, it is suggested that you should disable the Silent mode and locate the Do Not Disturb button in the Settings of iPhone, then switch the option off. Besides, you could also switch the Airplane mode on and off to see if the Wi-Fi network or cellular data works well.

5. Hard reset your iPhone

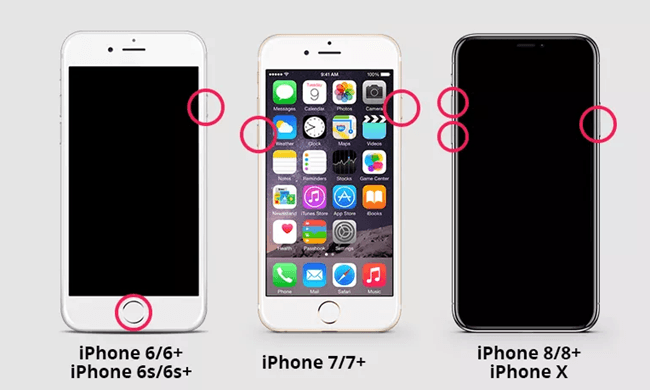
If there is still no sound on calls of your iPhone, then you possibly have to hard reset the device to resolve this problem. You can try the following procedures according to your iPhone models.

For iPhone 6 series, simultaneously hold the Home and Sleep buttons until the Apple logo appears on the screen.

For iPhone 7 series, press the Sleep and Volume Down buttons in the meantime until the Apple logo is shown on the interface.

For iPhone 8 and later, first, swiftly hold the Volume Up and Down buttons, then press down the Power button until the Apple logo pops up.

Bottom line

If there is no sound on your iPhone, try out the above 6 ways to resolve it. and be free to leave your comment and suggestions below.

Sep 18, 2020

Extract Audio from MP4 or Other Video Files? Check Now!

Q: "I've watched an interesting movie last weekend and especially impressed by the ending song. I have downloaded this film and now I want to get the song out, so that I can listen to it on other portable media players or devices. Is there any way that allows you to extract the audio from a video file and store it as an MP3 file? Thanks in advance." - Joanna from Ask Ubuntu

Are you confused about the question above? I guess many people met this kind of condition. Then you can directly find the best answers in this post. Here we introduce 4 Solutions to extract audio from MP4 or any other kinds of videos. The 4 MP4 extractors include free & paid and online & offline ones.

Solution 1. Extract Audio from Video with TunesKit Video Cutter

TunesKit Video Cutter is a smart video editing tool to extract audio from MP4 as well as other videos. It is an easy-to-use media software, which allows you to convert any media files to any other videos and audios, which is different from the original format. TunesKit is compatible with a wide range of media file formats. For instances, with TunesKit, you can extract audio from MP4, MKV, AVI, FLV, MOV, VOB, WMV, 3GP, MPEG, etc. and save it as MP3, AAC, AC3, M4A, WAV, FLAC, MKA, APE, OGG, AIFF, AU, WMA, M4R, etc. In addition to that, you can customize your codec, bit rate, channel, and other media settings.

Good points of TunesKit Video Cutter:

  • Extract audio from MP4 fast and easily
  • Support plenty of media file formats
  • Extract audios from videos in 100% original quality
  • With a user-friendly interface

Step 1 Add MP4 file to TunesKit

After running TunesKit, click the Open button to add MP4 or other video files or drag and drop the target file to the software.


Step 2 Cut the silent parts or the sections you don’t need

Preview and move the sliders to decide Start Time and End Time. Of course, If you want to extract the whole soundtrack of the video file, you can skip this step.

Step 3 Select the audio output format

Press on the 'Format' button to open a format selection. And you will see 2 modes: High-speed Mode and Encoding Mode. If you don't want any quality loss, pick the former > click “General Audio” > Choose “Original”. If you wonder to personalize audio settings, choose the latter.


Step 4 Start the conversion

Now press the 'Start' button to extract audio from MP4 video with TunesKit. Then a destination folder pops up, where the extracted audio is.


Solution 2. Extract Audio from Video in VLC for Free

Many people are familiar with VLC Media Player, a versatile media tool. It is not only a great video player but also a media extractor. And you don’t need any payment to extract sound from videos. Do you know how to do that? If not, let me perform the step-by-step process to extract audio from MP4 with VLC Media Player.


Step 1. Run VLC media player on your computer > click the Media icon > pick Convert/Save on the top toolbar.

Step 2. Hit the Add button to add the video you want to extract > click Open.

Step 3. Press on the Convert/Save button at the right bottom > pick an output format under Profile on a new window, such as OGG, MP3, FLAC.

Step 4. Next, hit the Destination and select a location to save your audio file. If necessary, change the file name, and then click the Save button. Now press on the Start button to start the extraction.


Solution 3. Extract Audio from Video with Audio Extractor

If you don’t plan to download any software, you can use some online audio extractor tools to extract sound from video file, like Audio Extractor. Now we show the specific steps to so that with this online audio converter. Go ahead!


Step 1. Download, install, and launch Audio Extractor.

Step 2. Press on the blue 'Open video' button to import your target MP4 video file from the local folder Google Drive.

Step 3. Select one audio format, such as MP3, WAV, M4R, FLAC, OGG, AMR, MP2, etc.

Step 4. Hit the blue 'Extract audio' button to convert video to audio. After that, press on the Download button to export your audio file to your local folder or save it to Google Drive or Dropbox.


The Bottom Line

According to the introduction above, I believe you have made your decision. Among the 3 solutions to extract audio from MP4, Audio Extractor can is free of charge to do that, but it's time-consuming & unstable and network required. VLC Media Player can also do extracting for free, but it may cause quality loss. If you do pursue a lossless quality, TunesKit Video Cutter is highly recommended.

Or do you have any other ways to extract audio from MP4 video file? Welcome to leave your comments here!

Sep 17, 2020

Fixed: iPad Sound Not Working

 If you find that your iPad has no sound or the sound feature is not working when you trying to listening to music or playing games one day, then you are suggested to check out this article about the full fixes to this issue.


1. Disable Do Not Disturb / Mute

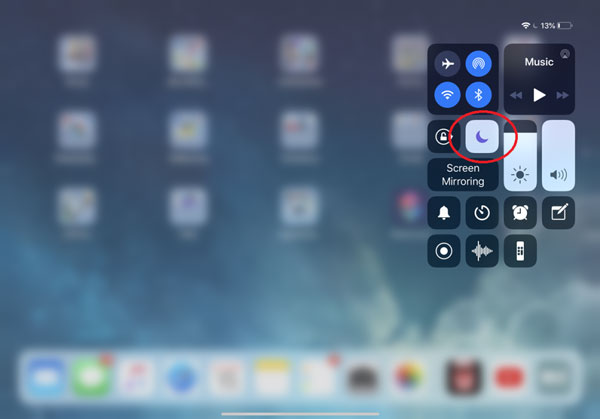
Each Apple device has the Mute and Do Not Disturb functions, which stop users from receiving any notifications and hearing sound when they are enabled. Thus, if you are watching movies or other and find there is no sound, head to the "Settings" and tap on the "Do Not Disturb", then turn it off. Or you can directly swipe up to see the Control Center and see whether the Mute and Do Not Disturb are turned on.

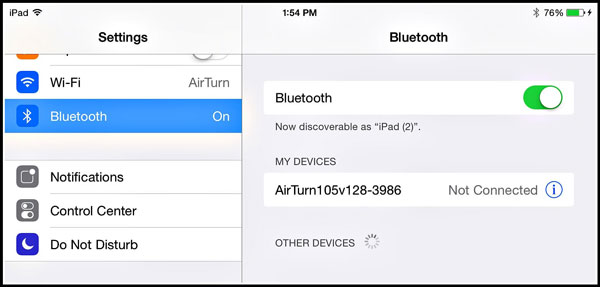
2. Close Bluetooth

If you turned on the Bluetooth, the iPad may send the sound to this accessory. So trying to go to settings and find the Bluetooth to close it. After that, check to see whether the issue is settled.

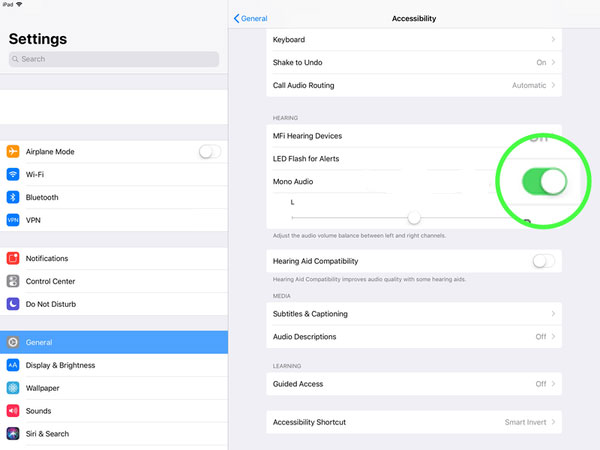
3. Turn Mono Audio on and off

Besides, you could attempt to switch the Mono Audio to solve your iPad sound not working. There are only 3 steps.

Step 1: Click on the General button in Settings.

Step 2: Go to the Accessibility and locate the Mono Audio under the column of Hearing.

Step 3: Toggle it off and then switch it on.

4. Test sound settings in apps

If your iPad sound goes wrong when opening a particular application or merely watching videos, then you are suggested to examine the sound settings of the apps and videos running. Because some apps' sound controllers are different.

5. Check your headphone

If the problem happens during the process of using headphones, then it may be the headphone's matter. Check out if there is debris or dust clogging it and make sure the headphone is not damaged.

6. Check Music app

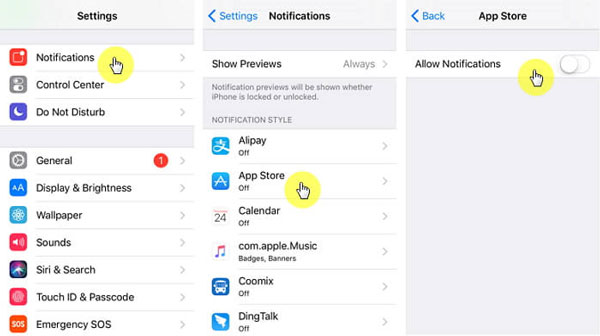
If the iPad having no sound issue occurs on the Music app, then checking the Music app settings is needed. Firstly, you can hit the Settings > Notifications > Music, then turn the Allow Notification switch off. Otherwise, you can double-press the Home button to make the "Recently used apps" appear on the screen, and force quit the Music app by swiping it.

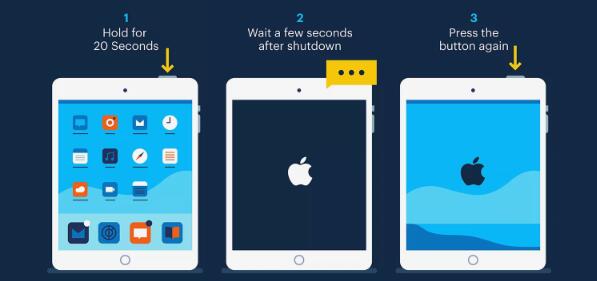
7. Force Restart iPad

Force rebooting iPad can quick refresh the device, finally removing some software glitches. The steps are as presented here.

Step 1: Keep pressing the Top or Side button until the Slider shows up.

Step 2: Pull the slider to switch iPad off.

Step 3: Hold the Top or Side button till the Apple logo pops up.

8. Update the iPadOs system

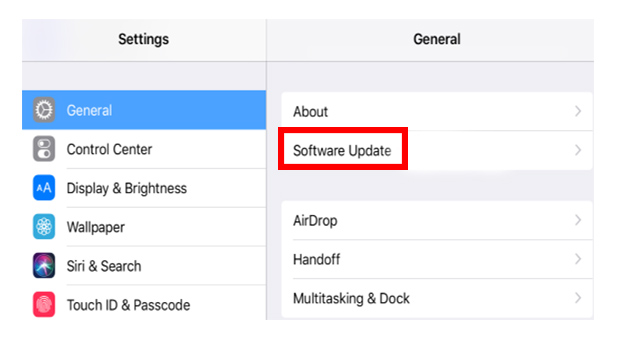
Updating the iPad to the latest iOS system may do the trick in dealing with the issue mentioned in the context. Please try the following procedures.

Step 1: Click the General in Settings on your iPad.

Step 2: Hit Software Update and Download & Install option.

Step 3: Confirm the choice.

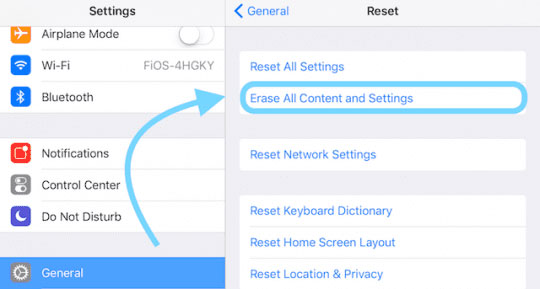
9. Factory reset iPad

If the above methods to fix iPad having no sound don't work, then you can try out factory resetting your device. But if you don’t have a backup, this way is not recommended as it will delete all the data on your device.

Step 1: Go to the General option in the Settings button.

Step 2: Find out the Reset button and tap it.

Step 3: Tap on Erase All Content and Settings.

10. Use TunesKit iOS System Repair

To cause no data loss and efficiently resolve the problem of iPad having no sound, here we would like to introduce a kind of iOS system repair tool to you. Its name is TunesKit iOS System Repair. Apart from solving iPad sound not working, this program can also fix other iPad issues like stuck on the Apple logo, black screen, and so on. Moreover, it is able to work out various iPhone problems, too. Finally, this application supports all iOS devices and is fully compatible with all iOS versions.

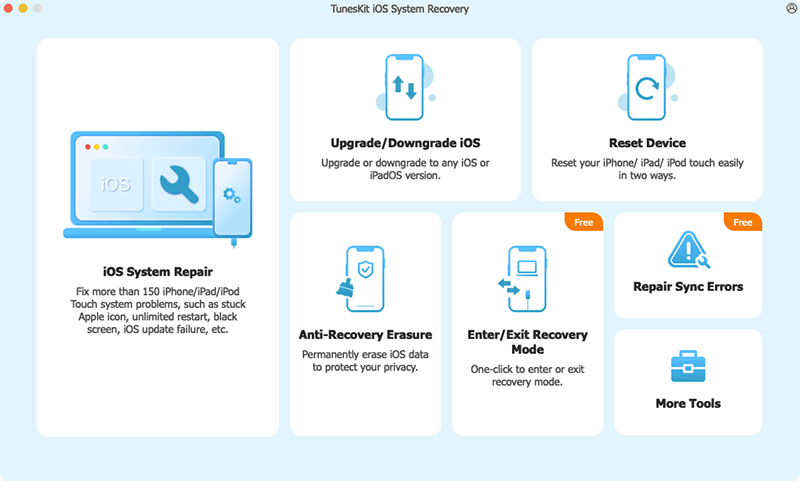
Using TunesKit iOS System Recovery to settle iPad sound error only requires three simple-to-operate steps.

Step 1: Launch the TunesKit iOS System Recovery for Mac and connect your iPad with the computer. When the computer has successfully detected your iPad, just press the “Start” button.


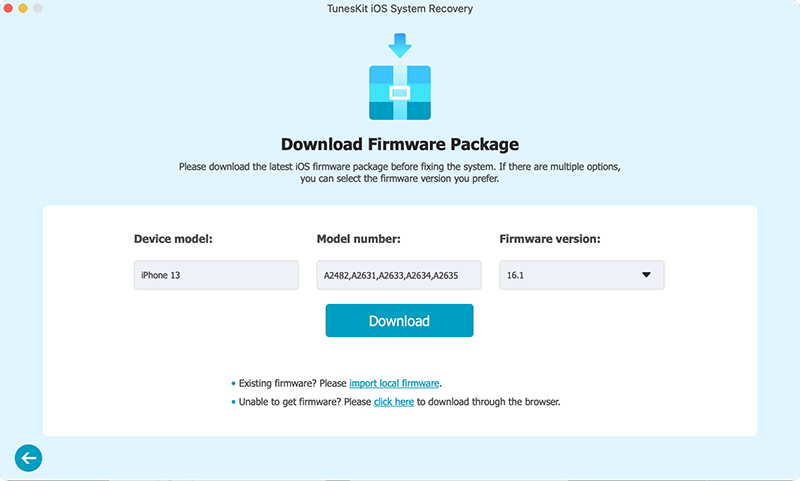
Step 2: Then two modes will be shown on the app's interface. Choose the Standard Mode first and then confirm your device info including the model and iOS version. If everything is fine, click the "Download" button and the program will start downloading and verifying the firmware package matched with your device.


Step 3: After the firmware package has been triumphantly downloaded, tap on the "Repair" button to fix your device's iOS system. When the iOS is fixed, your iPad sound will function normally.

Bottom line

Finally, if the reason to cause your iPad to have no sound is the software glitches, using a professional iOS system repair program is highly recommended. If you have any other question, welcome to leave your comment below.