Nov 29, 2020

How to Fix iMessage Waiting for Activation on iPhone/iPad

The iMessage waiting for activation error or the service not activating sometimes happens on iPhone/iPad. Maybe you are encountering this problem right now and looking for according solutions to solve it. Well, if so, then you are on the right page as this article covers the full methods to fix iMessage waiting for activation issue on iPhone/iPad.

Part 1: Why does iMessage won't activate on iPhone/iPad?

iMessage won't activate on iPhone/iPad is a common glitch that occurred at present. Before getting to the fixes, it is significant for you to know the possible reasons behind this issue, and they are listed below.

1. Poor Wi-Fi signal strength or unstable network connectivity.

2. Older iOS version on iPhone/iPad.

3. Wrong Date &Time settings and other system settings.

4. Software bug and iOS system errors.

Part 2: How to fix iMessage waiting for activation on iPhone/iPad?

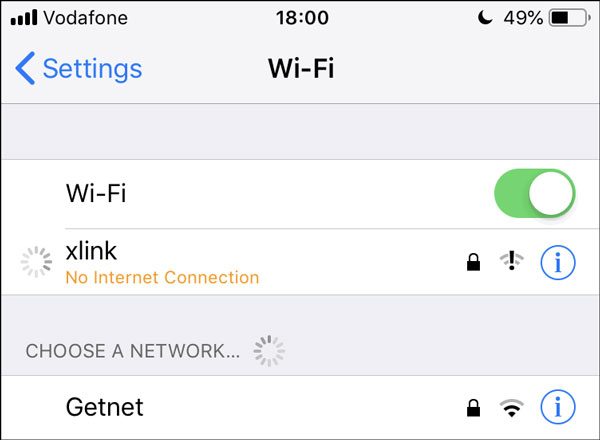
Solution 1: Check network connection

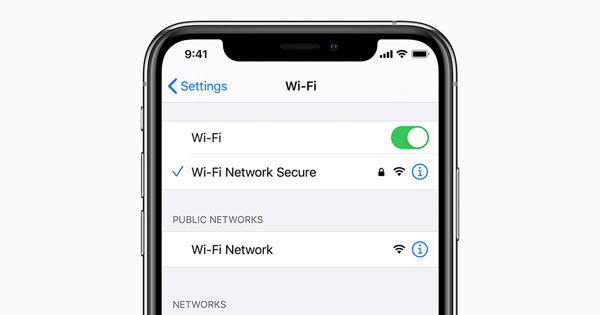
As mentioned above, unreliable or unstable network connection frequently result in iMessage waiting for activation error. In this way, you are supposed to check the network connectivity and the signal strength.

To do that, just head to Settings on iPhone/iPad > Wi-Fi, then see if the signal strength is full. If it isn't, you could switch off it and re-connect it again.

Solution 2: Toggle on and off Airplane Mode

Also, turning Airplane Mode on and off on your iPhone/iPad could be a good way to fix iMessage won't activate on the iOS devices. Because the operation can remove some technical bugs that prevent the device's incapability to connect network. To achieve that, navigate to iPhone/iPad's Settings > Airplane Mode, then toggle it off and toggle it on after a while. Or you can directly open the control center and find the Airplane Mode icon to proceed.

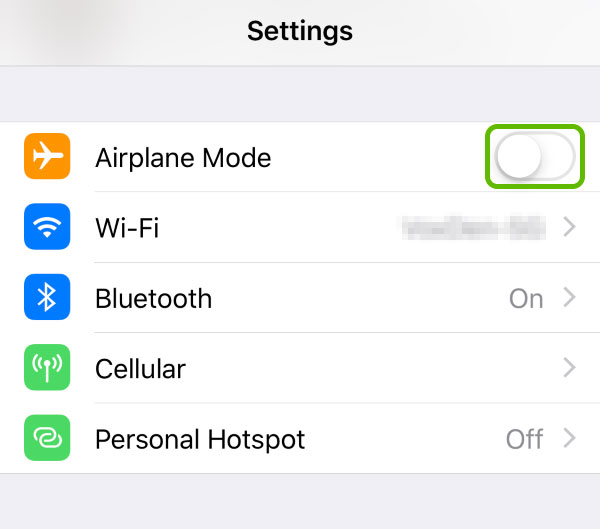
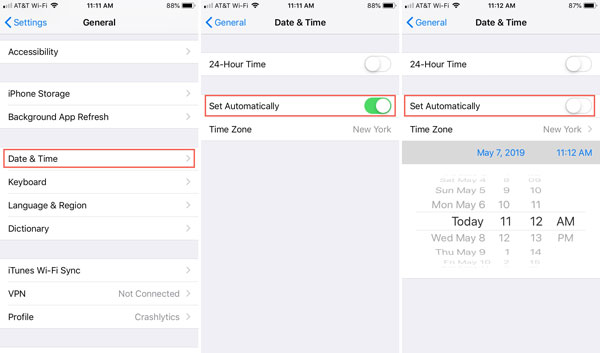
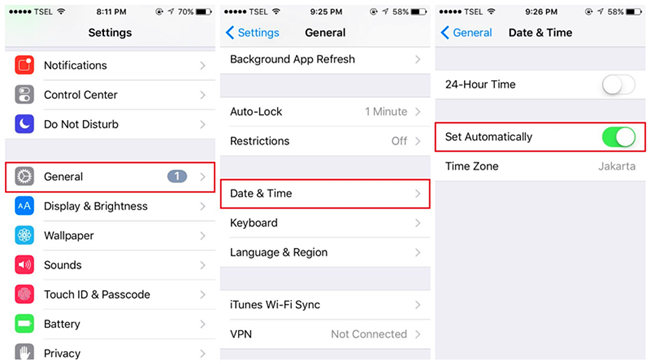
Solution 3: Set Date & Time correctly

If the Date& Time is set incorrectly, iMessage possibly won't activate on iPhone/iPad. In this case, you need to check it and do as follows.

Follow this: launch Settings on iPhone/iPad and tap on the General option, then choose the "Date & Time" and set it correctly, or just enable the "Set Automatically" button.

Solution 4: Reset iMessage settings

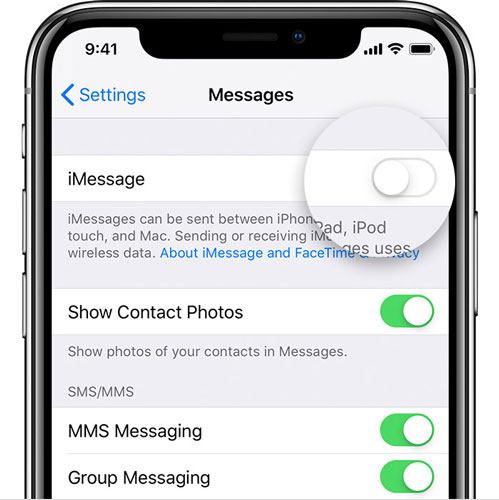
There are also other tips that are worth trying like re-sign in your Apple ID and re-enable the iMessage button. This tip is actually very simple yet efficient to resolve the problem discussed here.

Step 1: Open Settings and choose Messages.

Step 2: Click "Send and Receive" and select your Apple ID to log out.


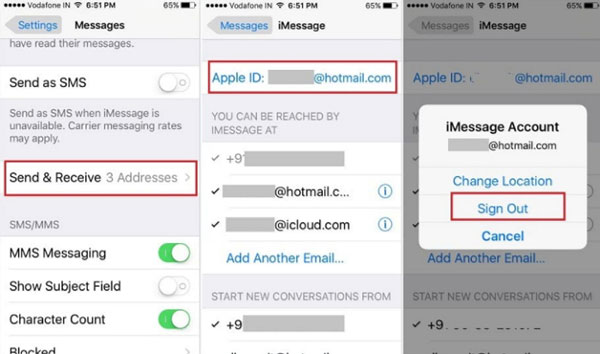
Step 3: Then turn iMessage button off and on under the Messages option.


Step 4: Sign your Apple account again.

Solution 5: Software update

Have you done the software update on your iPhone or iPad? If not, then you are suggested to check this and update your device to the latest iOS version, thus settling iMessage won’t activate matter. To begin with, go to Settings > General > Software Update, then tap on the Download and Install button.

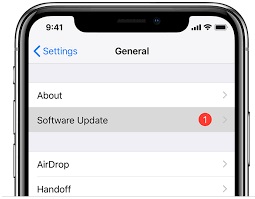
Solution 6: Fix iMessage bugs

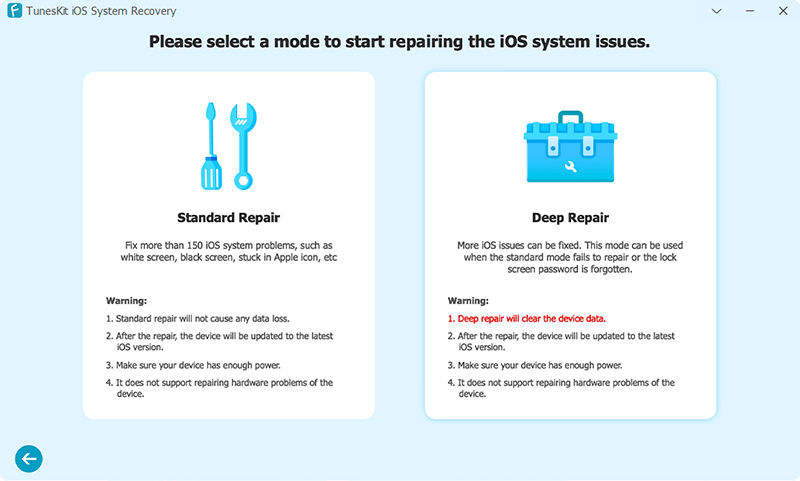
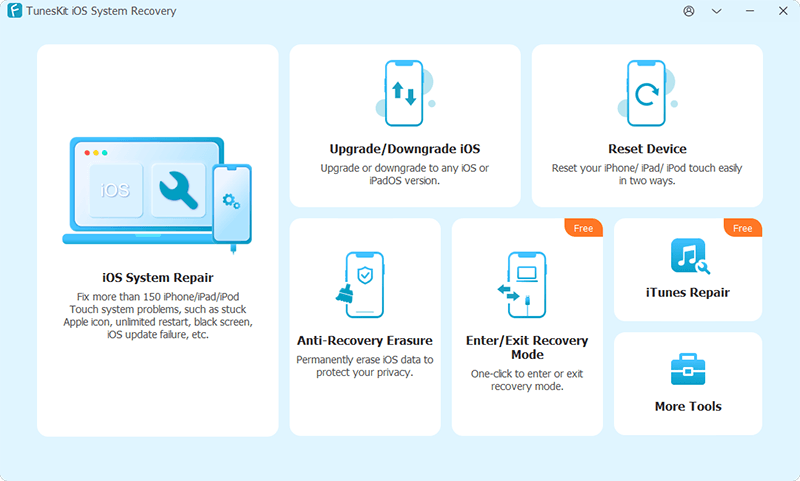
If the iMessage waiting for activation error still appears, then you may have to fix iMessage activation bugs. Here the best iMessage waiting for activation fix called TunesKit iOS System Recovery is recommended. Why? Because this powerful software, without causing any data loss, can resolve more than 50 kinds of iOS issues such as diverse iTunes errors and so on. Besides, this tool is fully compatible with all iOS devices and iOS versions including iPhone 12 running iOS 14. Finally, with an easy-to-operate and user-friendly interface, TunesKit iOS System Recovery can easily fix the iMessage waiting for activation issue on iPhone/iPad.

Steps to fix iMessage waiting for activation error on iPhone/iPad.

Step 1: Connect the iPhone to PC and launch TunesKit.

Connect the iPhone with computer. Open TunesKit iOS System Recovery. Click on the blue Start button. Then choose the Standard Mode.


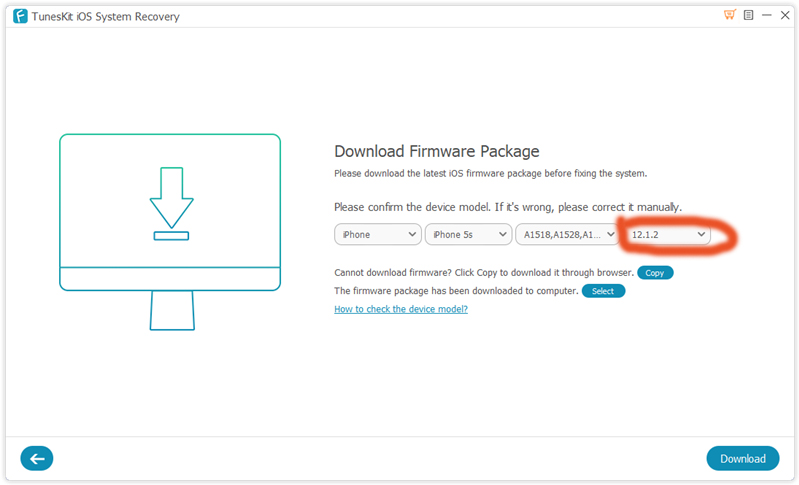
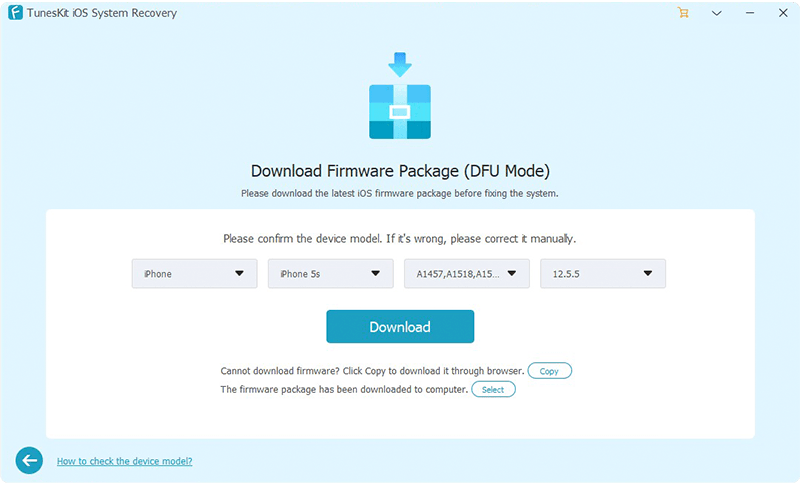
Step 2: Download the Firmware package.

See the information about your device is correct or not. Next, tap on the Download button to let the program download the firmware package matched with your device.


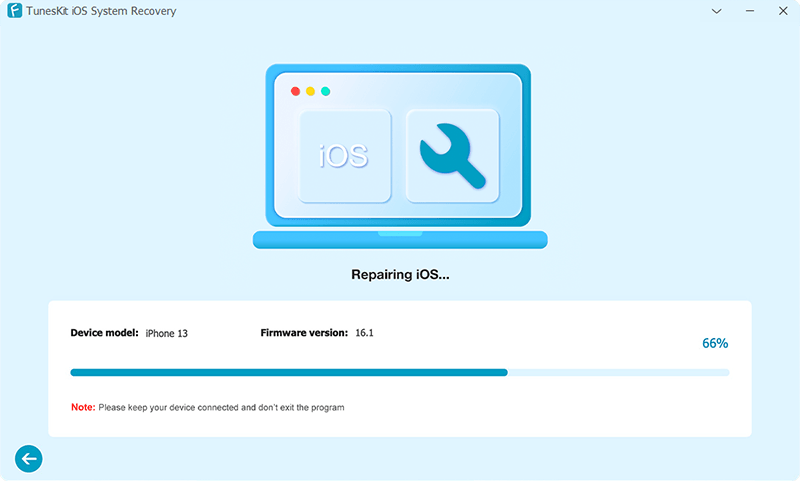
Step 3: Fix iMessage waiting for activation

When you have downloaded and verified the firmware package, hit on the Repair button to fix the iOS. After the fixing is completed, the iMessage won't activate gest solved.

Part 3: How to activate iMessage app on iPhone/iPad?

In conclusion, your device may have turned normal and the iMessage waiting for activation error has been resolved after the above methods. Lastly, other people might want to know how to activate iMessage service on iPhone/iPad. In fact, this will not take too much time and what you have to do is logging in your Apple account and password when setting up your device, then inputting the contact information.

Nov 26, 2020

Optimal Ways to Recover Data from Bricked iPhone/iPad

Many of you might know how to recover these data from iPhone/iPad in a common circumstance, yet when the iOS devices get bricked, then what you can do to bring them back? Well, take it easy, that's what we are going to talk about in the next parts.

Part 1: Basic knowledge about bricked iPhone/iPad

Firstly, when the title catches your eyes, you may be wondering that what bricked iPhone/iPad is. Electronically, the "brick" means a device not functioning or not working. While when it comes to the bricked iPhone/iPad, it refers to that the device not turning on, not responding, not making calls, stuck in a loop and so on.

Part 2: Bricked iPhone/iPad data recovery tool you need

If one of above similar situation happens on your iPhone or iPad and you are eager to get the lost or deleted data back, then this is what you are seeking. To recover data from bricked iPhone/iPad, professional iOS data recovery tools such as TunesKit iOS Data Recovery is necessary. This data recovery software provides three recovery modes to retrieve your lost or deleted data no matter whether you have backup or not. And its other key functions are as presented below.

Key features of TunesKit iPhone Data Recovery

1. Recover data from different iOS device like iPhone,iPad and iPod.
2. Retrieve data under various scenarios including mistaken deletion and software update failure.
3. Restore diverse types of data like videos, photos, etc.
4. Fully compatible with all iOS versions including the latest iOS 14.
5. Rescue encrypted files.
6. Support Previewing and selecting required data before recovery.

Part 3: Ways to retrieve data from bricked iPhone/iPad

Now it's time for us to start to recover data from bricked iPhone or iPad with three different means.

1. Recover without backup

Step 1: Launch TunesKit iPhone Data Recovery and connect your iPhone or iPad with the computer through a USB cable. Then choose the recovery mode as "Recover from iOS" from the program's main interface.


Step 2: After the device and different files are shown on the screen, choose the categories on the right column that need to be scanned. Then click the "Scan" button and the program will begin scanning.


Step 3: Then all data scanned will appear on the left. Before you click the "Recover" button, you can preview the iPhone data you want to retrieve from different columns. After that the application will start to bring your data back.

2. Restore from iTunes backup

Step 1: Open TunesKit iOS Data Recovery on the computer and connect your iPhone/iPad with the PC. Then select the recovery mode named as "Recover from iTunes backup" on the main screen of the app.


Step 2: Press on the "Scan" button to examine your iPhone or iPad data and choose the data on the left column.


Step 3: Find out the deleted or lost data on your iTunes you are willing to recover and lastly hit the "Recover" button to restore them to the computer.

3. Retrieve via iCloud backup

Step 1: Launch TunesKit iPhone Data Recovery on the computer and make your iPhone connected with the PC. Then choose the third icon called as "Recover from iCloud Backup" from the main interface.


Step 2: Log in your iCloud by entering your Apple ID and password. Next select your own device among many different iPhones or iPads.


Step 3: Choose the data under the left columns and click on the "Recover" button to retrieve your lost data from bricked iPhone/iPad to the computer.

Part 4: Wrapping up

With the above professional iOS data recovery program in hand, when your iPhone or iPad becomes bricked suddenly or after a software update, it is helpful in restoring the data on the device. Hope this simple how-to guide, which requires no skills, can do you a favor.

Nov 25, 2020

Best Audible Audiobooks for Beginners

Are you listening to audiobooks on Audible.com for the first time? If you are a newbie to Audible and audiobooks, I guess what you need most is the suggestion for the first book you choose to listen to. If you are just looking for the first audiobook, just check this passage which introduces the 5 best Audible audiobooks for beginners.


List of Top 5 Audible Audiobooks for Beginners

1. Endurance: Shackleton's Incredible Voyage

It tells the story of the crew of the Endurance, a ship that battled its way for six weeks through thousands of miles of pack ice while ironically only a day's sail from its destination. Prebble, the reader, delivers an excellent reading of the book, enhancing with his rich voice the humor, pathos, terror, exhilaration, frustration, disappointment, and resolution of the characters even as he speaks in their varied dialects of English. The New York Times Book Review called it "one of the greatest adventure stories of our time".

2. The Son

Philipp Meyer, the acclaimed author of American Rust, returns with The Son: an epic of the American West and a multigenerational saga of power, blood, land, and oil that follows the rise of one unforgettable Texas family, from the Comanche raids of the 1800s to the to the oil booms of the 20th century. Harrowing, panoramic, and deeply evocative, The Son is a fully realized masterwork in the greatest tradition of the American canon—an unforgettable novel that combines the narrative prowess of Larry McMurtry with the knife-edge sharpness of Cormac McCarthy.


3. The Name of the Wind

The Name of the Wind is a fantasy novel by Patrick Rothfuss, the first book in a series called The Kingkiller Chronicle. The book is divided into two timelines: the first in the present, described in first person to a travelling scribe; the second in protagonist Kvothe's past, narrated by Kvothe himself. The story is all about a young man Kvothe who grows to be the most notorious magician his world has ever seen. It is a high-action novel written with a poet's hand, a powerful coming-of-age story of a magically gifted young man, told through his eyes: to read this book is to be the hero. In the audio edition of this book, you'll find a rich, deep and unusually engaging listening experience.


4. A Prayer for Owen Meany

A Prayer for Owen Meany was the seventh novel by American writer John Irving published in 1989, telling the story of John Wheelwright and his best friend Owen Meany growing up together in a small New Hampshire town during the 1950s and 1960s. According to John's narration, Owen is a remarkable boy in many ways; he believes himself to be God's instrument and sets out to fulfill the fate he has prophesied for himself. After listening to this book, you'll find A Prayer for Owen Meany is a wonderful book enhanced in audio with perfect narration. It's about family, love, friendship, bullying, growing up, and believing in oneself.


5. Tristram Shandy

Laurence Sterne's most famous novel is a biting satire of literary conventions and contemporary 18th-century values. Renowned for its parody of established narrative techniques, Tristram Shandyis commonly regarded as the forerunner of avant-garde fiction. Tristram's characteristic digressions on a whole range of unlikely subjects are endlessly surprising and make this one of Britain's greatest comic achievements. This is a very modern and funny work written hundreds of years ago and is definitely one of those novels that need to be listened to by more people. It is zany, smart, and addictive. Listening to this novel will expand your conception of what both a novel and an audiobook can do.


How to Convert Audible AA/AAX Audiobooks to MP3, AAC, WAV, etc.

In order to play Audible audiobooks on any media playing device, you'll need to use some 3rd-party audiobook converter to convert the AA or AAX audiobooks to MP3, AAC, WAV, M4A or other formats. In this case, TunesKit Audible Audiobook Converter could be the best solution to remove lock from Audible audiobooks while converting the AA/AAX files to MP3, AAC, M4A, WAV, FLAC without losing any quality. By using such a powerful assistant, you'll be able to listen to any Audible audiobook on as many media devices as you like, including iPod, Sandisk Sansa, Zune HD, iRivier, Creative Zen, etc.

You can follow this tutorial to learn how to convert Audible audiobooks to MP3 or other formats: Convert Audible AA/AAX to MP3


Conclusion

In this article, we introduce the 5 best Audible audiobooks for beginners. We also suggest a necessary tool for Audible listeners, TunesKit Audible AA/AAX Converter, to make the listening easier and more convenient.


For more: https://www.tuneskit.com/audiobook-tips/best-audile-audiobooks-for-first-listens.html


Nov 23, 2020

TunesKit Announces Fantastic Thanksgiving Giveaway and Special Offers 2020

HongKong, Nov. 23, 2020 – To express gratitude to its users and supporters, TunesKit Studio, a world-class software developer, announced a special Thanksgiving & Black Friday giveaway and deals on all its multimedia and iOS tools.

Starting November 20th, everyone had a chance to get its upcoming flagship product – AceMovi Video Editor absolutely free, which will be valued at $59.95 per year. What’s more, visitors can purchase its Video Cutter or Screen Recorder at $5 only, the lowest price ever. Besides, all customers can save up to 65% discount to get its popular music converters or iOS solutions, and they can save more for software packs at up to 55% discount, which can meet their different usage needs.

This Thanksgiving & Black Friday Sale will last for two weeks only and be invalid in the last minutes of December 7. For more details about this promo, please visit here:

2020 Thanksgiving & Black Friday Sale

The first offer of TunesKit Thanksgiving Promotion is a totally free video editor called AceMovi. The company is going to release it in December. Now if visitors share this information with your friends on Facebook, Twitter, or Pinterest, you can get a one-year free subscription. This software is well-designed to help users create or enhance videos to a new level with filters, transition, effects, or other advanced features. Of course, users can also use it to record and create their own videos or tutorials with ease.

The second part is special offers for its Screen Recorder and Video Cutter. Both of the two useful multimedia programs are now only $5, and you can save almost $45. The former application can help record any videos or sounds on the desktop, while the latter is proud of cutting and trimming out the unwanted parts without quality loss.

Furthermore, TunesKit provides up to 65% discounts for its hot music converters and iOS solutions, including Spotify Music Converter, Apple Music Converter, Audio Capture, Audible Converter, iOS System Recovery, and many others. In addition, more discounts of these idea programs will be bunded at a lower price. Visitors can save more money if they bought these offers.


“TunesKit offers professional yet easy-to-use video, audio, and iOS tools for Mac and Windows users all over the world,” said Andres, the marketing director of TunesKit. “We’re happy to offer a free gift and big savings to our dear customers on this Thanksgiving holiday.”

Contact

Email: support@tuneskit.com

Official Website: https://www.tuneskit.com/

About TunesKit

TunesKit Studio is an innovative consumer software provider, providing customers with easy-to-use yet powerful multimedia and iOS utilities. Currently, it has developed some popular applications such as media converter, video cutter, screen recorder, iOS system recovery, and some other freeware. Now the company is still developing more complicated video solutions like video editor. All its programs have received numerous satisfied users from more than 150 countries worldwide.

How to Downgrade iOS 14 on iPhone/iPad

Though, the iOS 14 comes with many features different from the older versions such as the home screen widgets and App library. However, there are still a few errors and bugs as expected and many iPhone/iPad customers have regrated updating their devices to iOS 14 version. Thus, the question of how to downgrade from iOS 14 becomes the most frequently asked one online. Well, now you may be also seeking ways to downgrade iPhone/iPad from iOS 14, and this article is what you exactly looking for.

Part 1: How to downgrade iOS 14 with iTunes? (Data loss)

The first commonly acknowledged method to downgrade your iPhone/iPad from iOS 14 is to use iTunes to restore the device. iTunes really offers the function but it is worth mentioning that it will delete all of the data on your iPhone/iPad. So, it’s important for you to back up the data and make sure that they are well archived. After that, you could start to follow the steps as presented here to downgrade iOS 14 via iTunes.

Step 1: Visit ipsw.me and download the related file matched with your device.

Step 2: Head to your device's Settings > iCloud > Find My iPhone/iPad, then switch it off.


Step 3: Connect your device with the computer through an original USB cable and launch the latest iTunes.

Step 4: Tap on your device icon and locate the Summary tab.

Step 5: Put your iPhone/iPad into recovery mode.

Step 6: Click on the Restore iPhone button on iTunes and follow the later instructions.

Part 2: How to downgrade iOS 14 without iTunes? (No data loss)

If you want to downgrade iOS 14 on your iPhone/iPad, for example, from iOS 14 to iOS 13, then you are highly suggested to use the professional iOS system repair tool called TunesKit iOS System Recovery, which is much easier and safer than the above one. Besides, this program is definitely the top choice for you to downgrade from iOS 14 without iTunes. In addition, without causing any data loss on your iPhone/iPad, this application can also deal with more than 50 types of iOS issues iTunes errors, etc.

Key Features of TunesKit iOS System Repair

1. Downgrade iOS to former versions.
2. With Standard Mode and Advanced Mode in hand.
3. One-click to enter or exit recovery mode.
4. User-friendly interface and loweset price.
5. Simple steps to downgrade iOS.

Step 1: Launch TunesKit iOS System Recovery and connect your iPhone/iPad with the computer. You can use its Windows or Mac version. Then, click the Enter Recovery button to let your iPhone/iPad enter the recovery mode, lastly just tap on the Start button to proceed.


Step 2: Choose the Standard Mode so that the downgrading will cause no data loss. (The Advanced Mode is used to resolve the complicated problems and will erase all your personal data.) Then hit on the Next button to continue.


Step 3: At this step, check all the information of your device to make sure everything is right. On the circled box, choose the former version you want to downgrade.Then click the Download button to download the firmware.


Step 4: Press the Repair button to start downgrading your iPhone/iPad. Be careful not to disconnect the device with your computer or it might be brick. When it finishes, iOS on your device should be back to the iOS version you want.

Part 3: How to solve other frequently asked questions?

The above ways are proven effective in downgrading your iPhone/iPad from iOS 14. After achieving that, you might still have some other questions which trouble you. You can check out the FAQs below.

1. Can I downgrade iOS beta without a computer?

Generally speaking, the answer is "No". the reason why you are unable to downgrade iOS 14 and former without a computer is that the older firmware will be stopped being signed by the Apple company once the new iOS version is released.

2. What should I do if the iOS 14 downgrade gets stuck in the boot loop?

When it comes to the final process of downgrading iOS 14, your iPhone or iPad has the potential to be landed into stuck issues such as the boot loop. In this case, you could try to force restart your device and use third-party tools to fix it. 

3. How can I delete the iOS 14 profile on my iPhone/iPad?

To delete your device's iOS 14 profile, you just need to go to the device's Settings > General > Profiles & Device Management, then choose the iOS profile you desire to delete, finally hit on the "Remove Profile" option. Please remember to restart your iPhone/iPad after that.

Nov 20, 2020

Best M4V Cutter: How to Trim M4V Videos Losslessly

cut and merge mp3 songs

Are you fans of a movie or a star like me? Have you ever thought to save the highlight moments of a movie?  Then the best option is to cut and merge all the terrific scenes of the movie to create a cool video. In that case, you can go for M4V videos in that they are the easiest to get source videos. As we all know that M4V has encryption to protect the copyright. Videos from the iTunes store, including full-length movies, TV shows, and music videos, are all saved in M4V. There are also M4V videos with no protection and can be played on your device with no authorization needed.

Therefore, you need a reliable M4V video cutter and merger. TunesKit Video Cutter can be your best assistant. It integrates a video cutter, merger, and editor. The next section introduces the specific steps about how to cut and merge M4V movies.


Key Features of TunesKit Video Cutter

  • Split media files into sections accurately
  • Save the trimmed M4V videos in 100% original quality
  • Edit video and audio files with various editing tools
  • Merge video clips from the same source media file

Step 1 Import M4V Video to TunesKit

tuneskit audio cutter

First of all, download TunesKit Video Cutter from the link above and then launch it. Then you should add one M4V video into the cutter by clicking the "Open" button. Or you can drag and drop the M4V file to the main interface. Note that you can only import one video each time.

Step 2 Set Cutting Sections

set

After M4V imported successfully, then the video will play automatically in the preview window. Next, you should set the duration of the M4V video to be cut, you can either move the yellow slider bar or input the start and end time manually. The former is easier to operate and while the latter is more accurate. According to your needs, you can click the "+" icon to create more cutting segments from the same source.

Step 3 Edit the video

edit

If necessary, you can also edit M4V videos with its built-in video editor. Press on the "Edit" icon of each segment to open the editing window. Here you can crop, rotate, trim the video, adjust the contrast, brightness, add background music, watermark, subtitles, and other effects to the video clips as you like.

Step 4 Choose output format

edit audio

After editing M4V, you should click the "OK" button to save all the changes. After that, return to the main screen and click the "Format" button to select the output format or device such as MP4, MOV, 4K, MKV, WMV, DivX, MP3, WMA, Apple iPhone X, Samsung Galaxy S8, Xbox One, etc. Or you can stay with M4V.

Step 5 Cut the large video into small clips

set output format

In this last step, hit on the "Start" button to trim your video file into smaller clips. If you choose High-Speed mode, TunesKit will trim your M4V files at 60X faster speed. If you want to merge all the trimmed multiple segments, click the "Merge Segments" option before exporting the clips.

Extra Tips

M4V is a special format. This kind of video is usually DRM-ed. That is to say, you cannot trim and edit M4V videos without removing DRM. Therefore, you can use TunesKit M4V Converter to rip DRM and then use TunesKit Video Cutter to trim and edit M4V video files.


You may also like:

[Review] Top 4 M4A Cutters 

6 Best Free Video Cutter No Watermark

Nov 19, 2020

Complete Fixes to FaceTime Waiting for Activation

We can make video calls and the like on FaceTime. However recently, many users find the FaceTime keeps waiting for activation and they cannot use the app. In this article, we will illustrate what does this message mean and the most effective Facetime waiting for activation fix methods.

1. What Does the FaceTime Waiting for Activation Means?

iPhone facetime waiting for activation problem has many causes. Normally, the FaceTime activation will be completed automatically when you're connected to the Internet. FaceTime needs a network connection at all times to be activated, and in most cases, the activation error results from poor or no connection. This happens most often when we use a new device. However, the causes can also be wrong time zone settings or software errors.

After trying the solutions below, remember to wait 24 hours so that the activation can be completed.

2. Solutions to the FaceTime Waiting for Activation Problem.

1.1 Check Network to Fix FaceTime Waiting for Activation iPhone

As we just mentioned, the activation needs to be done online, and poor or no connection will naturally hinder the procedure. Therefore, the first thing we need to fix is the cellular data or WiFi that you are using.

To do that, go to Settings > WiFi. Now you should see that you are connected to a WiFi network, otherwise, you should find your WiFi and connect to it. If you don’t have access to WiFi, then you should turn on the cellular data. Just go to the Settings > Cellular, then toggle on the Cellular switch.


1.2 Fix the Time Zone Settings

To ensure that FaceTime can work properly, you must ensure that your time zone is set correctly. To do that, go to Settings > General > Date and Time. You should see a list of time zone options to which you can set your iPhone. Make sure that you have it set to the correct one.

You might also notice there is an option saying "Set Automatically". You can turn this on to let your phone corrects your time zone on its own. However, if the automatic time zone setting goes wrong, it's better to adjust the time zone manually.

1.3 Fix the FaceTime Bugs Easily – TunesKit iOS System Recovery

With the simple solutions tired, your FaceTime might or might not resume to normal. If the problem persists, here is the easiest FaceTime waiting for activation fix for you. TunesKit iOS System Recovery is one of the best iOS repair tools. It can help you get rid of most iOS system errors easily. It is highly user-friendly – even amateur users can easily use this program to fix their FaceTime activation problem on their own. All you have to do is to click a few buttons.

Tutorial to Use TunesKit iOS System Recovery.

Step 1: Download and install TunesKit iOS System Recovery and open it. Use an Apple USB cord to connect your iDevice to your computer, and the program should recognize your device. Press the "Enter Recovery Mode" button, and the program will put the device into recovery mode. Press the "Start" button to continue.


Step 2: Two repairing modes will be displayed on the screen. Click on the "Standard Mode" box so that your iDevice will be fixed without any data loss (The "Advanced Mode" will erase all the data and fix more advanced issues). Press the "Next" button to proceed to the next step.


Step 3: Some basic info of your device will be shown on the screen. Please check and ensure that all is correct, then press the "Download" button to download the matching firmware.


Step 4: The final step is to push the "Repair" button to unzip the firmware and initiate the repairing process. It will be finished minutes later. By the time it ends, unplug the iDevice from the computer and check whether FaceTime works properly.

1.4 Turn Off FaceTime and Restart the iDevice

The reason you see the FaceTime waiting for activation message is probably that FaceTime or your device malfunctions temporarily. In that case, try turning off FaceTime and open it again. If it refuses to open, then just restart the phone and open FaceTime again to see if it works.

For users of iPhone X or later version, you must press and hold down the Side button and the Volume Up button. The Slide to Power Off slider will show up on the screen. Slide it to the right to turn off the device. Then, press and hold the Side button until you see the Apple logo.

For users of older iPhone, just hold the Side button until the slider appears on the screen. Similarly, slide to power off your device, then hold the side button until the Apple logo appears on the screen.

1.5 Update iOS to the Latest Version

The system errors and bugs that cause the activation problem can be solved by updating iOS. In fact, the update package often contains fixes to old glitches. So whenever you find something wrong with your iPhone or iPad, don’t hesitate to update.

To update your iOS, go to Settings > General > Software Update. Here the iDevice will automatically check for new updates, and if there is one available, download and install it. After the update, check and see if your FaceTime has been activated.

1.6 Contact Your Carrier or Apple Support

If the problem persists after you have tried all those solutions above, chances are that something wrong with your paid-up plan, or your devices seriously malfunction that it can only be fixed by Apple Support. Some guides may suggest users reset their iDevices or restore without telling them to back up the data. Our advice is that the restoration can only be done after consulting Apple Support.

3. Summary

The FaceTime waiting for activation problem has many causes. With the 6 solutions listed above, you should be able to get your FaceTime back to normal again.

How to Add Music/Audio File to Video Easily

add audio to video

Are you fond of shooting a video with your smartphone or camera or recording a video tutorial on the desktop? Do you want to make better videos, what will you do? As far as I am concerned, I would like to cut the video and remove unpleasant parts, add special effects, etc. Of course, adding background music to a video is a nice choice. In this tutorial, you will get two easy ways to add background music to a video clip. Scroll down to get more detailed information.

Part 1. How to Add Background Music to a Video Clip with TunesKit

If you plan to add an audio file to your video, a video editor to help you a lot. There are a number of video editing tools on the market, and if you just need some basic editing, an easy-to-use video editor is what you need. TunesKit Video Cutter is such a program.

As its name shows, TunesKit is well-known as a video cutter due to it can trim any video and audio with no quality loss. Still better, it is actually a video editor as well, which allows you to split, merge, crop, rotate, and flip any video and audio file. With the help of it, you can also enhance your movie by adding background music, special effects, subtitles, etc. Besides, this software is easy to use, and anyone can use it even if he/she doesn't have any relative experience before.

  • Add background music to video with high quality
  • Support almost all media formats and many compatible devices
  • With an intuitive interface and be user-friendly
  • Available for both Windows and Mac computers

Now you can follow the step-by-step instruction on how to add background music to a video via  TunesKit Video Cutter for Windows.

Step 1 Import target video file to TunesKit

add video

Double-click to launch TunesKit Video Cutter after installation and then hit the "Open" button to import a video file that you want to add the music file to. Of course, you can also simply drag and drop the file into the program.

Step 2 Add background music to video

After importing your video file, TunesKit will play it automatically in its inbuilt video player. Now you can press on the Edit icon beside the video clip to open a new window. You can see six options for editing, and choose the "Audio" in the last position.

add music to video

Now click the Open File icon open file icon under the File option to browse a music file from your local folder and you can pre-hear it then. Tick the "Repeat" box if the duration of the music file is shorter than the video file while you want the background music playing all the time. You can also adjust the "Volume" and "Weight" of the music file or add special sound effects for your audio. Once the settings are ready, click the OK button in the lower right corner.

Step 3 Choose an output mode

set output

Next, click the "Format" panel and you will see two output modes. To add background music to the video, you need to choose the Encoding Mode to edit your video. You can choose an output format or device according to your needs and then hit the OK button to proceed.

Step 4 Start the conversion

convert video

Now hit the Start button and TunesKit will start to add background music to the video. Once the process is done, you can locate the polished video from the history folder.

Part 2. How to Add Background Music to Video Online for Free

As for those who don't want to download any software on the computer, you can use free online tools to add music to the video. If you search on Google, you will get many results and here we will take Kapwing as an example. Now follow me to get the specific steps about how to add an audio file to a video clip online.

add music to video with kapwing

Step 1 Upload the video file

Go to the official website of Kapwing and click the Upload button to import the video that you want to add an audio file to. More conveniently, you can also paste a URL in the box up to load an online video.

Step 2 Add MP3 file to the video

Next, click the white box to upload an MP3 file from the local folder and you can also drag-and-drop it, or paste an audio or video file URL from the Internet.

Step 3 Create a new video with music

On the next page, you can trim the music file, adjust volume, or loop audio based on your needs. After that, click the red Create Video button and wait a while until the process finishes.

Note: After the video is processed completely, your new video inserted background music will be added watermark automatically. If you want to remove the Kapwing watermark, you need to sign in with your Facebook or Google account. Of curse, if you don't mind the company logo, you can click the Download button to export it to your computer.

Conclusion & Suggestion

Now you've got two methods to add background music to a video file efficiently. Which one do you prefer? In my opinion, Kapwing is free of cost, but it also has its limitations. For example, Kapwing will insert its company logo on your exported work; it only supports limited input video and audio formats; the speed to upload and download will be slow if your file is in large size, etc. Thus, if you do care more about the quality, you can try TunesKit Video Cutter, which will enhance your video to a better one.


You may also like:

[Review] Top 4 M4A Cutters 

6 Best Free Video Cutter No Watermark