Oct 16, 2020

[Top Tutorial] How to Cut ASF Files without Trouble

how to cut asf

Advanced System Format, also known as ASF, is a media format, developed by Microsoft. In general, ASF concludes WMA and WMV data. And it can offer the framework for digital rights management in these two formats.

Do you have some ASF videos that need to cut? Based on my personal experience, a specific ASF cutter is hard to find. Then you should find a video cutter that is compatible with ASF, which can also meet all your requirements. TunesKit Video Cutter is highly recommended. 

As an all-in-one video cutting tool, TunesKit can cut nearly all kinds of video and audio files. That is to say, in addition to ASF, TunesKit supports other 30 more input formats including M4V, AVI, MP4, MPG, MPEG, 3GP, 3G2, WMV, ASF, RM, RMVB, and so on. And you can convert your ASF file to any other video or audio formats. Most important of all, TunesKit supports you to trim media files without damaging any quality loss. 

Apart from trimming and converting, TunesKit supports you to join, edit, and extract media files. It supports you to merge sections from the same videos and provides multiple editing functions. If necessary, you can extract audios from the ASF files. TunesKit has an amazing exporting speed. You can export your videos at 60X faster speed no matter how large your file is. In that case, you can save much time to trim ASF. Next, we will perform the specific steps about how to cut the ASF video with TunesKit.

Key Features of TunesKit Video Cutter

  • Cut and trim video and audio into parts or clips precisely
  • Save and convert the videos to any format with 100% quality preserved
  • Edit the video with special effects, watermark, and subtitles
  • Merge video clips from the same source

Step 1 Add ASF File to TunesKit
tuneskit audio cutter

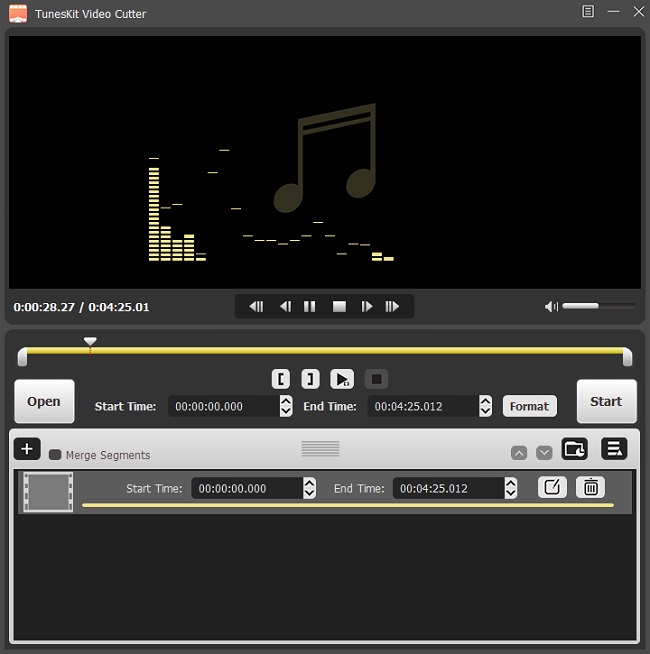
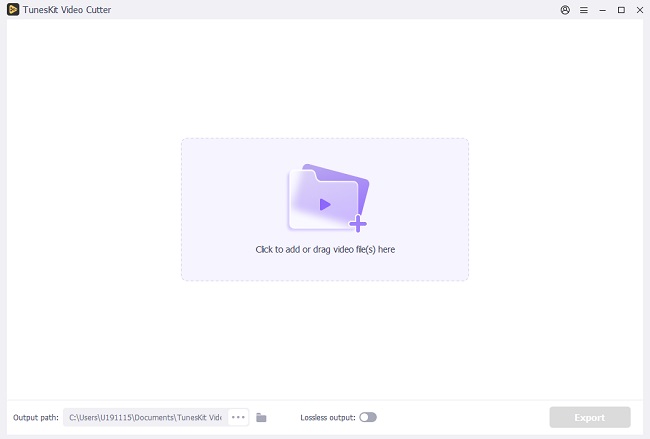
To begin with, open the official site to install and launch TunesKit Video Cutter in Windows or Mac version. Find the "Open" button on the left corner, click it to select the ASF video you want to import. You can also drag and drop the ASF file to the cutter. 

Step 2 Adjust Time Duration to Cut
set

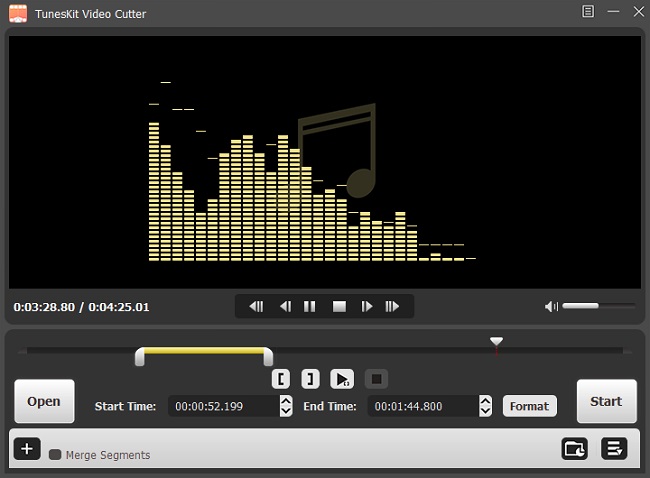
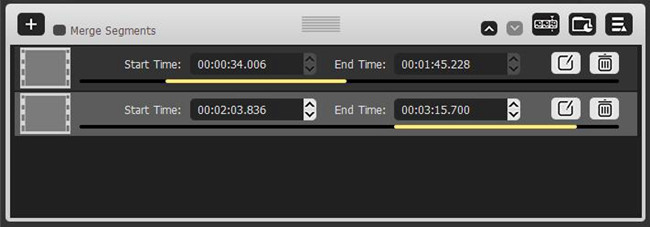
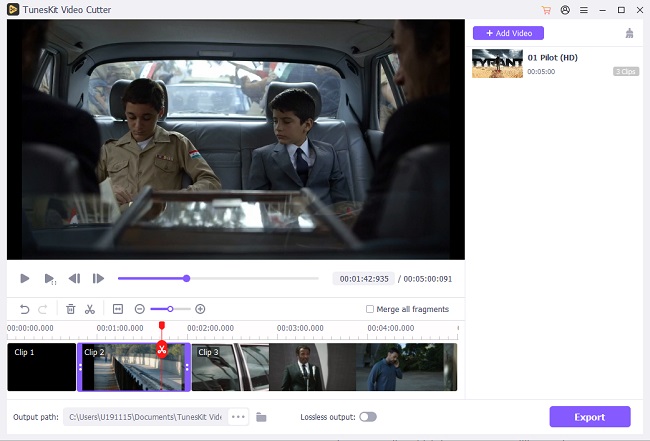
Once you load one ASF video to this program, it will play without any operation. Now, you can move the yellow slider bar to set an appropriate section of the ASF and then adjust the start time and end time to make it more precise. To create new segments from the source video, simply click the "+" icon under the "Open" button. Then you can trim multiple parts of ASF.

Step 3 Edit the Video Segments
edit

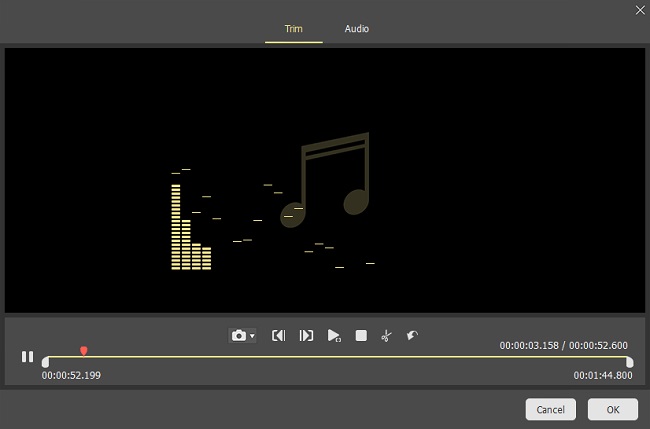
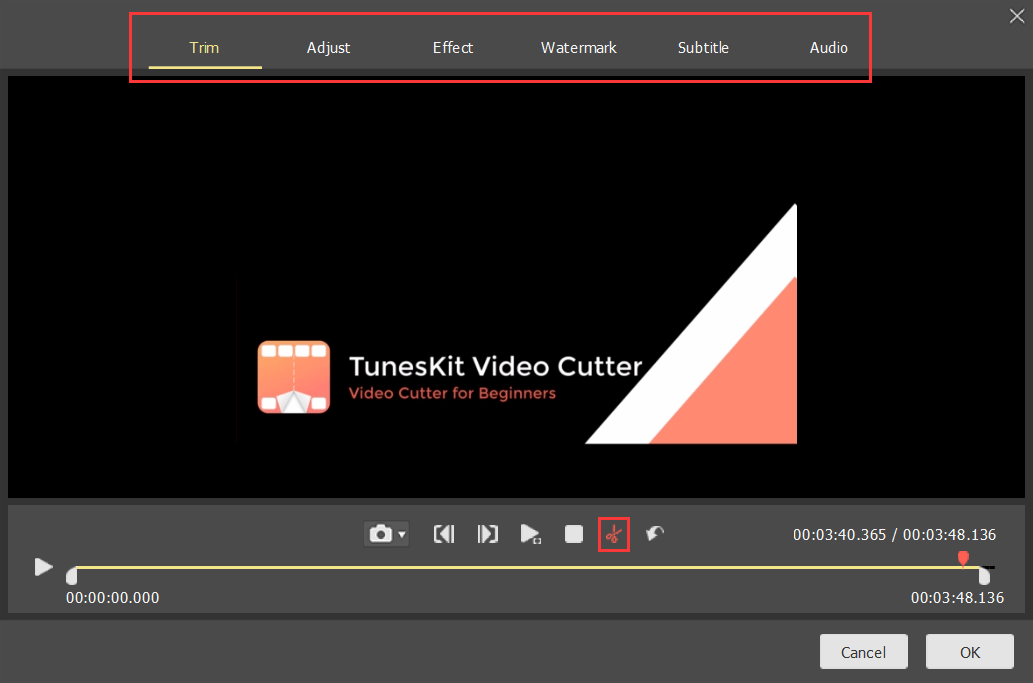
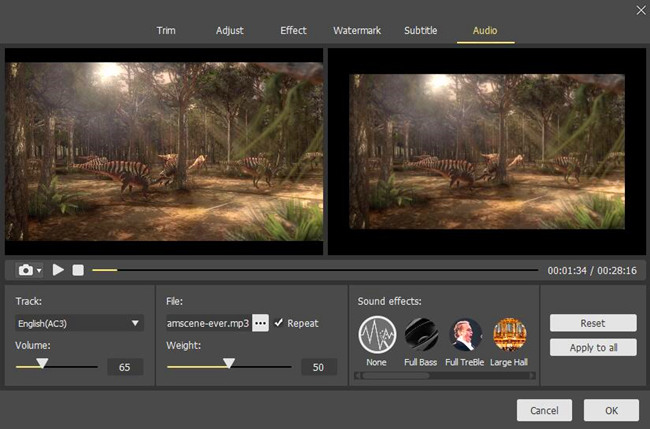
TunesKit has some additional functions provided by its built-in video editor. Simply click the "edit" icon of the segment and you'll be directed to the editing window where you can trim, adjust, add watermark, subtitles, video and audio effects to the video clips as you like.

Step 4 Set Output Format
edit audio

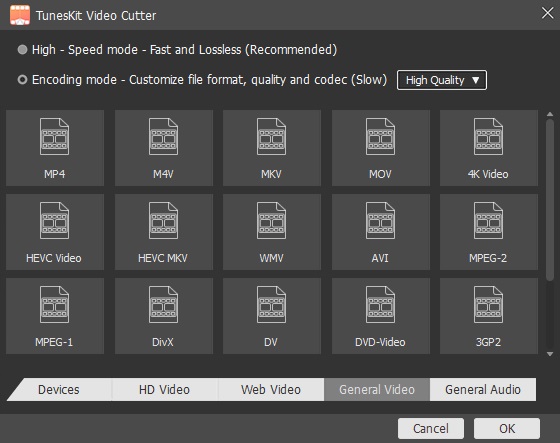
Click the "Format" button on the right corner and choose the output format or one device as you want. You have many options, including HD MP4, MKV, MOV, 4K, WMV, DivX, MP3, OGG, WMA, and more. You can customize both the output video and audio format, like adjusting the media parameter like codec, size, bit rate, etc.

Step 5 Start Exporting ASF Video Clips
set output format

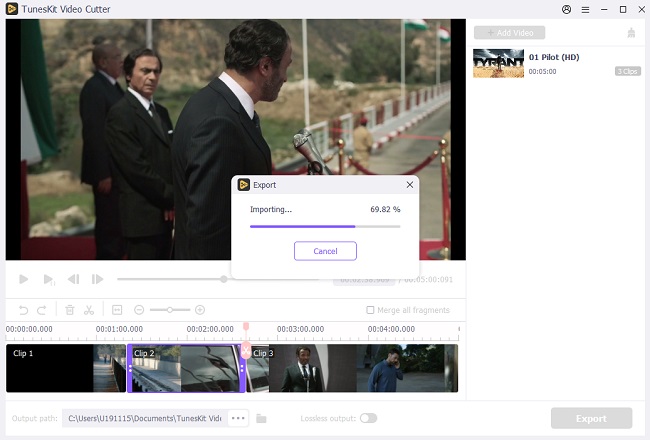
If you think everything is done, click the "Start" button on the main screen and TunesKit Video Cutter will begin to trim the original ASF video file into small clips as needed. Then you can get the desired segments under the history folder. If you have split multiple segments from the same source file, you can choose to merge all the videos into a new file by checking "Merge Segments" before starting the cutting process.


The Final Thought

Do you have learned how to trim ASF in an easy and fast way? If you have any confusion about the functions of TunesKit Video Cutter or the steps, why not tell us your problem in the comment box below?

Oct 15, 2020

How to Cut and Convert 3GP Videos Fast with 3GP Cutter & Merger

cut and merge mp3 songs

Before discussing 3GP, you should get the knowledge of the 3G2 format. In general, if you used Nokia, Motorola or Ericsson to record your video, you will find that these videos are usually saved in 3GP or 3G2. 3G2 format is very similar to 3GP but consumes less space and bandwidth. 3GP or 3GPP is a multimedia file format to stores video and audio streams that are transmitted between 3G mobile and phones over the internet. It is based on the ISO media format.

3GP  is a very common video format in the 3G era, but not all the media cutters are compatible with it. To save your time to get a 3GP video cutter, you can check here, where we recommend one easy-to-use 3GP trimmer - TunesKit Video Cutter. TunesKit Video Cutter is designed for beginners because it has a concise interface. It supports nearly all the input video and audio formats including 3GP and 3G2. Next, we will perform a simple guide about how to cut and merge 3GP videos. Scroll down!

Key Features of TunesKit Video Cutter

  • Split video and audio into parts or clips precisely
  • Save the videos to any format with 100% quality preserved
  • Edit the video with special effects, watermark, and subtitles
  • Merge video clips from the same source file

Step 1 Import 3GP Video to TunesKit Video Cutter

tuneskit audio cutter

Download and install TunesKit Video Cutter from its official website and launch it. Then, you can click the "Open" button on the left hand to add one 3GP video file to TunesKit. Or try another faster way, directly drag the file to the main screen to import 3GP video, too. TunesKit supports adding one video or audio file each time.

Step 2 Select Segment to Be Trimmed

set

Once the 3GP file is imported, it will play in the video automatically. Then, you can personalize the duration of the segment needed to be cut from that video file. Or you can move the slider bar to select the segment or set the start time and end time manually. The latter method is more accurate.

Step 3 Edit and Enhance the Media Before Cutting

edit

After that, click the Edit button to open the built-in video editor to edit 3GP. There you can customize your video by changing the aspect ratio, adjusting brightness, adding watermarks, subtitles, and other effects according to your own needs.

Step 4 Merge Video Segments

merge mp3 audio

If you want to cut multiple segments from the same source file and merge them together, simply click the "+" button to create new footages and trim them according to your needs. And then check the option of "Merge Segments". In that case, TunesKit will help you merge those different sections from the same video source into new one.

Step 5 Set Output Format

edit audio

Clicking the "Format" button on the main interface to choose one cutting mode and the output format. Here you can select 3GP format or others, like MP4 as your output format from this format panel. If necessary, you can customize the media parameter like codec, size, bit rate, etc. if you like.

Step 6 Cut and Convert 3GP to MP4

set output format

Last but not least, click the "Start" button to start trimming, merging and converting the videos. When the splitting process is finished. Then you can click the history folder to get your trimmed video.

The Bottom Line

TunesKit Video Cutter, a simple media file editor, is really powerful to cut, edit, and join videos and audios. Not only just 3GP files, it supports a wide range of media formats. Under the help of it, you can convert video and audio files to another format, different from the same source. In addition to that, the built-in media player is another great feature. Don't you wanna try this incredible and favorable tool?


You may also like:

[Review] Top 4 M4A Cutters 

6 Best Free Video Cutter No Watermark

Oct 14, 2020

Want to Know How to Rip DVD to iPad/iPhone?

 DVD is so popular in the past and meets great shock when smartphones especially iPhone show up. To make the watching easier, many DVD collectors want to play their DVDs on iPhone or iPad. But some of them have not found the correct method to do it. Today, we want to introduce a great way to rip DVD to iPad or iPhone. If you have an interest, just keep reading it.


What is DVD Ripper?

Just as its name implies, a DVD Ripper is one kind of software which can rip any DVD disc to any video format like MP4, MP3, AVI, etc. Only by using a DVD Ripper in your PC, you can convert the videos or audios in a disc to the format which can be used in other devices like iPad and iPhone.


What Type of DVD Ripper Should You Choose?

Here I introduce one of the best DVD Ripper in 2020 called TunesKit Video Converter to you. TunesKit Video Converter (hereafter, TVC) can easily help you rip and convert DVD Movies to more than 250 formats, including video formats like MP4, AVI, M4V, and audio formats like M4A, M4B, and etc.

It also can convert DVD to the format which is suitable for more than 68 output devices including iPad, iPhone, Samsung, Huawei, Game Consoles, Smart TV, and other mobile devices. More importantly, it can convert videos to DVD without quality loss at 60X faster speed. It's perfect converting quality and high speed that make TVC outstanding. You can press the following ‘download’ button and have a try.


How to Convert or Rip DVD to iPad/iPhone?

TVC has a very intuitive and concise interface and very easy to operate so even if you are not good at technical issues you still can easily make a good command of this software. You can easily convert your DVD to iPad by doing the following steps.


Step 1. Insert Your DVD in PC and Drag the DVD files in TunesKit.

First, you should open TVC on your PC, then you will see the following interface of the software. This software will remind you to drag your files in the interface or you can also tap the button in the red frame to add files.


Step 2. Customize Output Settings and Format

After you have dragged your DVD files in it, you may see a list of different files. And you can choose the audio tracks and subtitles for each video as you want.

Next, click the 'Format' and press "Encoding mode", then press "Devices" and find the output devices you want according to the model of your digital device.


Step 3. Finish Converting DVD and Put It into Your iPad/iPhone

Notes: This DVD to iPad converter also provide you the function of editing and enhancing the videos like Trim, Adjust, Effect, Watermark, Subtitle, Audio. If you want to combine the videos into one, you can just click the button "Merge all into one file" at the bottom right of the interface.


Step 4. Put Videos into iPad/iPhone

When all the videos finished, you should put these videos into your iPad by connecting your iPad with PC. Here are the methods that you should follow if you want to put some videos into your iPad or iPhone.

1. First, we need to connect the tablet to the computer with a cable.

2. Open iTunes on the PC, and we click on 'Select Account' -- 'Authorize' (Enter your own Apple ID and password, and then click authorize).

3. After the authorization is completed, we click the small device icon as shown in the figure.

4. And then you can see that we've got the iPad page open, and we can click and select 'File Share'.

5. Then click 'Add Folder' and add files that need to be imported to the iPad/iPhone from your computer.

6. Then you can see that you're already copying the video from your computer to the iPad/iPhone and when it's done, we can click finish.

Conclusion

Finally, I want to say that find a good DVD ripper will save much work and eliminate many troubles for you. So, if you have no idea about good DVD rippers, just use TunesKit Video Converter to rip DVD to iPhone or iPad easily.

For more: https://www.tuneskit.com/video-converting-tips/convert-dvd-to-ipad.html


Oct 13, 2020

Cut and Merge MP3 Files? A Lossless and Fast Way Here

cut and merge mp3 songs

Have you ever thought to cut out the unpleasant parts of some MP3 recording files? Or do you want to trim your favorite song to make a ringtone? Well, here in this article, we highly recommend an easy-to-use yet multifunctional MP3 cutter and merger, which will be a great assistant for your purpose. Next, this efficient and lossless audio cutter and joiner is named TunesKit Video Cutter. Under the help of it, you can trim and merge any MP3 or other kinds of audio files.

Part 1. TunesKit MP3 Cutter - Cut and Merge MP3 without Quality Loss

One of my favorite media tools is TunesKit MP3 Cutter, which is actually a powerful audio cutter and joiner as well. Also, TunesKit is a lossless video splitter. That's to say, it supports users to cut any MP3 songs into smaller clips and join the rest into a new file, with 100% original quality. It has an intuitive interface and you can handle it with ease. If you plan to get rid of needless parts of a music track, like intros and outros, commercial ads of a song, this program helps a lot. Apart from cutting and merging, you still can apply some sound effects to your MP3 tracks.

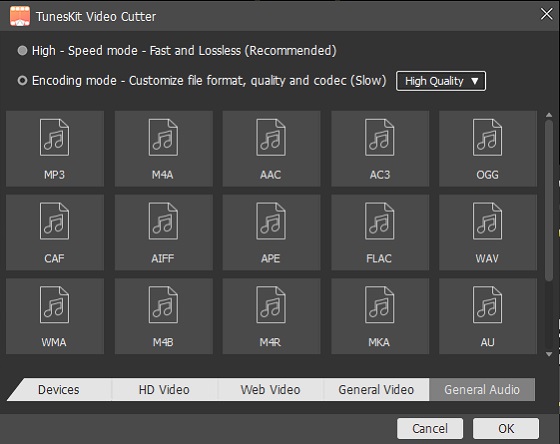
Besides MP3 formats, TunesKit MP3 Cutter is compatible with multiple other audio files like FLAC, WAV, OGG, AAC, AC3, M4A, M4R, MKA, AU, APE, AIFF, etc. Besides, you can not only export your polished MP3 file into various media formats but also some compatible mobile devices such as iPhone, iPad, iPod, Android phones and tablets, Windows Phone, game consoles, and so forth.

Key Features of TunesKit Media Cutter:

  • Cut and merge MP3 songs with zero quality loss
  • Cut one audio file at 60X faster speed
  • Suitable for both beginners and professionals
  • Support tons of file formats and portable devices
  • Intuitive interface and easy to operate
 

Part 2. How to Cut and Merge MP3 Music Easily and Losslessly with TunesKit

Now follow me to know how to cut and merge MP3 files with TunesKit MP3 Cutter. Take the Windows version as an example, and if you're a Mac user, download the right version to follow this instruction.

Step 1 Launch TunesKit and add your target MP3 file

add mp3

Download, install TunesKit MP3 Cutter and then launch this program on your Windows or Mac computer. You have two methods to import the audio songs to TunesKit. One way is to click the "Open" button to select one MP3 file from the local folder of your computer. The second is to directly drag and drop the MP3 file to the screen. For your information, TunesKit MP3 Cutter only supports you to import an MP3 file at one time.

Step 2 Set cutting segments for cutting

set duration

Now, you should choose the segments you want to trim. Simply drag the yellow slider to set the starting time and end time > manually input the specific number for the starting point and end point. 

Step 3 Select segments for merging

merge mp3 audio

Next, press on the "+" button to add one or more audio tracks from the same source and trim them like step 2. After that, just check the "Merge Segments" box.

Step 4 Edit the MP3 file (Optional)

edit audio

If necessary, you can make your MP3 song better through its inbuilt audio editor. Click the "Edit" icon next to each audio track to open a new editing window. Here you can adjust the volume, apply special sound effects, etc.

Step 5 Choose the output format

set output format

Then click the "Format" icon to open its selection. TunesKit provides 2 modes: High-Speed mode and Encoding mode. To cut and merge MP3 songs at 60X faster speed, select the former, which will help you save your audio file without re-encoding. If you wonder to edit the MP3 file, pick the latter, with which you can personalize the format, codec, bit rate, channel, etc.

Step 6 Start the conversion

Hit the "Start" button on TunesKit MP3 Cutter to cut and merge MP3 song quickly and losslessly. And the destination folder of the trimmed and merged audio file will pop up.


The Final Thought

When done here, you have known how to cut and join MP3 songs without quality loss with TunesKit MP3 Cutter, a simple and professional tool. I have tried some web tools that claim to help cut and merge MP3 online for free, but they caused quality loss. And they didn't work well as TunesKit. Some of them only offer a cutting function;  others only help you join MP3 files. What's more, uploading the target audio file online is slow and not stable. If you have any other ideas for MP3 cutting and merging, please leave your comments.


You may also like:

How to Cut Unwanted Parts of Videos

6 Best Free Video Cutter No Watermark

How to Solve iPhone Silent Switch Not Working

Do you know how to effectively fix the iPhone silent switch not working? The silent switch also can be called as the ring switch, is used to put the iPhone into silent / mute or ring mode with one step. If it goes wrong, then people may land into some troubles. And indeed in the recent times, it is reported online that some individuals have been unable to make their iPhone ring or become silent through this strong functionality. To help them solve the confusion and you who are seeking suggestions, this article is going to list 8 methods to fix iPhone silent switch not working issue.

Way 1: Restart your iPhone

Usually, when the ring switch on iPhone not responding, the first solution comes to your mind is to restart your iOS device, and it can surely remove some software errors that may cause this matter. Owing to reason that the problem can happen on different models of iPhone such as iPhone 8 and iPhone XR, you can follow the below instructions.

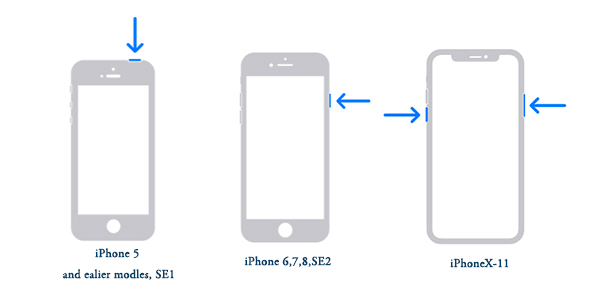
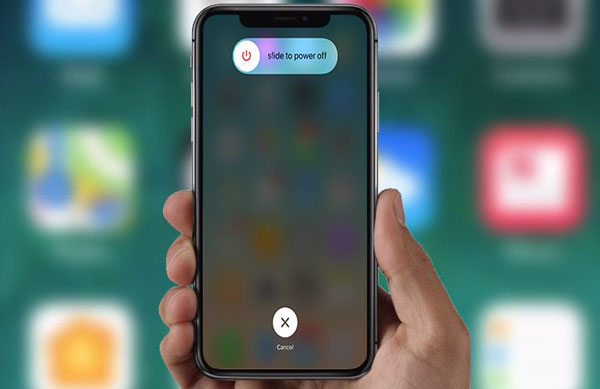
For iPhone X/11, simultaneously press the Side and the Volume buttons until the Slider is shown, then pull the slider to power off the iPhone, finally hold the Side button to power your device on.

For iPhone SE (2nd) /8 /7/6, hold the Side button until the Slider pops up and drag the slider to switch off the iPhone, finally press the Side button to switch on the device.

For iPhone SE (1st) / 5 and former, press the Top until the Slider appears, then slide the slider to turn off the iPhone, finally turn on your device again by holding the Top button.

Way 2: Turn down the volume

If you are eager to make your iPhone enter the mute mode at present, then you could employ the volume down button to silent your ringing iPhone. You just need to long hold the volume down button, which locates the left side of your iPhone, until the volume level reach the zero.

Way 3: Add silent ringtone

Another alternative to put your iPhone into silent mode is adding a silent ringtone as default. This method is easy with the help of iTunes library. Related steps are as presented below.

Step 1: Download a silent ringtone on your computer and launch the latest iTunes.

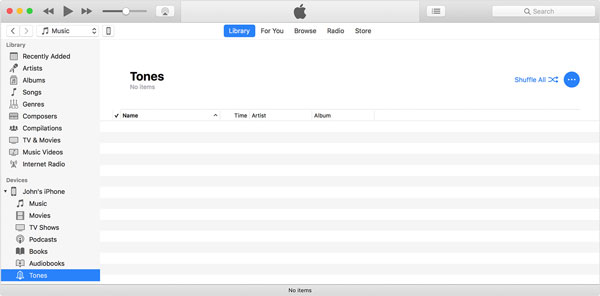
Step 2: Under the iTunes Library column, click on the "Tones" option and copy the downloaded silent ringtone on it.

Step 3: Connect your iPhone with the computer and hit the "Device" icon to sync the data.

Step 4: On iPhone, go to "Settings" > "Sound and Haptics", then click the "Ringtone" button to set the silent tone.

Way 4: Open airplane mode

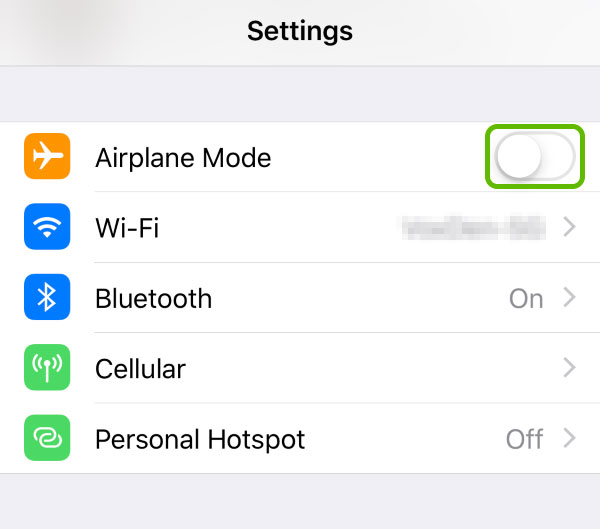
Also, you can open the Airplane mode to mute your iPhone with only Wi-Fi network working. You can turn it on either on the iPhone's control center or heading to the Settings of iPhone, find out the Airplane Mode and enable the switch.

Way 5: Enable Text Tone to None

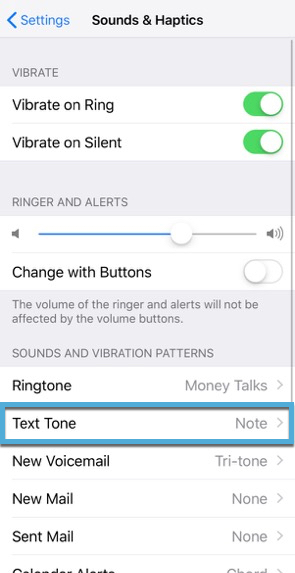
If you are merely willing to make some specific notification disappear like messages and emails, then you could set the Text Tone to none. It is a feature that silent notifications you receive on your iPhone. To do that, run the "Settings" of iPhone and tap on the "Sound and Haptics" button, then find the "Text Tone" and enable it to “None”.

Way 6: Turn on Assistive Touch

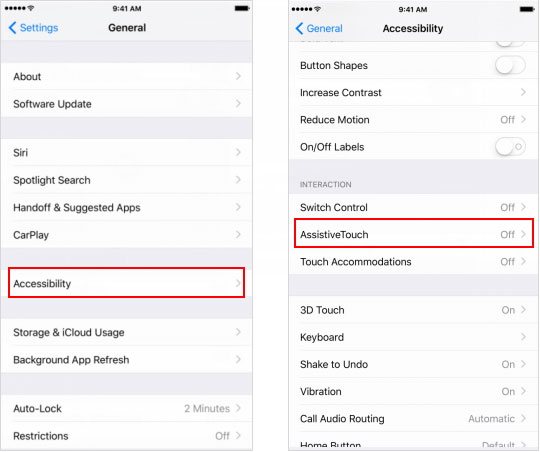
In case the situation is that the ring or silent switch is broken, you can use the Assistive Touch, grey in color and floating on iPhone’s screen, to manage the device. Do as follows to solve iPhone silent button not working.

Step 1: Run "Settings" of iPhone, hit the "General" button and then the "Accessibility" option.

Step 2: Click on the "Assistive Touch" and turn on it.

Step 3: On the home screen, use the Assistive Touch to open the menu and press the "Device" to silent iPhone during ringing.

Way 7: Use TunesKit iOS System Repair program

The above ways to fix iPhone silent switch not working are temporary and can't resolve this issue completely. In this case, you are suggested to use professional iOS system recovery applications, for example, TunesKit iOS System Repair. This program can work out the problem once and for all, and with its professionalism and effectiveness, it is also able to fix other iOS issues such as stuck problems and errors. Apart from this, it supports iPhone/iPad/iPod/iPod touch/Apple TV, etc. other iOS devices. Moreover, the most stunning feature of this program is that it will not result in ant data loss while resolving the not-working silent switch on iPhone under the Standard mode. Last but not least, it is fully compatible with the latest iOS 14, 13, 12 and former versions.

Now try the following 3 easy steps of TunesKit iOS System Recovery to settle the iPhone silent / ring button and make it working again.

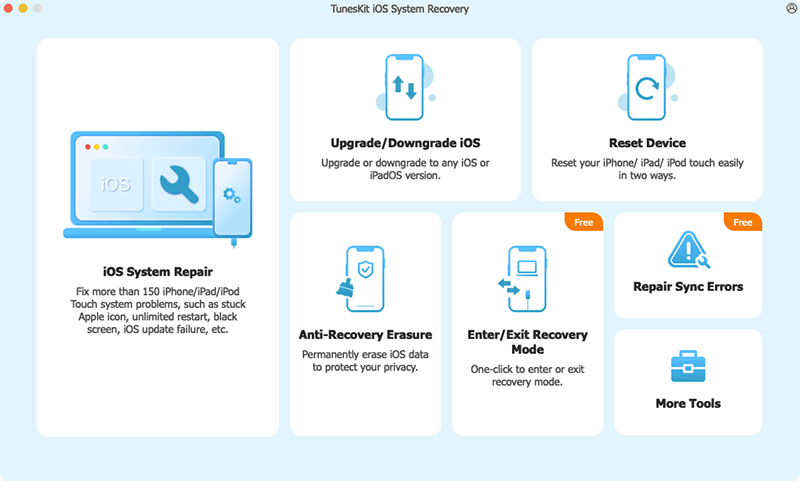
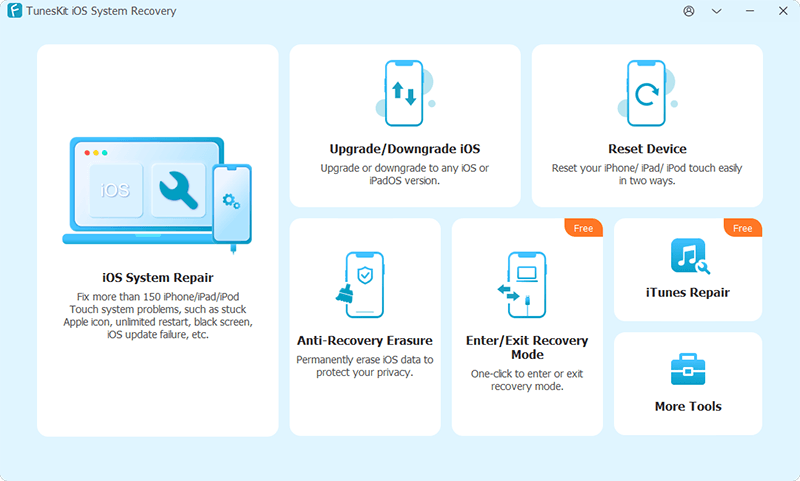
Step 1: Download TunesKit iOS System Recovery for Windows and open this software on the computer. Then, connect your iPhone with PC until it is being detected. After that, press on the "Start" button.


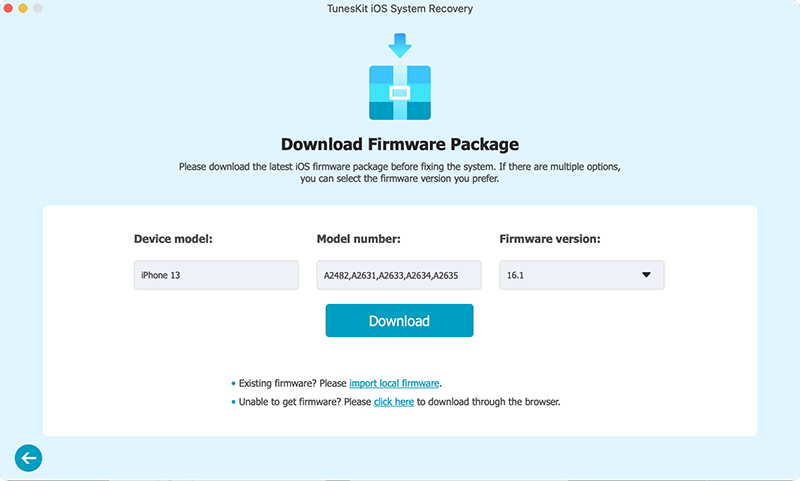
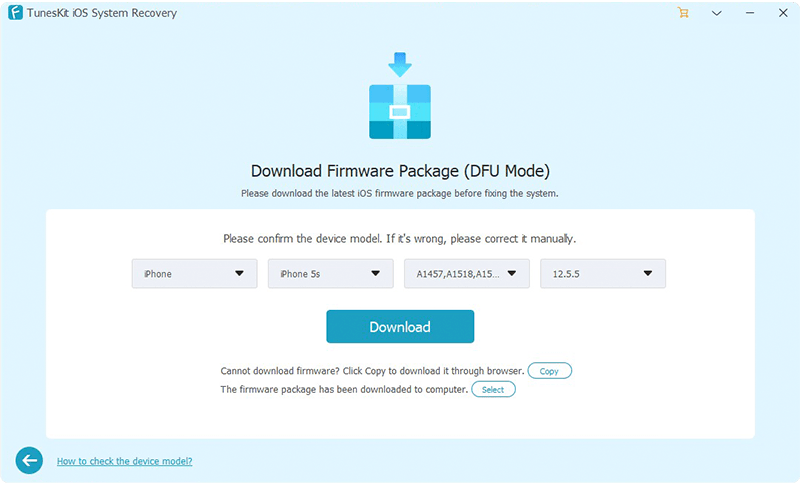
Step 2: At this step, check whether your device model, version and other information are correct. If there is nothing wrong, click on the "Download" button and this tool will start to download and verify the firmware package according with your iPhone.


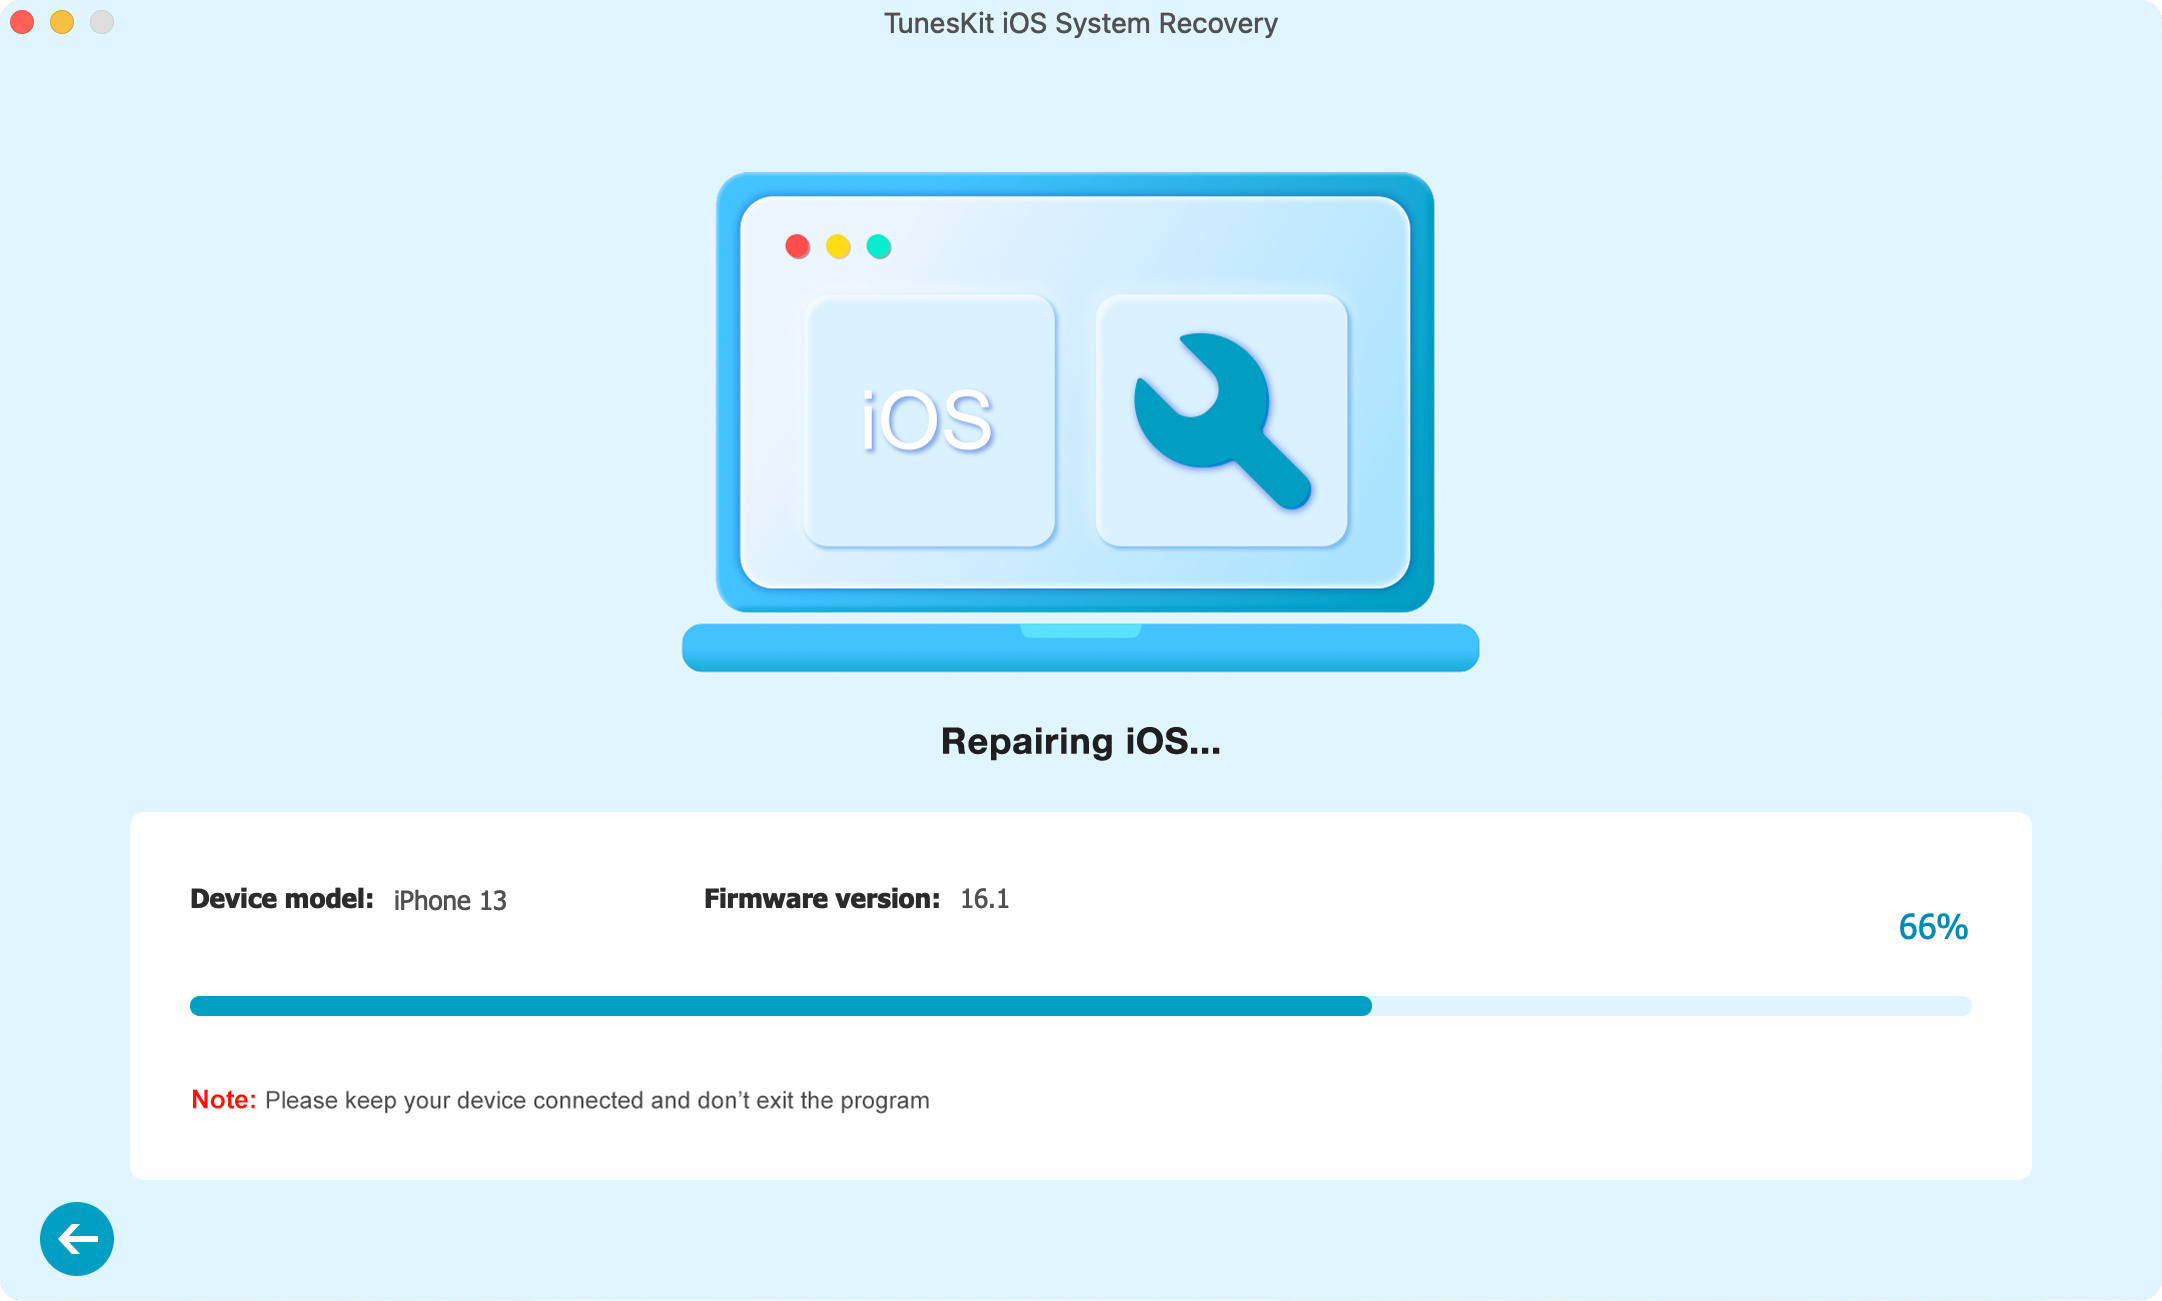
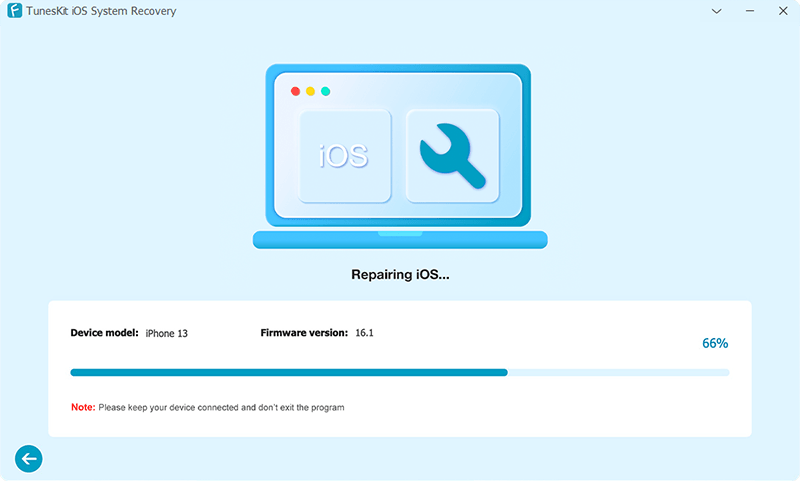
Step 3: After the message that reads the firmware package has been downloaded successfully is presented on the screen, press the "Repair" button on the right corner to fix the iOS system.

Conclusion

If you don't favor all the solutions mentioned above, then the final try is going to the Apple store for professional help. But if you don't have a warranty, it may cost you many bucks. In this way, it's better for you to employ the cheaper iOS system repair software.

Oct 12, 2020

How to Cut Out Unwanted Parts of a Video? Check Here!

how to cut video

If you have a raw video by recording, it is unwise to upload it to some social media sharing platforms like Instagram or YouTube. What you need to do after recording, is to trim the video shorter because a long, boring and dull video may attract fewer users to watch. If you want to keep the attention of your audience, you need to make your video funny and interesting. 

The easier way is to trim off the unwanted parts of a video, which is the basis for video editing. What do the unwanted video parts mean? For example, the video may include some error scenes, meaningless footages, and also the unnecessary parts. Now you don't need to worry about those conditions. In today's content, we will talk about how to get rid of unwanted video parts. The tool you will need is TunesKit Video Cutter, an easy-to-use and intuitive video cutter for beginners.

TunesKit Video Cutter supports you to trim any parts of one video file in a lossless way. And if necessary, you can trim multiple sections of the same video and then merge them together. TunesKit promises you a fast speed to trim video or audio files, up to 60X faster speed. And it supports a great number of video and audio formats. Apart from cutting, you can edit, convert, extract media files as you want.

Key Features of TunesKit Video Cutter

  • Cut out video and audio into parts with zero quality loss
  • Save the videos with 100% original quality
  • Edit the video according to your needs
  • Combine video clips from the same source
  • Export the trimmed videos at 60X faster  speed

Step 1 Import Video into TunesKit Video Cutter

tuneskit audio cutter

First of all, you should come to the official website to download and install TunesKit Video Cutter in the Windows version or Mac version. After that, launch TunesKit on your computer. Then you can click the "Open" button on the left to load a video. From the pop-up window, select the video you want to import. Of course, you can also open the file folder parallel to the cutter, and then drag and drop the video file to the cutter. Note that TunesKit supports one video each time.

Step 2 Set Time Segments

set

Once the video finishes loading, it will begin to play automatically. Now, you can move the yellow slide bar to set the time segment. In this way, you can select the clip you want to keep and leave out those unwanted parts. If necessary, after that, you can press on the "+" icon under the "Open" button to create new segments from the source video and trim multiple parts as you want.

Step 3 Cut Out Unwanted Video Parts

edit

After trimming unnecessary video parts from these clips in step 2, you can edit your videos if you like. Just click the "edit" icon on the right of every column of the segments to open TunesKit's built-in video editor. Here you can also use the slide bar to pick the part you want to keep and click the "scissor" icon to cut out those unwanted parts in a more accurate way. Apart from that, you can rotate, crop videos, add background music, subtitles, and watermark, apply video and audio effects.

Step 4 Set Output Format

edit audio

In this step, you simply click the "Format" button to open its format selection. There are many options and you can choose the output format or device as you want, like HD MP4, MKV, MOV, 4K, WMV, DivX, MP3, OGG, WMA, some compatible devices, and more. You can use the output video and audio format, which is different from the source. What's more, TunesKit supports you to customize the media parameters like codec, size, bit rate, etc.

Step 5 Merge and Export Video Clips

set output format

Before exporting the media file, you can merge all the video clips into one by checking the box of "Merge Segments". Then it is time to click the "Start" button on the right corner on the interface of TunesKit Video Cutter. Then your split video or audio can be exported at 60X faster speed.

The Bottom Line

Do you think that TunesKit Video Cutter is really user-friendly? I use it for the first time without any experience, but I can trim videos without hassle. This software is suitable for beginners like me. Hope you like this sharing! 


You may also like:

[Review] Top 4 M4A Cutters 

6 Best Free Video Cutter No Watermark

Oct 10, 2020

The Best WMV Trimmer to Cut A WMV File

cut wmv video

WMV is a video format, which is usually used in Windows Media Player. As its name shows, it is a short form of Windows Media Video. I guess many Windows users know that WMV is one of the most popular formats to save video in Windows. For example, if you need to download a video from the Internet or a video your friends shared with you via USB or email, you will find that the video format is usually WMV. Some people may be confused about WMV and WMA. Actually, the latter is the Windows Media Audio format.

Since WMV is a common video format, cutting WMV files is also a great demand. There are a number of video cutters on the Internet. You can spend time selecting a suitable one. In that case, I think you may be mad at so many options but you cannot decide which one to use. But if you continue to read, you will get one tool to cut WMV without re-encoding - TunesKit Video Cutter. Let's check how this software to cut WMV video losslessly.


Key Features of TunesKit Video Cutter

  • Trim WMV videos into segments in a precise way
  • Convert the trimmed WMV videos to any formats
  • Save the split WMV files with 100% original quality
  • Edit the WMV videos with special effects, watermark, and subtitles
  • Merge WMV video clips from the same source file
 

Step 1. Add WMV Video to TunesKit Video Cutter

tuneskit audio cutter

To begin with, download, install and launch TunesKit Video Cutter. On the left corner of the main interface, hit the "Open" button to select the WMV files to import through a pop-up window. Or try a faster way to add file: directly drag and drop the WMV file to the screen.

Step 2. Set Trimming Duration

set

After loading the WMV video into the cutter, set the duration of the segment you want to cut. You have 3 ways to do that. First, move the yellow sliders to set the approximate duration. Second, adjust the start time and end time through the two bracket shape buttons. And the last but not least, you can input the start time and end time manually to cut WMV more precisely. If you want to cut other parts of this WMV video, press on the "+" icon to create new segments.

Step 3. Edit the Video with Multiple Features

edit

TunesKit Video Cutter supports you to edit the video clips before cutting. You just need to hit the "Edit" icon of each segment, and the inbuilt video editor interface will pop up. With various editing tools, you can trim, adjust, add watermarks, subtitles, etc.

Step 4. Set Output Format

edit audio

After that, return to the main interface. Click the "Format" button to select the output format or device. To cut WMV without re-encoding, you should choose the "High-Speed Mode". Or you can also customize the media parameters like codec, size, bit rate, etc. 

Step 5. Start Cut the WMV Losslessly 

set output format

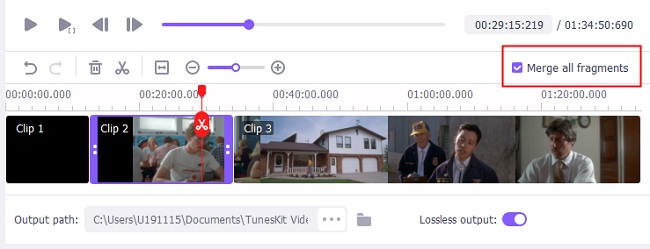
Press on the "Start" button to trim WMV at 60X faster speed. If you've trimmed off multiple segments from the source video, you can check the option of "Merge Segments" before starting the cutting process. In this way, you can merge all the parts into one file.
Conclusion

If you have read here, I guess you have gained the detailed information of TunesKit Video Cutter. Are you interested in this lossless video cutter? I have used TunesKit for a long time. It can not only satisfy my needs to trim videos without degrading any quality loss, but also provides a wide range of video editing tools to make my videos better. 

Or if you have any other lossless WMV trimmers to recommend, welcome leave your comment!


You may also like:

[Review] Top 4 M4A Cutters 

6 Best Free Video Cutter No Watermark

Oct 9, 2020

Best Guides to Fix Instagram Not Working/Crashing on iPhone

People all love Instagram to share their pictures and photos, but sometimes this welcomed application stops working or becomes crashing. At this time, how to fix this issue? First, let me tell you why does your Instagram on the iPhone keeps crashing?

As far as I first encounter this problem, I was wondering why does my iPhone Instagram app keeps down or crashing? And the reasons are nothing but these points, which range from the app itself to the iOS system including insufficient storage, software bugs, iOS system glitches, and more. In the following passage, 8 fixes are offered to work out the problem of Instagram not working on iPhone.

1. Re-connect Wi-Fi

Based on my experience, the top priority when Instagram on iPhone stays crashing is to check out whether the internet connection performs slow or limited. You can simply disconnect the Wi-Fi to turn off and switching it on to connect again after waiting a few seconds, finally see if the problem is solved.

2. Log in account again

I also attempted a simple way, that is logging out my Instagram account on my iPhone 11 and logging in again. The step-by-step instructions are as presented below.

Step 1: Launch the Instagram app on iPhone.

Step 2: Click on the Profile icon.

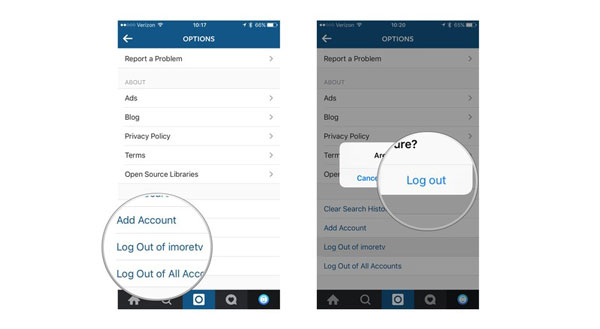
Step 3: In the Gear or the three dots button, hit the Log Out option.

Step 4: Open the app and log in the account.

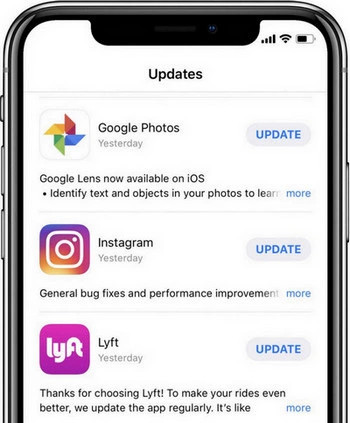
3. Update Instagram

Usually, the main culprit of the Instagram on your iPhone XR not loading can be attributed to the outdated version of the app. At this time, you need to update it to the latest.

Step 1: Go to the App store on the iPhone's Home screen.

Step 2: Click the Update button at the bottom right.

Step 3: Update the Instagram among the apps shown on the interface.

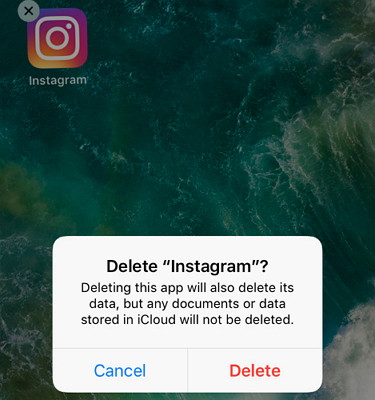
4. Reinstall the app

The process of deleting the Instagram on iPhone and reinstalling it can help to clear the temporary caches that may cause this issue. Follow the procedures here to complete it.

Step 1: Long press the Instagram on iPhone until the "X" signal appears.

Step 2: tap on the cross to remove the app.

Step 3: Navigate to App store and get the app again.

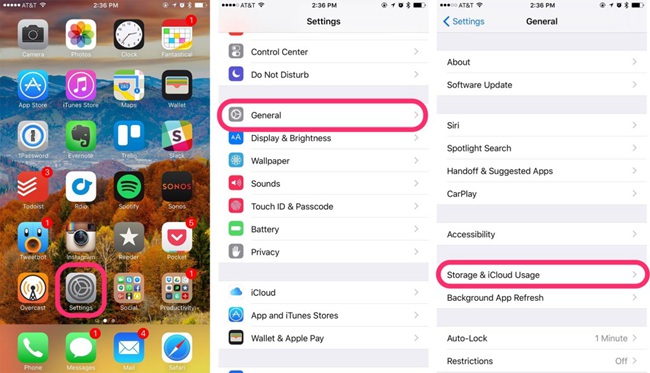
5. Free up storage

Besides removing the data on the Instagram app to spare storage, you can also free up the space on your iPhone XR. To do the deeper clearing, head to Settings > General > Storage on the device, then delete the unwanted files.

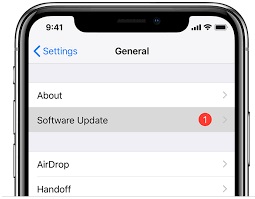
6. iPhone software update

If the Instagram on iPhone keeping crashing still persist, then it is advised that you should update the iOS to the latest. This method can improve the device's performance and remove glitches such as app compatibility issue. You can do according to the below steps.

Step 1: Hit on the General option on the Settings of iPhone.

Step 2: Press the Check for update button.

Step 3: Tap the Download and Install button.

7. Restart iPhone

After finishing the iPhone's software update, you could restart your iPhone XR to troubleshoot the problem of Instagram not working or crashing. To do that, you just have to hold the Power button for a while and when the slider pops up, drag on the slide to the right to turn off your iPhone. Finally see whether there is any sign of anomality Instagram after the device reboots.

8. Use iOS system repair programs

Actually, after I tried one or two solutions above, which don't work evidently, I directly turn to the professional iOS system recovery applications. Because people online think that the iOS repair tools can deal with Instagram staying crashing on iPhone with 100% working and results show that these people hold the correct viewpoint. I used the program called TunesKit iOS System Recovery that they recommend and I consider what differentiate this software with other similar products is that it can fix more than 50 types of iOS and tvOS system issues, for example,the overheating iPhone, without any data loss. Moreover, with the help of TunesKit iOS System Repair, managing the iOS system is really preferrable.

Here are the specific tutorials to employ TunesKit iOS System Repair to fix the crashing Instagram on iPhone.

Step 1: Open the software on the computer and hook up your iPhone with the PC. After the device is connected and detected, press the "Start" button. Then choose the Standard Mode and click on the "Next" button. Later, tap the "Enter Recovery Mode" option in the app’s main screen to let your device into the recovery mode.


Step 2: At this step, the program will begin to download and verify the firmware package corresponding with your device. Before that, you had better to check the device info for sure. If everything is correct, simply click the Download button.


Step 3: On successfully downloading the firmware package, press the "Repair" button to fix your iOS system. Remind not to disconnect your iPhone during the process in case other unexpected problems happen.

Verdict

Hope this how-to article is helpful for you. Finally, if your Instagram keeps crashing or not working on the iPhone, try out the above ways and you will be surprised.