Oct 30, 2020

Lossless AVI Cutter: How to Cut an AVI Video

cut avi video

Audio Video Interleave, also named AVI, is a video format developed by Microsoft in 1992. Although this format had been created for a long time. and it is still used by many people today. The AVI format is compatible with a great variety of media players, including WMP (Windows Media Player), Apple QuickTime Player, VLC Player, Google Drive, and so on.

To cut AVI Video with no quality loss, the highly recommended  AVI cutter is TunesKit Video Cutter. This software is professional to trim AVI video in a simple and fast way. You can remove unwanted sections from videos but won't cause any quality loss. And TunesKit integrates a video editor, with which you can rotate and crop videos, add background music, subtitles and watermark, apply video and audio effects, tec. Also, apart from an AVI video trimmer and editor, TunesKit also supports you to extract audio from AVI videos. Now follow me to get the tutorial below to cut AVI file losslessly on Mac/Windows with TunesKit Video Cutter.


Key Features of TunesKit Video Cutter

  • Cut AVI video files into parts or clips precisely
  • Save AVI videos with 100% quality preserved
  • Edit the video with special effects, watermark, and subtitles
  • Merge AVI video clips from the same source

Step 1 Add AVI Video File to Tuneskit

tuneskit audio cutter

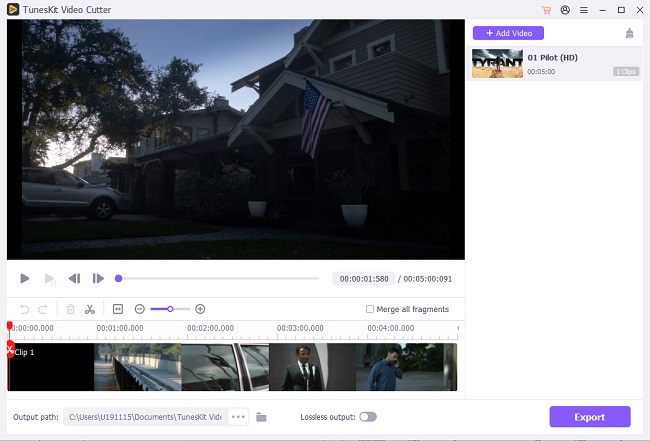
Download, install and Launch TunesKit Video Cutter in Windows or Mac version on your computer. Then click the "Open" button to select the AVI video to import. Or try another easier way: directly drag and drop the target AVI video file to the main window. For your information, you can only import one file each time.

Step 2 Select Segments to be Trimmed
set

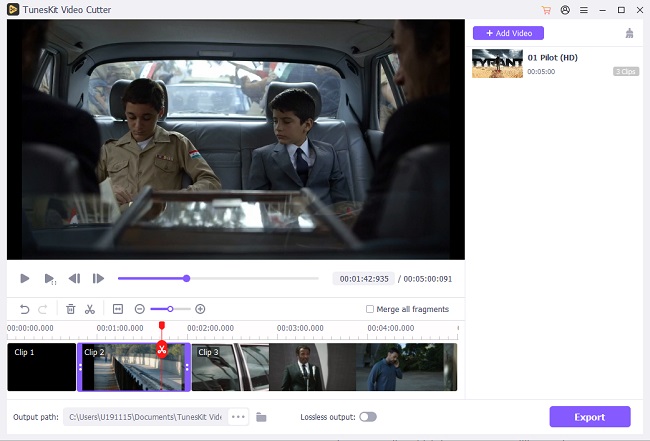
Once the AVI video imported, you can preview it with its built-in player. Now you can set the duration to be cut from the source video by moving the yellow sliders or entering the start and end time manually. If you want to trim multiple segments from the same source video, you just need to click the "+" button to create new segments for cutting.

Step 3 Edit AVI Video with Additional Effects
edit

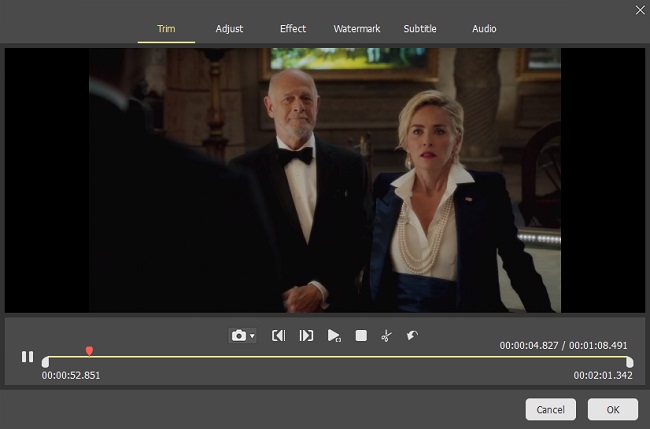
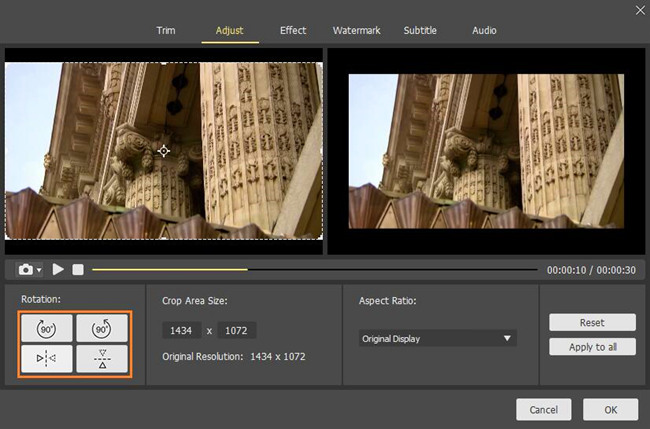
If necessary, you can use its video editor to edit the segments with more effects. For instance, you can trim, rotate, crop, add watermarks and subtitles, etc. To access the embedded video editor, simply click the "Edit" icon of each segment on the main interface.

Step 4 Choose Output Format
edit audio

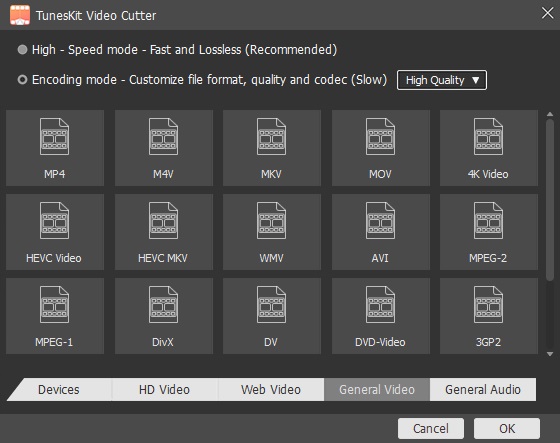
In this step, click the "Format" button to select the output format. If you want to achieve lossless cutting, try High-Speed mode. If you want to edit videos and convert AVI to various formats, such as HD MP4, MKV, MOV, 4K, WMV, DivX, MP3, OGG, WMA, etc, Encoding mode is your best choice. The latter also allows you to customize the media parameters like video codec, size, bit rate, sample rate if you like.

Step 5 Start Cutting AVI into Clips Losslessly
set output format

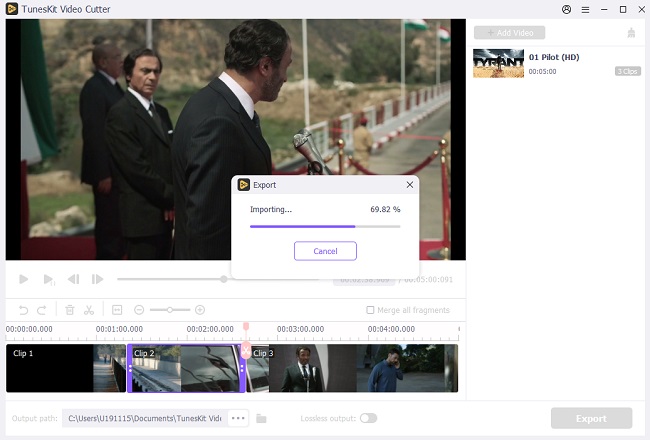
Now click the "Start" button to begin trimming the AVI videos into small pieces. If you choose High-Speed mode, The cutting process will accomplish at 60X faster speed. Once done, your destination folder of cutting will pop up automatically. If you want to join multiple video clips into one, check up the box of "Merge Segments" before trimming.

Suggestion & Conclusion


I think a lossless video cutter is important for me, so I choose TunesKit Video Cutter from multiple Google results. In my opinion, the video quality can influence my watching experience. If trimming my video can cause quality loss, I won't do that. Luckily, I get a lossless video trimmer - TunesKit Video Cutter, which is my favorite.

This program has an intuitive UI. And you only need to take easy-to-use steps to trim AVI files, which is friendly to beginners. At the same time, TunesKit is also powerful and multifunctional. It has all the features to cut, join, edit, extract and convert a media file. So no more waiting and try it right away!


You may also like:

[Review] Top 4 M4A Cutters 

6 Best Free Video Cutter No Watermark


The Best Way to Recover Music from iPod Touch

 To be honest, losing music files and songs on the iPod touch can get people frustrated and irritated especially when they are unique to you. But don't worry, keep reading and you will get the best way to retrieve them.

Part 1: Common causes of iPod touch music being lost

Diverse kinds of reasons could result in the music lost or deletion from iPod touch, and the followings are some common scenarios.

1. Insufficient capacity in iPod touch.

2. Battery reset or removal.

3. Unknown iPod touch volume format.

4. iPod touch being frozen.

5. The device is brought to factory settings.

6. Mistaken deletion during using iTunes and so on.

Part 2. Is it possible to restore deleted music from iPod touch?

Q: "All of the music files on my iPod touch were gone suddenly, I want to know if I can get them back and if there is a way to do that."

A: Of course, you can restore the lost songs from iPod touch. It may first occur to you that you can't enjoy the old songs anymore when this problem happened. But don't worry, it is highly possible to retrieve them from iPod touch and you must make your device has enough free space.

Part 3: The free and best music recovery software you'll need

To bring lost and deleted music files or songs from iPod touch, you are strongly recommended to use professional iPhone data recovery tools such as TunesKit iPhone Data Recovery. This application definitely can help you to recover iPod touch music no matter which model you are employing. Besides, it supports restoring various formats of music like MP3, AAC, etc. And you can check out its more spotlights below.

Key features of TunesKit iOS Data Recovery:

1. Recovering lost data like SMS with fastest speed and 100% of security.

2. Rescuing iOS files deleted due to various scenarios including mistaken deletion and virus attack.

3. Restoring diverse kinds of data like contacts, SMS, photos, etc.

4. Full compatibility to different iOS devices such as iPhone, iPad, iPod touch.

5. Supporting Recovering encrypted files.

6. With three smart recovery modes: iDevices, iTunes and iCloud backup.

7. Previewing and selecting required data before recovery.

8. Fully supports all iOS versions including the latest iOS 14.

Part 4: How to recover songs from iPod touch?

Download and install the TunesKit Music Recovery program on your computer. TunesKit is available on both Windows and Mac computers. In the following tutorial, we will show you recovering music from the iPod touch with the Mac version.

Step 1: Select the recovery mode.

Launch TunesKit iPhone Data Recovery and connect your iPod touch with the computer through a USB cable. Then choose the recovery mode as "Recover from iOS" from the program's main interface, because this mode doesn’t require you to have the music backup.


Step 2: Scan and preview data.

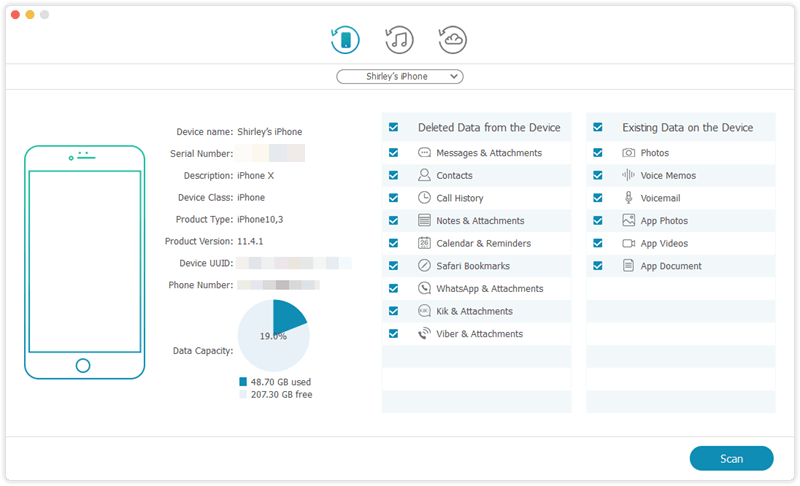
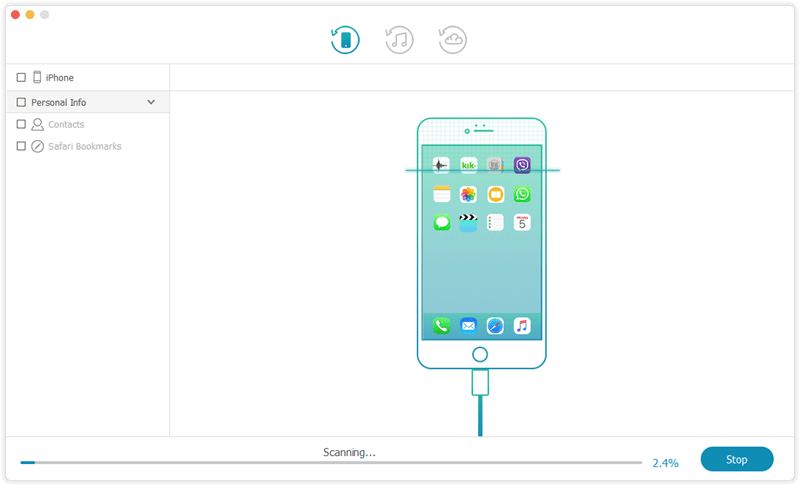
After the device and different files are shown on the screen, select the categories on the right column that need to be scanned. Then click the "Scan" button and the program will begin scanning.


Step 3: Recover and save lost data.

Then all data scanned will appear on the left. Before you click the "Recover" button, you can preview the music files you want to retrieve from the "Media & Documents" column. After that, the application will start to get your lost and delete songs on the iPod touch back.

Summary

By now, you must have recovered the music from your iPod touch based on the above simple and secure procedures. In addition, if you have backed up the music files and songs on your iPod touch, you can also retrieve them from iTunes backup mode and iCloud backup mode of this powerful tool. The relevant steps are similar to the mode of recovering from iOS device. Finally, contact us if you have any problems.

Oct 28, 2020

The Best Method to Convert DVD to AVI

 DVD is a good way to store our most-liked movies safely. But sometimes we may need to play them with other devices and have to convert them to other formats. Today, I want to talk about the best method to convert DVD to AVI.

The best DVD to AVI ripper

You just need to download a DVD ripper that can rip and convert your DVD files into the formats you want. 

TunesKit Video Converter is the best DVD ripper that aims at solving a series of converting problems for its users. It can be the most suitable software that you download on your computers.

This professional converter also has the functions of editing, converting, transferring, trimming, and ripping. What's more, the video you put in this software can be converted into more than 250 formats and be set into the formats which are compatible with more than 69 output devices.

Furthermore, it also contains the following characteristics.

1. Convert videos at 60X faster speed with no quality loss

2. Convert videos in batch

3. Merge Videos into One

4. Convert DVD to 69+ portable devices such as iPhone, iPad, Android, HD TV, Apple TV, etc.

5. Customize and adjust the codecs, resolution, frame rate, bit rate, sample rate, etc.

6. Convert both common and commercial DVDs in an easy way

Convert DVD to AVI with TunesKit Video Converter

Next, I will teach how to use TunesKit Video Converter to convert DVD to AVI steps by steps.

Step 1. Open TunesKit 

Before you add your files, you should connect your DVD with a computer by using a DVD drive. Then you can add the files by clicking the button in the red frame or directly dragging the videos in the DVD files to the interface of TunesKit one by one.

Step 2. Choose the AVI as Output Format


After the videos finish uploading, you should first click the 'Format' button in the lower-left corner. Then choose 'High- Speed mode', next click 'General Video' on the menu and find 'AVI' below.

Step 3. Convert DVD to AVI


After selecting the output format of your videos, you should press the 'Convert' button. At last, you can find all your historical converted video in the button on the top of the interface.

Summary

In this passage, we talk about how to rip DVD to AVI with TunesKit Video Converter without quality loss. Why not have a try and get the converted video easily!


For more information: https://www.tuneskit.com/video-converting-tips/convert-dvd-to-avi.html


Get Free License from TunesKit Halloween Sale 2020

TunesKit Studio has recently launched a big Halloween promotion with a free gift and up to 50% off discount for all users. It lasts for two weeks only and will end on Nov. 9th, 2020. 

Hong Kong, Oct. 28, 2020 – Halloween is around the corner. Have you prepared your candy or tricks? How would you spend this special night with your family or friends? To help you create or enhance your spooky Halloween videos, the multimedia provider TunesKit Studio has rolled out a super Halloween offer, and all its flagship video solutions are on the list for sale. 

TunesKit 2020 Halloween Sale is now available on its official website, or you can simply visit this page to get the free gift and more:


Specifically, this promotion includes 4 parts, including a 100% free giveaway for TunesKit Video Repair, up to 20% off discount for other video software, up to 50% off discount for video bundles, and 10% off coupon code for use storewide. 

Part 1. Time-limited giveaway for TunesKit Video Repair

TunesKit Video Repair is an efficient video repair tool dedicated to fixing various kinds of video or audio corruptions, such as MP4 video header corruption, video not playing on the computer, black screen, out of sync, choppy or grainy video, etc. If your well-prepared scary video is broken, you can try TunesKit Repair for Video. 

Now the software is free for users, and everyone can easily get the free license code as long as you join the campaign early, as only the first 1,000 users can win the freebie per day. Yet, if you didn't get it today, don't worry; you'll have another chance the next day. 

Part 2. Enjoy up to 20% off discount for video solutions

Besides this free candy, users can also get an up to 20% off discount for all TunesKit video programs, including TunesKit M4V Converter, TunesKit Video Cutter, TunesKit Video Converter, and TunesKit Screen Recorder. 

If you want to save Halloween moves from the iTunes store to your computer, you can try M4V Converter, a powerful iTunes M4V to MP4 converter for Windows and Mac. If you would like to convert your Halloween video format or remove unwanted clips, TunesKit Video Converter or Cutter is your best choice, because it will help you achieve the purpose without any quality. Also, TunesKit Screen Recorder is a useful and easy-to-use video recording tool for you, in case you're going to make an innovative short video for Halloween party. 

Part 3. Get more video tools and save more

In this part, TunesKit offers four video-related bundles among the aforementioned video applications, with up to 50% off discount. In other words, if you want two or more video solutions, you can get it in the form of bundle and thus save more money. All the bundled products will provide lifetime license, with lifelong free upgrades. 

Part 4. Share to get 10% off coupon code from TunesKit

Besides video solutions, TunesKit also provides other desktop audio solutions and iOS utilities such as Music Converter for Spotify, Audio Converter, iOS System Recovery, etc. To those who are not in need of video solution, TunesKit provides a 10% off discount code for all users. Once you share the campaign page to social platforms such as Facebook, Twitter, or Pinterest, you'll receive a 10% off coupon code. You can use it to buy any products you want from the TunesKit store. 

TunesKit 2020 Halloween Sale is now running and will end on November 9, 2020. Time is limited, if you like it, just grab this rare opportunity and take action now. 

Contact

Email: support@tuneskit.com
Official Website: https://www.tuneskit.com/

About TunesKit

TunesKit Studio is an innovative software provider, offering easy-to-use yet powerful multimedia and iOS utilities for Windows and Mac users. Currently, it has developed some popular software such as media converter, video cutter, screen recorder, iOS system recovery, and some other freeware. Now the company is still developing more complicated video solutions like video editor. All its programs have received numerous satisfied users from more than 150 countries worldwide.

Oct 27, 2020

Official and Effective Ways to Troubleshoot Podcast Crashing on iPhone

Do you find that the Podcast becomes crashing or merely stops working? According to the complaints from people online, such problems cover the content on the app not streaming or downloading, the app being hard to get accessed and so on. If you also meet with similar issues above, then you are suggested to go along this post to get the matter solved.


Part 1: Official fixes to Podcast crashing on iPhone

At first, let us look at the official methods, which are published by the Apple company to resolve the problem of the Podcast app crashing on the iPhone.

Solution 1: Force close the Podcast app

Starting from the simplest method, you could force quit the Podcast when the app performs unwell on your iPhone. Here are what you should do to complete the process.

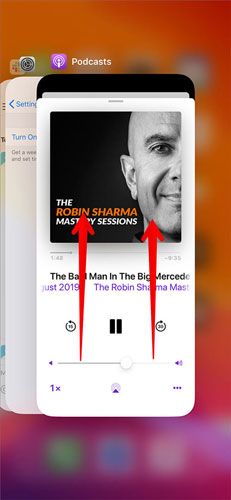
Step 1: Swipe up from the bottom of the Home screen. (for iPhone 8 and older, double click on the Home button.)

Step 2: Find the Podcast app among several programs shown in the background, then swipe it off the top screen to quit it.

Step 3: Launch the Podcast app again to see whether the issue is fixed.

Solution 2: Install the latest Podcast

If you don't update the Podcast app to the latest version, some problems like crashing and not working may happen on it. To correct it, you could follow the steps presented below to install the latest Podcast.

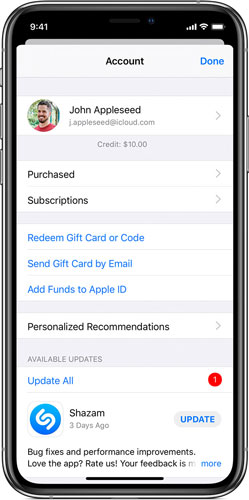
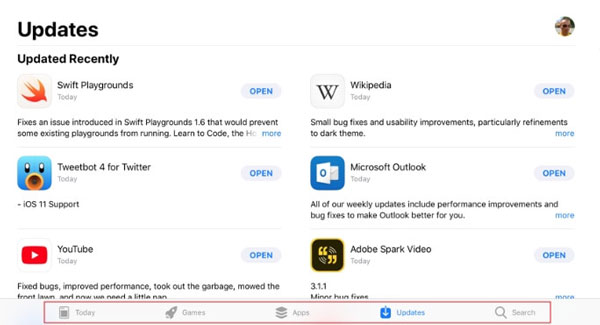
Step 1: Launch the App store and hit on the Today at the bottom column.

Step 2: Click the profile icon at the right top corner.

Step 3: Scroll down to locate the Podcast app to update.

Solution 3: Delete and reinstall the app

If it is not the matter of the latest version of Podcast, then you might be able to try deleting and install the Podcast app again. To see if it works, please finish the steps here.

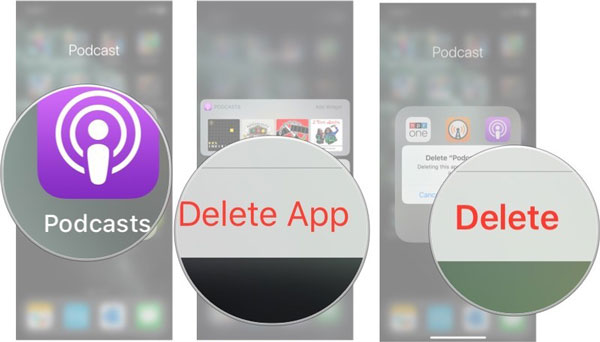
Step 1: Long press the Podcast app on the home screen.

Step 2: Tap on the Cross icon to delete it.

Step 3: Head to the App store, input the Podcast on the Search bar and download it.

Solution 4: Force restart your iPhone

Suppose that the above ways fail to do the trick, then the final official attempt to settle the Podcast app not working on iPhone is to force restart your iPhone. To reboot it, choose the following procedures matched with your iPhone model.

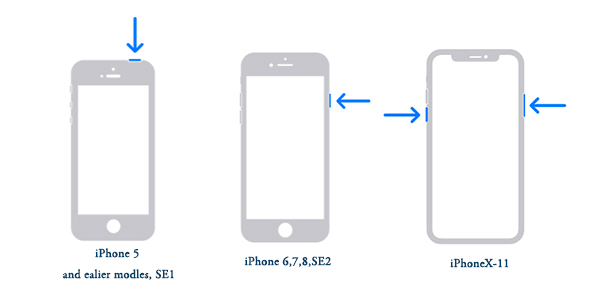
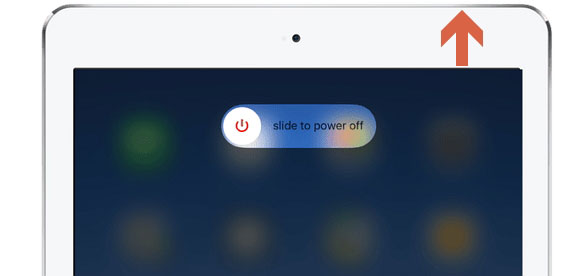
For iPhone X/11, hold down the Side and the Volume buttons at the same time until the Slider is shown, then pull on the slider to turn off the iPhone, finally press the Side button to turn your device on.

For iPhone SE (2nd) /8 /7/6, hold down the Side button until the Slider is displayed and drag on the slider to close the iPhone, finally press down the Side button to open the device.

For iPhone SE (1st) / 5 and former, press down the Top until the Slider appears, then drag on the slider to switch off the iPhone, finally switch on your device again by holding the Top button.

Part 2: The effective alternative to solve iPhone Podcast app crashing

To be honest, many iPhone customers are indifferent to these official fixes when the Podcast app goes wrong on their iPhone, because they don’t work for many times. But don't be upset, as there is still another solution to resolve your crashing Podcast on iPhone with almost 100% success rate. That is using professional third-party iOS system repair applications such as TunesKit iOS System Repair. Why? You will get the answer from the below frame.

Key functions of TunesKit iOS System Recovery

1. Fixing all iOS and tvOS system issues.
2. Supporting iPhone/iPad/iPod touch/Apple TV and all iOS versions.
3. With Standard mode and Advanced mode to fix common and complicated iOS, tvOS errors respectively.
4. Supporting downgrading iOS to the previous version and one-click to enter or exit recovery mode.

You won't be regretful to employ this software to fix the Podcast crashing on iPhone with the fastest speed and no data loss. Come and try the steps.

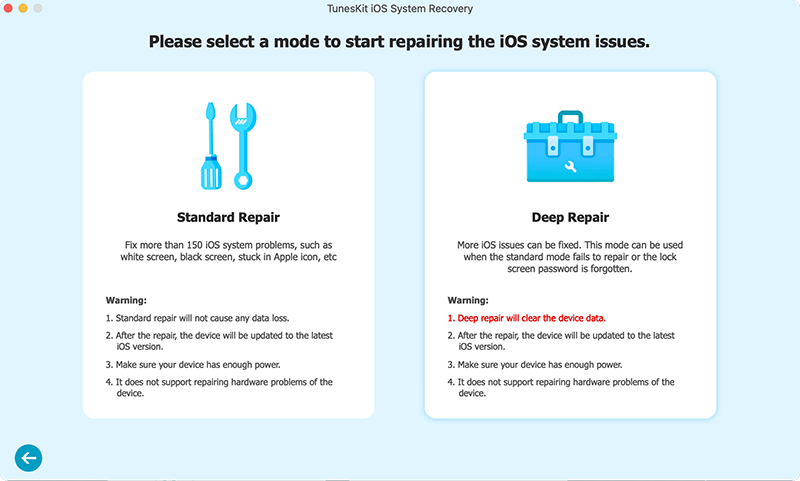
Step 1: Open TunesKit iOS System Repair for Windows and connect your iPhone with your personal computer by virtue of a USB cable. Then tap on the "Start" option and choose the "Standard mode" appears in the following screen. Finally follow the instruction to put your iPhone into DFU mode.


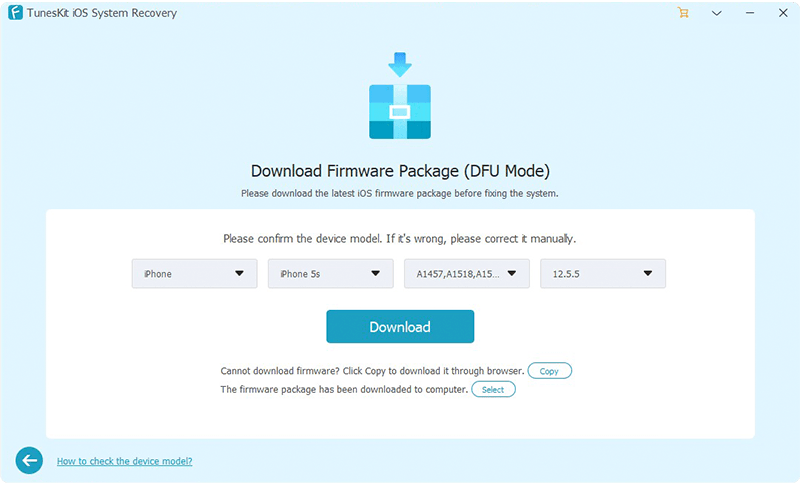
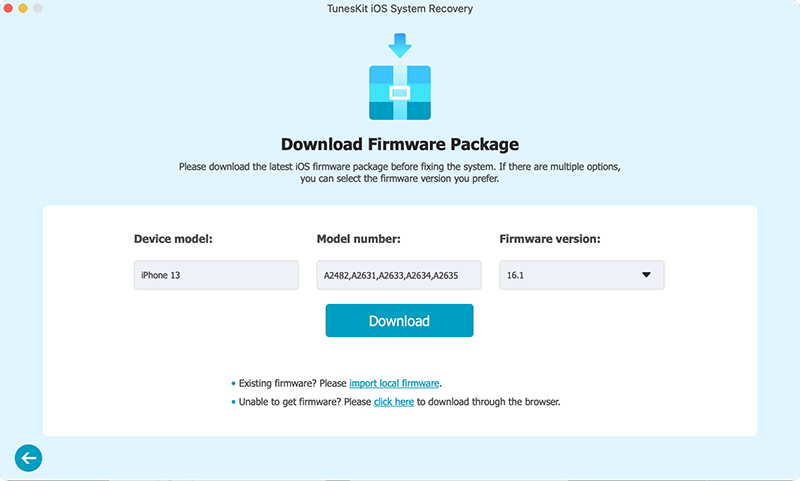
Step 2: Confirm the device model, iOS version and other related information. After checking the information is right, click "Download" button to let the program download and verify the firmware package matched with your iPhone.


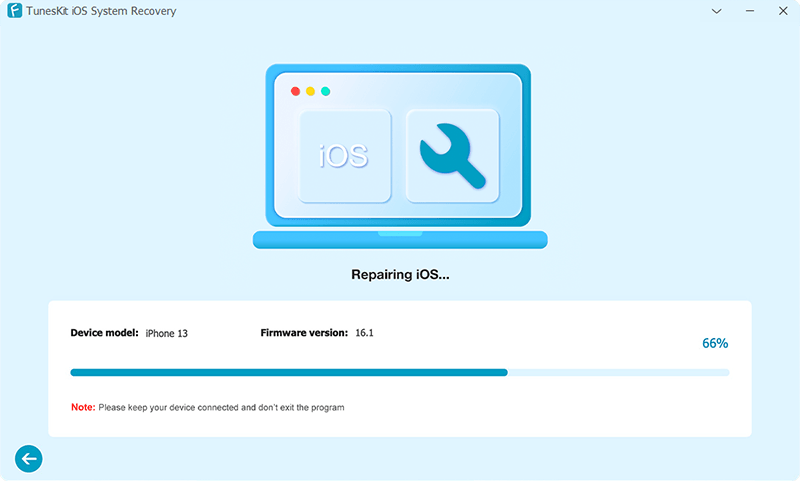
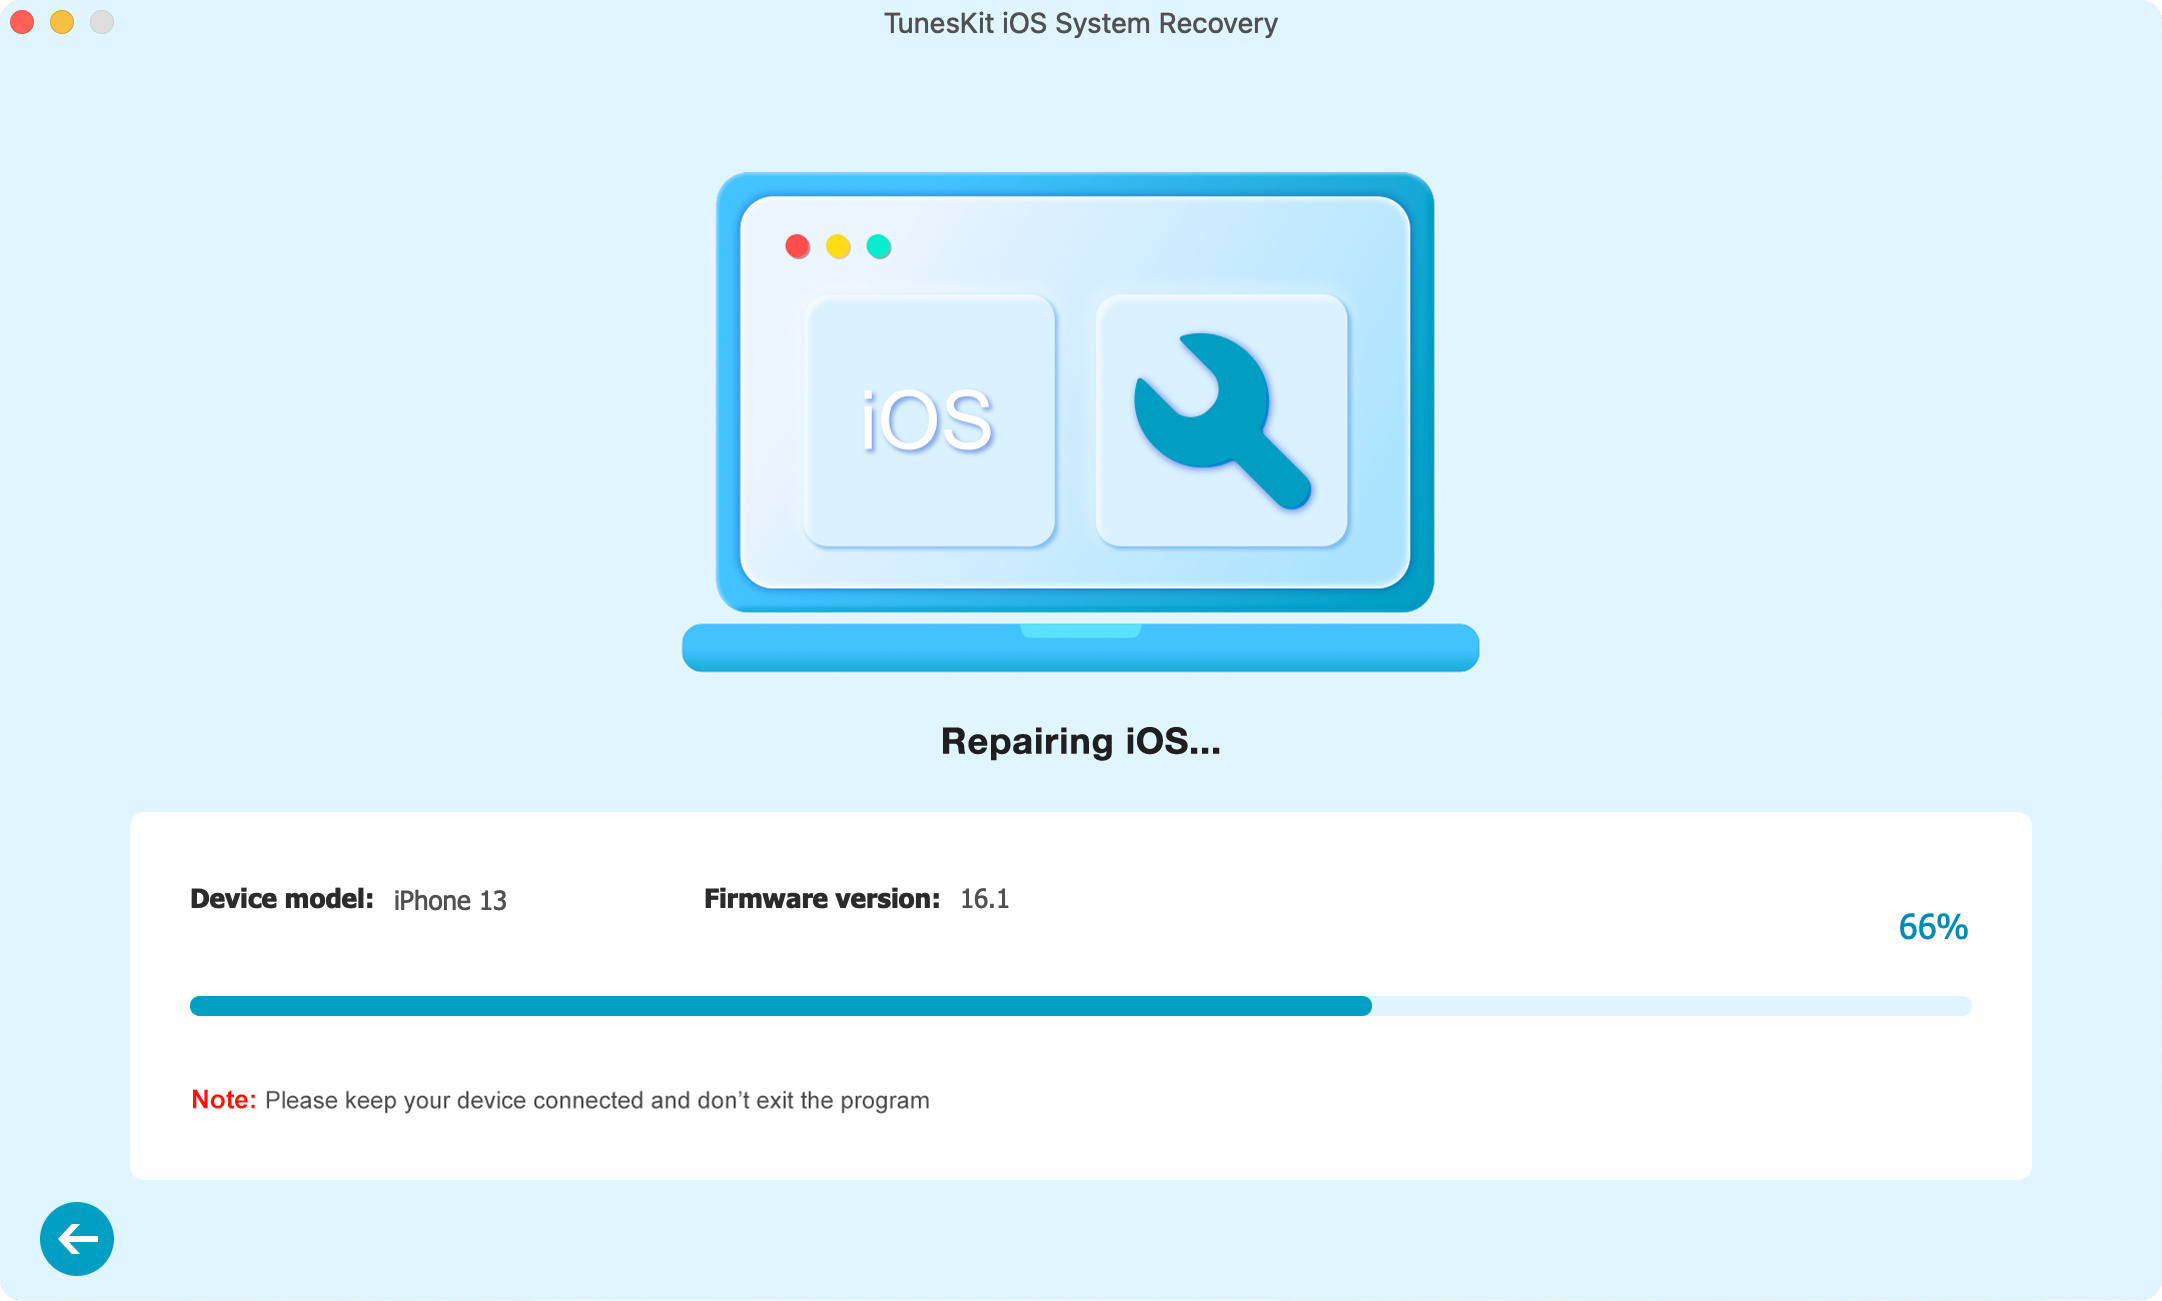
Step 3: When the firmware package download is completed, press the “Repair” button to fix the iOS system. after the process is finished, the Podcast app can work well and won’t crash later.

Part 3: Bottom line

In conclusion, don't be panic when the Podcast app not work or crashes on your iPhone. The above official 4 solutions and one absolutely workable way can provide you with help. Of course, you can directly go to the Apple center for help if you don’t mind the time and energy you waste.

List: 3 Best Movies on Amazon Prime Video

Do you love watching movies? If so, which place is your first choice, your house, or movie theatre? In the special times of coronavirus pandemic, watching movies at home is the best and the safest choice. Which movie is on your list? Still, have no better choice? Then you come to the right places. Here in this article, we recommend 3 best movies on Amazon Prime Video.


1. La famille Bélier

Directors: Eric Lartigau

Starring: Karin Viard, François Damiens, Eric Elmosnino

La famille Bélier is a France movie, which is one of the best family movies on Amazon Prime Video. This story is about the Bailey family. Farmers Bailey and their sons are all hearing impaired, so they only can rely on their daughter Paula to act as a sign language interpreter for daily work and life. 

Paula is studying in high school. Her music teacher, Mr. Thomasso discovered her talent and encouraged her to participate in a singing competition on French radio. Paula, who yearns to go to Paris to continue her music journey. But in that case, she will be separated from her family. This coming-of-age ceremony, which must be passed through in life, has a more special meaning for the Bailey family.


2. The Big Sick

Directors: Michael Showalter

Starring: Kumail Nanjiani, Zoe Kazan, Holly Hunter

The Big Sick is based on a real-life case. This movie is the story of Pakistan-born comedian Kumail Nanjiani and grad student Emily Gordon. They fall in love. But Kumail’s parents only want their son to marry a Pakistani girl, so the two sides collided. On the other hand, his career is at a very difficult time. The family wants him to do a "serious" business, and his beloved talk show field is struggling to make a name. The leak in the house happened to rain overnight when his American girlfriend Emily suddenly contracts a mysterious illness. The remedy process is complicated. Emily needs a medical coma to eliminate the infection and find the root cause. Her parents came to take care of her, and Kumail spent the most difficult moments with them


3. Green Book

Directors: Peter Farrelly

Starring: Viggo Mortensen, Mahershala Ali, Linda Cardellini

Green Book is adapted from real life, which tells the story of the bodyguard Tony being hired as the world's outstanding classical pianist Tang Jia. The pianist will start a concert tour from New York and they gain a friendship across races and classes

The nightclub, where Tony works, is closed for renovations, and a job is desperately needed. A friend suggested that he go to an interview conducted by a doctor of music to find a driver. When he arrived at the luxury apartment, he found that the doctor was a black classical music pianist named Tang. The pianist needs a driver to be responsible for the pick-up and drop-off work when he holds his southern tour. Of course, they both knew very well in their hearts that in the southern region where apartheid was severe in the 1960s. In their journey, they could easily get into trouble, but Tony needs money, and Don needs a professional driver who can take care of him. At that time, many hotels and restaurants are only for whites. So they need a "Green Book" guide, which listed places where local blacks can eat and sleep.


More to Talk:

Which movie on the list above you like most? The family movie? These classic movies deserve to watch again. Then when you watch the movie twice, are you mad at the heading and ending, which may waste some time? In that case, the best way is to remove unwanted parts of movies. Here I recommend you to use TunesKit Video Cutter.

TunesKit Video Cutter can trim movies without causing quality loss. And it also has some additional functions. For instance, you can edit movies, extract audios from movies, like background music or classic dialogues, convert movies to another format to be played on other platforms, like Apple TV, etc.


You may also like:

[Review] Top 4 M4A Cutters 

6 Best Free Video Cutter No Watermark
Oct 26, 2020

Trim Videos on Windows 10? Top 2 Solutions!

 If you are a Windows user, I guess you use the latest system version - Windows 10. Then have you ever installed any video editors on your computer? Do you need some basic video editing, like cutting, before uploading your videos to social platforms? In that case, you may not need some comprehensive video editors like Adobe Premiere Pro. To trim off unnecessary footage from the video clips, what you need to look for is just a dedicated video cutter. Luckily, there are many tools on the market to cut videos fast and efficiently.

Most Windows users know that Microsoft has a built-in program called Photos, which is a  free video cutting tool to trim the videos directly. Or you can use third-party video cutters to cut video on Windows 10 if you like. The following parts will include how to cut videos on Win 10 either with Photos or 3rd-party Win 10 video trimmer.

Part 1. Trim Videos with Windows 10 Photos

If you wonder to cut the video files on Windows 10 but don't want to install any extra software on your PC, Photos may be the perfect solution for you. But this software cannot promise 100% original quality. And if you are in search of a more professional and stable video cutting tool with additional editing, you are suggested to try the other way instead.

Step 1 Open video file with Photos

open video

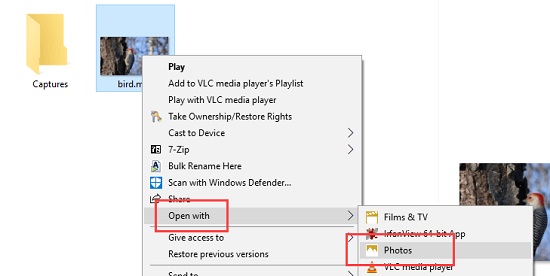
To begin with, locate the video file you wish to cut. Then you should right-click the specific file and choose Open With > Photos option. Of course, you can also run the Photos app firstly and then load the video into the program.

Step 2 Set cutting section

trim videos on win 10

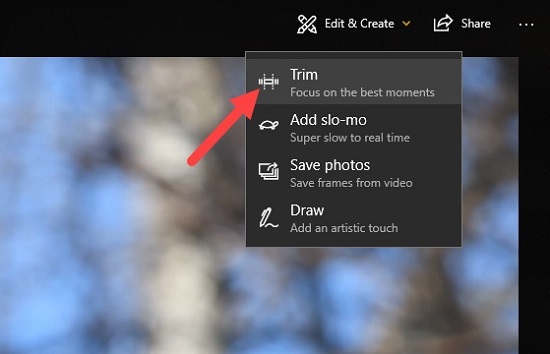
After loading the video in Photos, press on the video to see a menu bar. Hit Edit & Create > Trim. Now three circles appear on a slider. Next, move the smaller two (starting and ending sliders) to setthe video segment you want to trim. Simultaneously, adjust the larger circle around to confirm that you have correctly trimmed where you want without missing out anything. After that, press on the Play icon and preview how the trimmed video.

Step 3 Cut the video

save video copy

In this step, hit the Save a Copy icon at the top menu. Then Photos will automatically to create a copy of the trimmed video for you.

Step 4 Define the name of the trimmed clip

After trimming the video, return to the same folder of the original video, and you will find the finised video cuts with "Trim" in its file name. You can then rename the file according to your needs.

Part 2. Cut Videos on Windows 10 with 3rd-party Video Cutter

As mentioned above, Windows 10 Photos only supports to trim videos and may cause quality loss. If you need a lossless and multifunctional video cutter and editor, TunesKit Video Cutter for Windows is highly recommended. This program is the best alternative to Photos to cut all your videos (and audios) on Windows 10.

This fully functioning software not only supports to trim any video file into small segments losslessly but also allows you to edit the video clip with customized effects, such as cropping, rotating, adding background music and more. What's more, if necessary, you can cut and merge multiple parts from the same source of video/audio and save the video cuts to any other popular formats, including HD MP4, WMV, FLV, MOV, AVI, etc. as well as portable devices like Apple iPhone, Android, Windows Phone, game consoles, smart TVs, etc.

tuneskit video cutter for windows

  • Trim off videos and audios on Windows 10 without quality loss
  • Convert the media segments to other formats
  • Merge multiple parts trimmed from the same source video
  • Edit and customize the video flexibly with various effects
  • Export the media file at 60X faster speed

Now it is time to follow the tutorial here to learn how to use TunesKit Video Cutter to trim the videos on Windows 10 in a lossless and fast way.

Step 1 Add video to TunesKit

add video

To begin with, launch TunesKit Video Cutter on Windows 10. To add the video file, you can click the "Open" button or use the drag-and-drop option.

Step 2 Set trimming duration

set duration

Once loaded the video into the program, you can personalize the duration of the segment you want to cut from the video. To do that, you can move the yellow slider bar or adjust the start and end times manually. If necessary, you can cut multiple sections from a single video by clicking the "+" icon to create a new segment for you to trim.

Step 3 Edit the video as you want

edit video

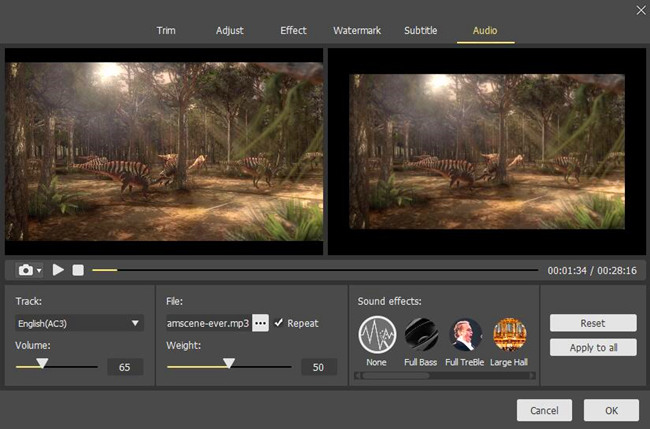
TunesKit is powerful to support you to edit the video clip before cutting. Press on the "Edit" button on the end of each segment to the video editor interface. Here you can trim, adjust, add watermark, subtitles, etc.

Step 4 Choose output format

set output format

Now return to the main interface, click the "Format" button to select the output format or device. If you are professional enough, you can also customize the parameters like codec, size, bit rate, etc. if you want.

Step 5 Start to cut the video losslessly on Win 10

cut video on win 10

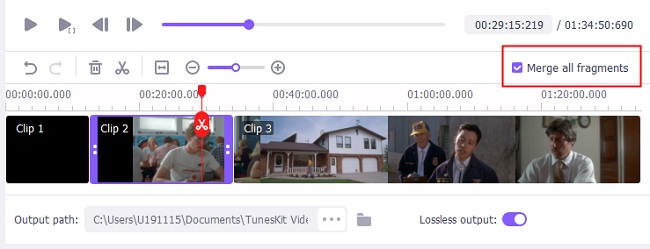
Now hit the "Start" button to cut out the video file on Windows 10 at up to 60X faster speed. If you've trim off multiple segments from the source video, you can choose to merge all the parts into one by ticking the box of "Merge Segments" before starting the cutting process.

Suggestion & Conclusion 

Now, have you known how to trim videos on Windows 10? Which tool will you select? In my opinion, Photos is convenient without downloading software. If you just want to trim videos without editing and don't care about the videos' quality, Photos is highly recommended. But if you want to remove unwanted parts of videos without degrading any quality and still need some additional functions to modify your videos, TunesKit Video Cutter is absolutely your best choice.


Oct 23, 2020

How to Fix iPad Can't Connect to App Store

Does your iPad have trouble connecting to the App store? Don't worry, it is a common issue among iOS devices and fortunately, there are several ways that can be used to deal with it. Go along this post and get more related information.

In this case, why does iPad be unable to connect to the App store? The reasons behind it could be the software or hardware glitches. Yet mostly, this issue is caused by your iPad disconnected with the network connection. And there are also other explanations, to name a few, the App store server failure and wrong settings.
So, how to fix this annoying issue of your iPad can't connect to App store? Due to the various causes that result in the matter, there is no single workaround to work out it. You can try out the following 8 fixes one by one.
Fix 1: Force close the App Store

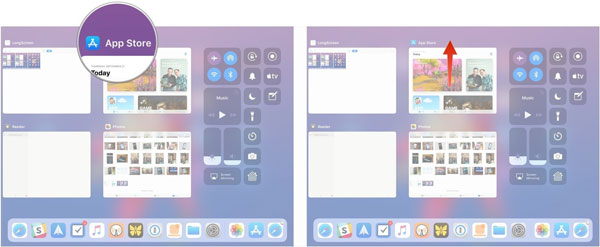
Usually, when something goes wrong, the first thing comes to our mind is to force quit it. Similarly, you can force close the App Store app to solve your iPad saying cannot connect to App store.

Step 1: Double press the Home button of your iPad.

Step 2: Find the App Store among a list of programs running in the background.

Step 3: Swipe up it off the top screen.

Fix 2: Check whether the App store is down

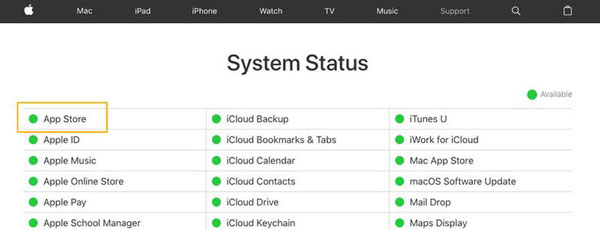
The Apple's servers being down is sometimes the main culprit of your iPad App store not loading problem. To answer it, you have to make sure that App store server performs fine. This is easily operated merely through going to and visiting the Apple system status official page. If the dot next to the App Store shows green, then the App store issue on your iPad may be attributed to other conditions.

Fix 3: Clear App store cache

Besides, it is necessary for you to clear the caches on the App Store to ensure its long and good performance. Otherwise, accumulated files may corrupt it. To prevent it, head to the App Store, swiftly press on any tabs at the bottom of the app for 10 times, then the App Store caches will be freed up.

Fix 4: Check network connection

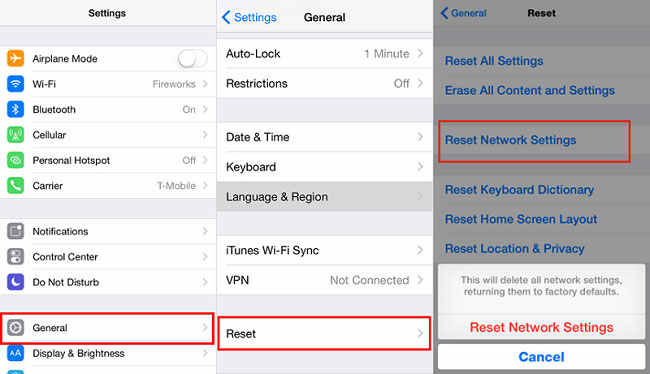
No network connectivity or unstable network connection will undoubtedly stop you from accessing the App Store. Thus, you need to check if the Wi-Fi connection is strong or the cellular data is filed. Or you can directly reset the network connection to fix this issue.

Step 1: Open Settings of your iPad.

Step 2: Then navigate to General >> Reset.

Step 3: Finally click on the Reset Network Settings button.

Fix 5: Re-sign in Apple ID

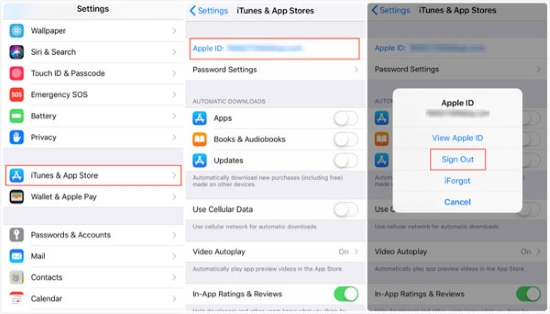
To deal with your iPad can't connect to the App store, trying logging out and logging in your Apple ID may work sometimes. The steps are as presented here.

Step 1: Choose the iTunes & App Store on the Settings of iPad.

Step 2: Hit on your Apple ID and log out.

Step 3: Enter your account and password to sign in it again.

Fix 6: Set Date & Time

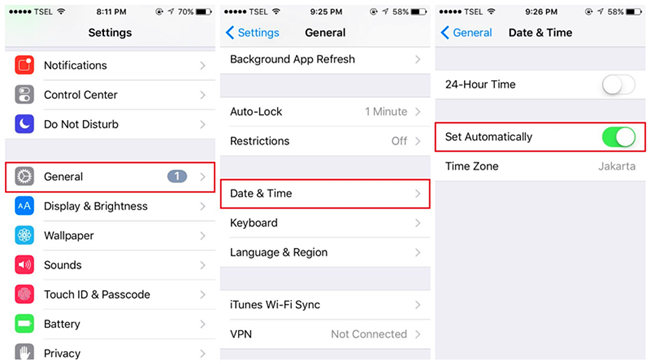
At times, wrong date and time settings can make your iPad unable to connect the App store, because the App store availability and features are different from countries and regions. You could correct it by follow the steps below.

Step 1: Launch Settings of iPad and click the General option.

Step 2: Tap the Date and Time button.

Step 3: Enable the Set Automatically switch.

Fix 7: Force restart iPad

If the above fixes fail, then this trouble could result from software or MacOS system bugs. In this way, you are supposed to fix the system by force restarting your Pad to remove errors, or you can just skip this and try out the next workaround. But whatever, let's force reboot the device first.

#iPad with Home button# hold the Home and Power buttons down in the meantime until the Apple logo appears on the interface.

#other iPad versions# quickly press and release volume up and down buttons respectively, then hold the top button until the Apple logo appears on the screen.

Fix 8: Use professional tools to fix iOS system

If you feel troublesome about trying the methods one by one, then you could immediately employ third-party iOS system repair software such asTunesKit iOS System Recovery. No matter which reason give rise to your iPad can't connect to the App store, this way can fix it quickly and efficiently. Why? TunesKit iOS System Repair, without data loss, can resolve all iOS system issues, for instance,iPhone errors, etc. with highest success rate and fastest speed.

Other Spotlights of TunesKit iOS System Recovery

1. Supports other devices like iPhone and iPod touch.
2. With Standard Mode and Advanced Mode in hand.
3. Compatible with all iOS versions including the iOS 14.
4. Supports tvOS and can fix many Apple TV issues.
5. Simple-to-operate procedures with friendly interface.

Step 1: Download and launch TunesKit iOS System Recovery for Mac. Then you need to connect your iPad with the computer. After successfully detecting the device, press the "Start" button. Next, choose the "Standard Mode". After that, tap on the "Next" button.


Step 2: See if your device info including the model version, iOS version, etc.is right, fix it if there's anything wrong. If all information is correct, hit the "Download" button and the firmware package matched with your iPad will be downloaded and verified.


Step 3: After the firmware package has been downloaded and verified completely, you just have to press the "Repair" button and the program will automatically start to fix your iPad. When the system fixing is finished, your iPad can connect to the App store.

Final words

If you are troubled by the problem of iPad failed to connect to the App store, try the above effective methods as soon as possible. I am sure you will be relieved after that.

How to Cut MOV Files Fastly and Easily in 2020


cut mov video

We may be familiar with MOV, which is the format Apple uses in the QuickTime Movies. Now, the MOV video format has compatibility with both Mac and Windows computers. That is to say, you can play your MOV video files in many media players, such as VLC Player, WMP, Roxio and others. But it is not so easy to find a video trimmer to cut MOV video, which supports MOV as the input format and output format. If you can find a video cutter can meet all the requirements you have, that may be better. For example, apart from cutting, maybe you want to join different parts from the same video.

Based on my experience, TunesKit Video Cutter works well to meet your needs. Except for being an MOV video cutter, TunesKit also supports many other media kinds to cut. Some of these formats are common, others are rare. In addition to supporting wide formats, it is also an all-in-one video tool. Under the help of TunesKit, you can split, combine, edit and convert the video according to your needs. Now, get the steps to cut the MOV file with TunesKit.

Good Points of TunesKit Video Cutter

  • Cut MOV video files precisely
  • Save MOV with 100% original quality
  • Edit the video with multiple functions
  • Combine video clips from the same source

Step 1 Add MOV Video to TunesKit

tuneskit audio cutter

Firsts of all, download and install TunesKit Video Cutter in a suitable version, Mac or Windows. Then, click the "Open" button on the left corner to add one MOV video file to this program. Still, you have another choice, directly drag the file to the main screen. You should know that TunesKit allows one file to be added each time.

Step 2 Select Segment to Cut

set

Once loading the MOV video successfully, you can preview it on the window. Next, move the yellow sliders to select the segment or set the start time and end time manually. The two ways can help you to split MOV from the source media. The latter is more accurate.

Step 3 Edit the MOV File Before Cutting

edit

TunesKit has a built-in video editor. You just need to simply click the "Edit" icon in each segment. There you can customize your video by trimming, changing the aspect ratio, adjusting brightness, adding watermarks, subtitles, and other effects as you like.

Step 4 Merge Video Segments (Optional)

merge mp3 audio

With TunesKit, you can cut different sections from the same source and combine them. What you need to do is press on the "+" button to create new footages. After cutting like step 2, tick the box of "Merge Segments". Then you can merge those clips into one.

Step 5 Set Output Format

edit audio

Hit the "Format" button on the right bottom, you can see a selection window of mode and output format. Picking High-Speed mode can trim and combine MOV losslessly. If you choose Encoding mode, you can customize the media parameter like codec, size, bit rate, etc. if you like. Here we choose MP4 as the output format.

Step 6 Cut and Convert MOV to MP4

set output format

The last step is to click the "Start" button. Then TunesKit Video Cutter will start trimming, merging, and converting MOV to small clips. Wait until the splitting process finishes. Then you can find the segments under the history folder.


Video Tutorial: You can also learn to trim MOV files in this video guide.


The Bottom Line

TunesKit Video Cutter is really a powerful video cutter, which also allows you to extract audio from the MOV video. What you need to do is to choose "MP3" or other audio formats as your output format, then the cutter will convert MOV to MP3 for you. All in all, this MOV cutter has various multifunctional features. Relying on this video cutter, you can modify your videos with multiple editing tools.


You may also like:

[Review] Top 4 M4A Cutters 

6 Best Free Video Cutter No Watermark